

HOW TO: 6 speed transmission tailshaft extension housing swap
 07-13-2015, 01:09 AM
#1
SADFab Destructive Testing Engineer


Thread Starter
iTrader: (5)
Join Date: Apr 2014
Location: Beaverton, USA
Posts: 18,642
Total Cats: 1,866
MT.net lost another good post again. So here is the link to the album: Tailshaft extension housing - Album on Imgur
And here are the pictures...again
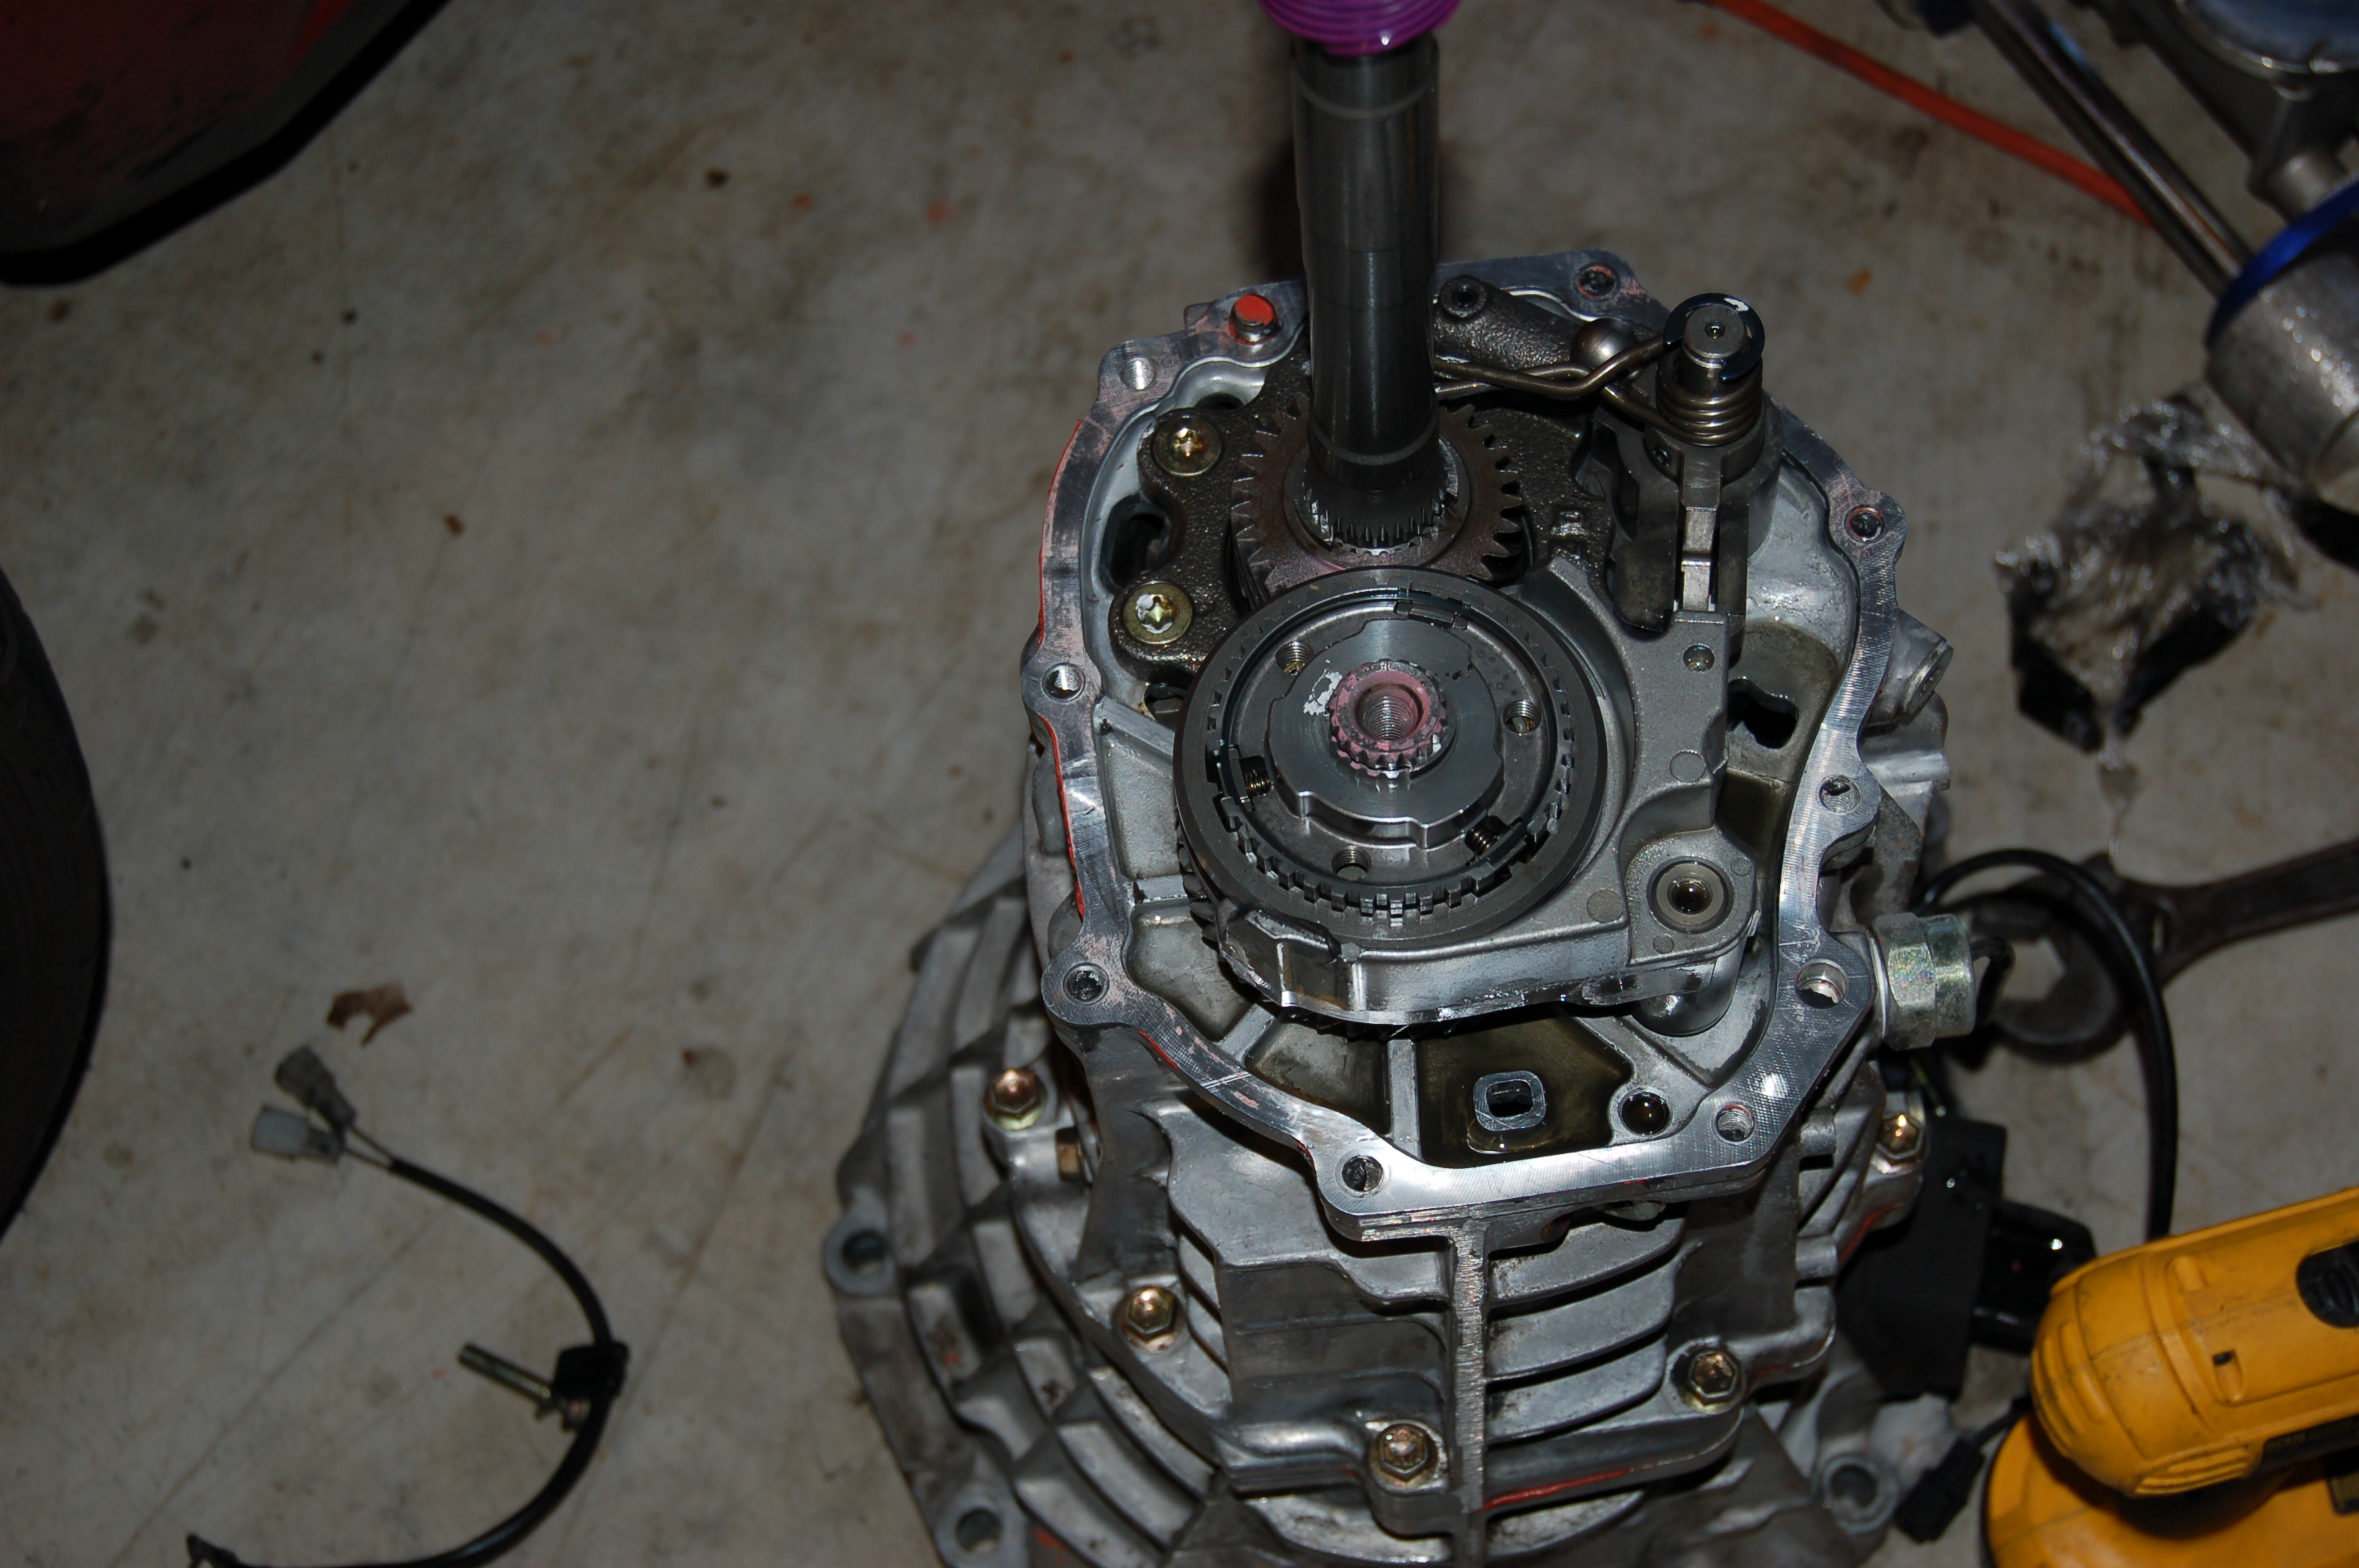
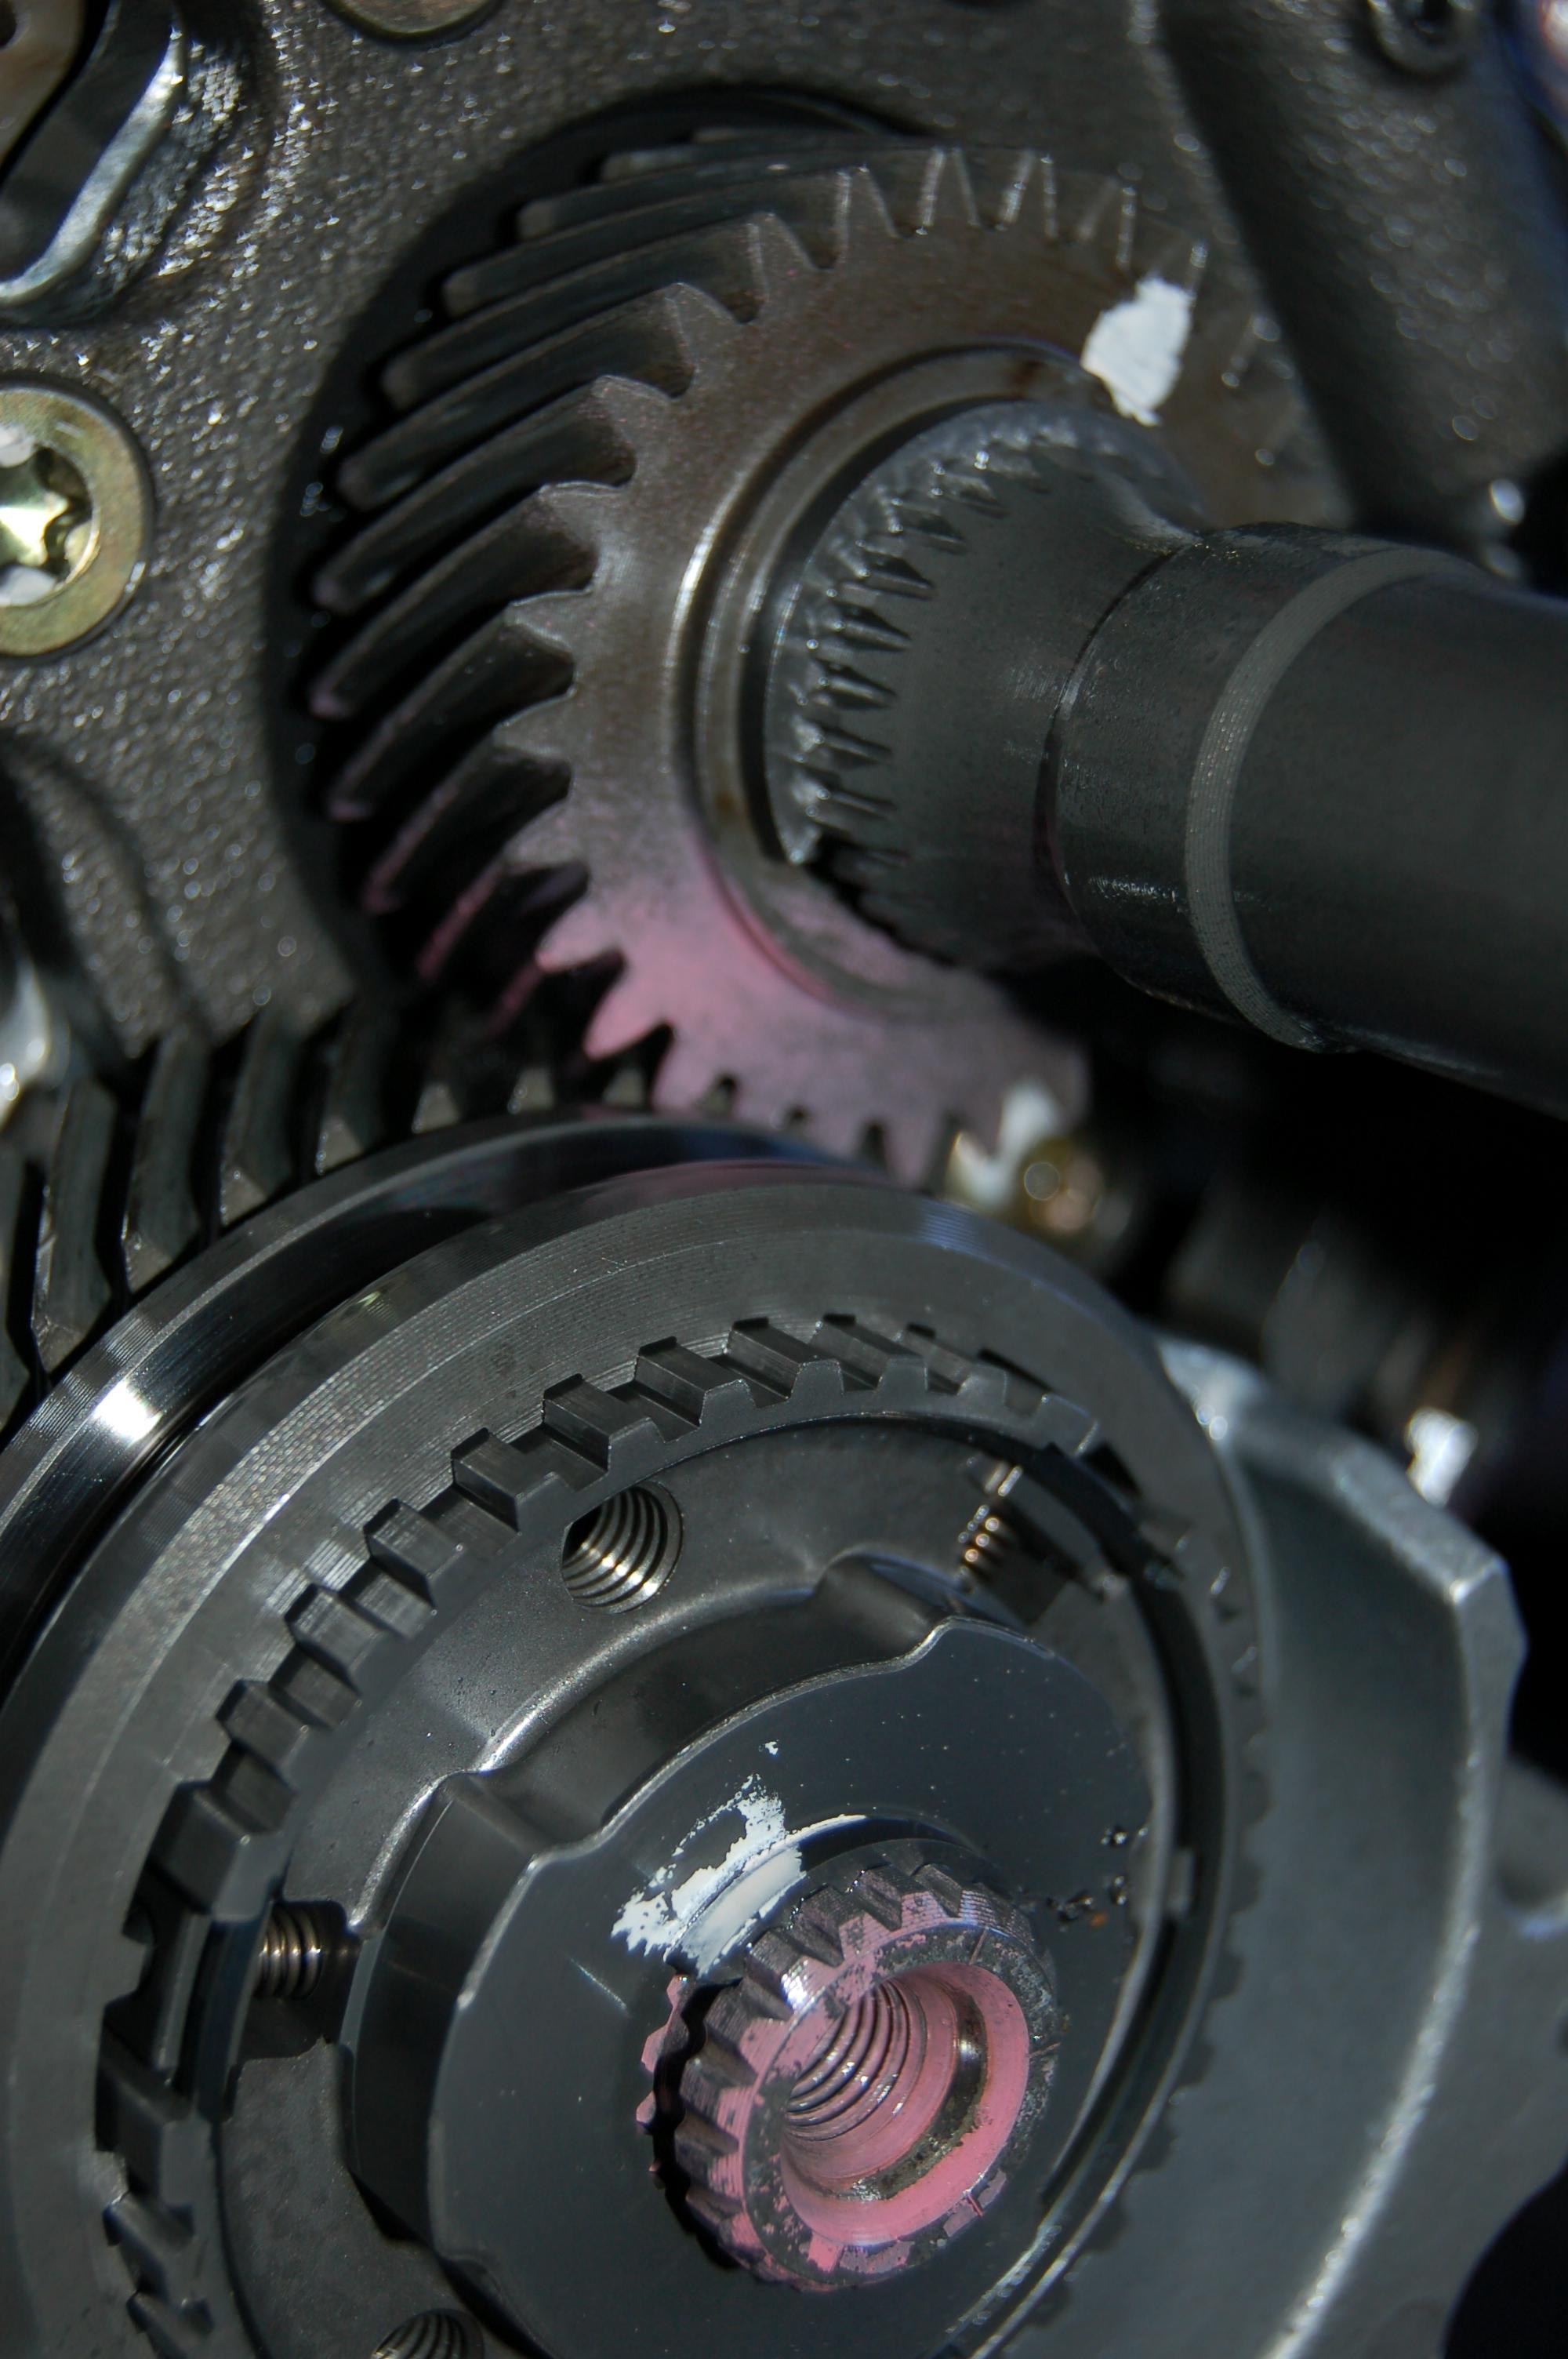
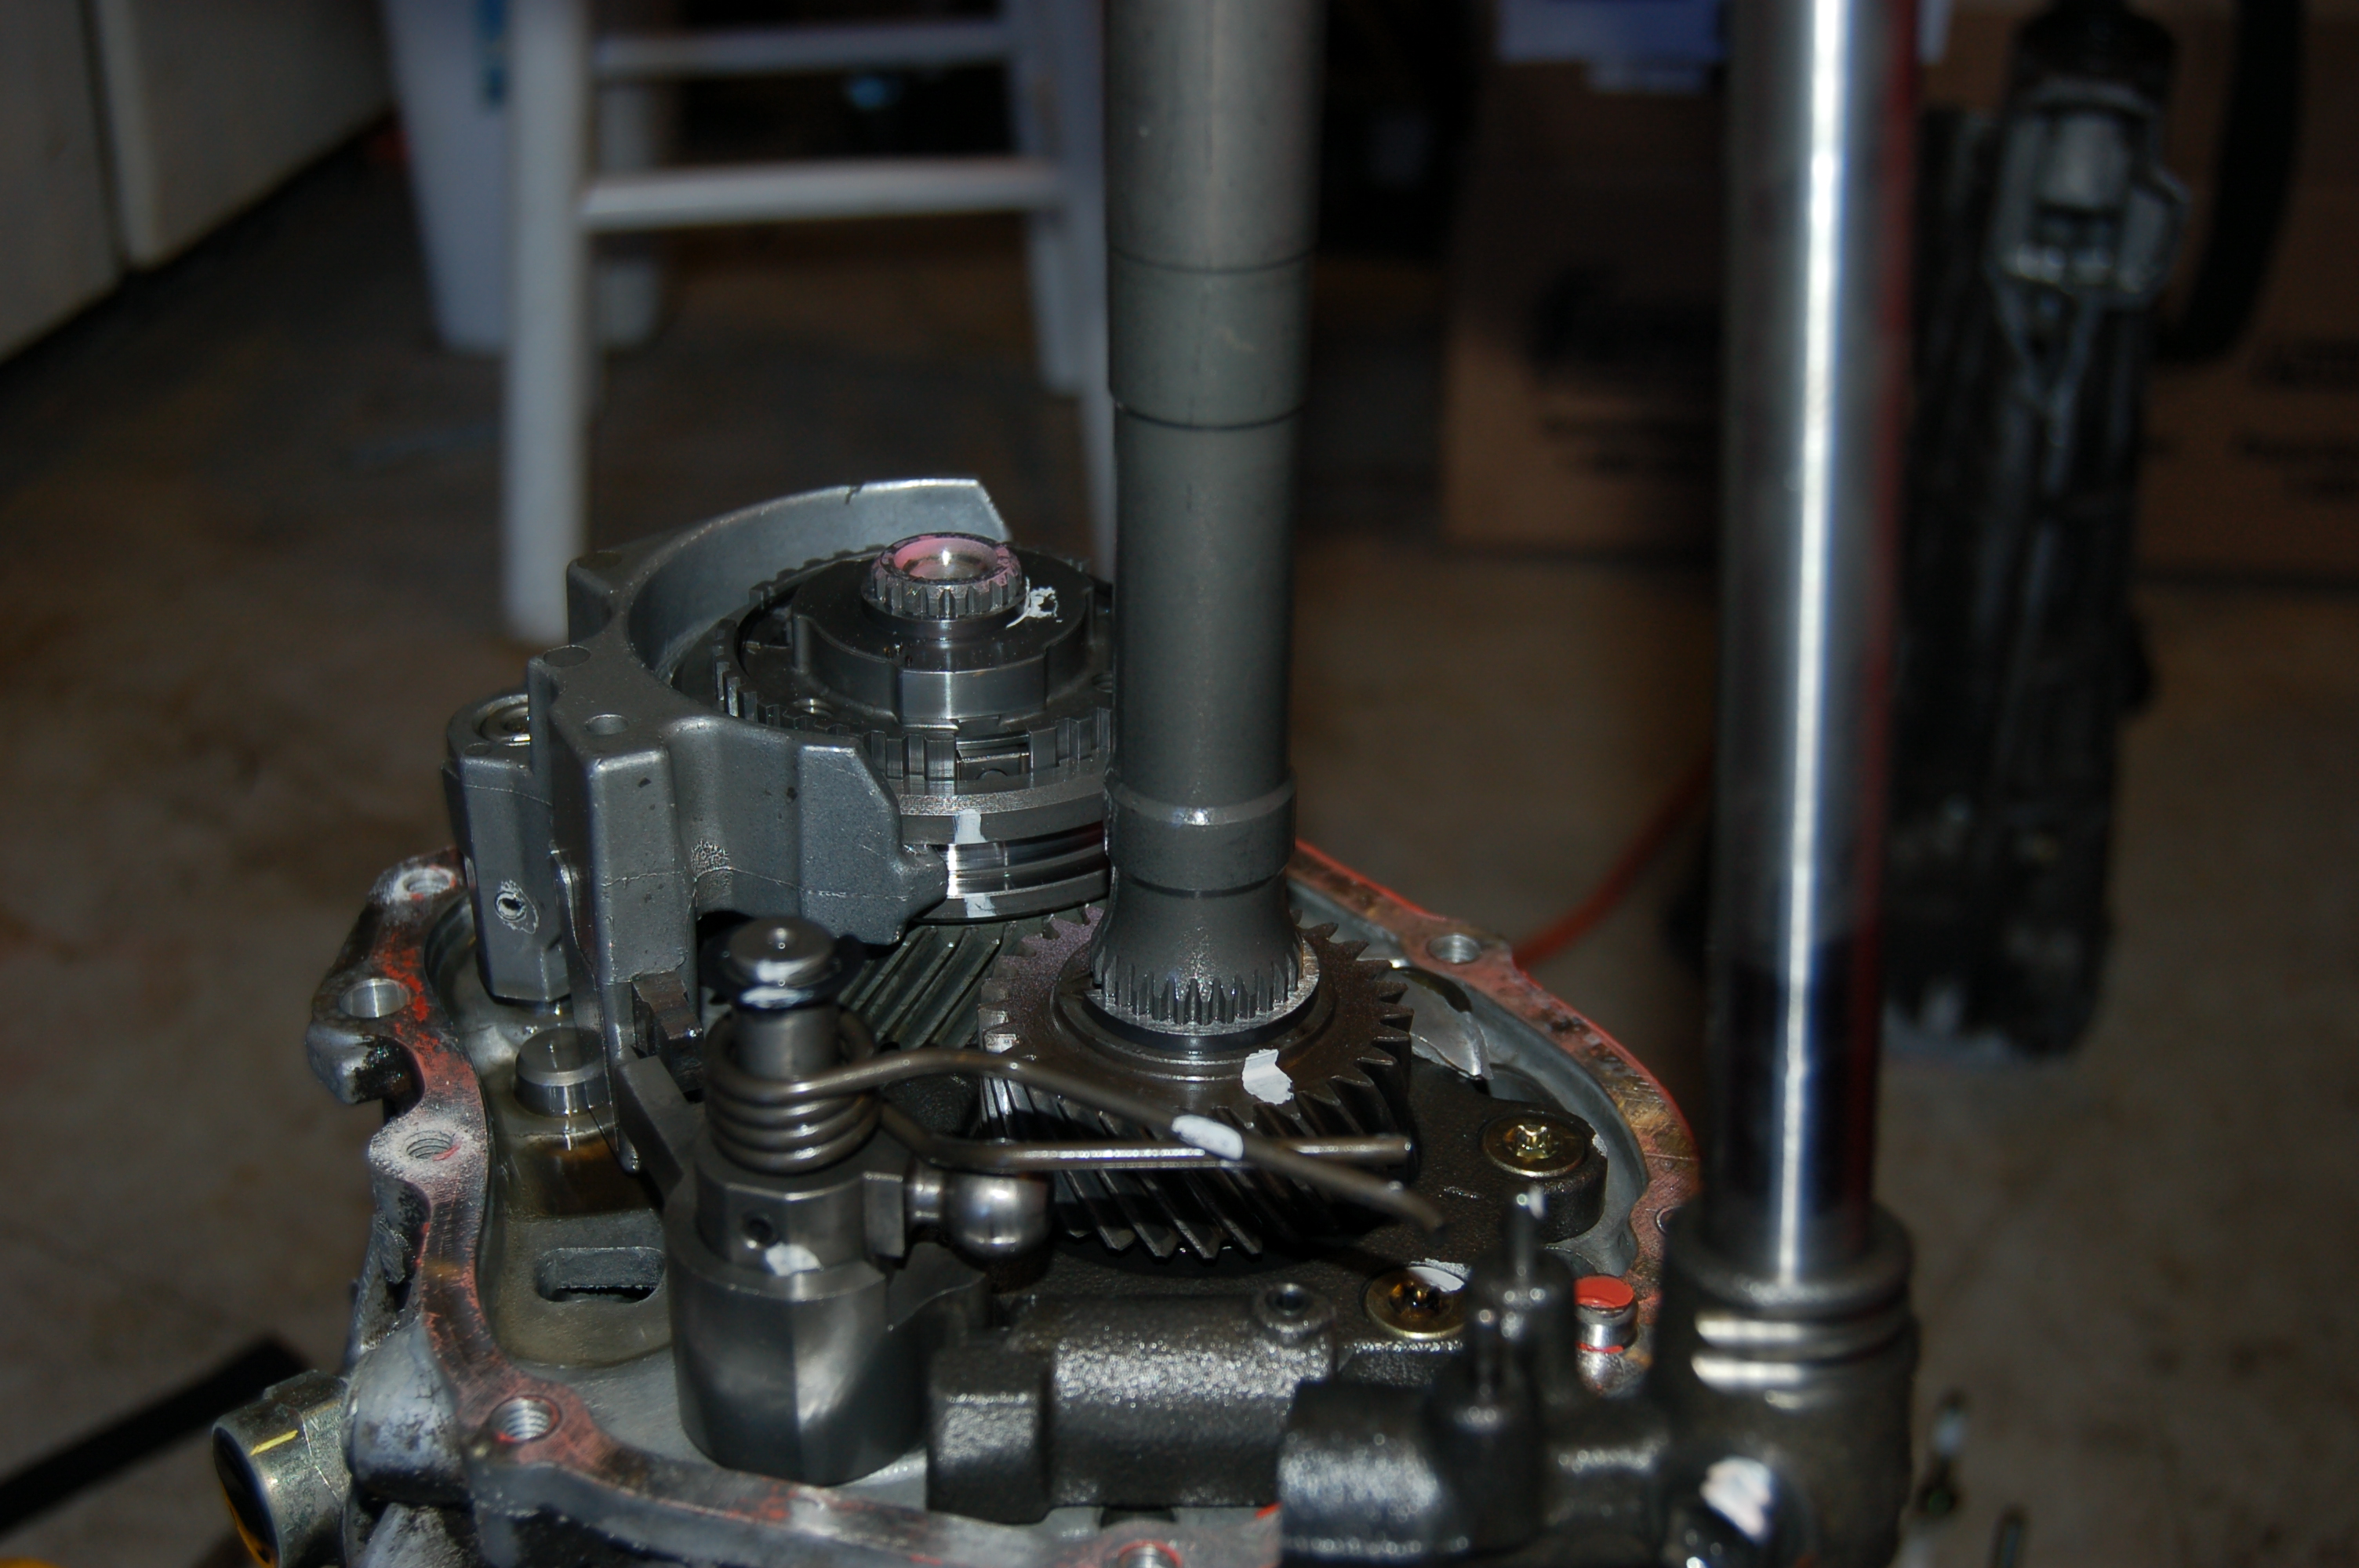

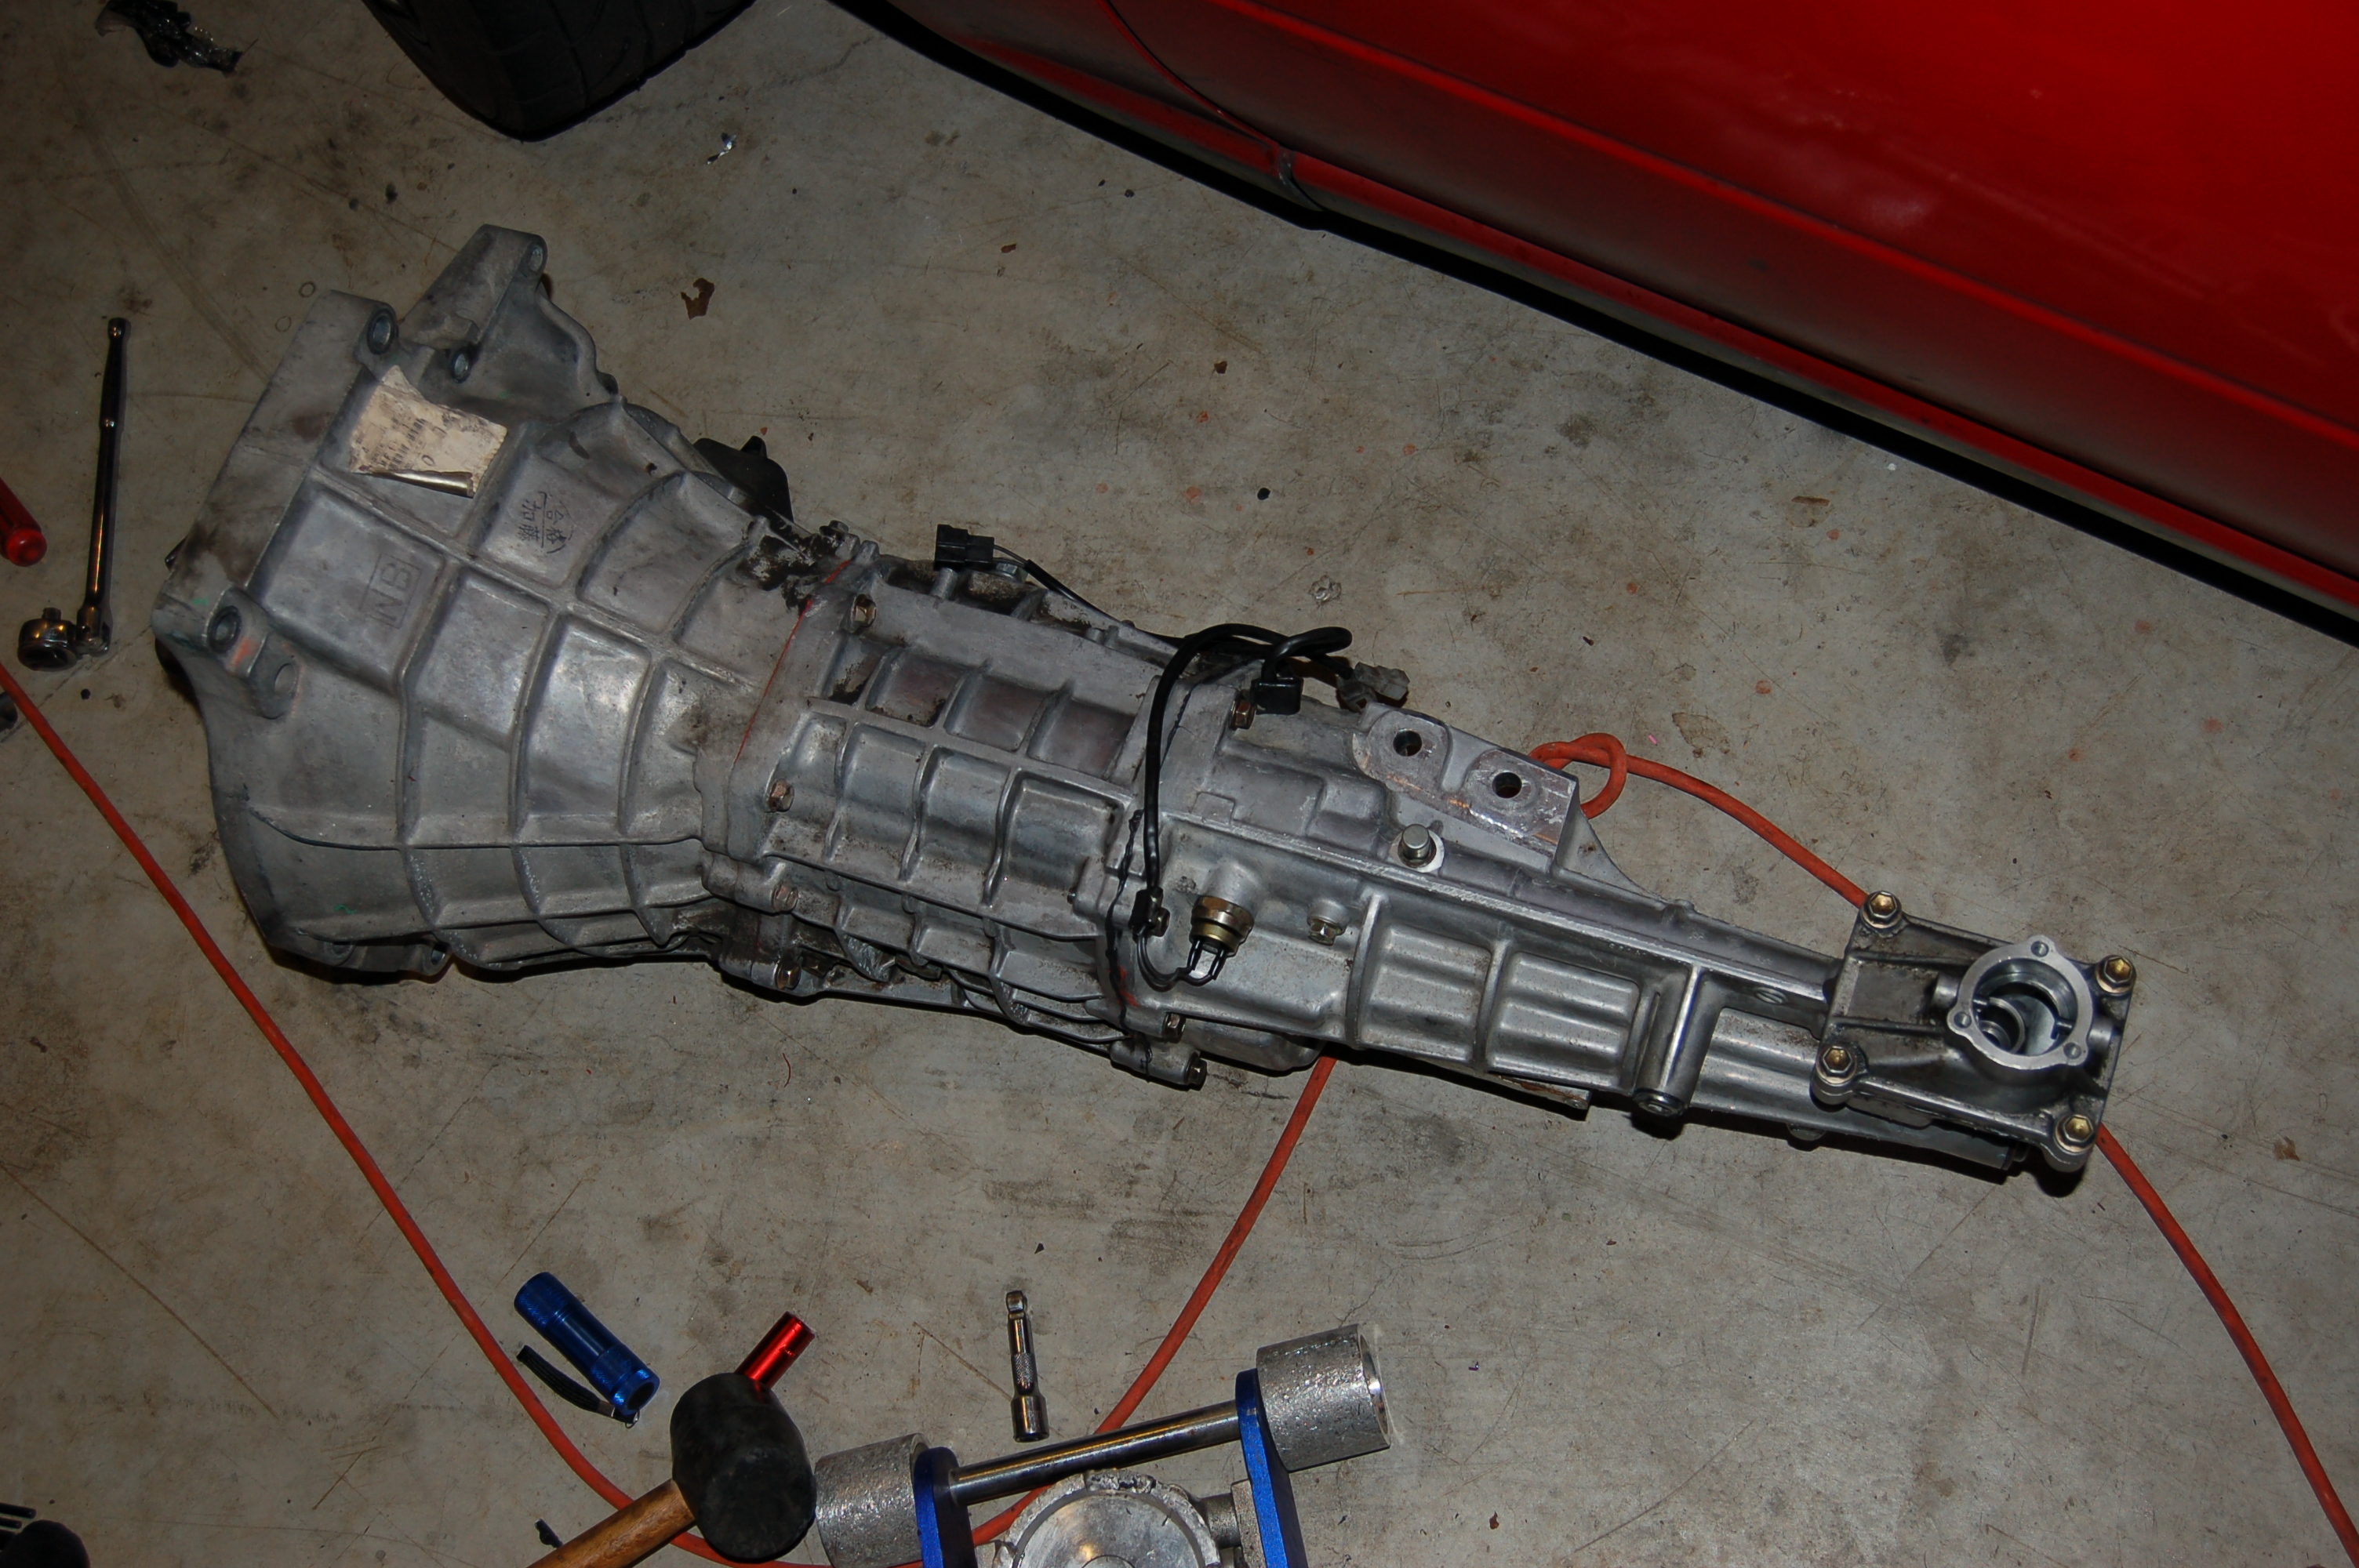
Last week I took my 6 speed with a broken tailshaft extension housing and put on a new one that I got thanks to bbundy. They FSM documents this proccess very well but I borrowed a DSLR and took a whole bunch of pictures. I'll also give some tips and things that I ran into while doing this swap.
New tailshaft housing from Bob. This is from a later trans, mid-01 to 05. This fact will come back to bite me in the *** just wait. The main difference is the shifter though. Here is a quote from Bill at MiataRoadster.
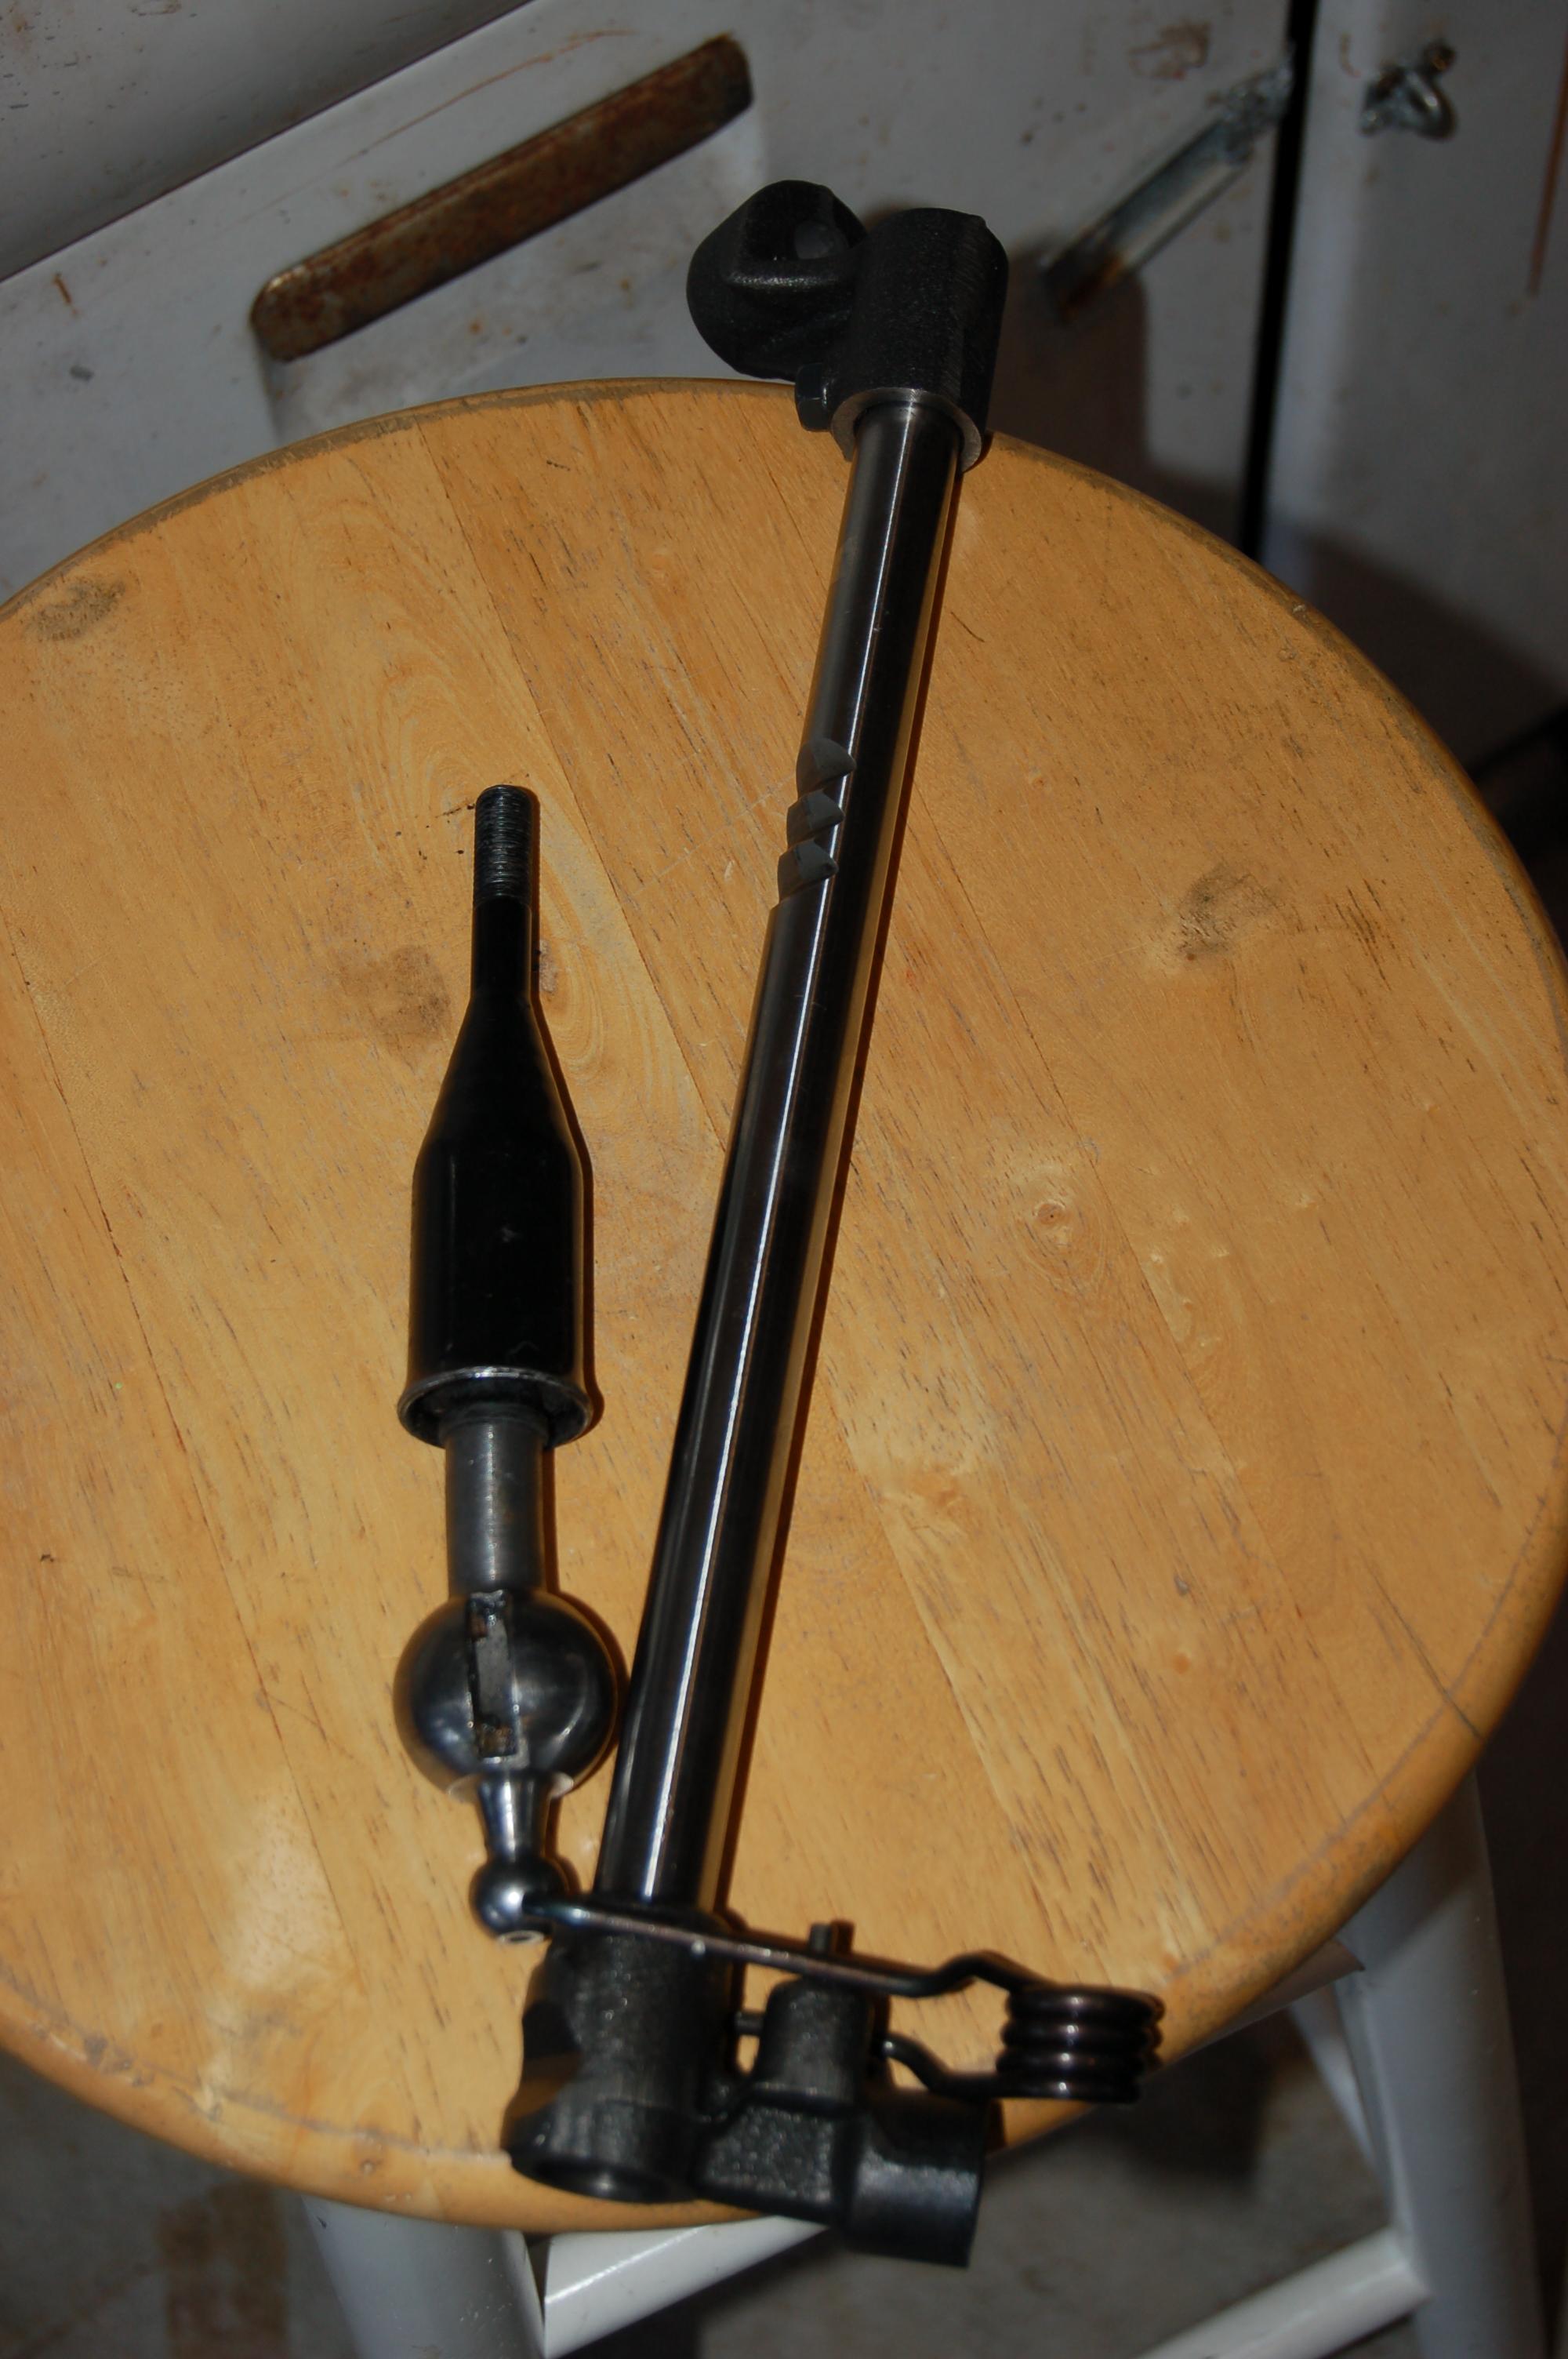
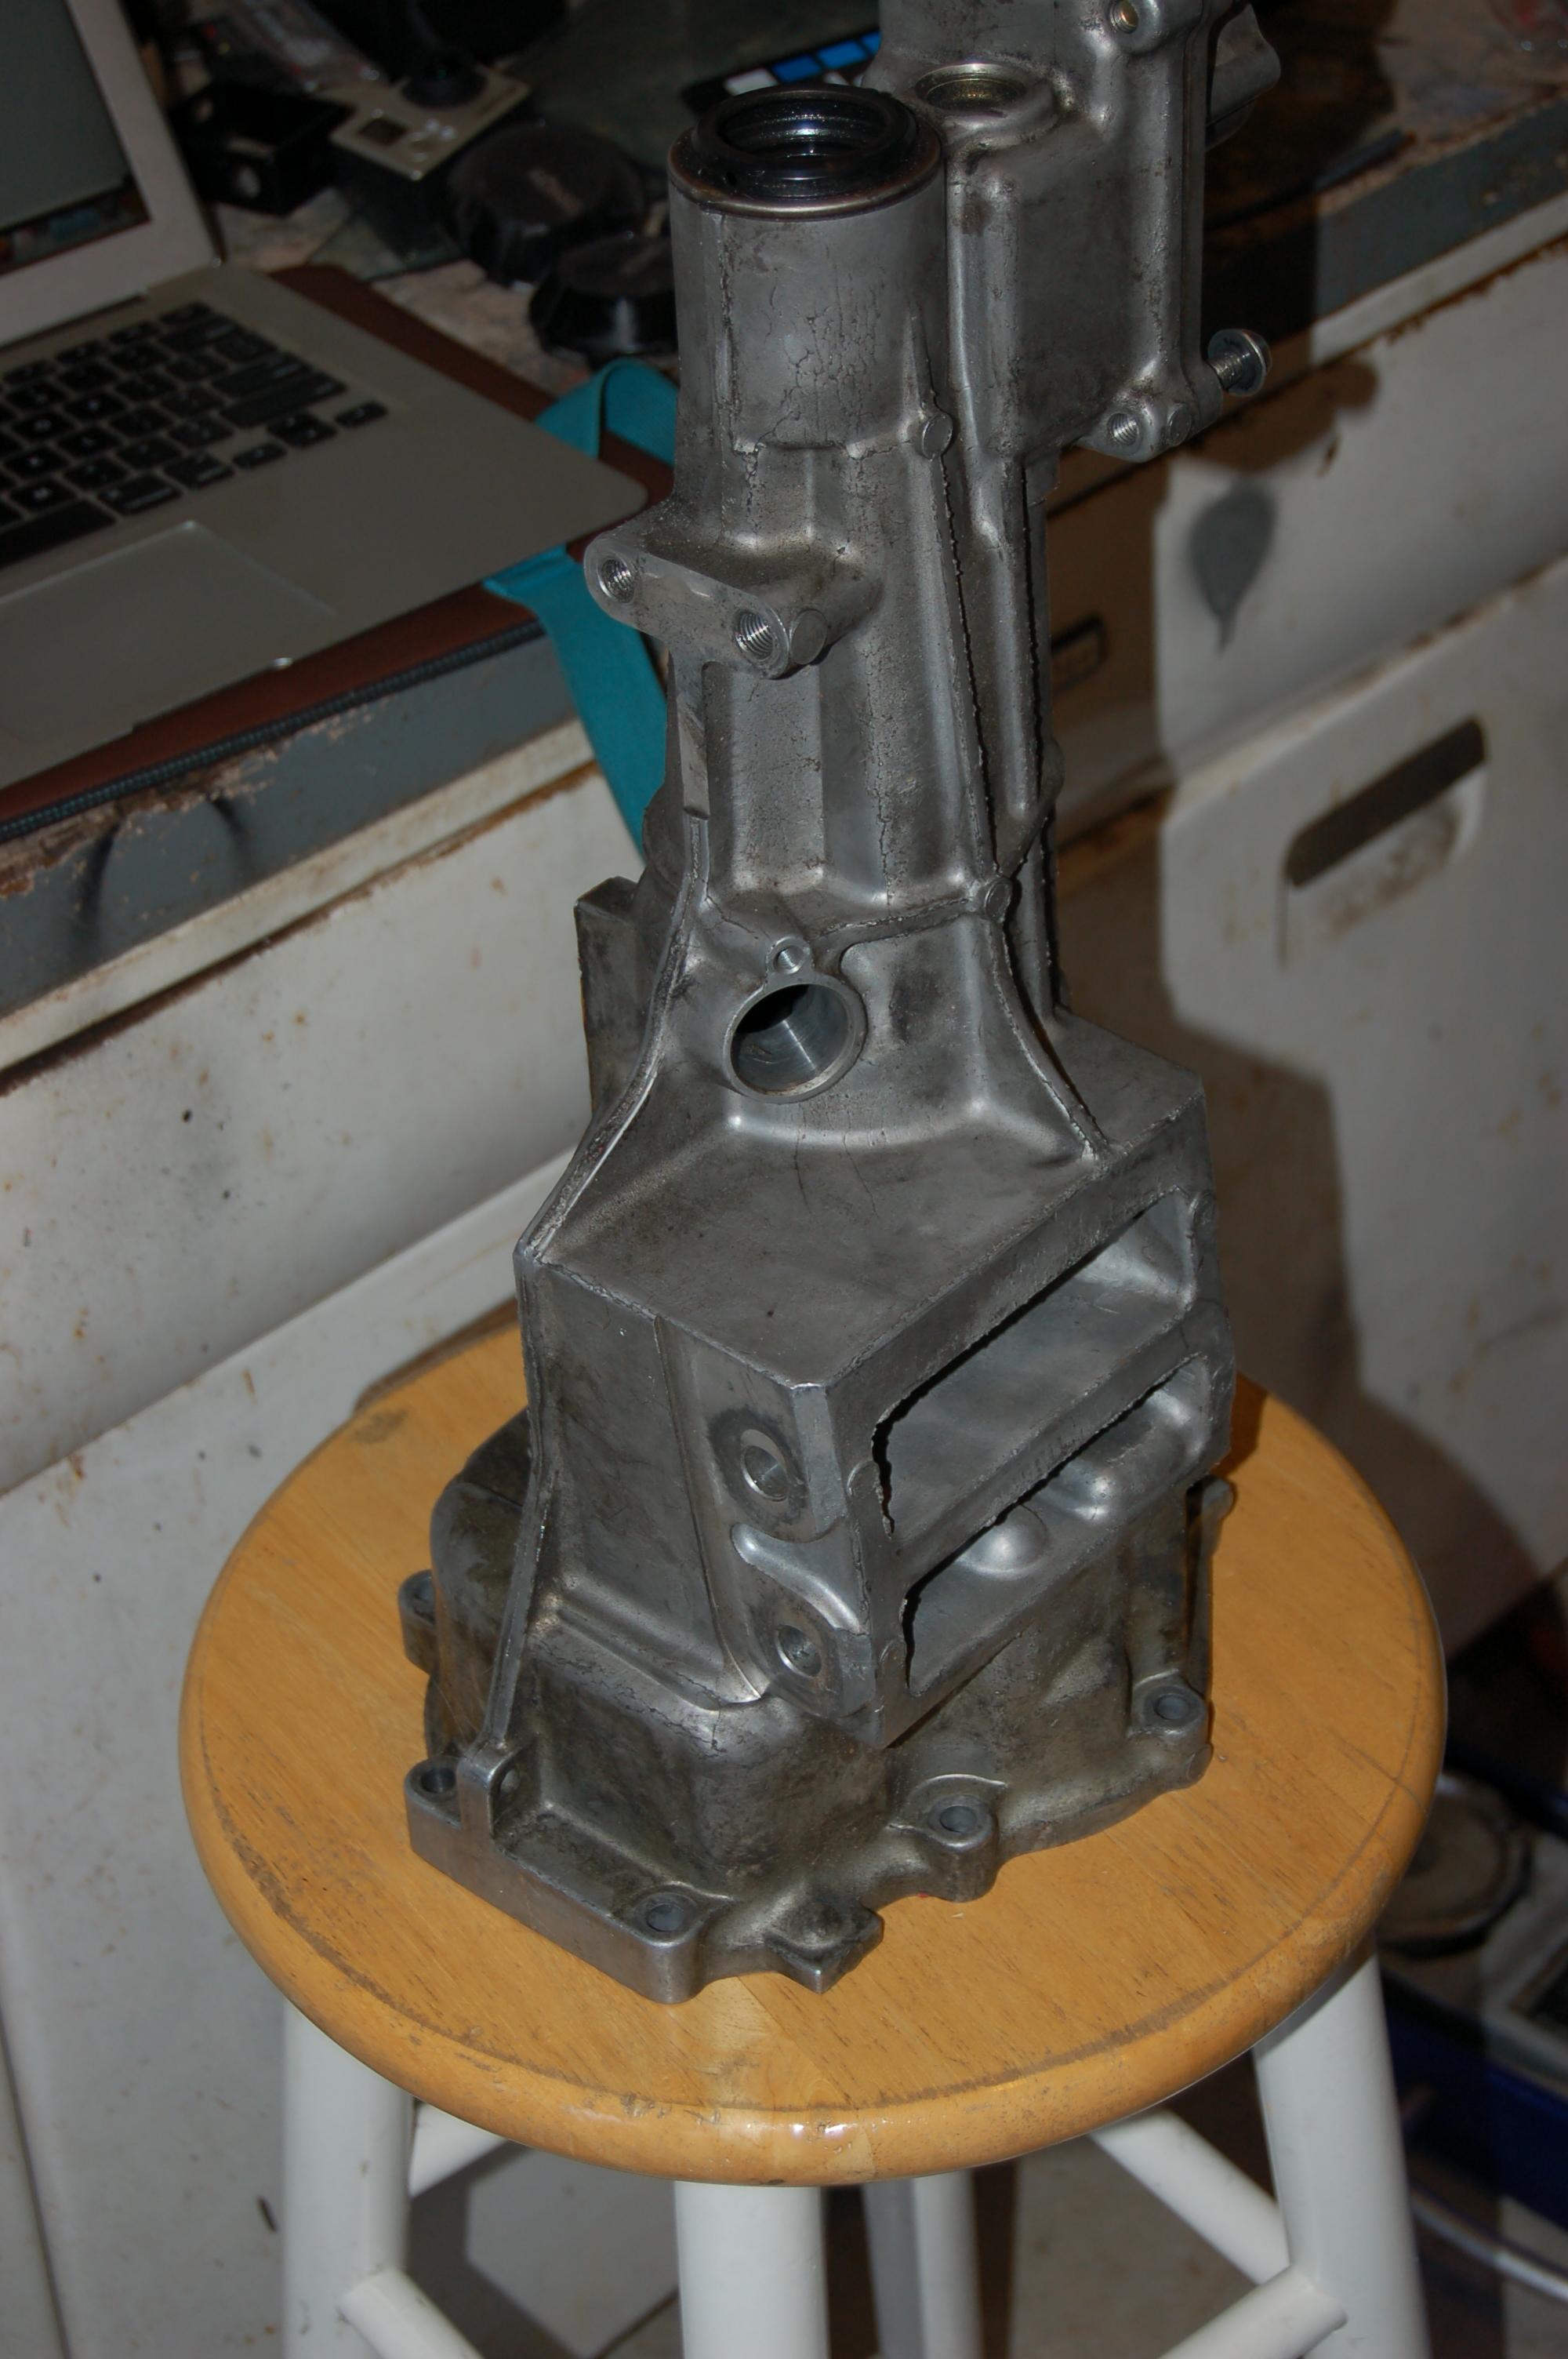
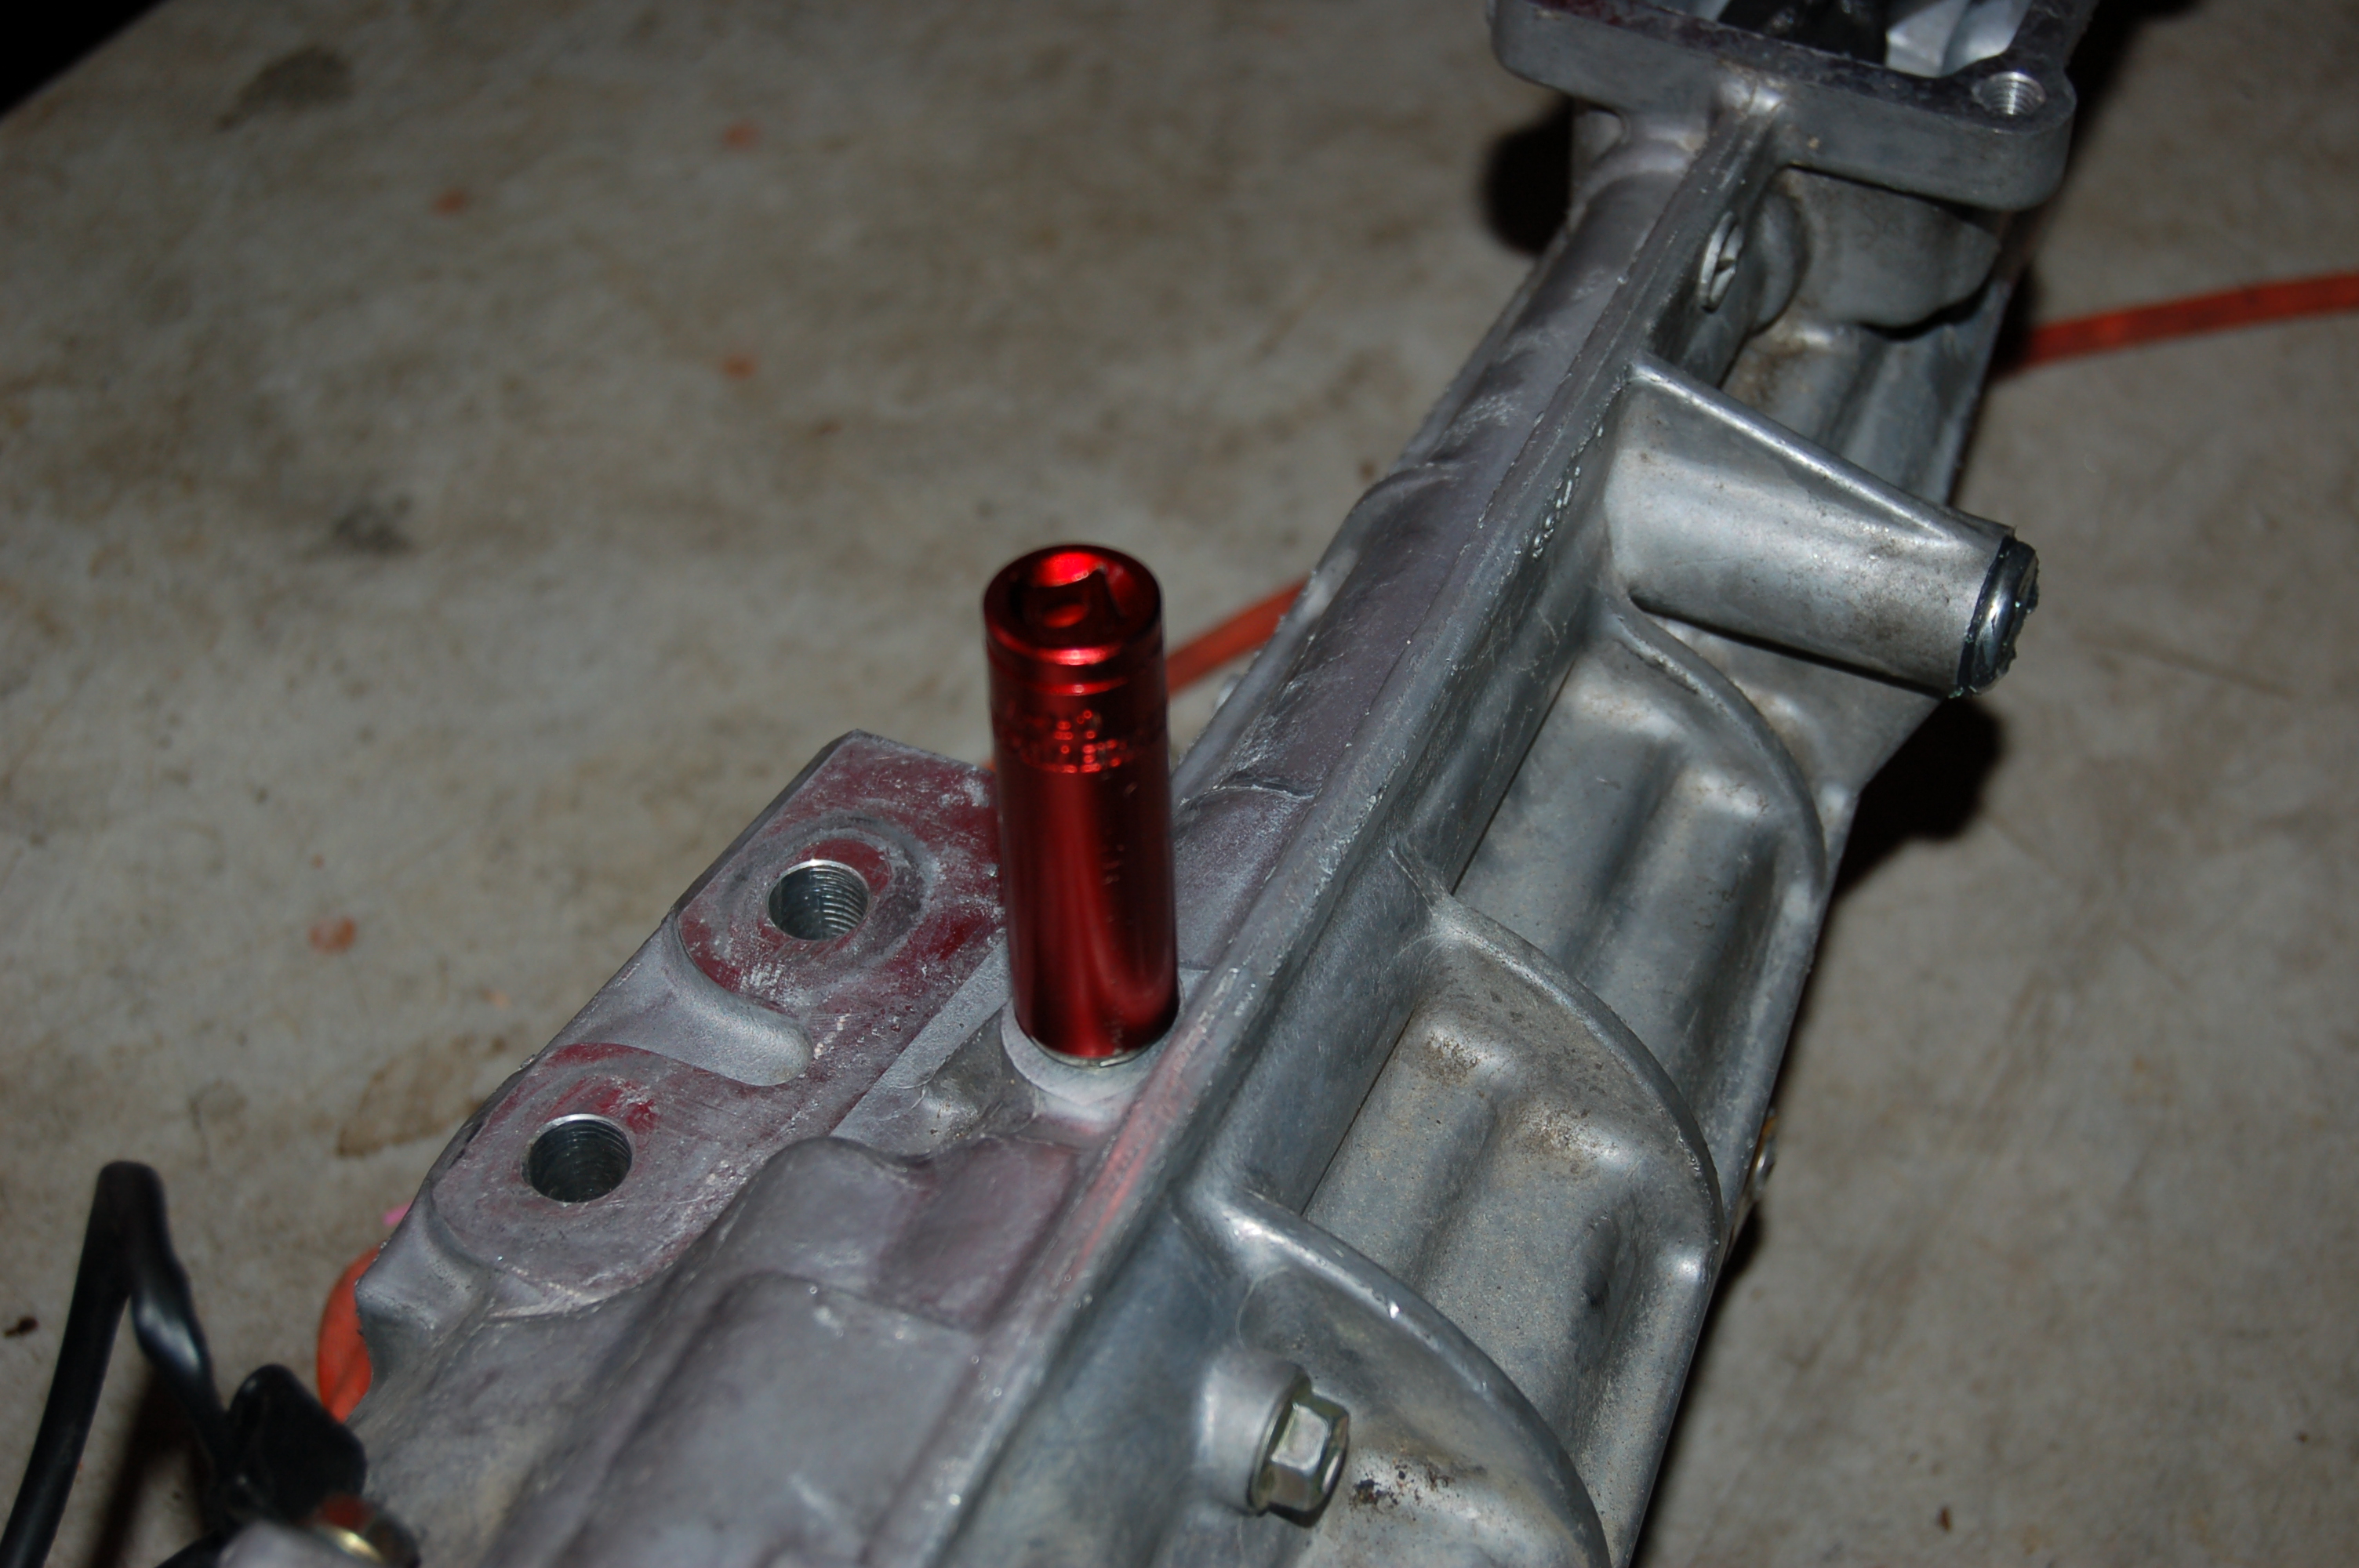
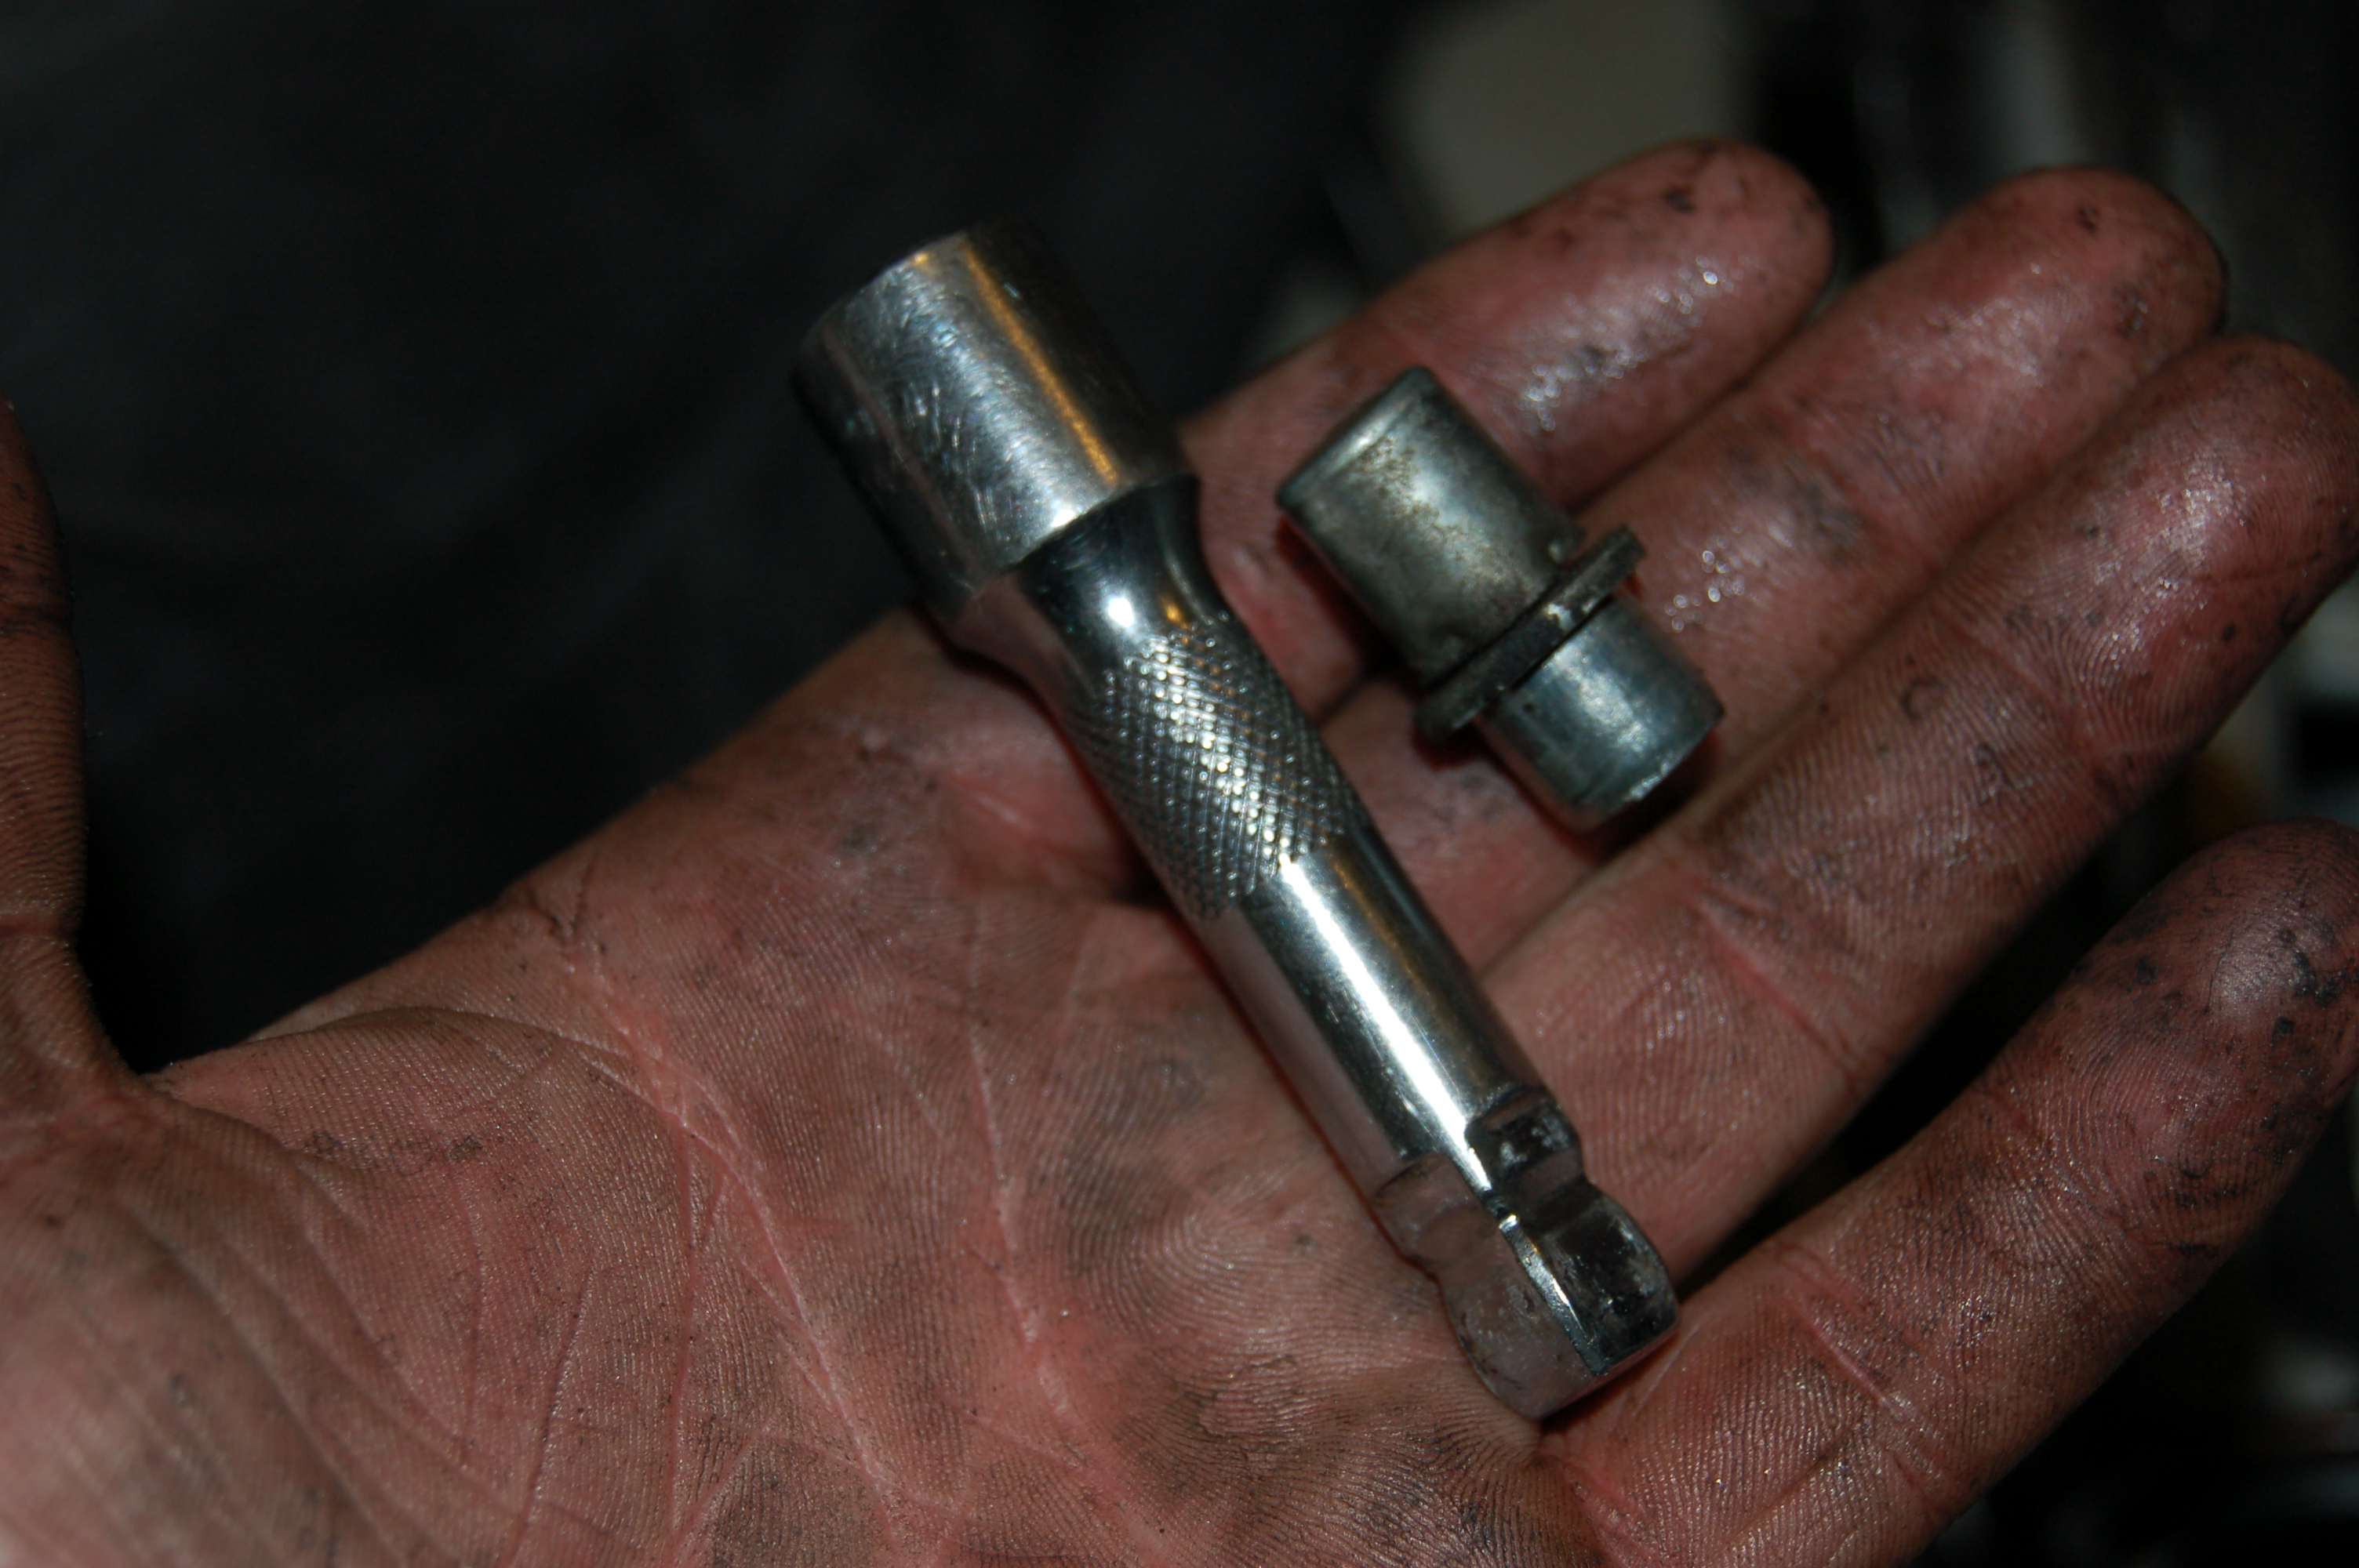
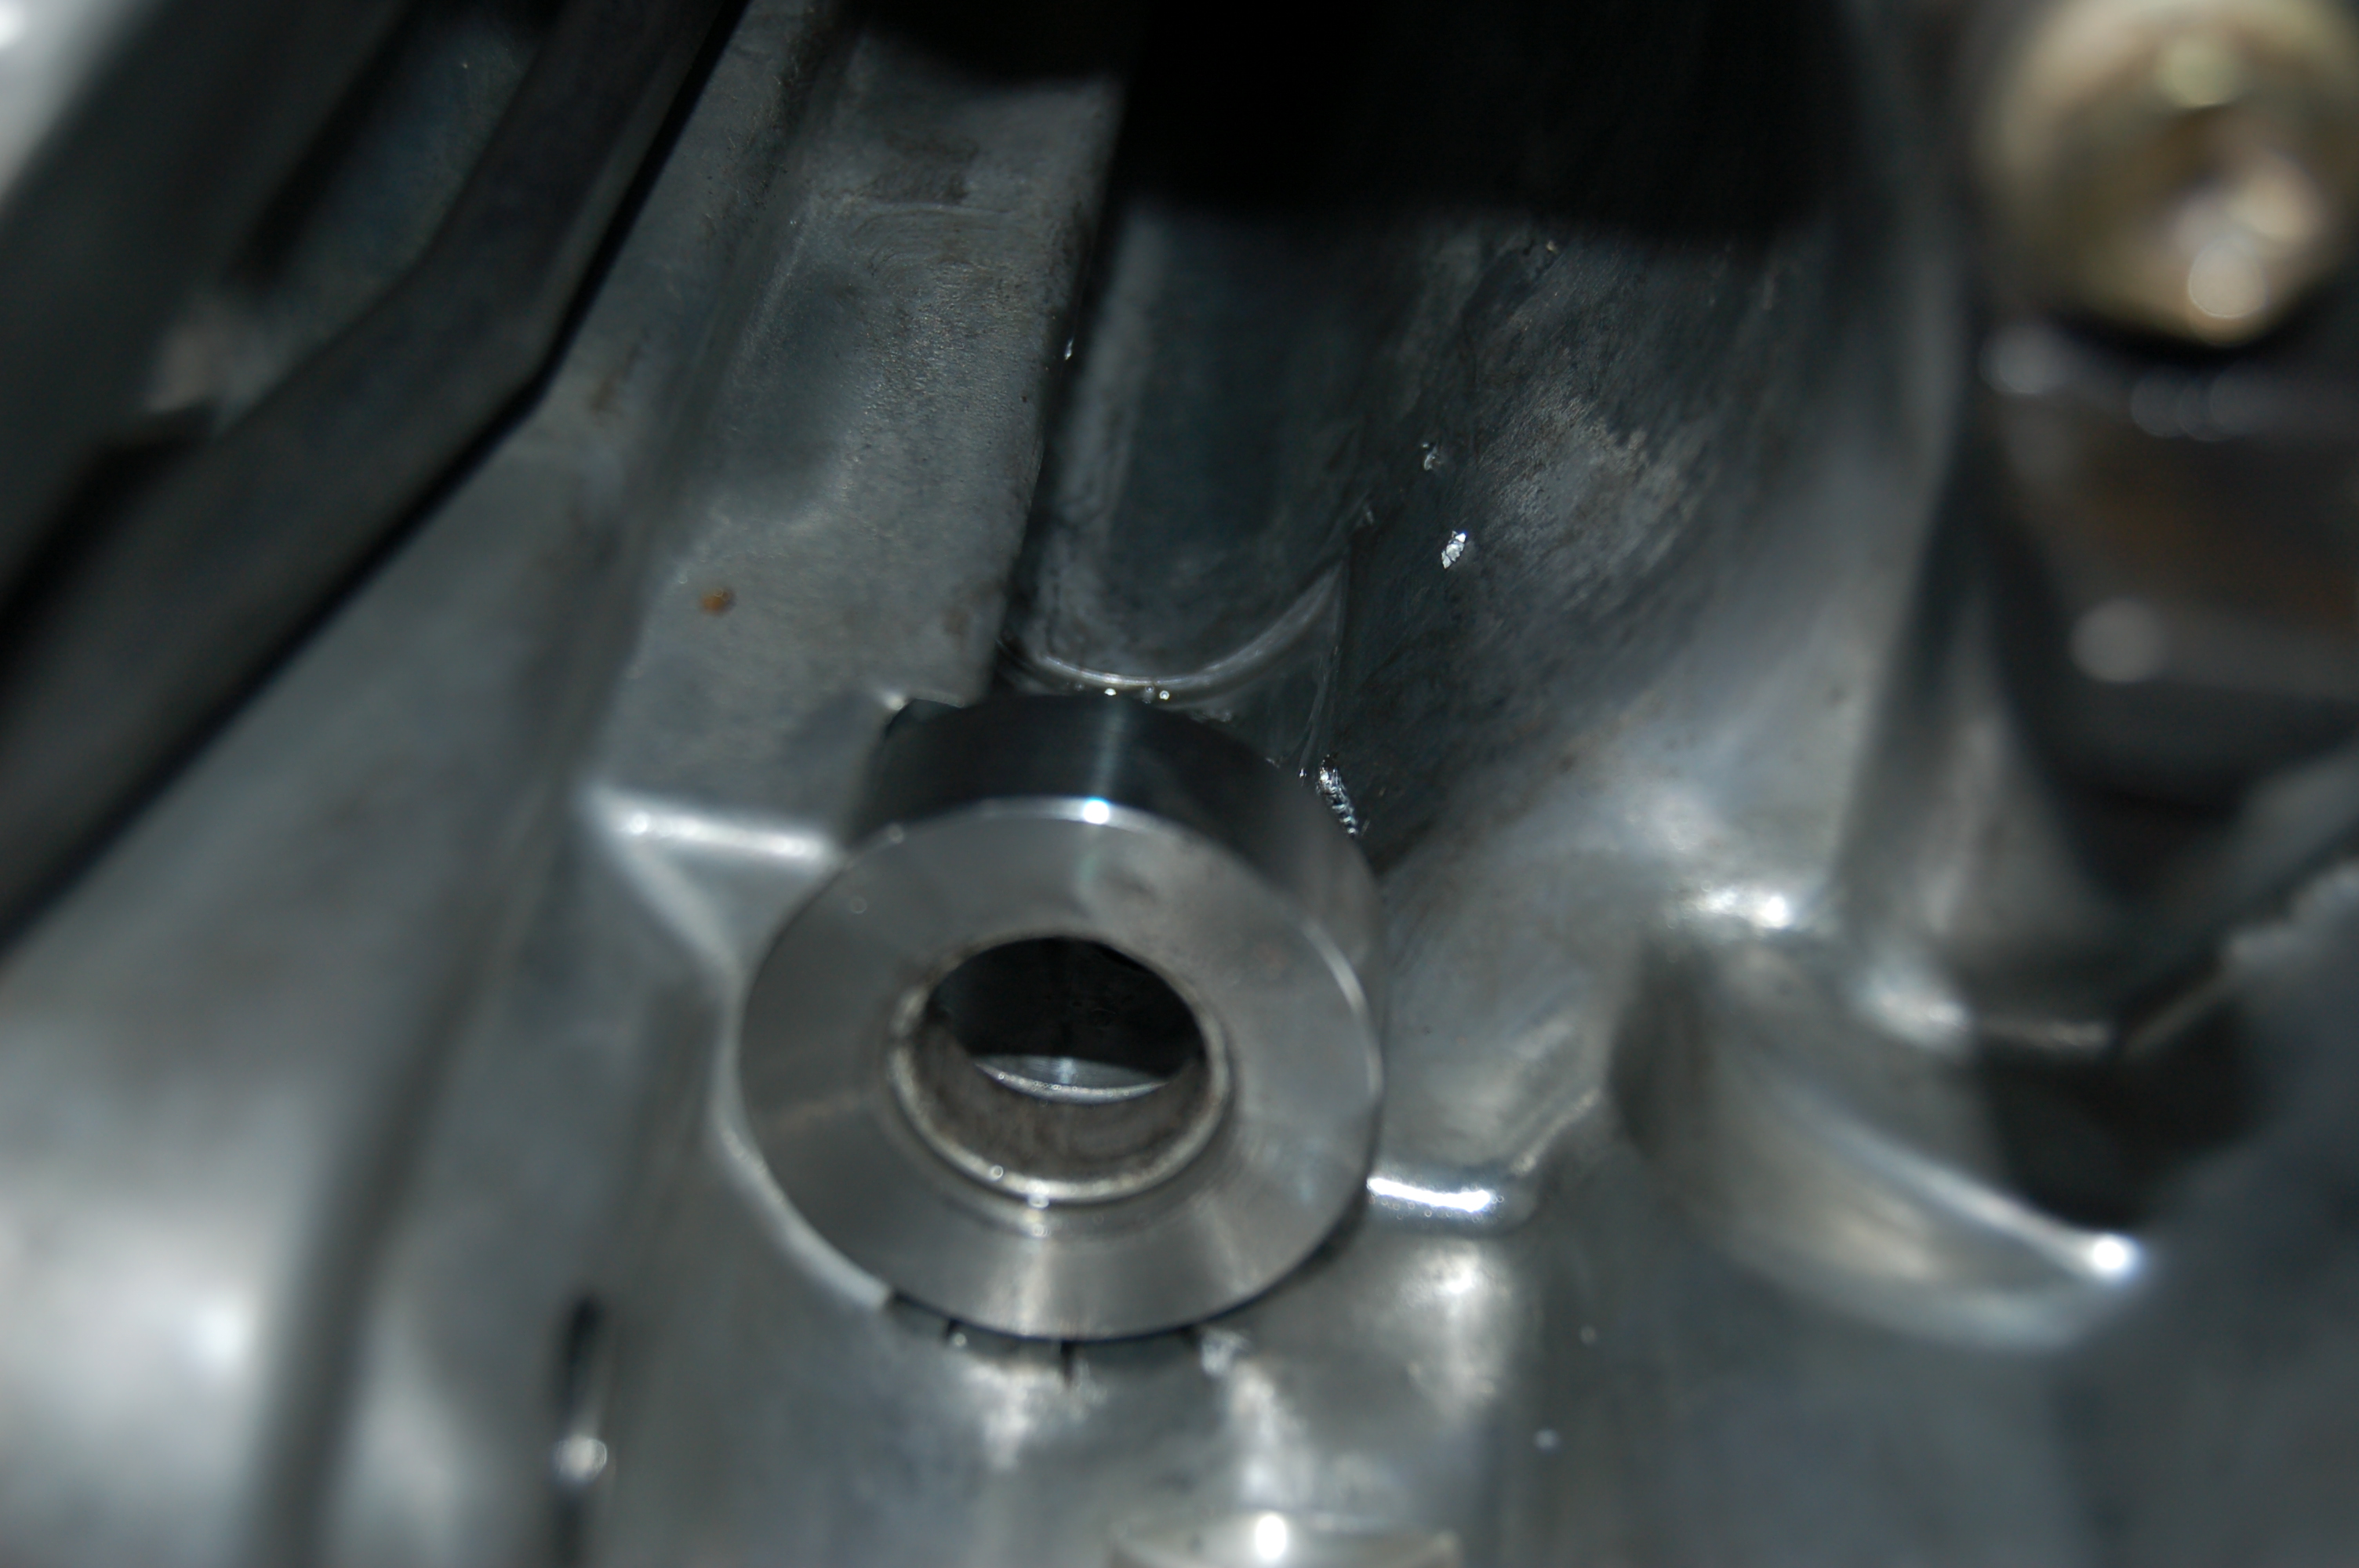
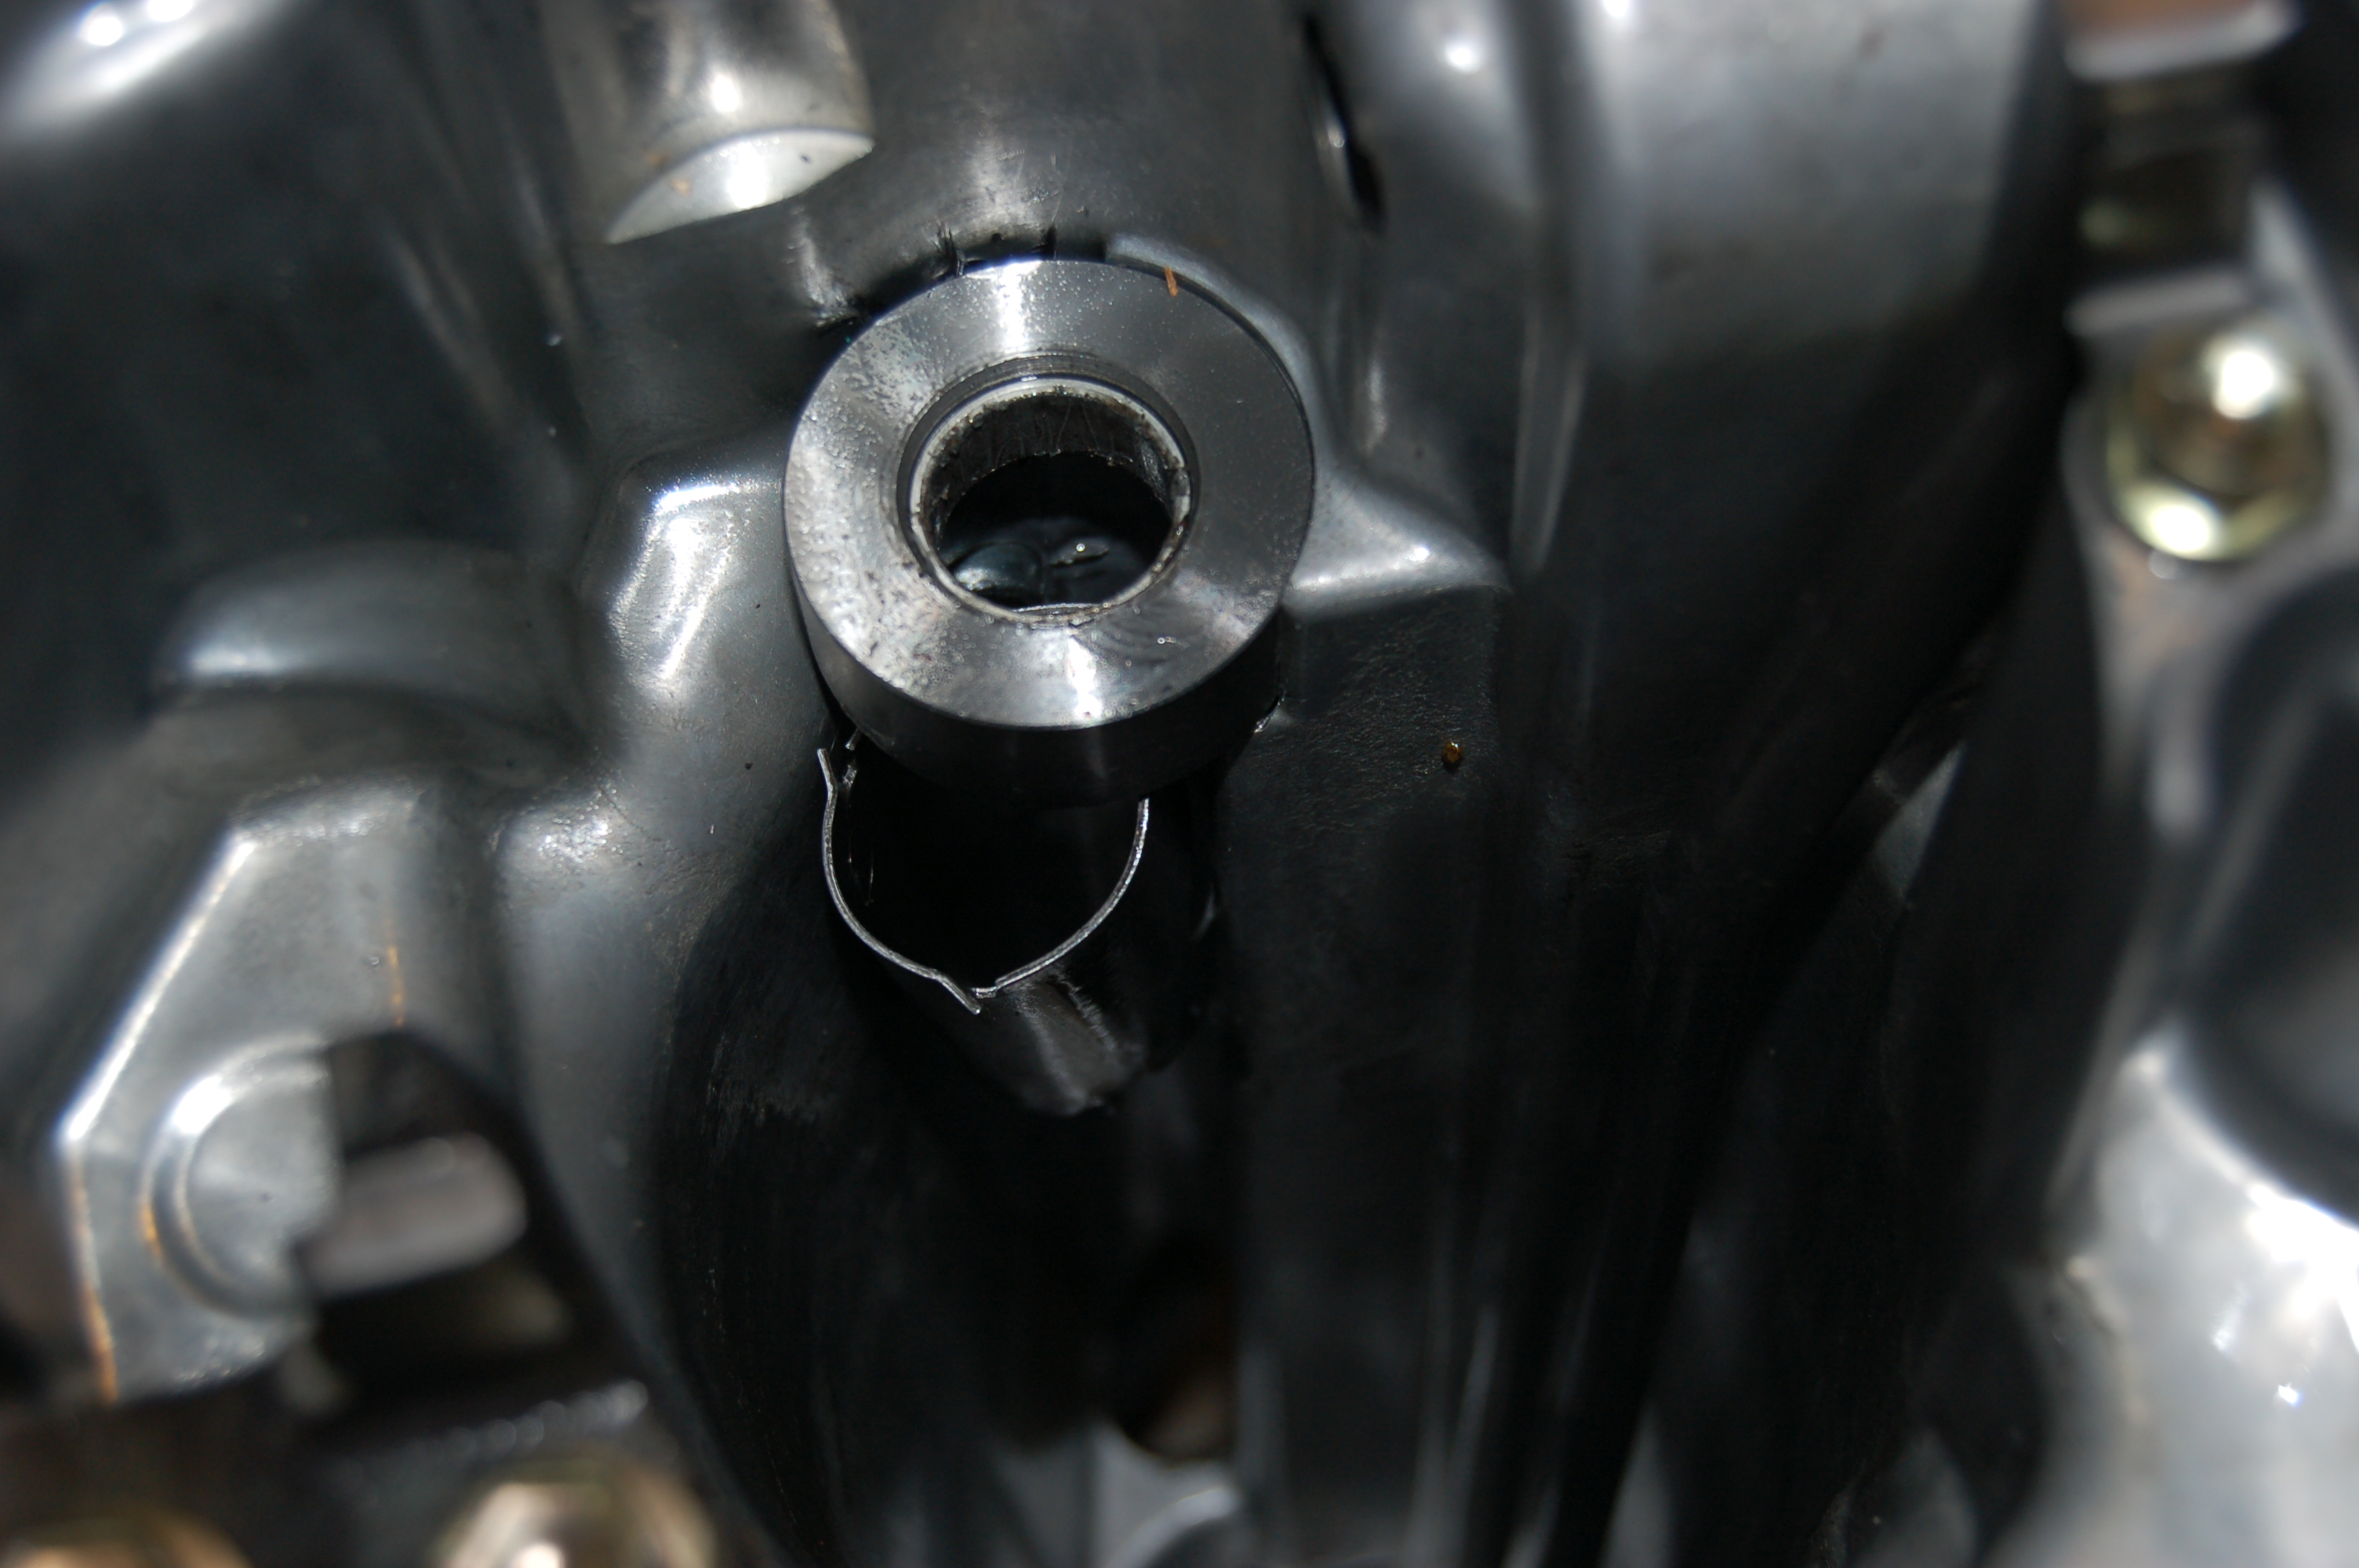
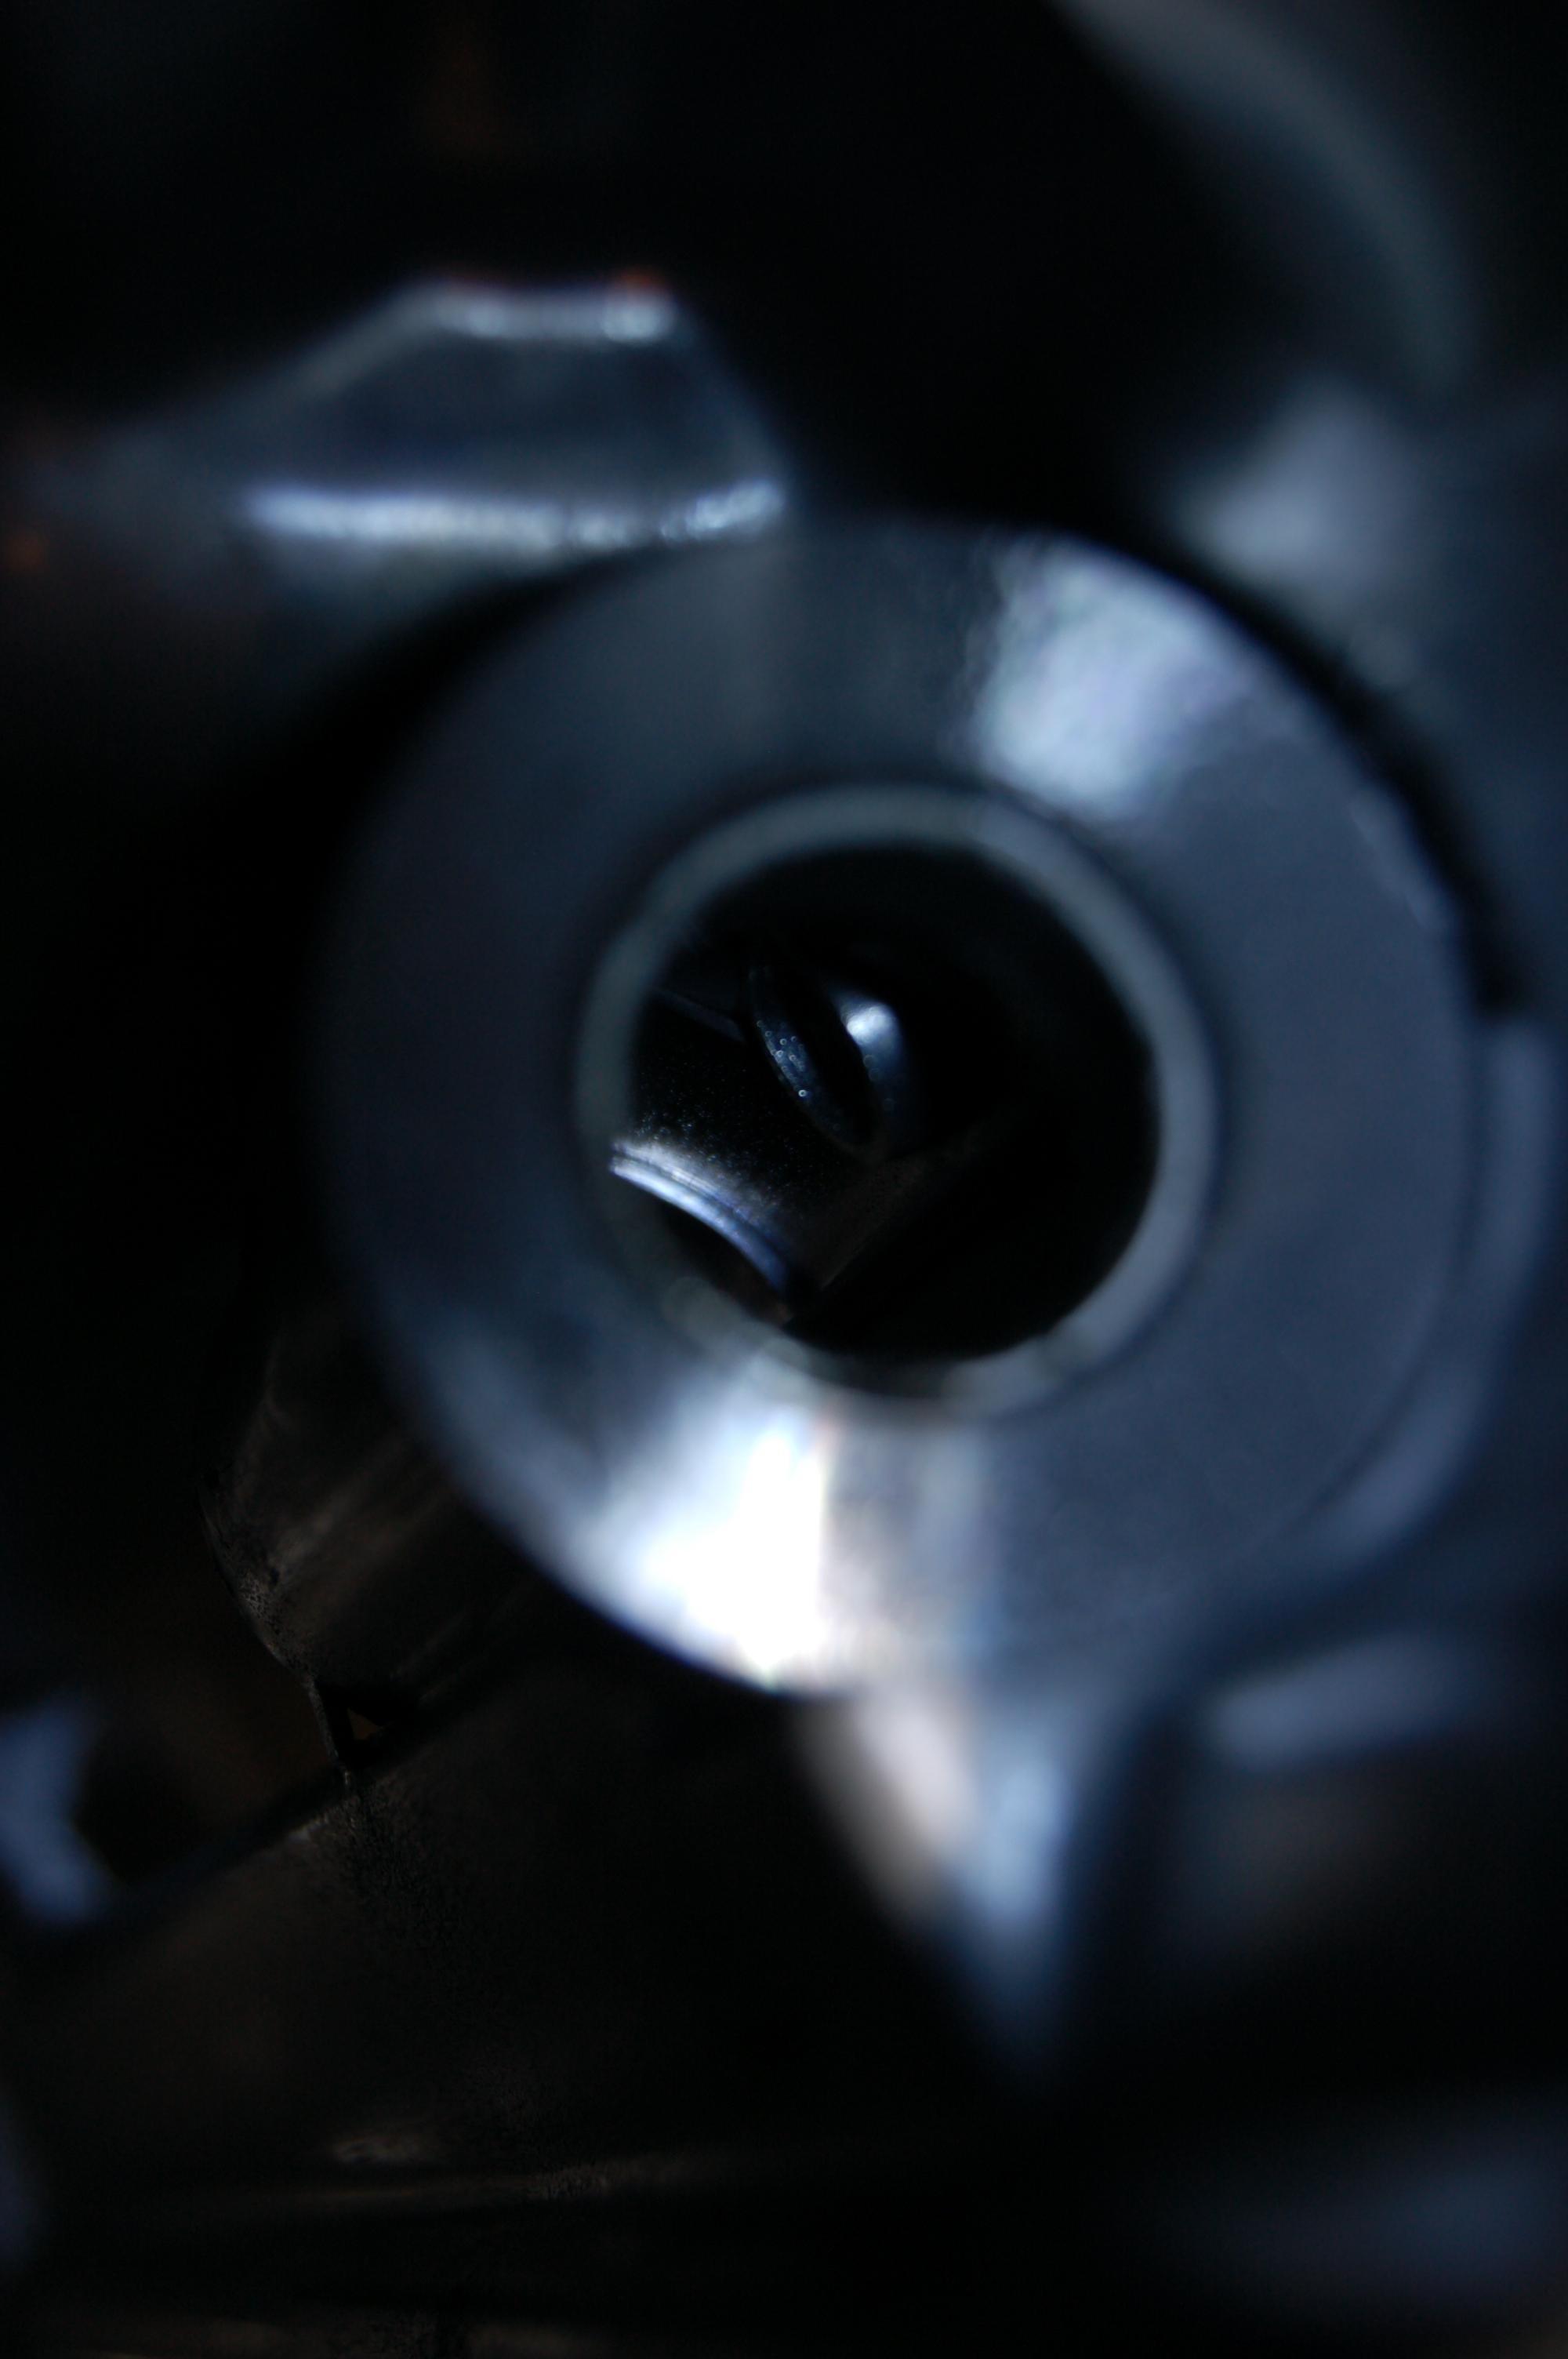
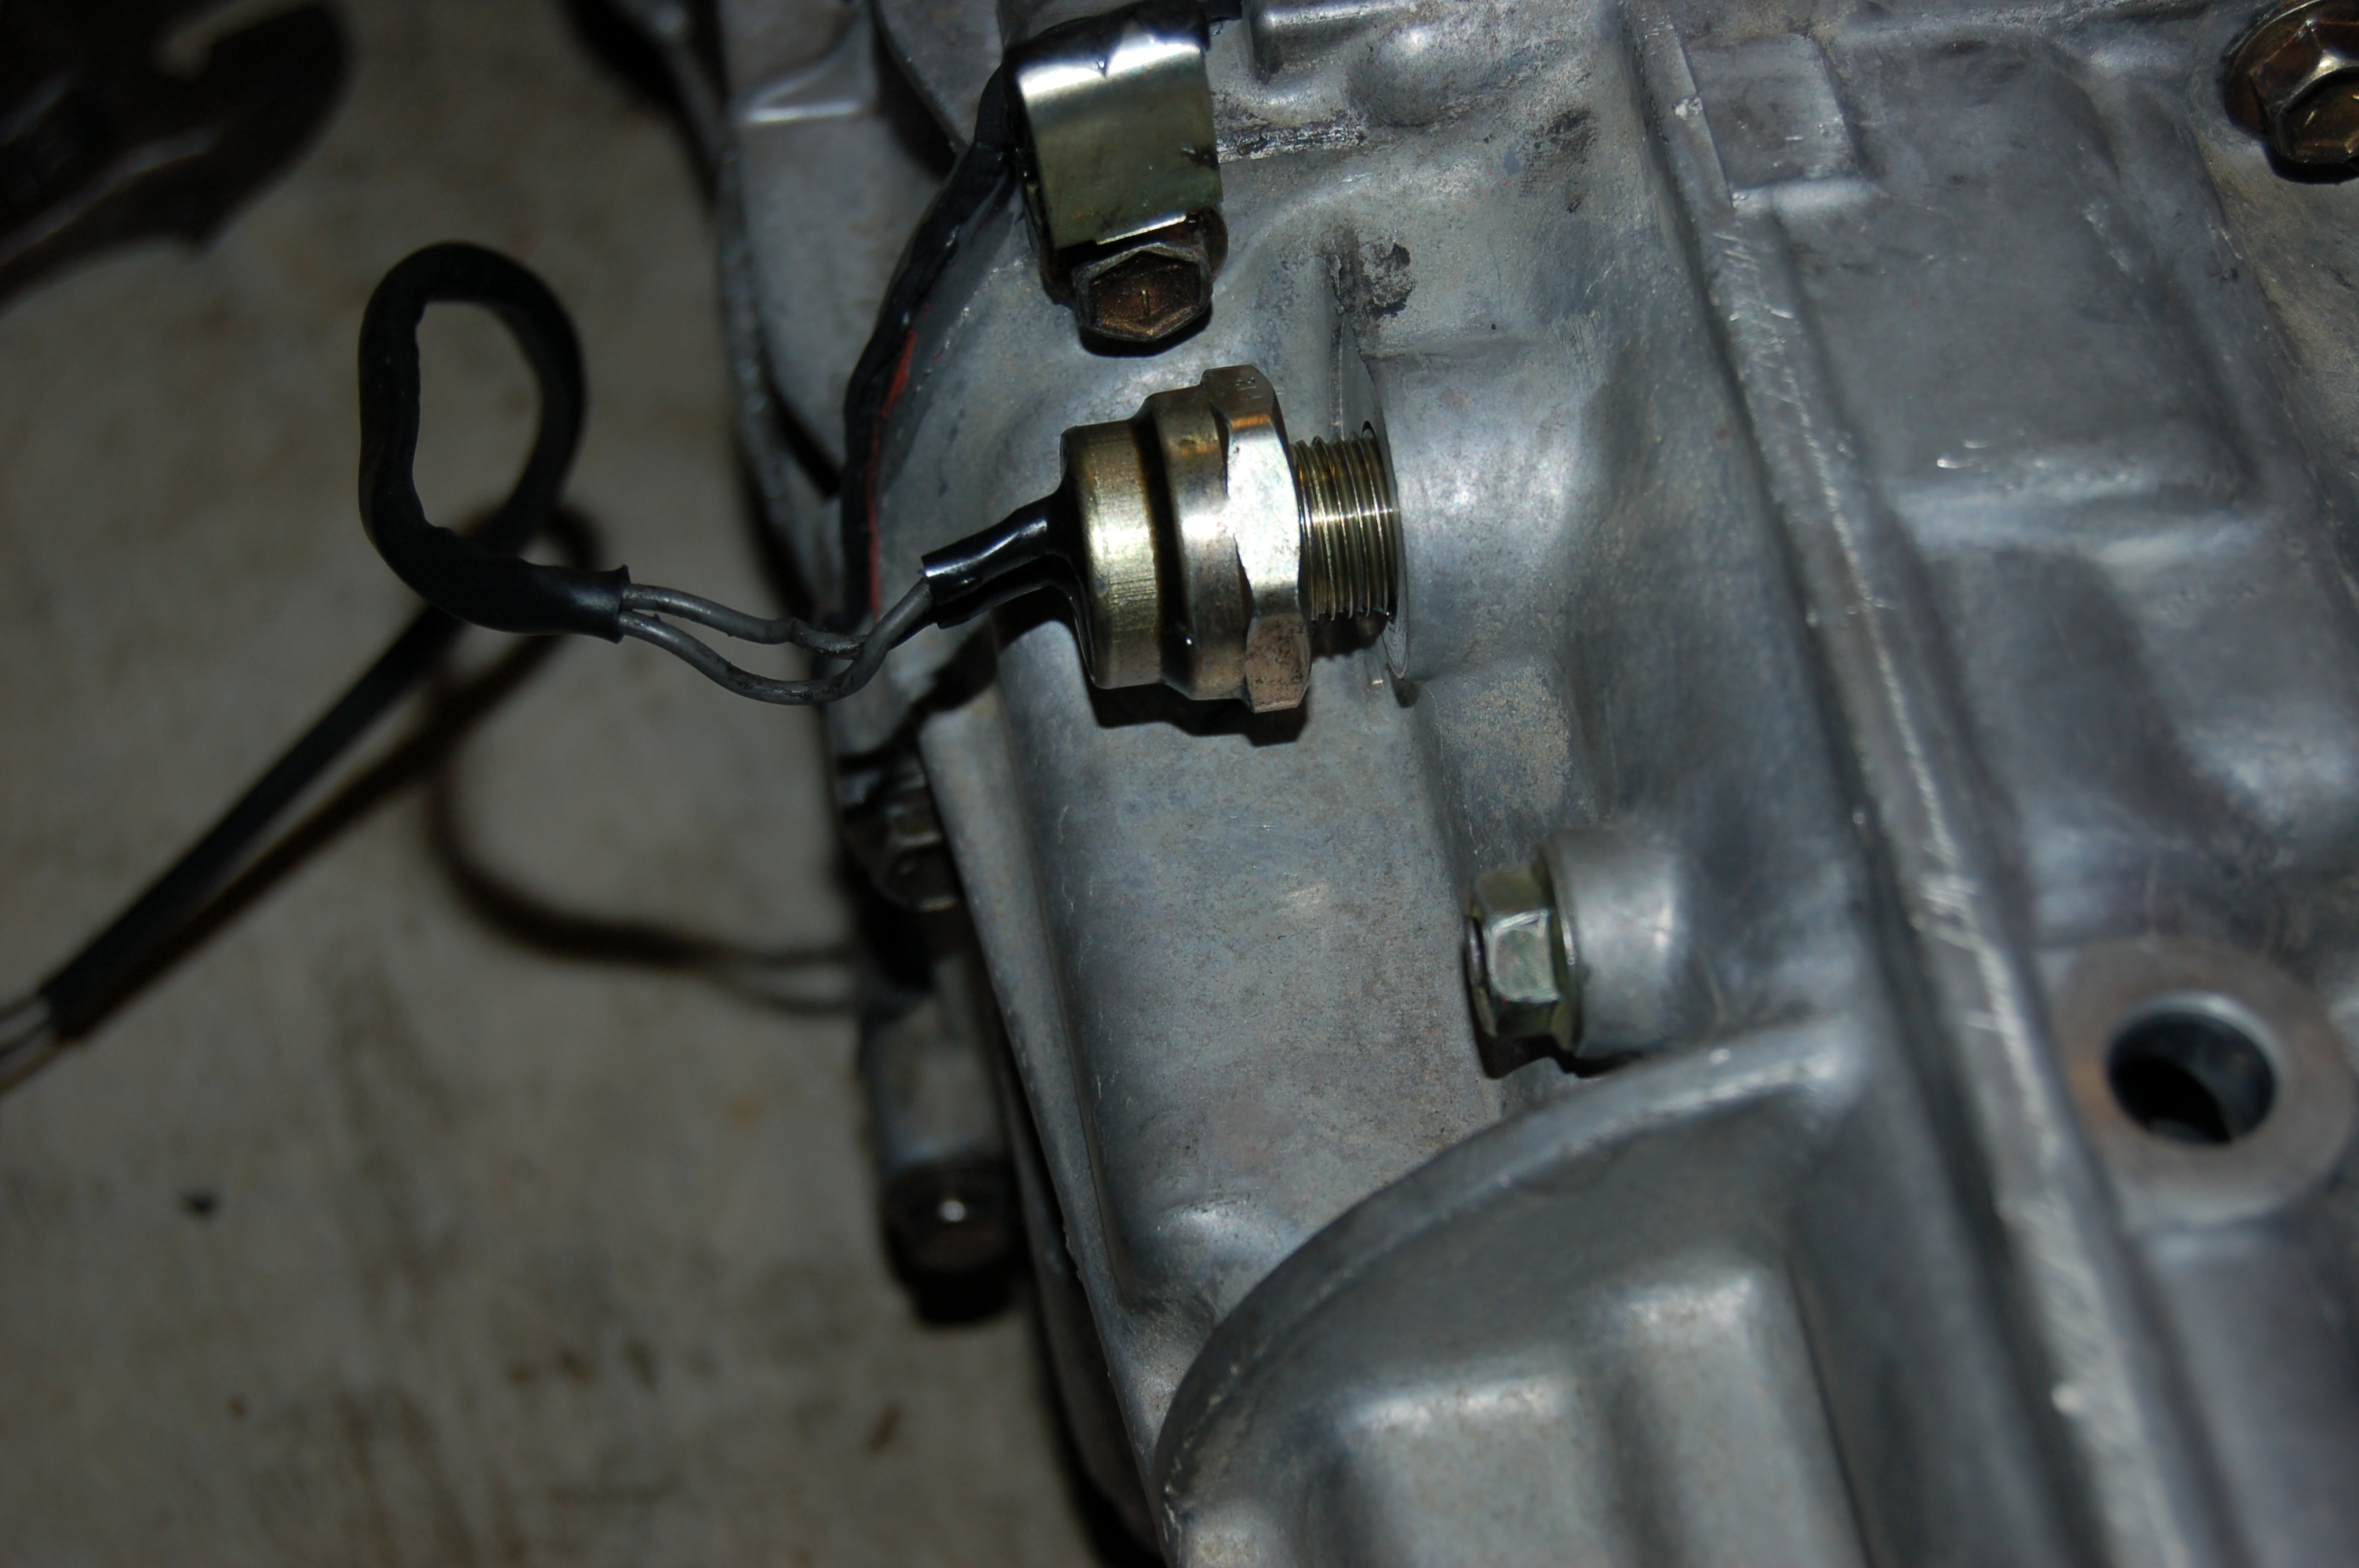
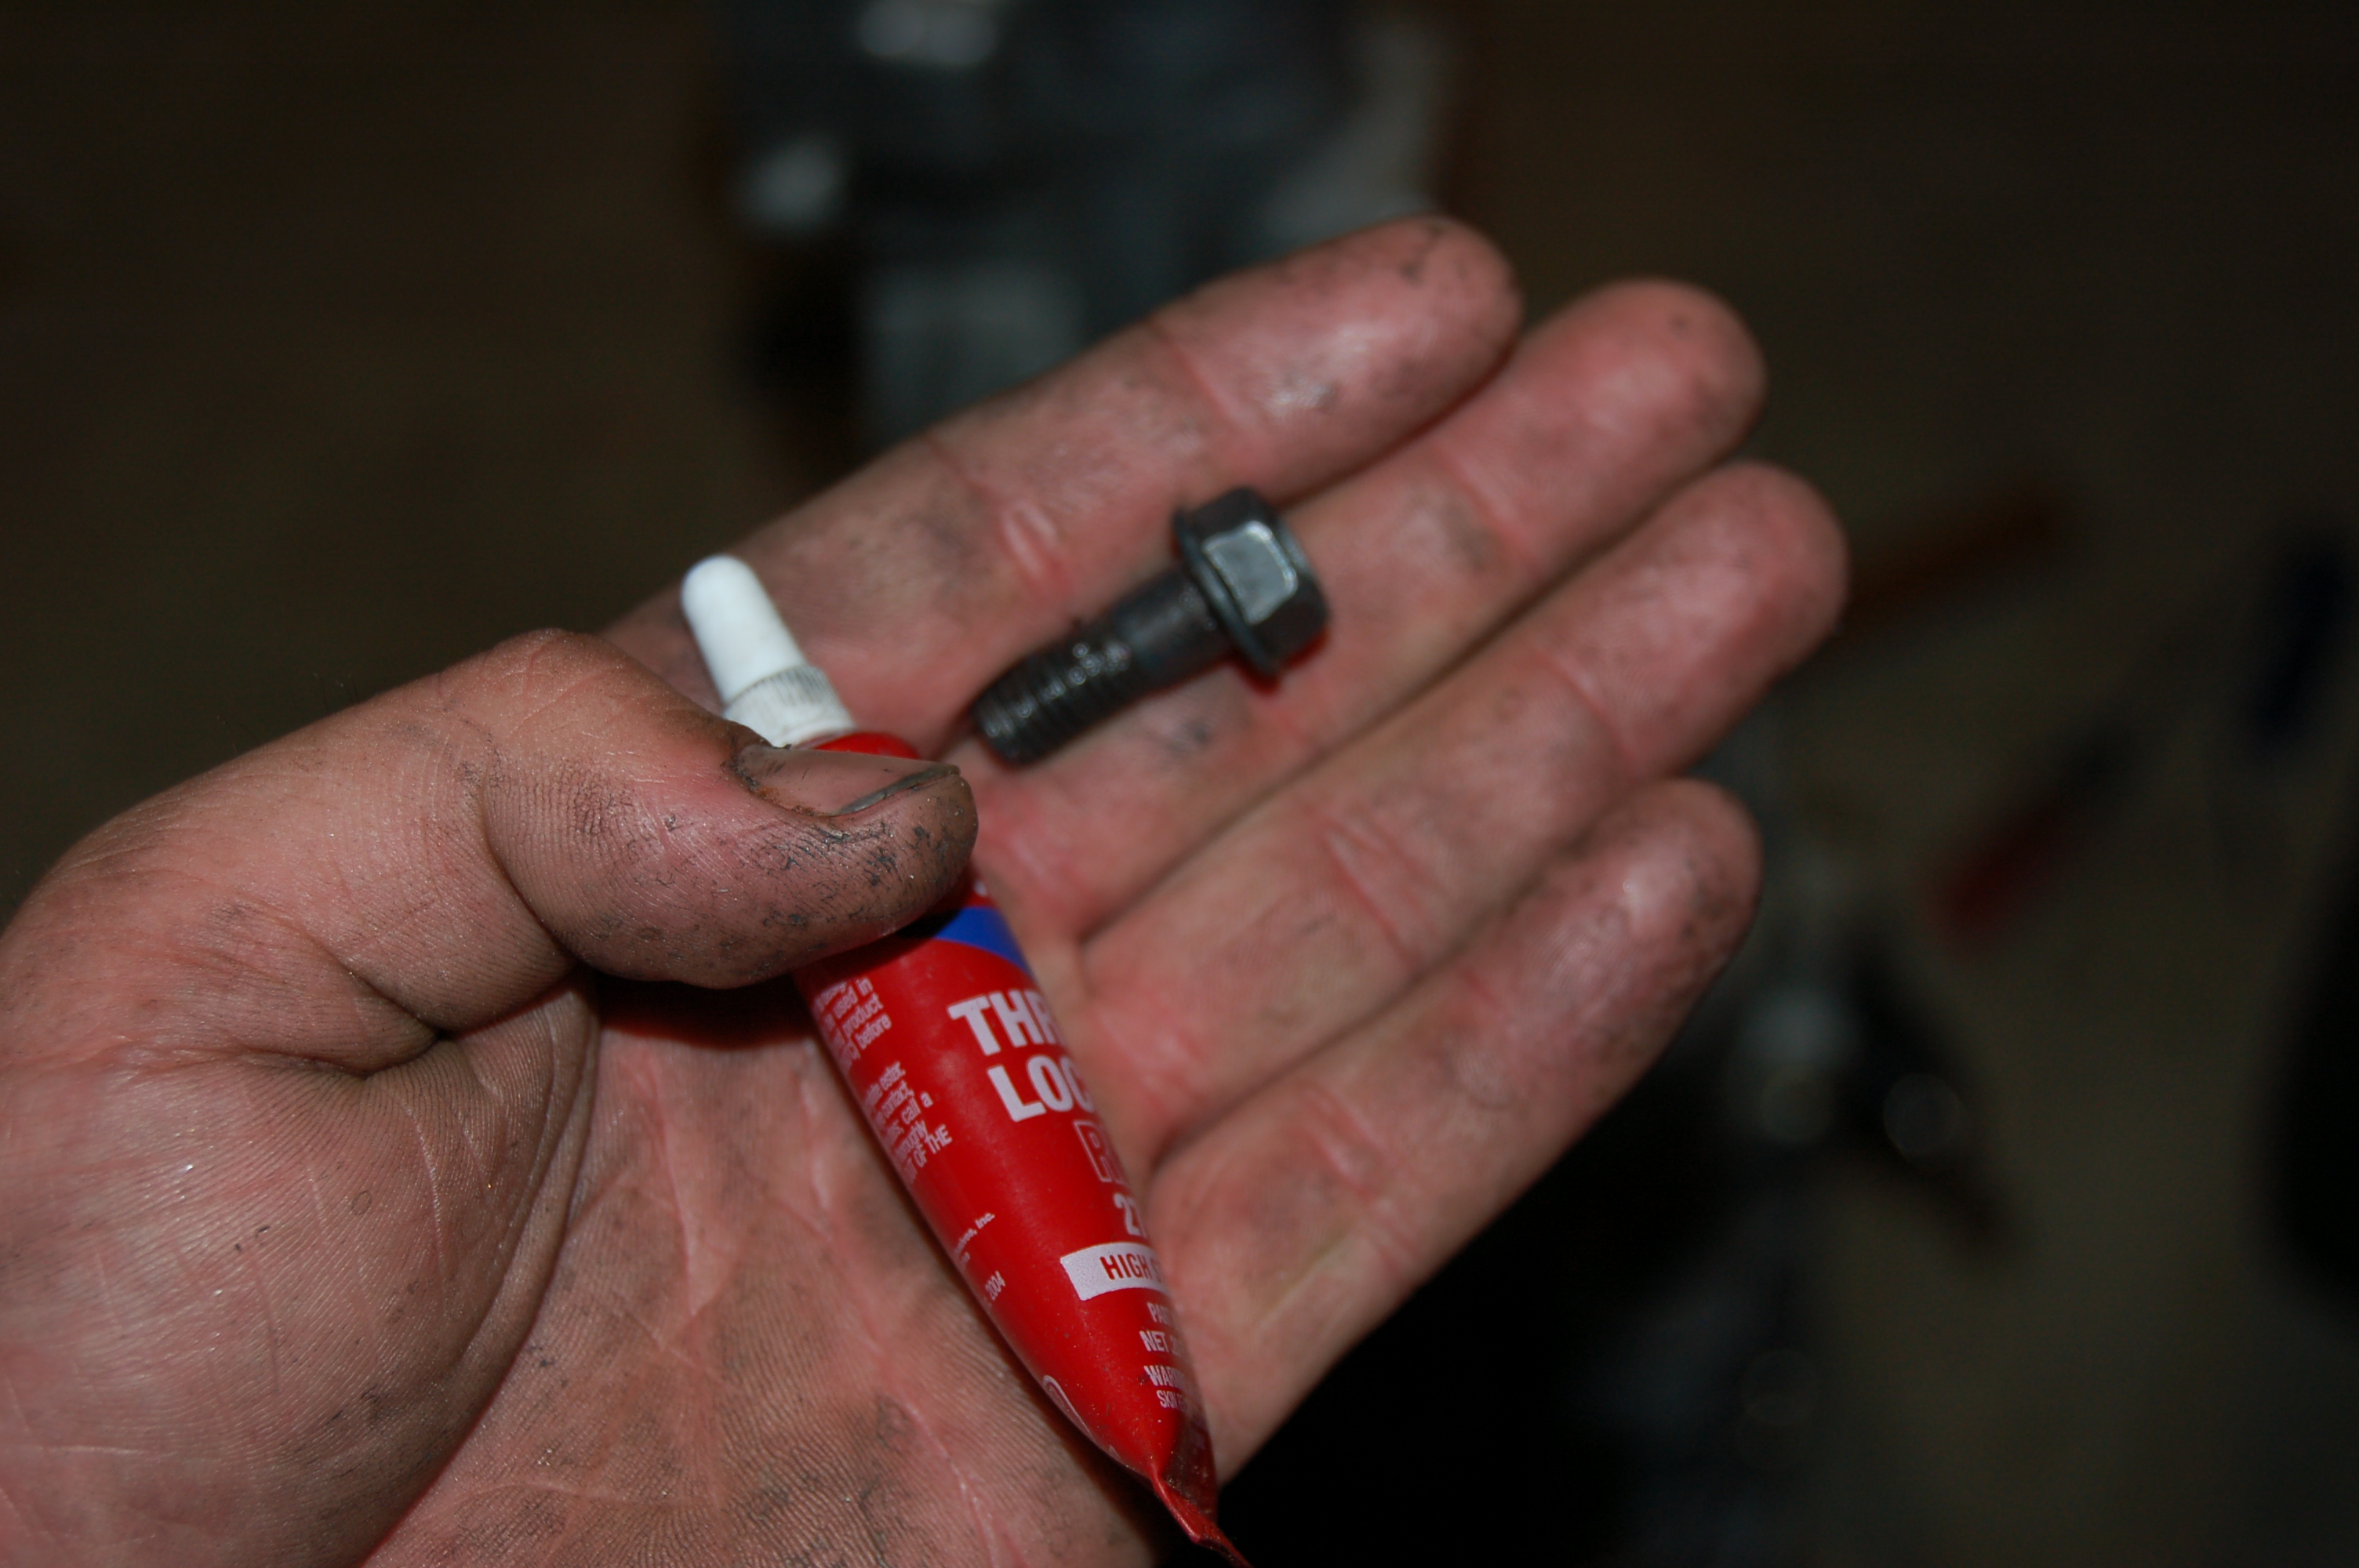
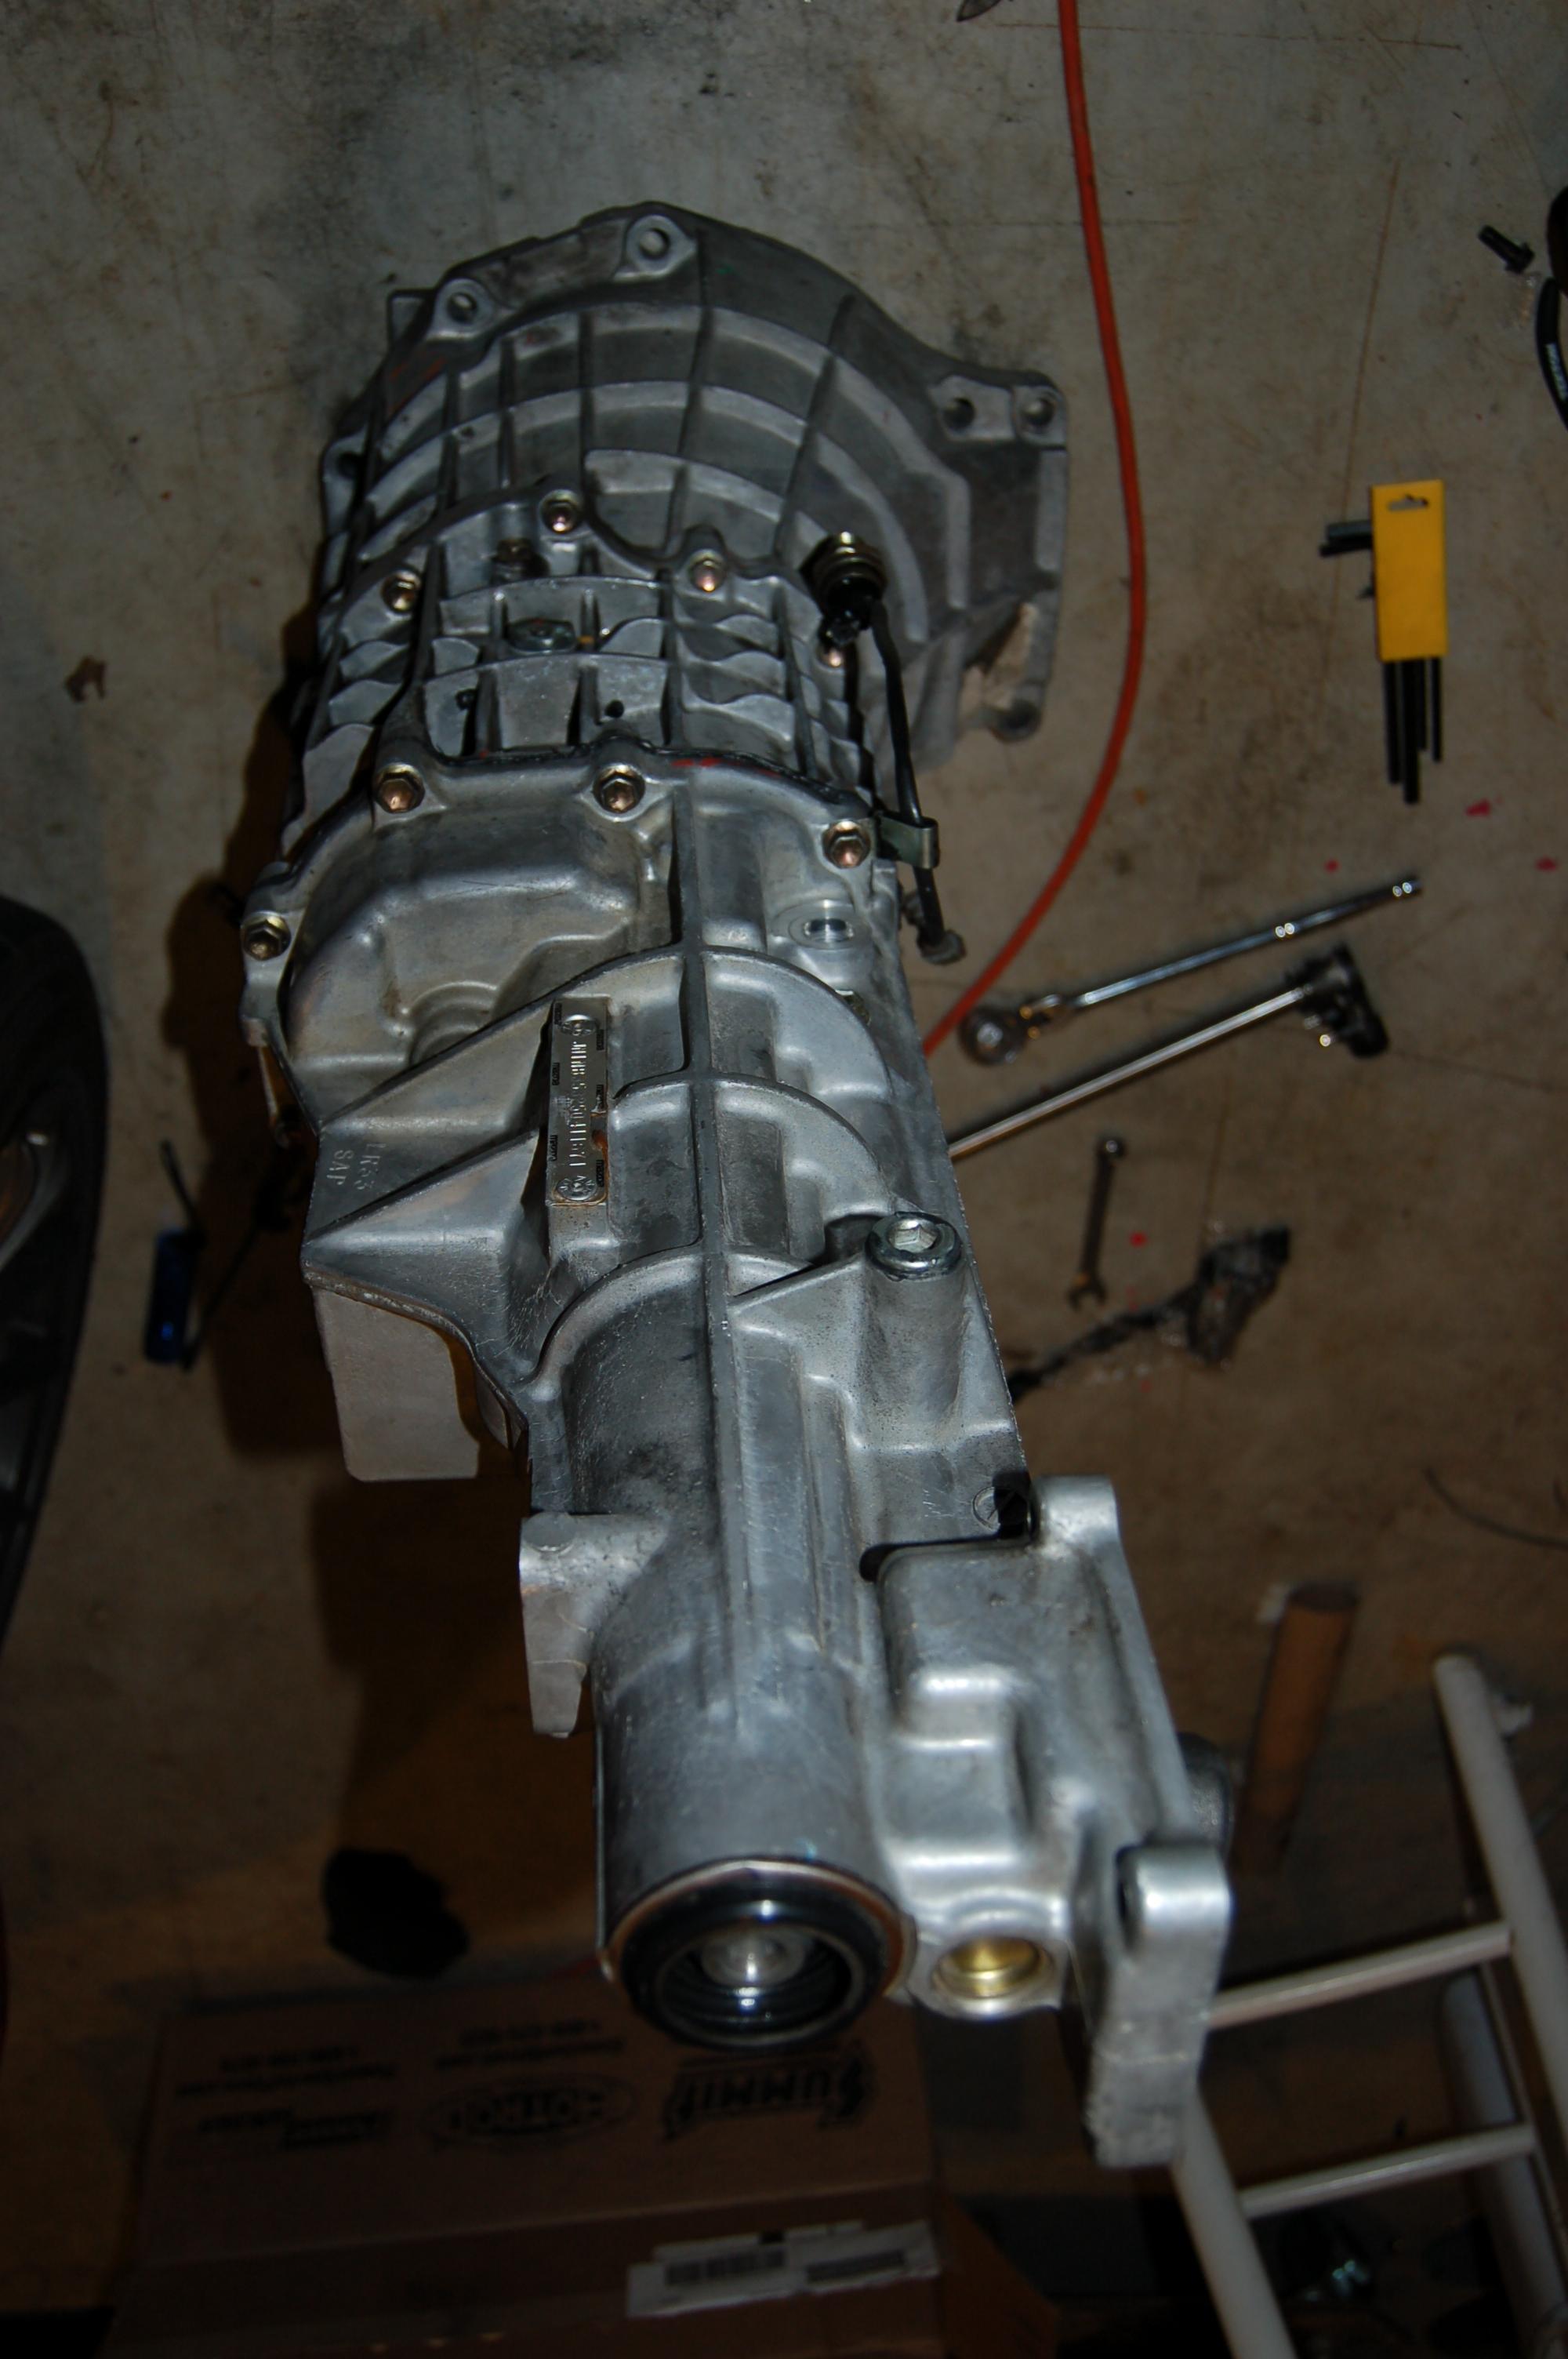
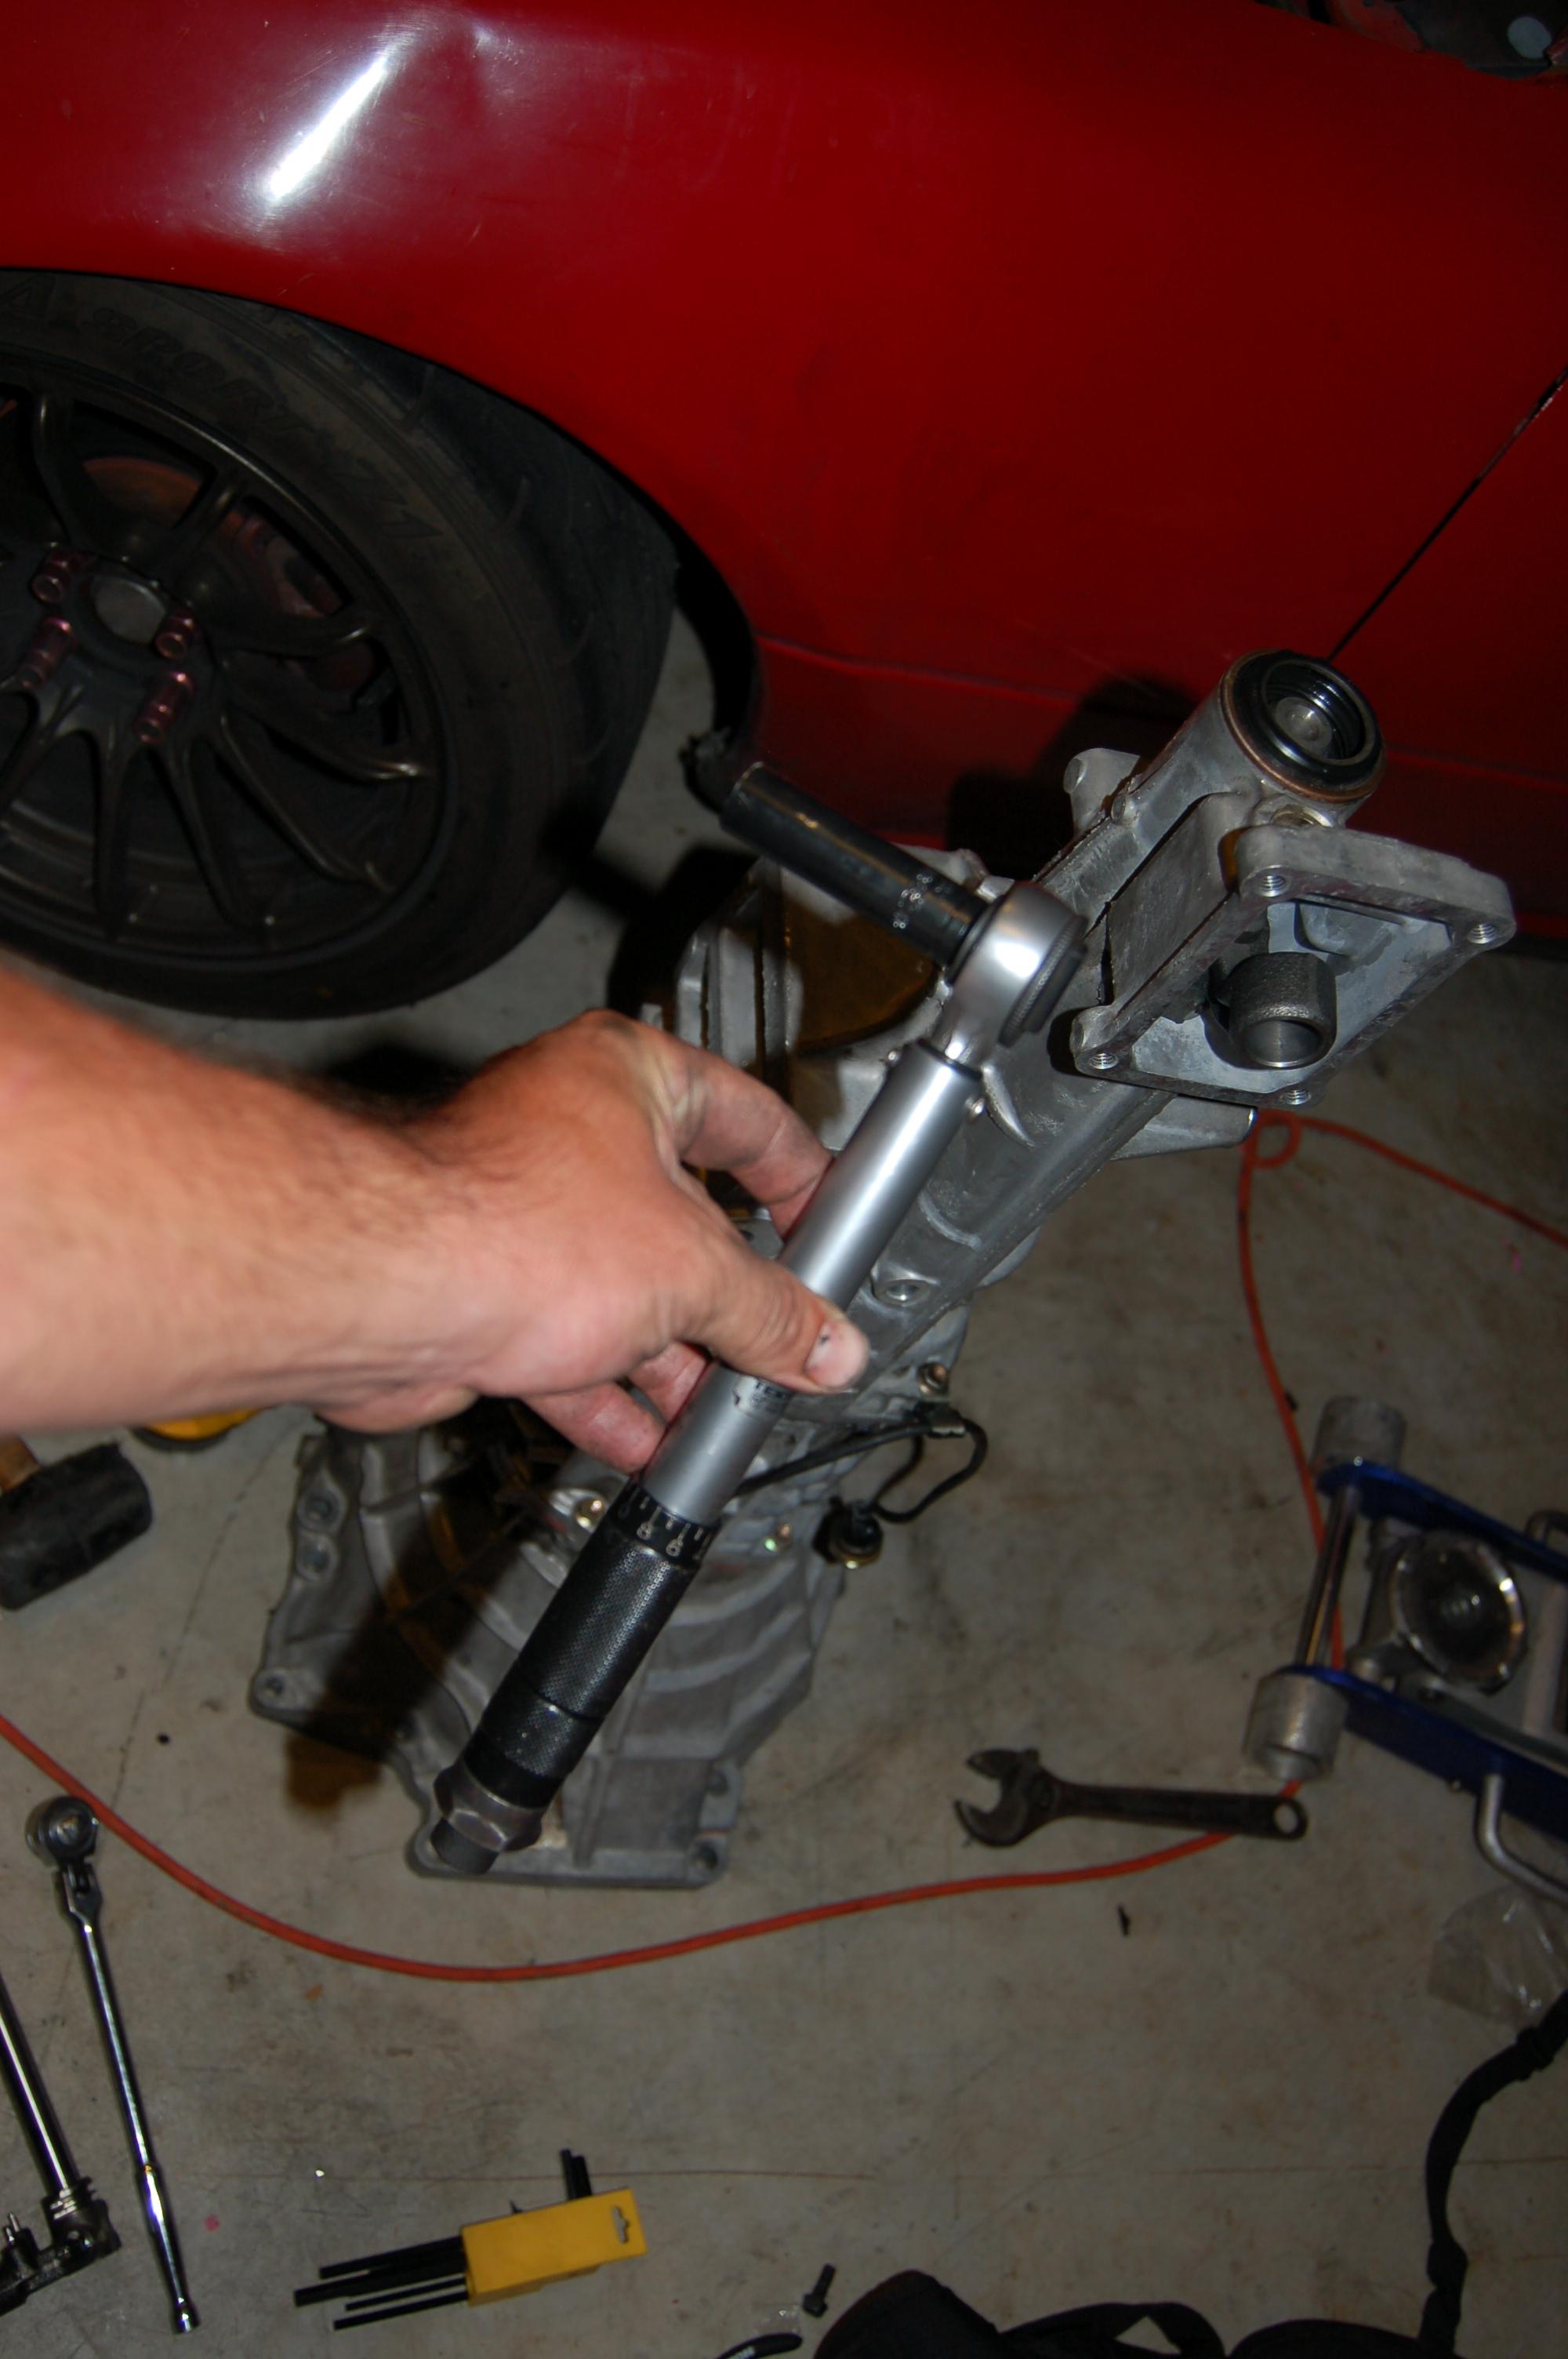
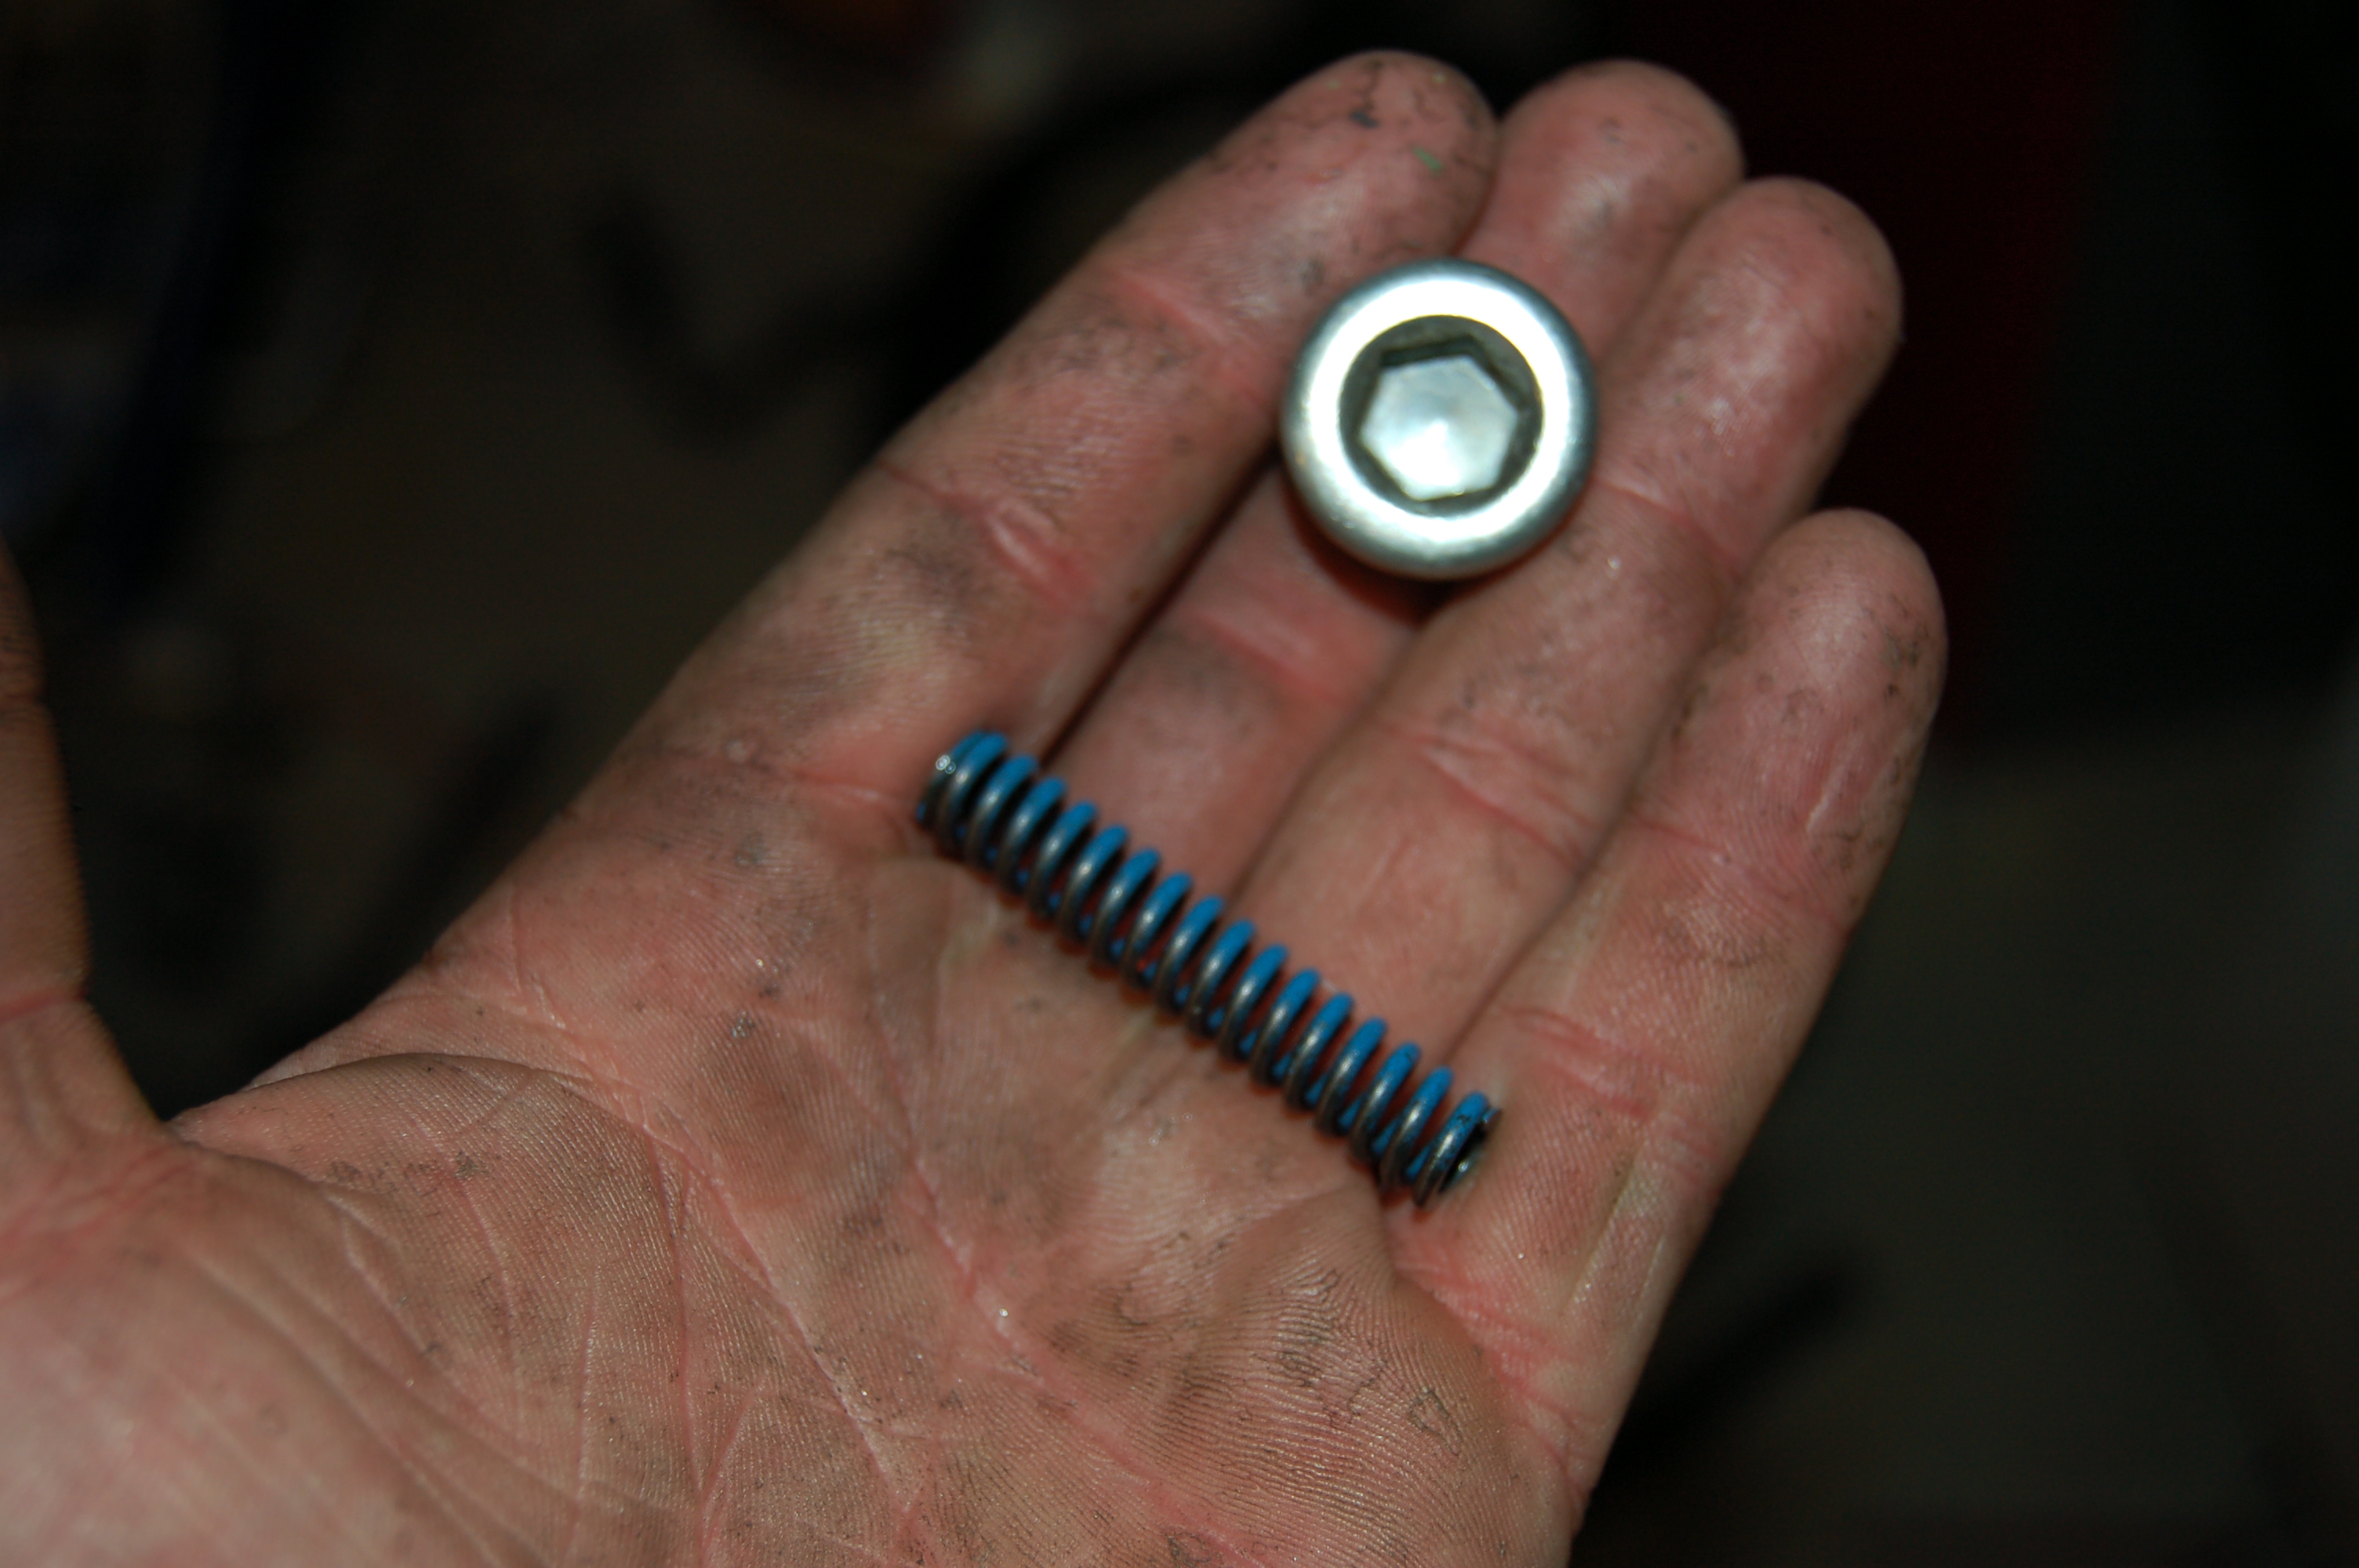
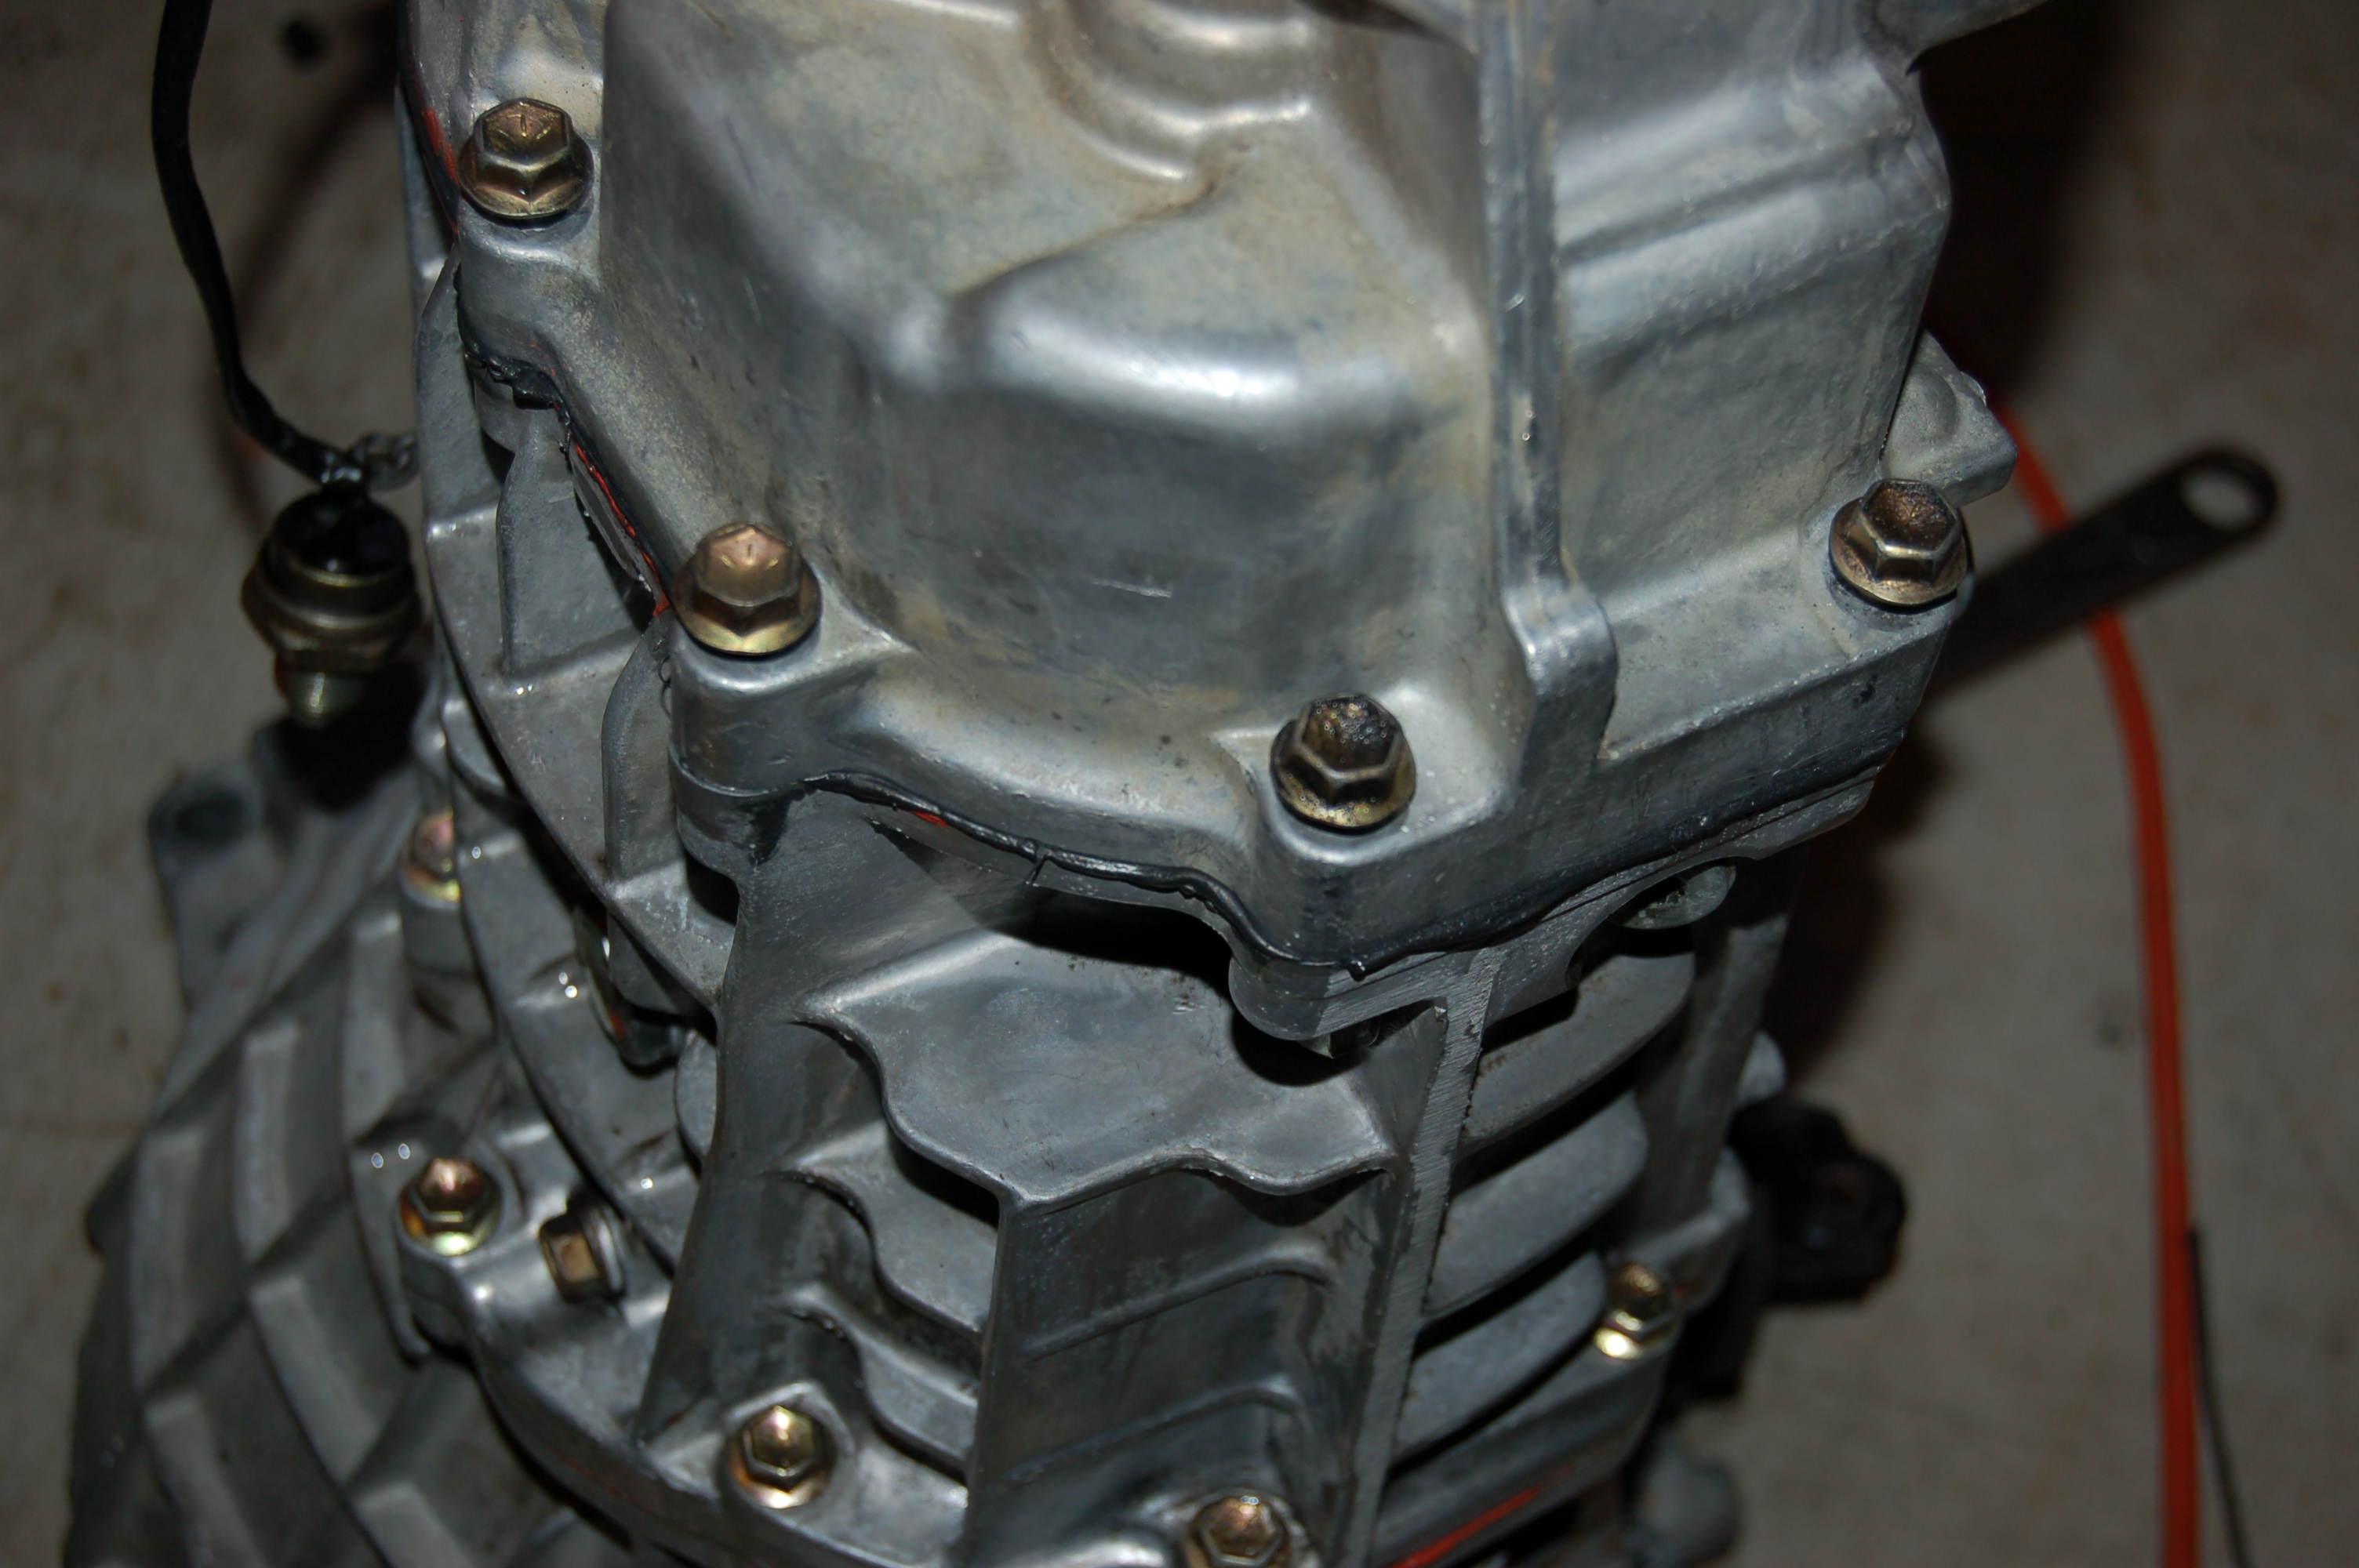
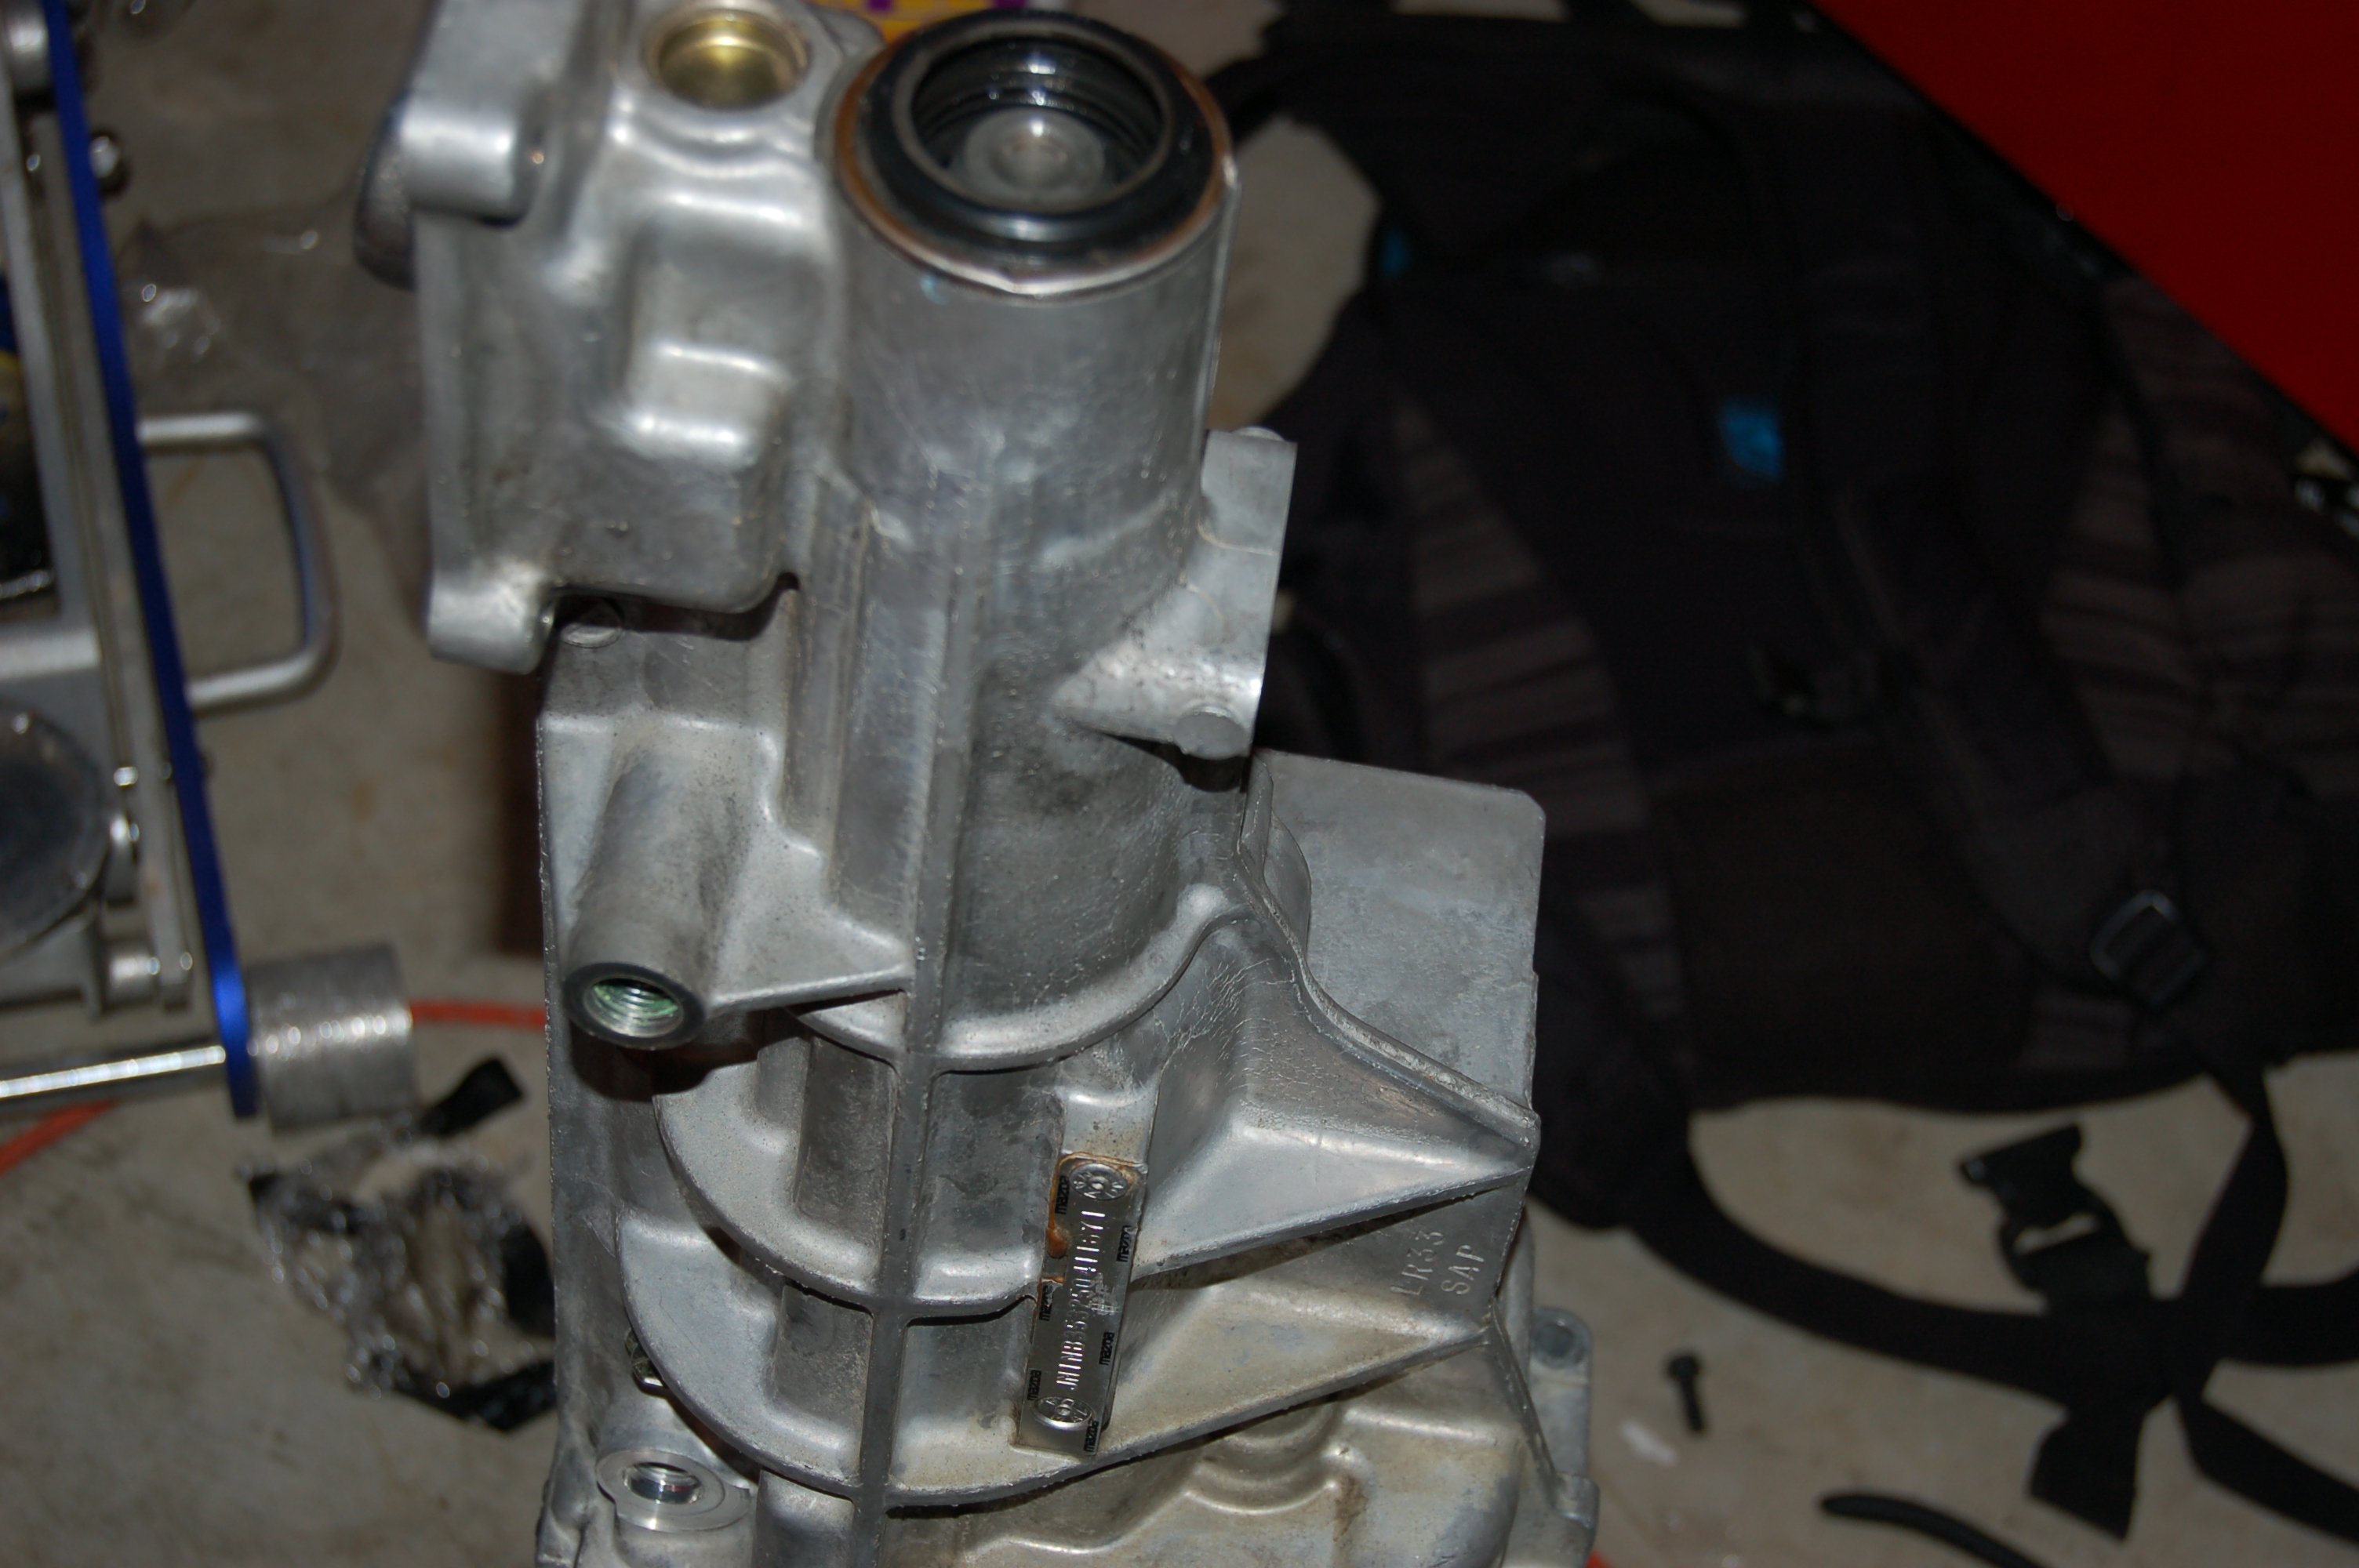
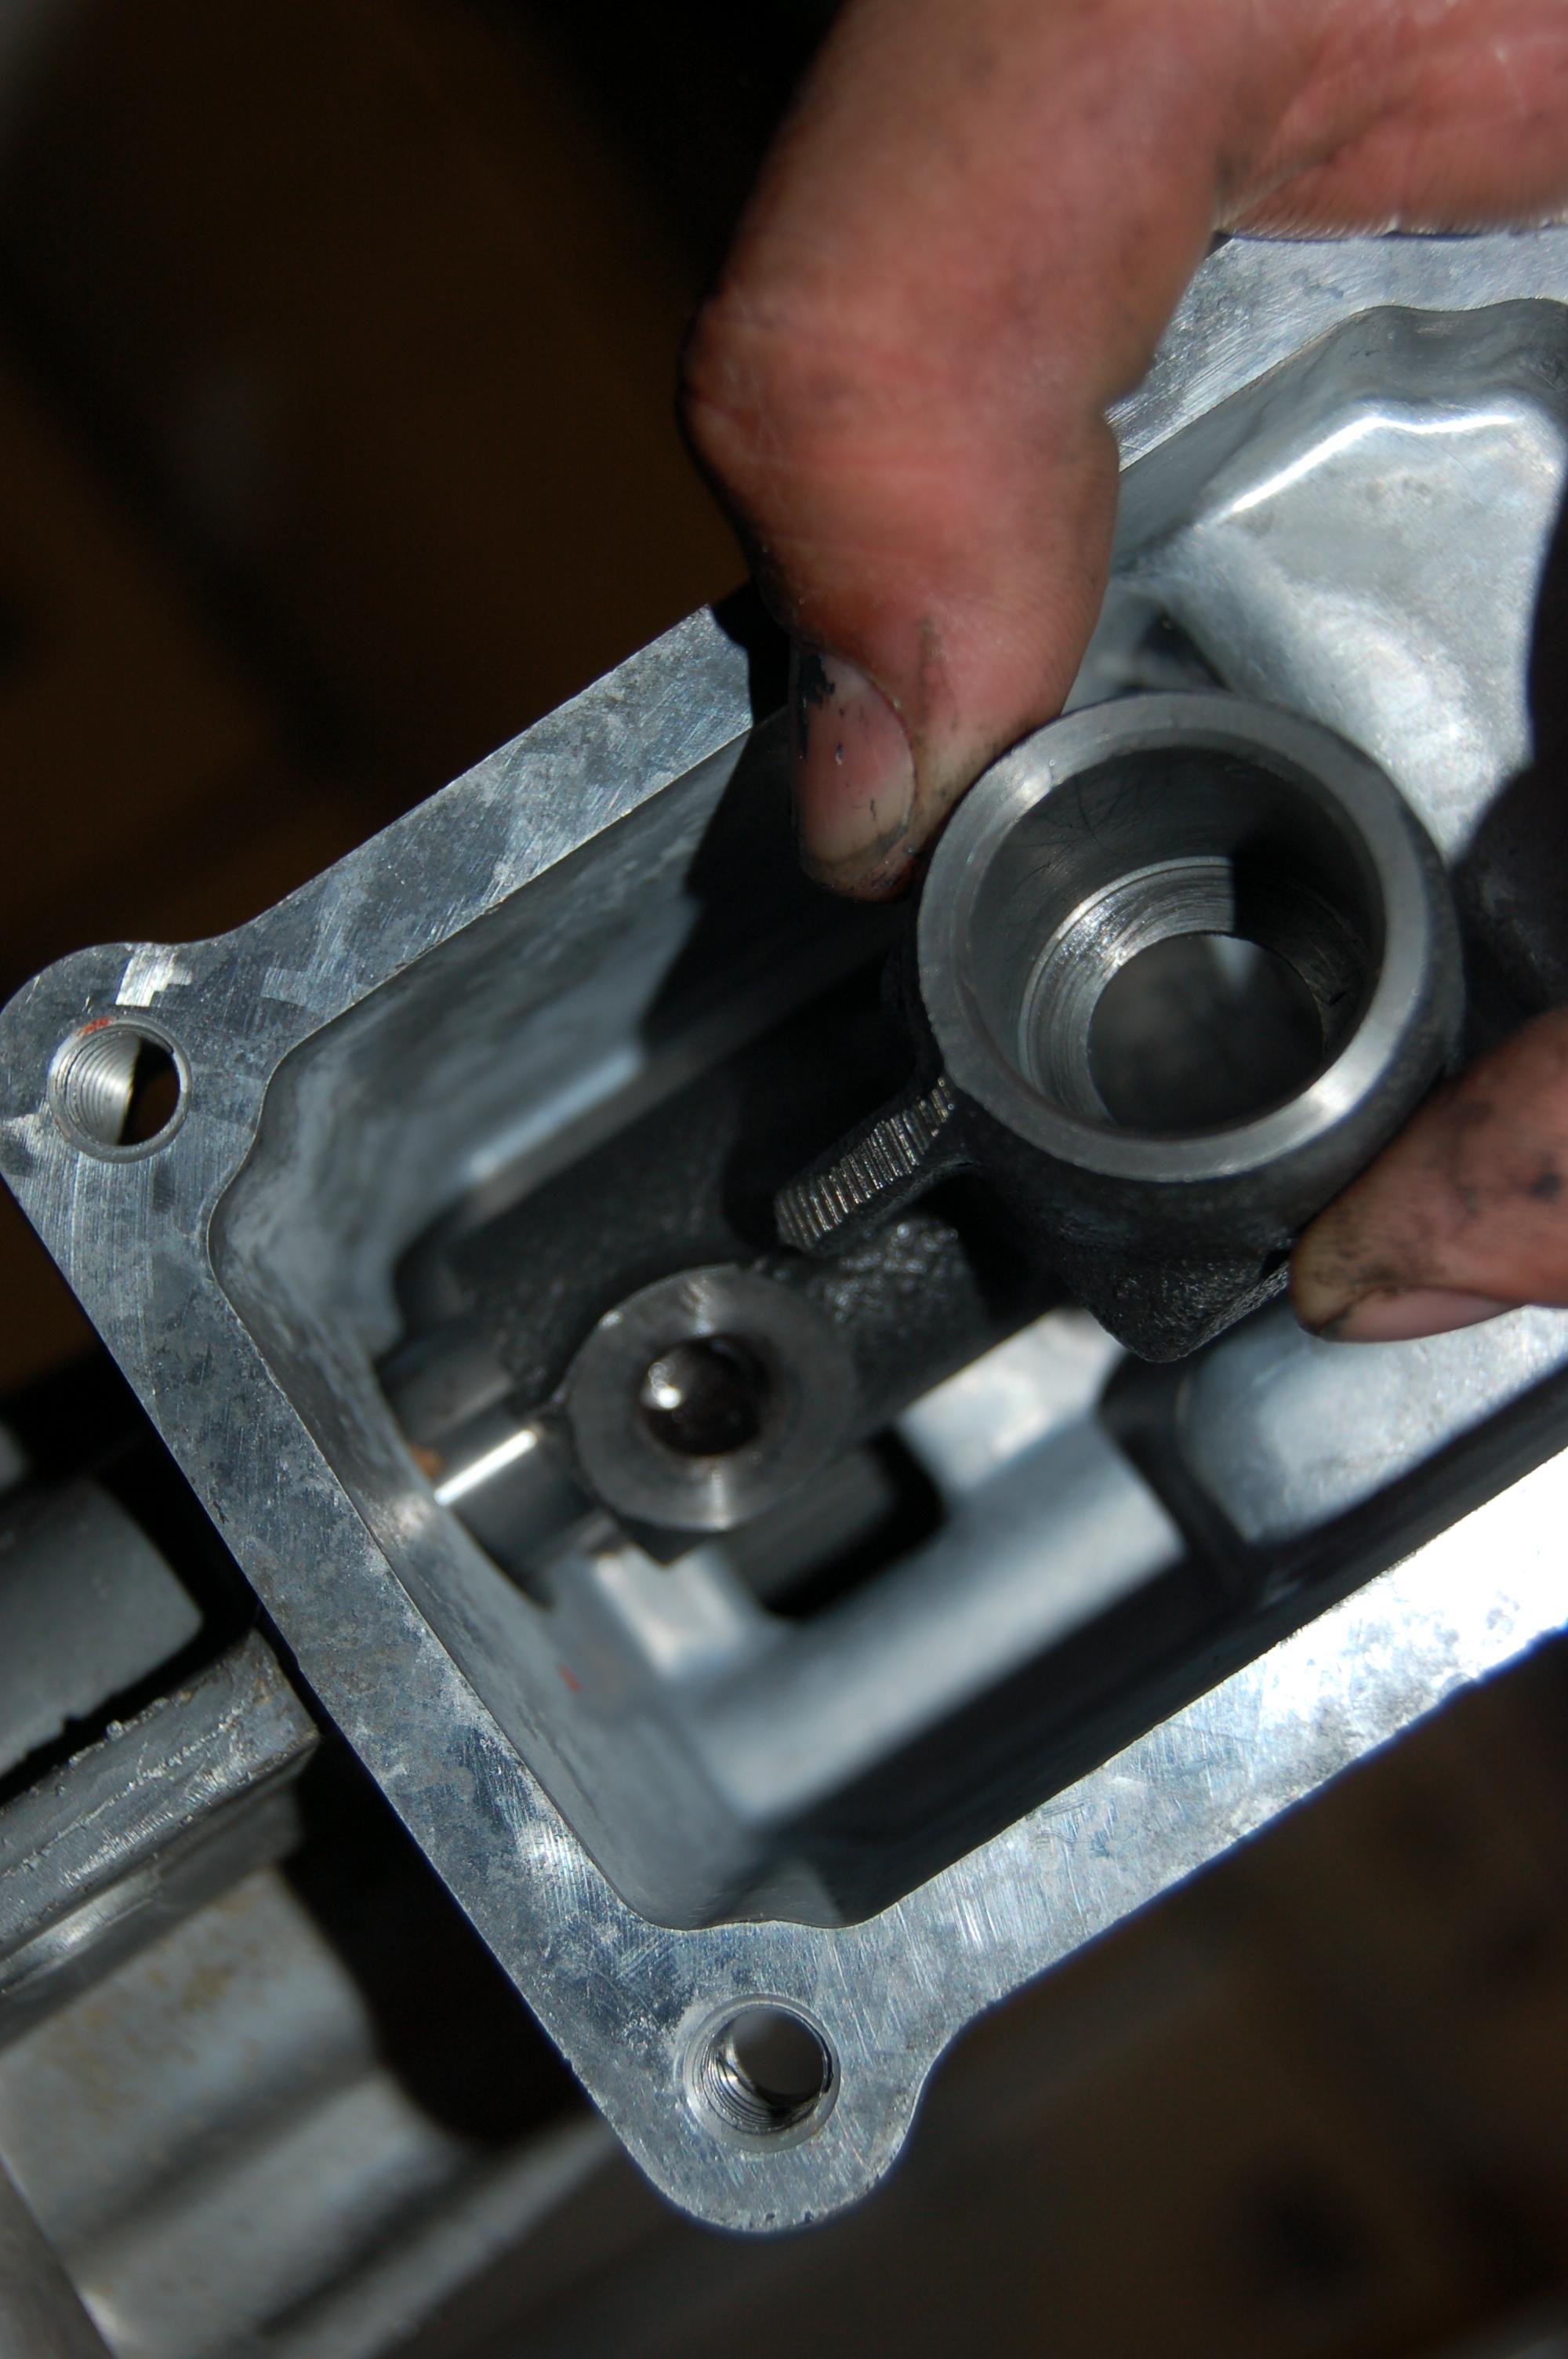
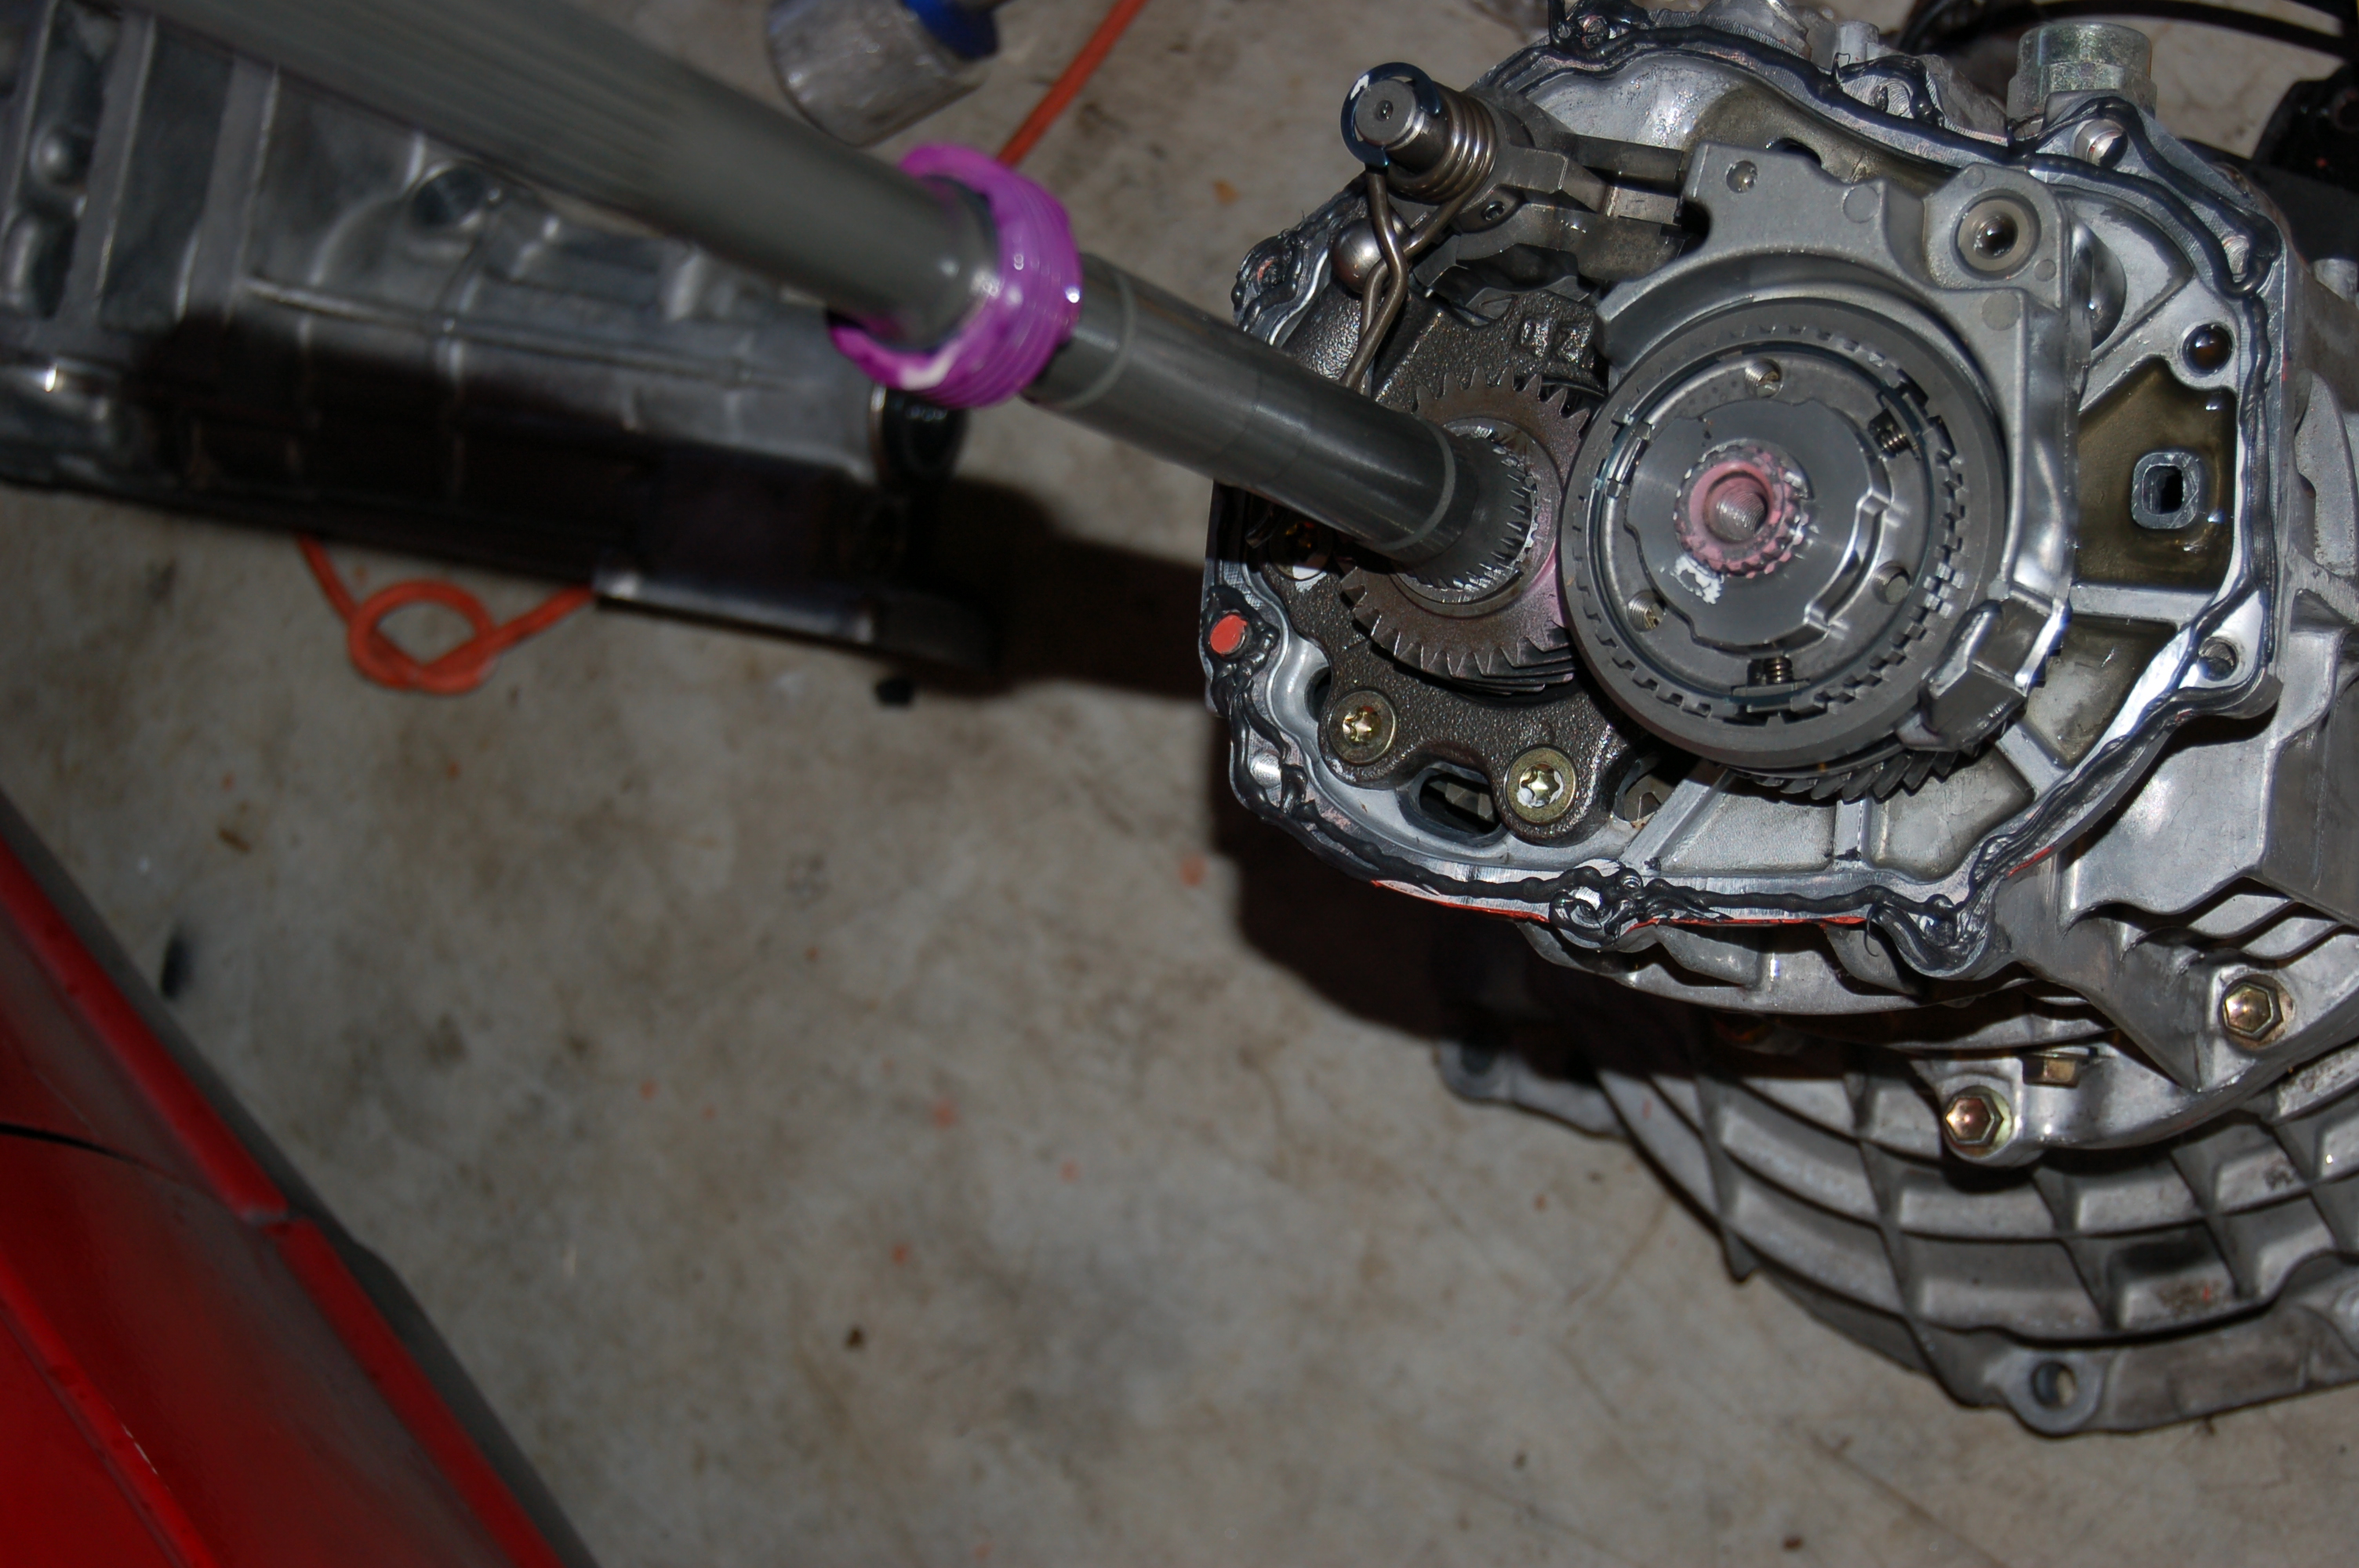
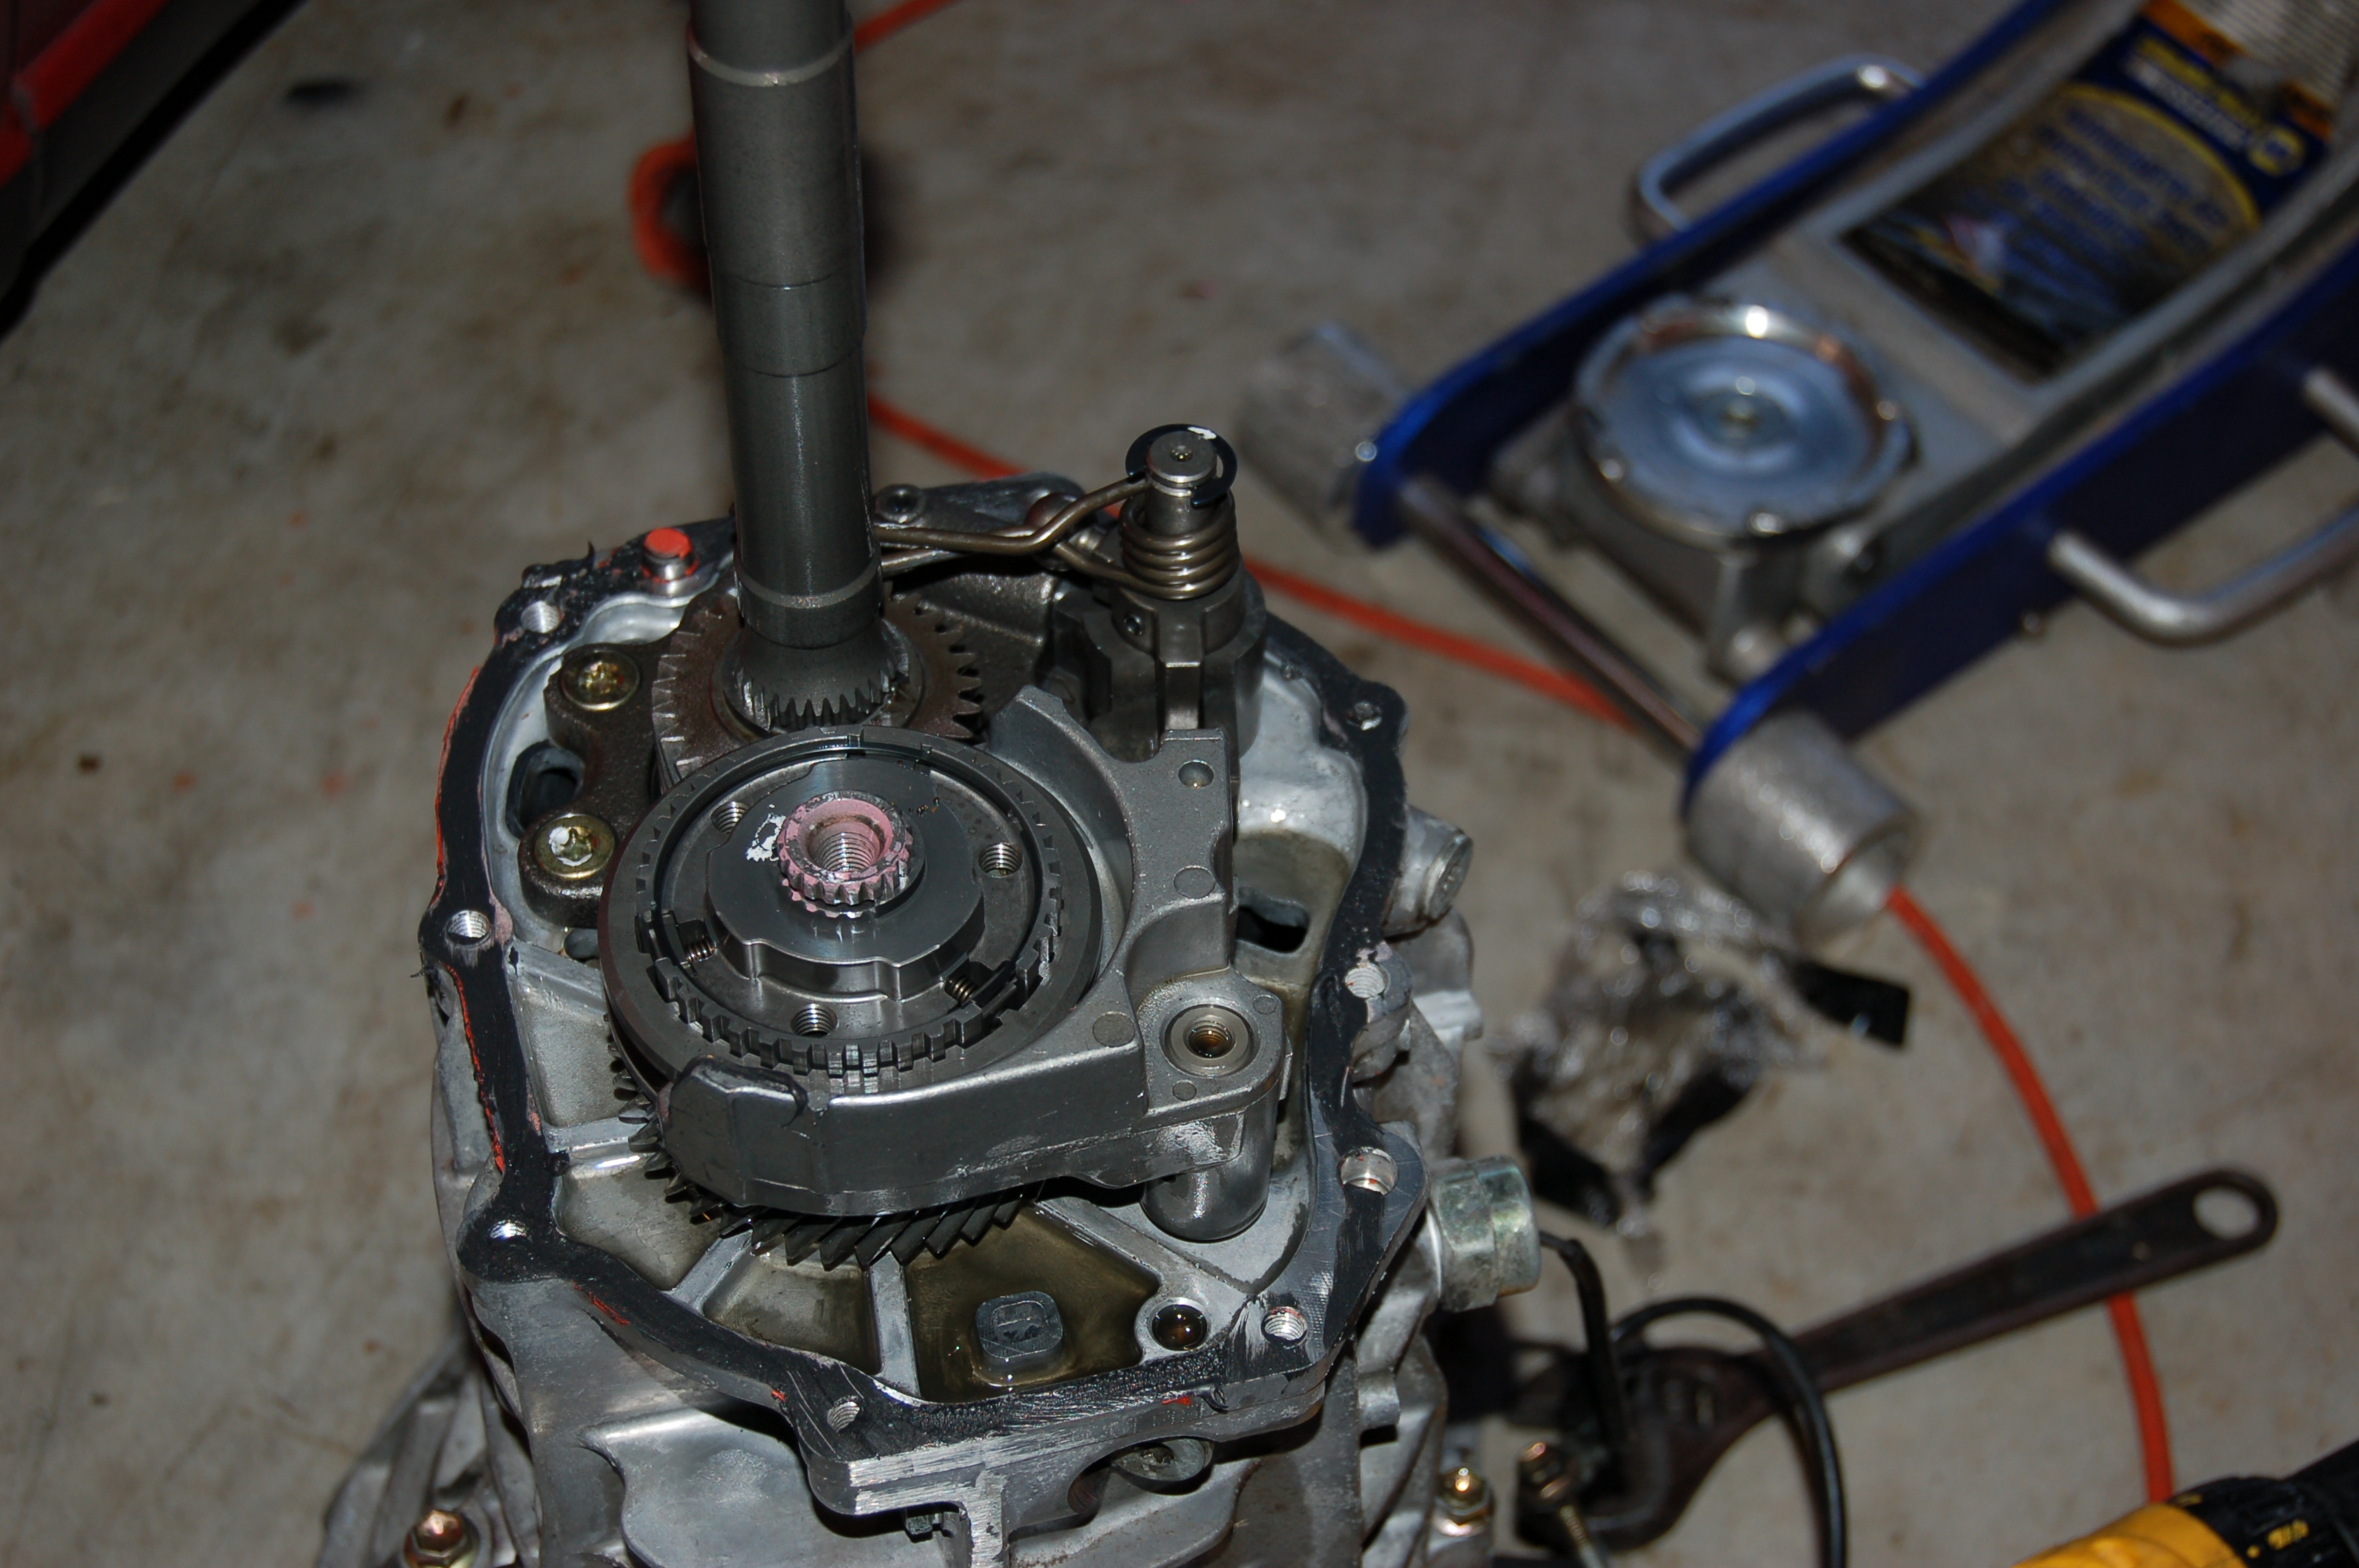
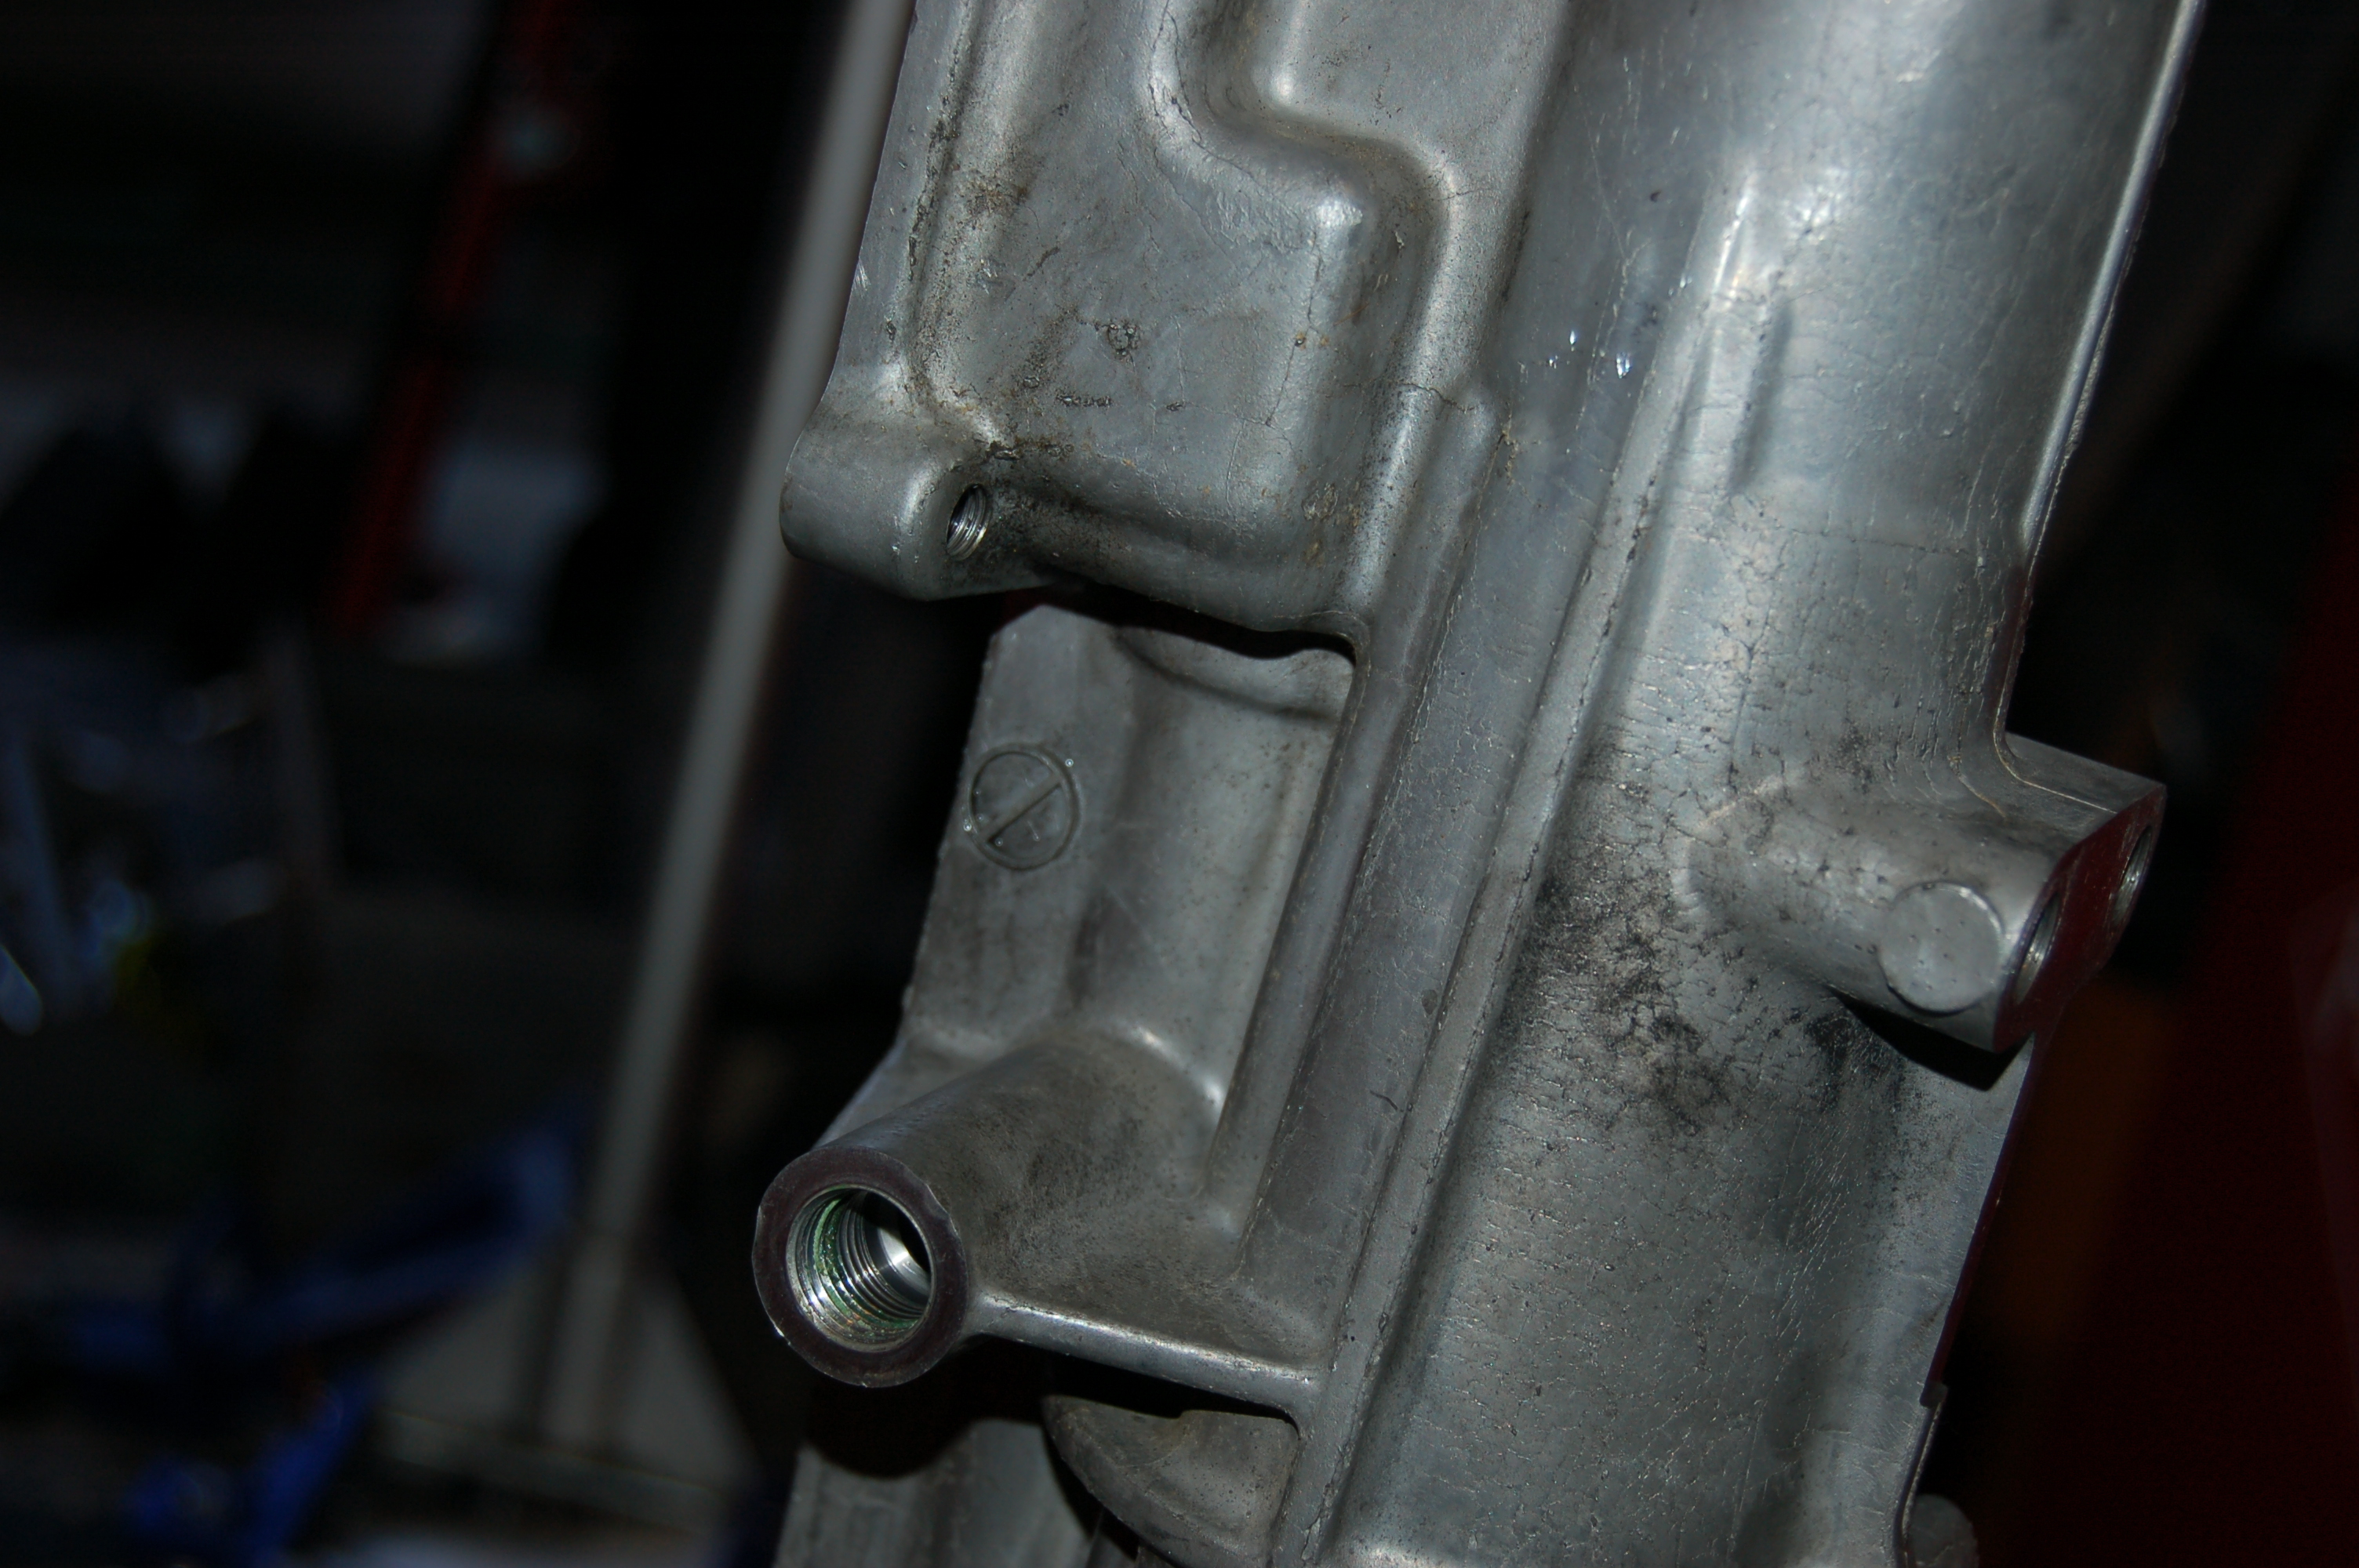
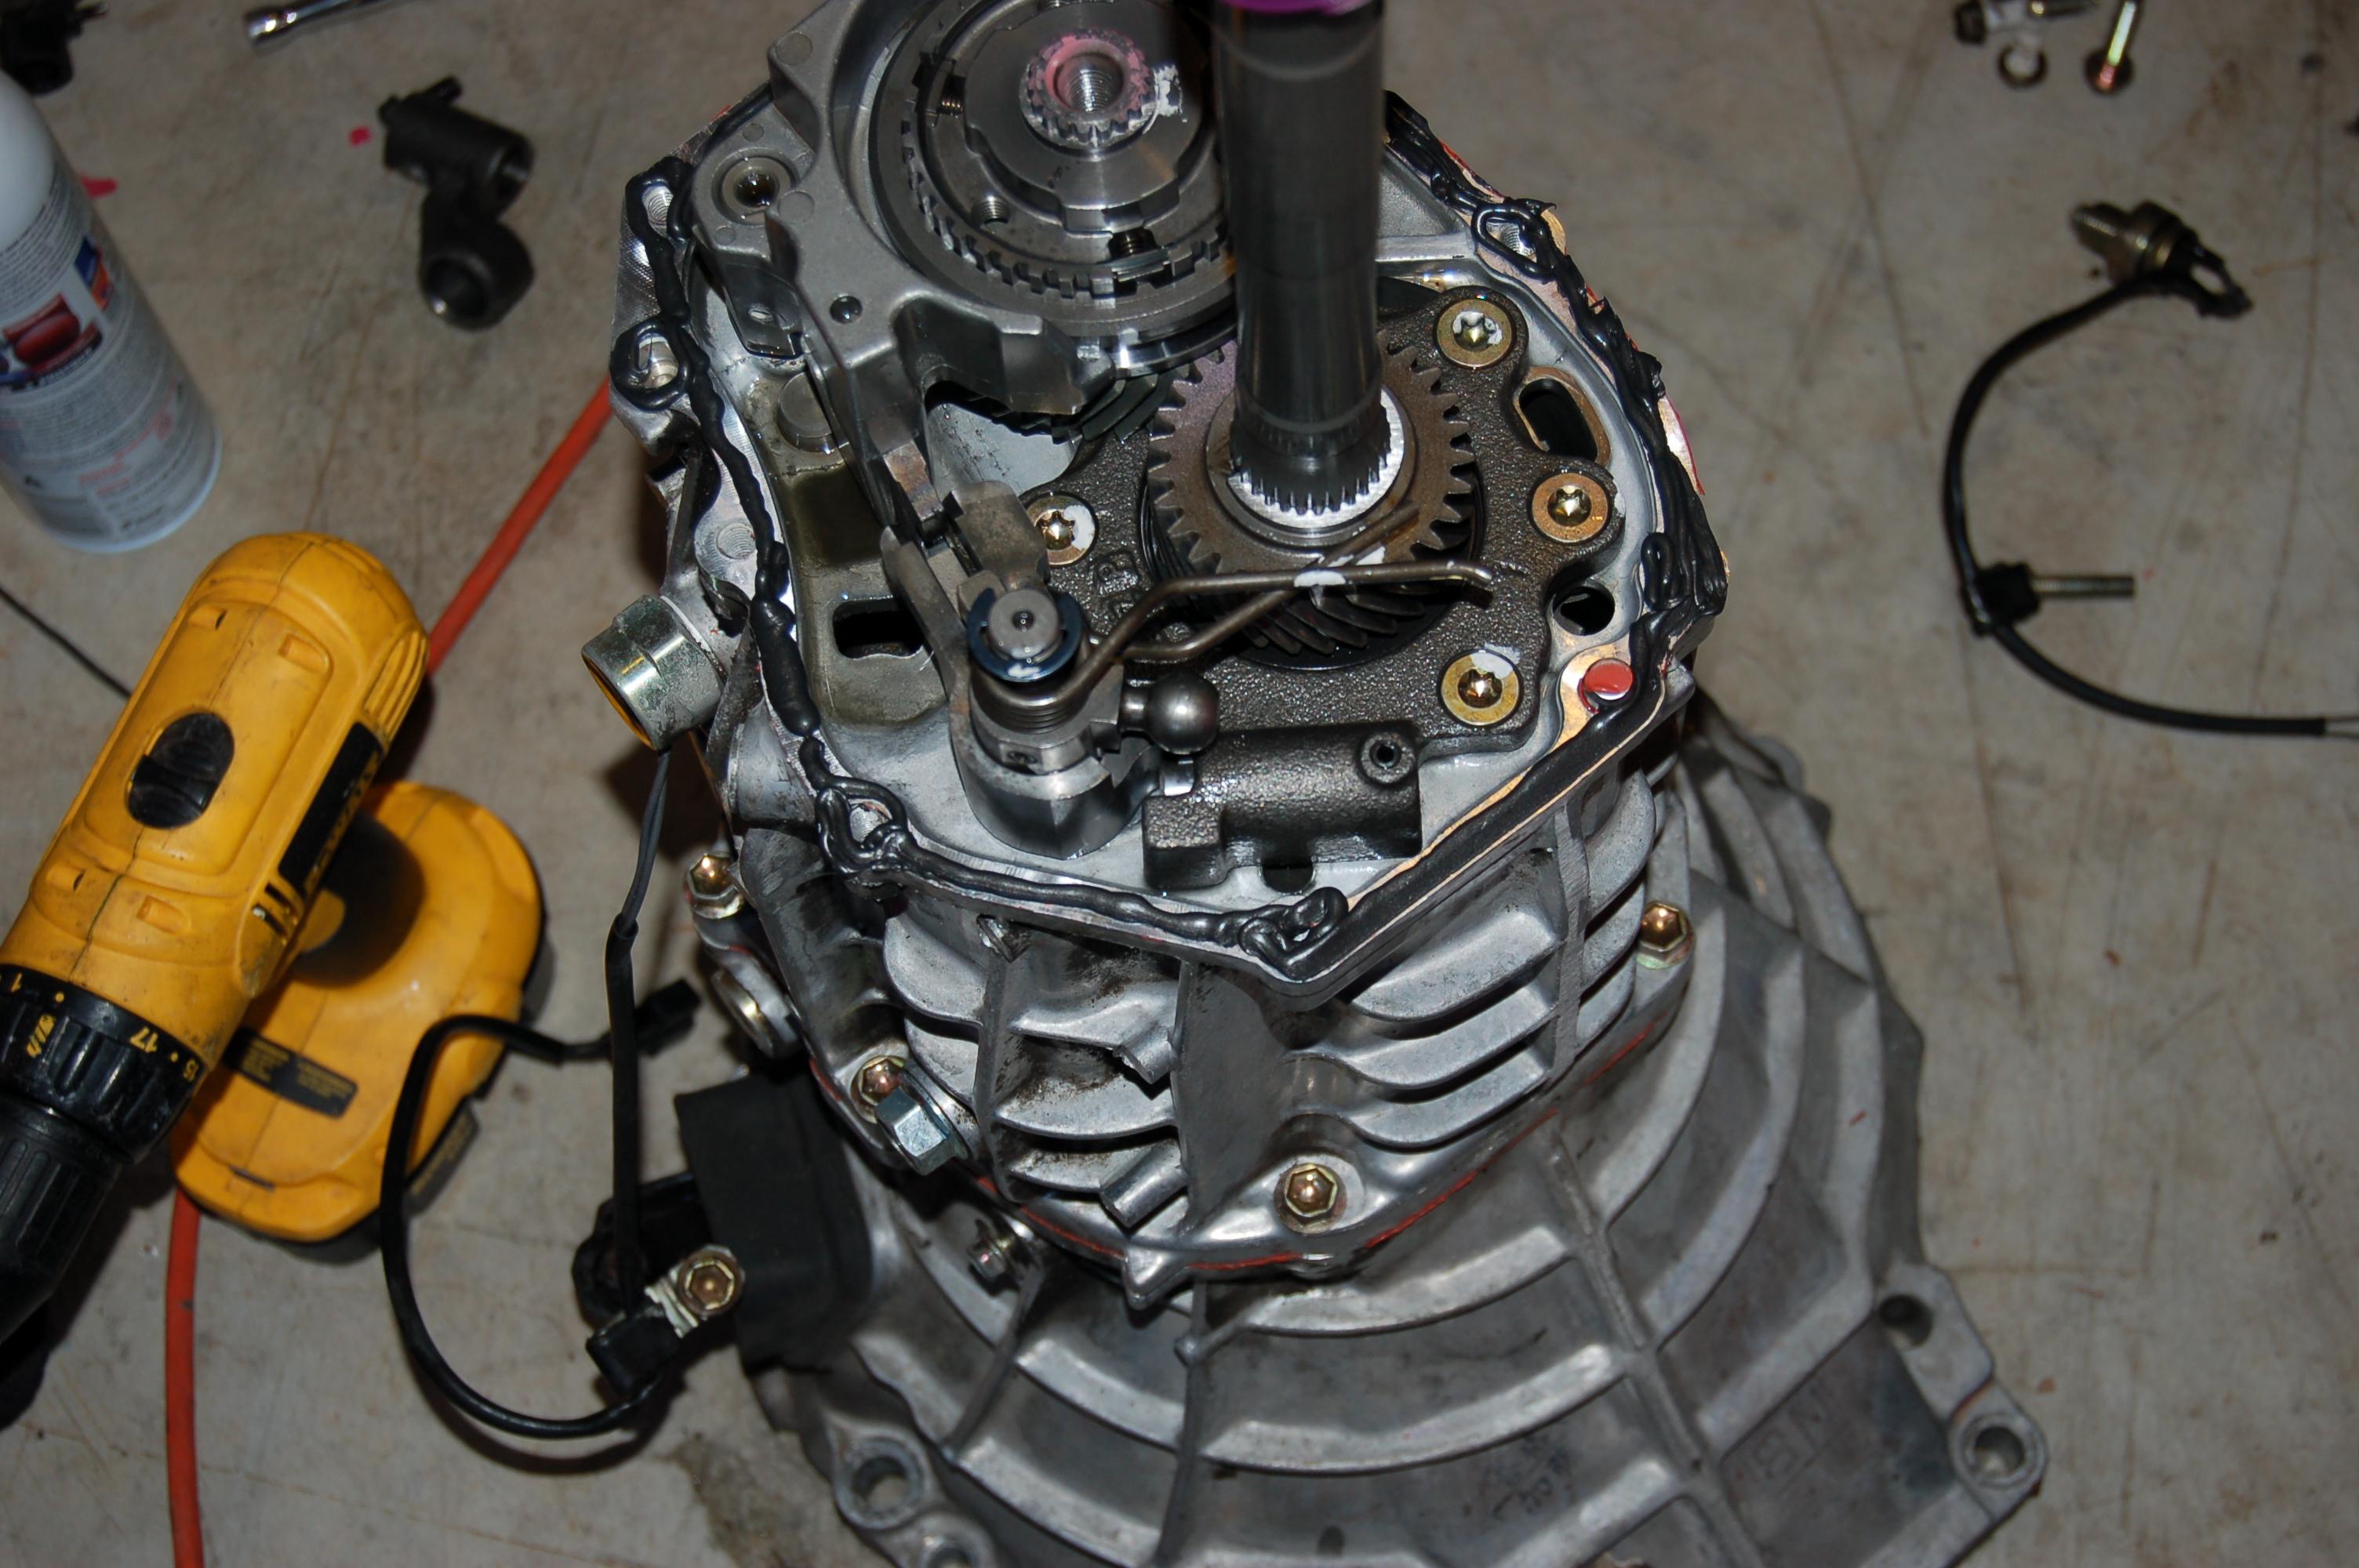
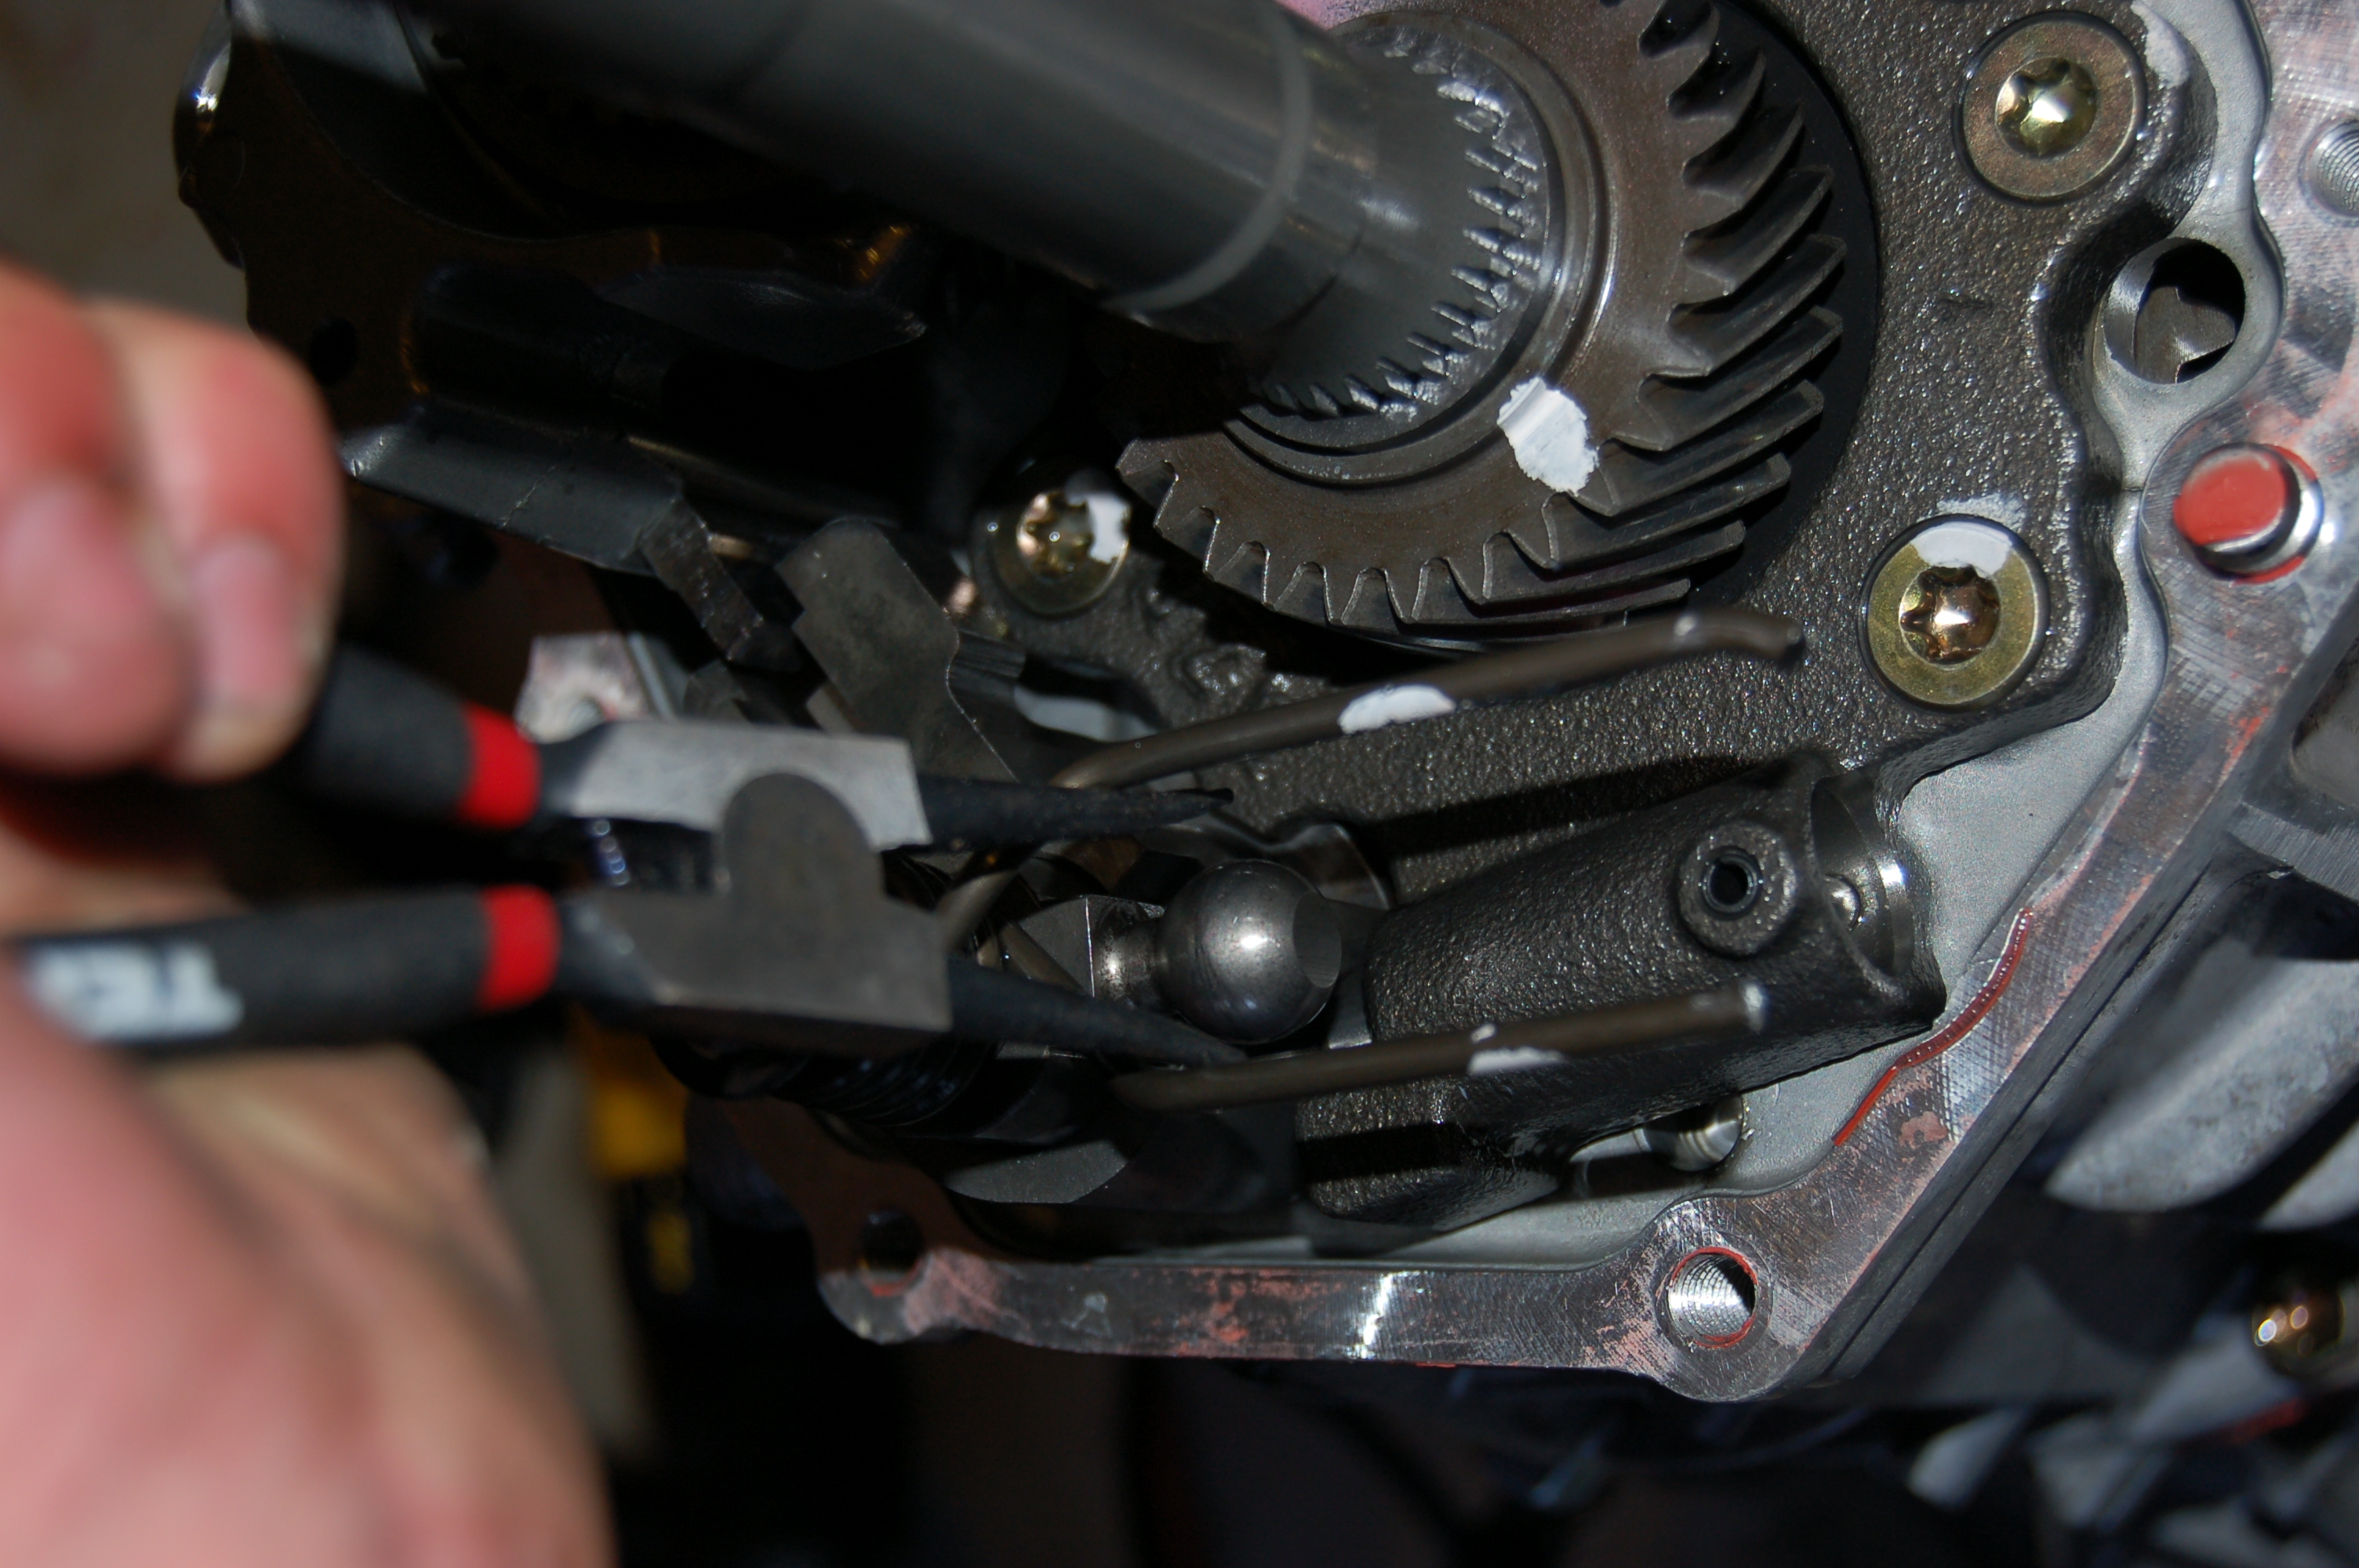
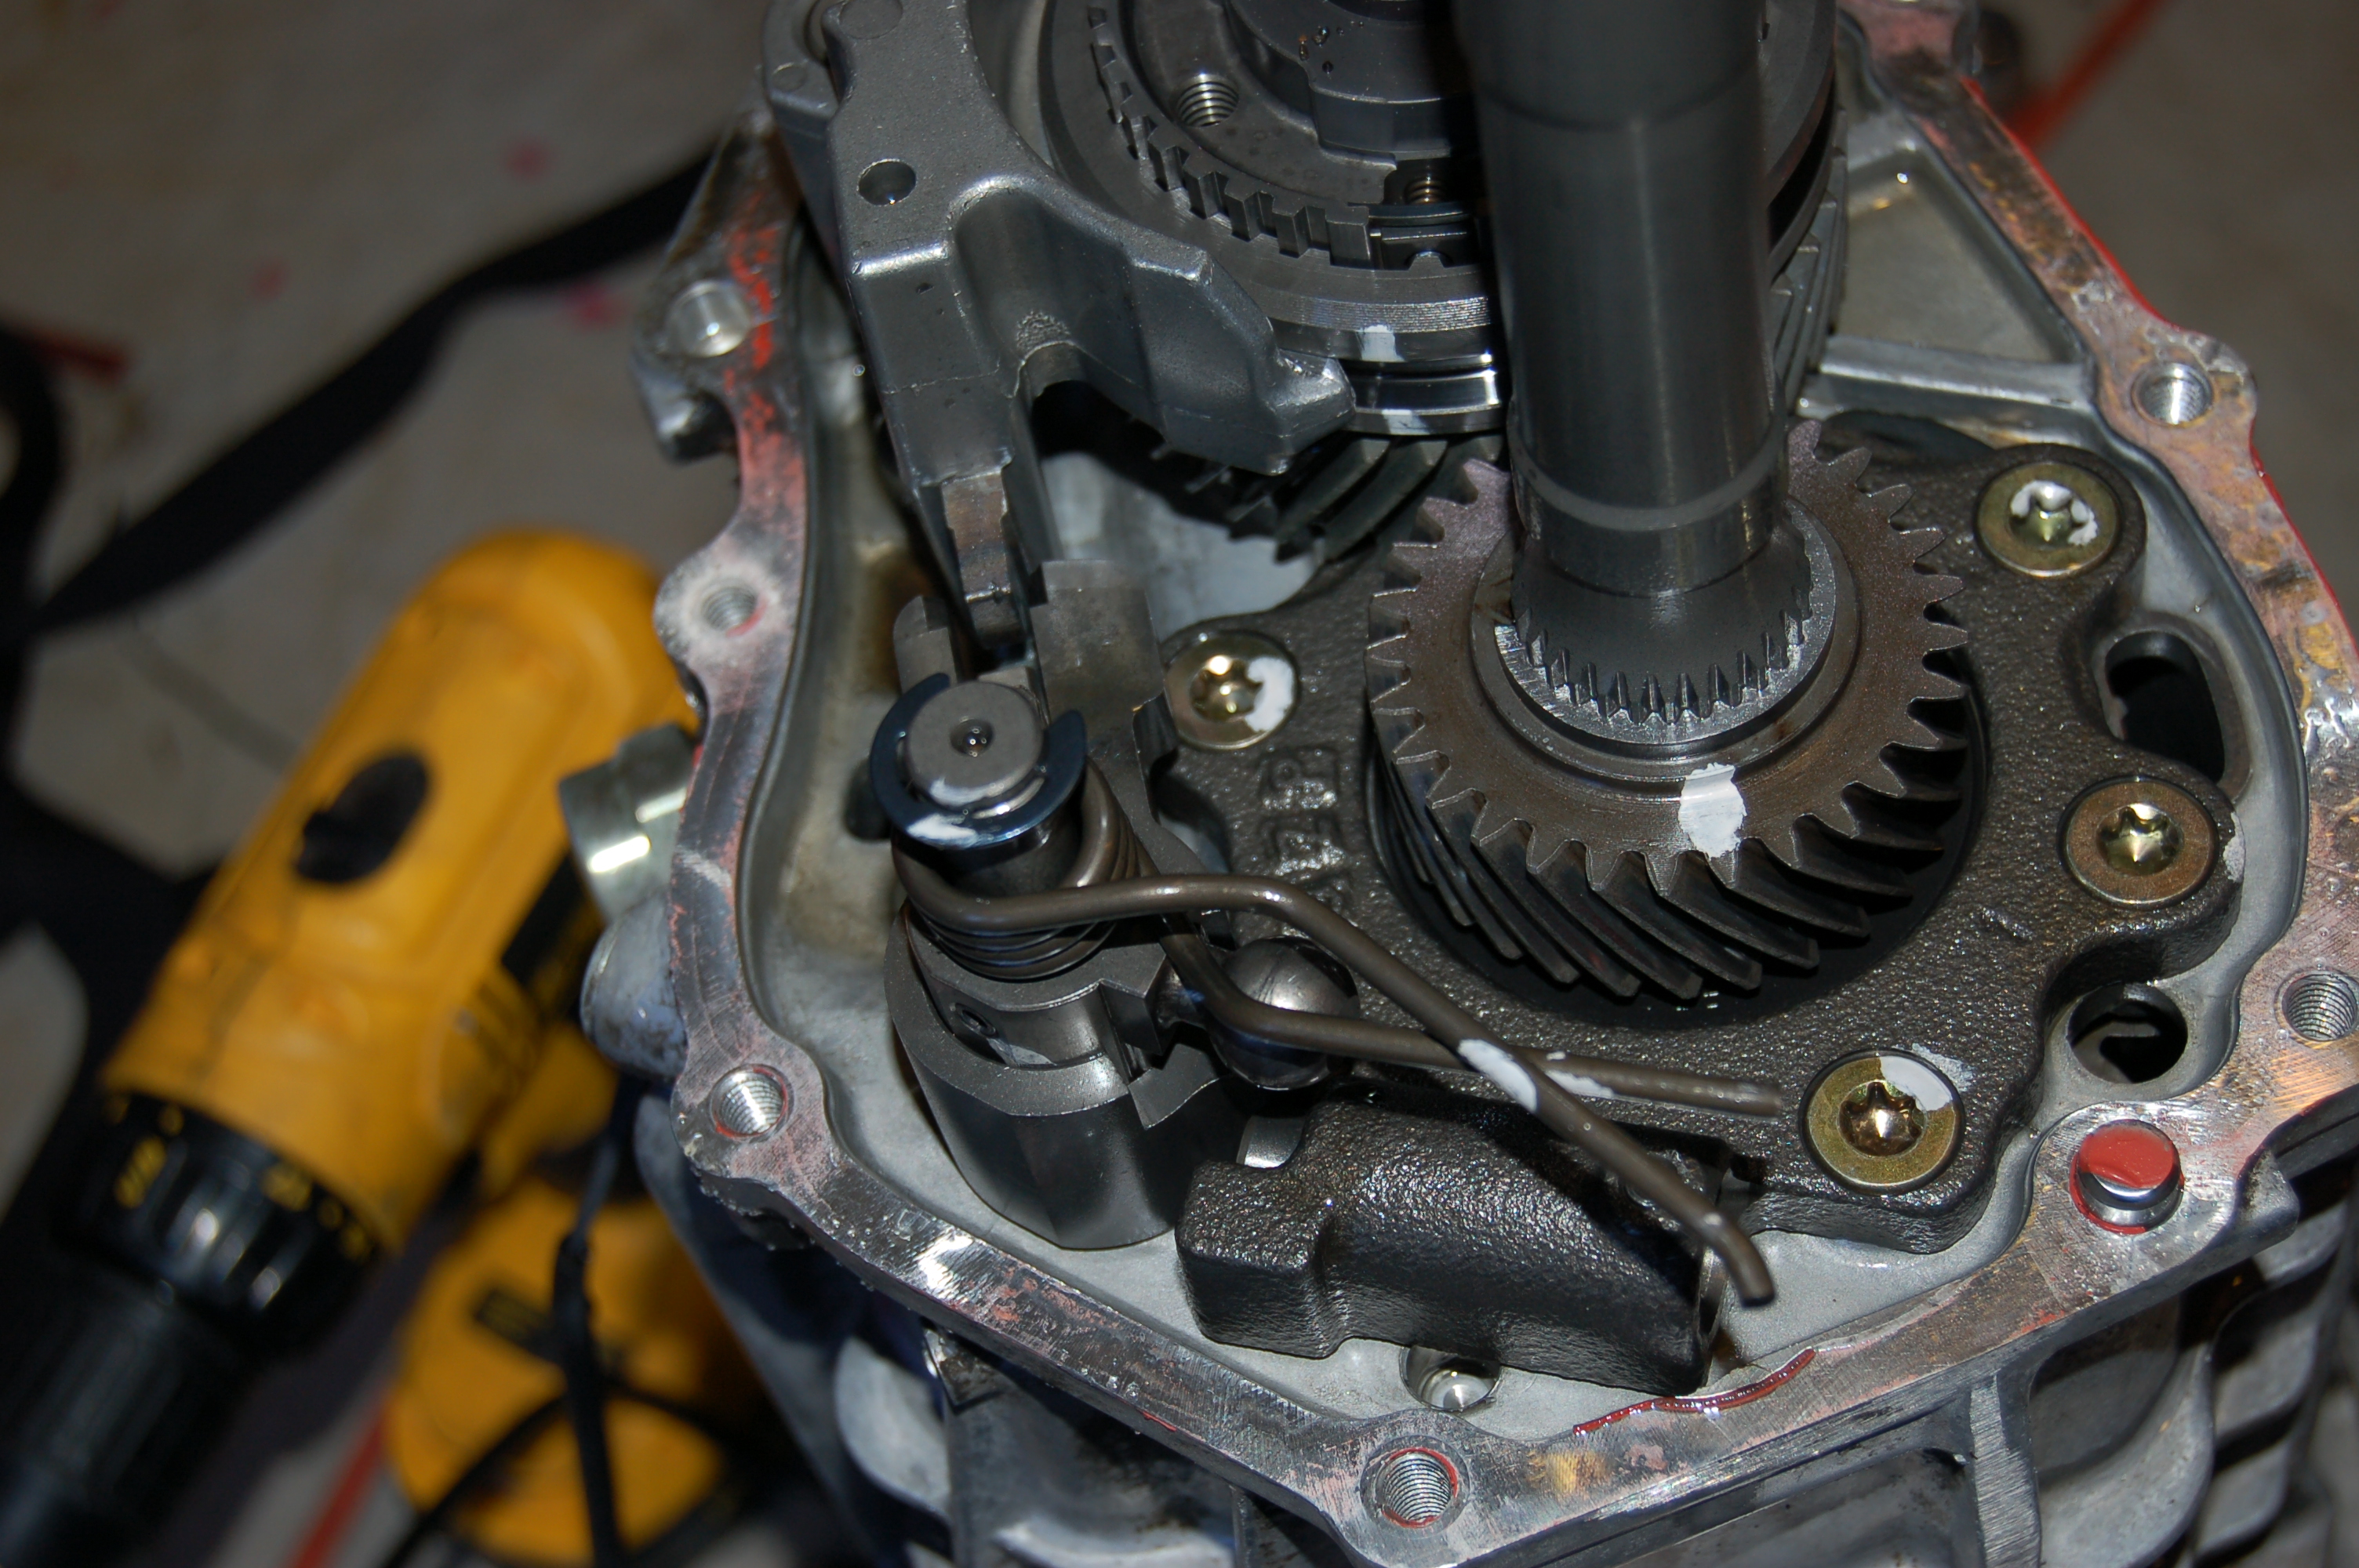
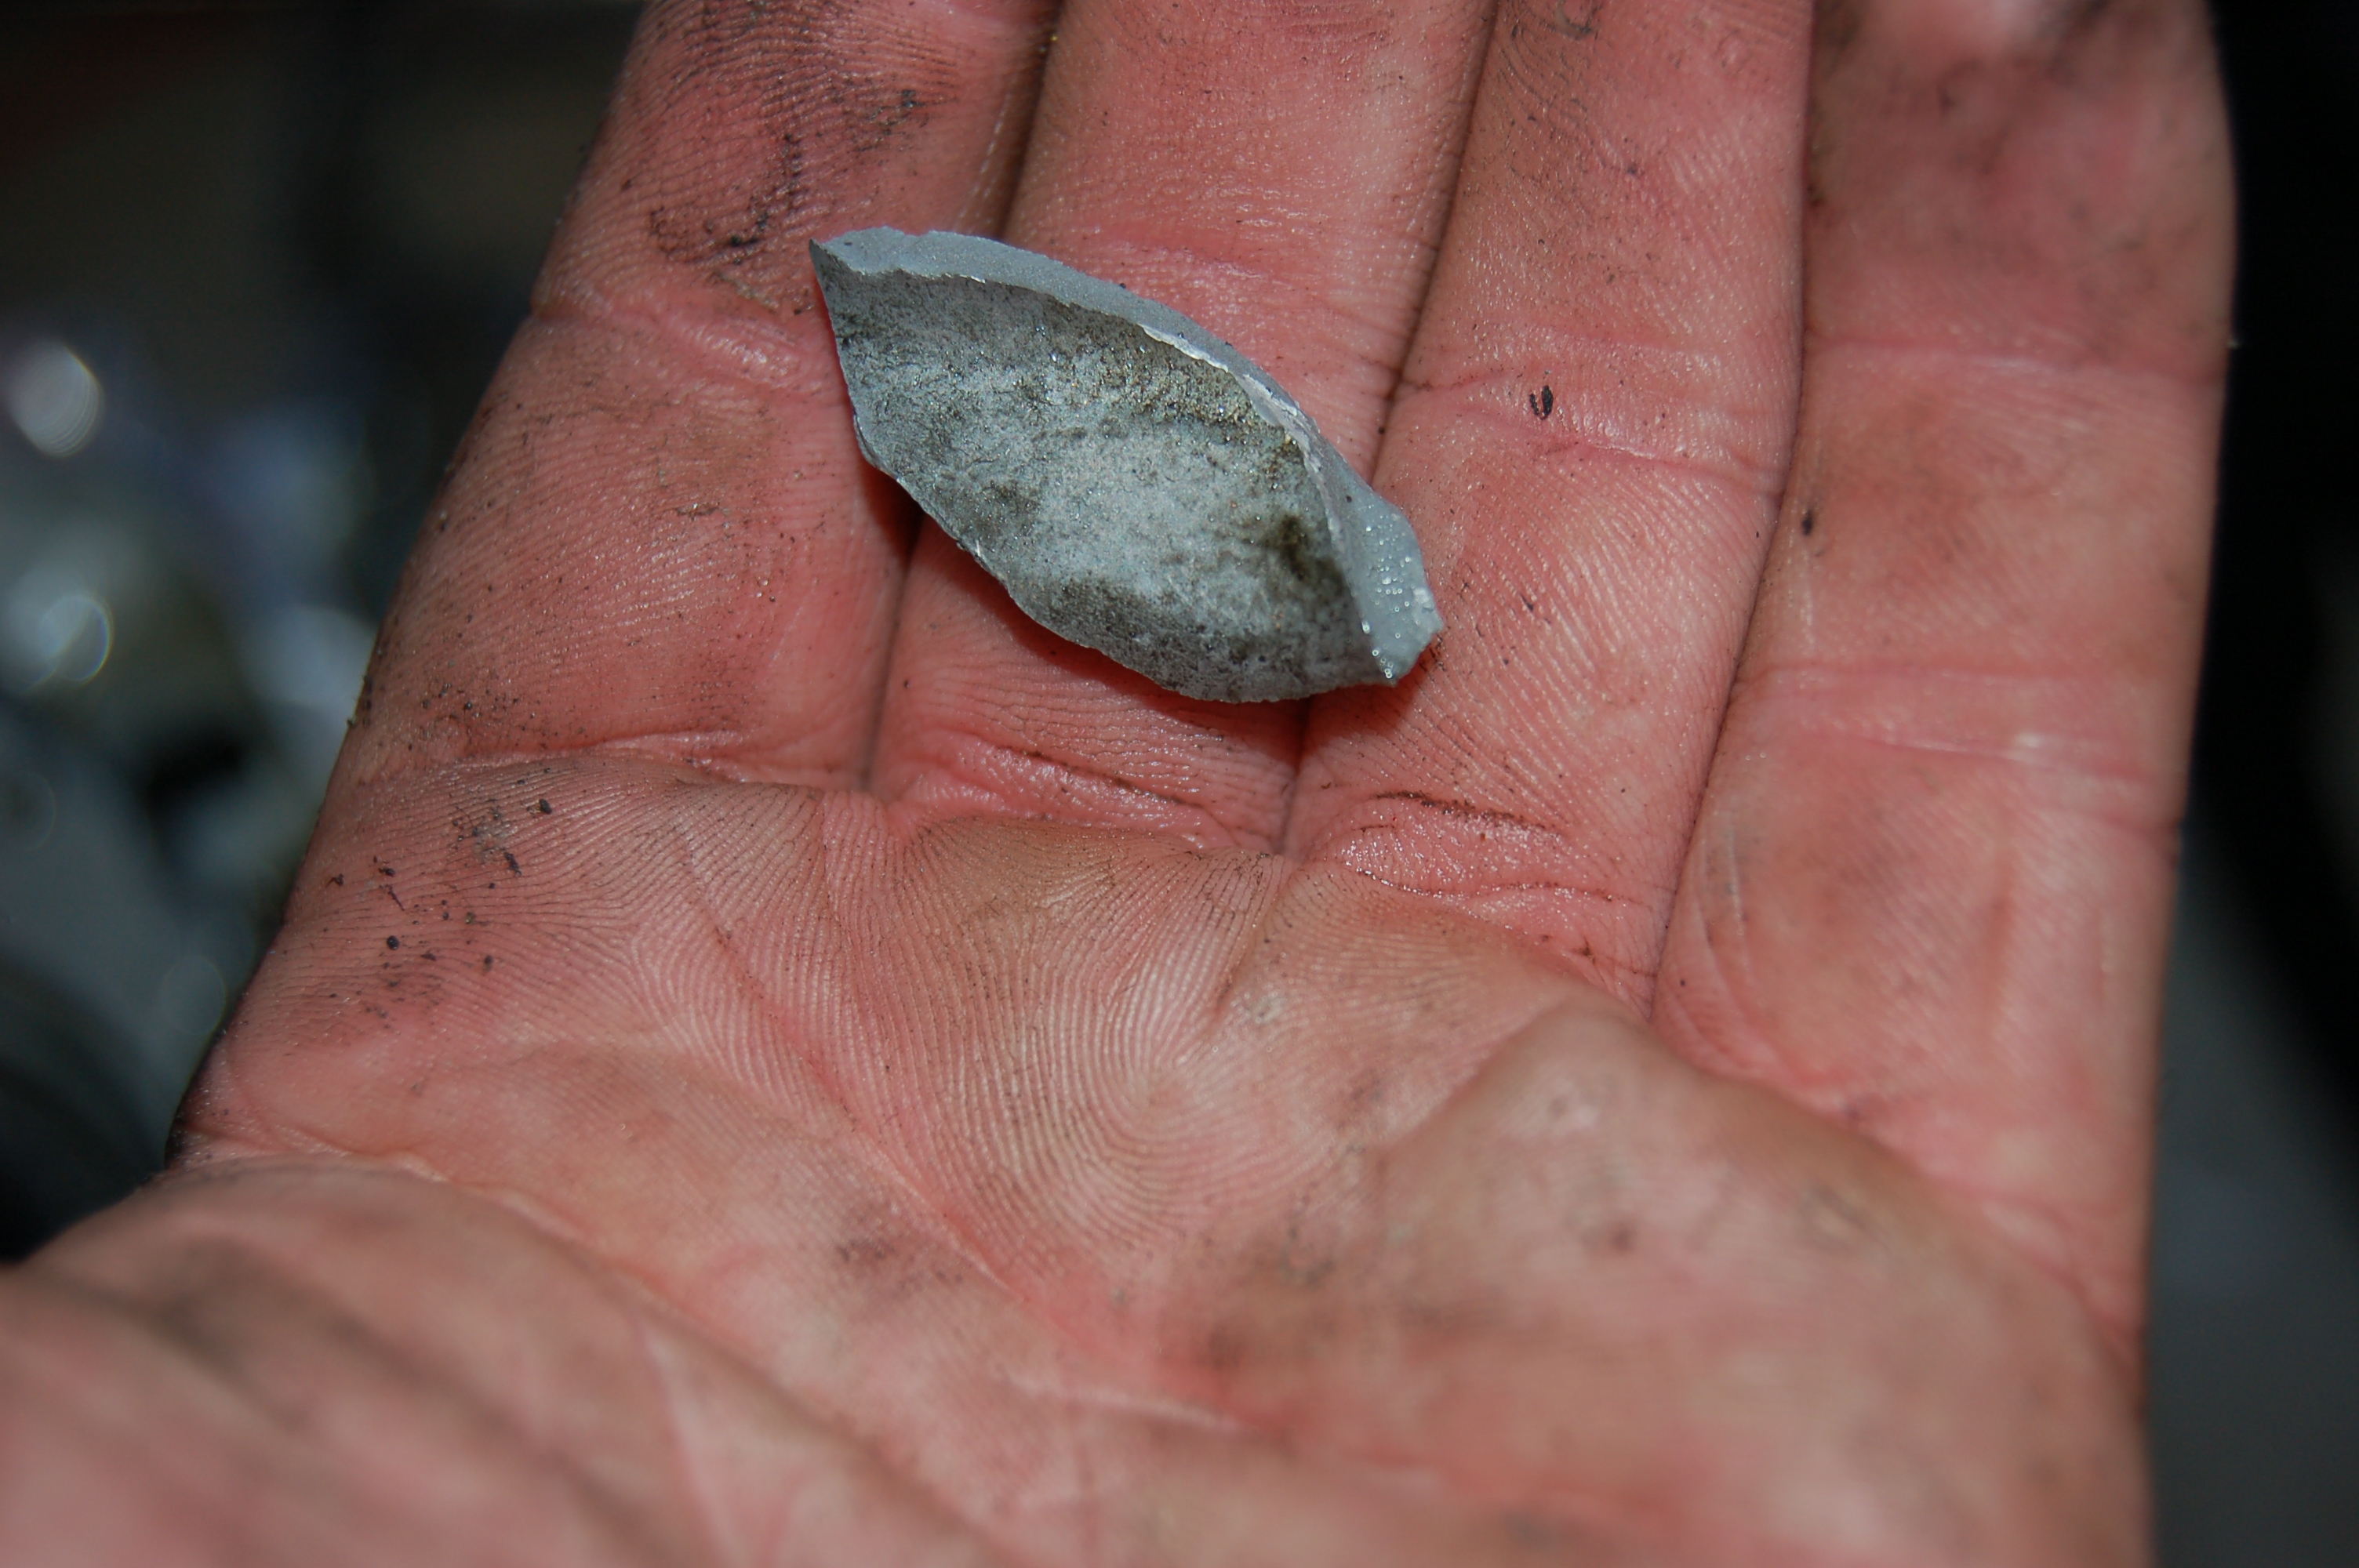
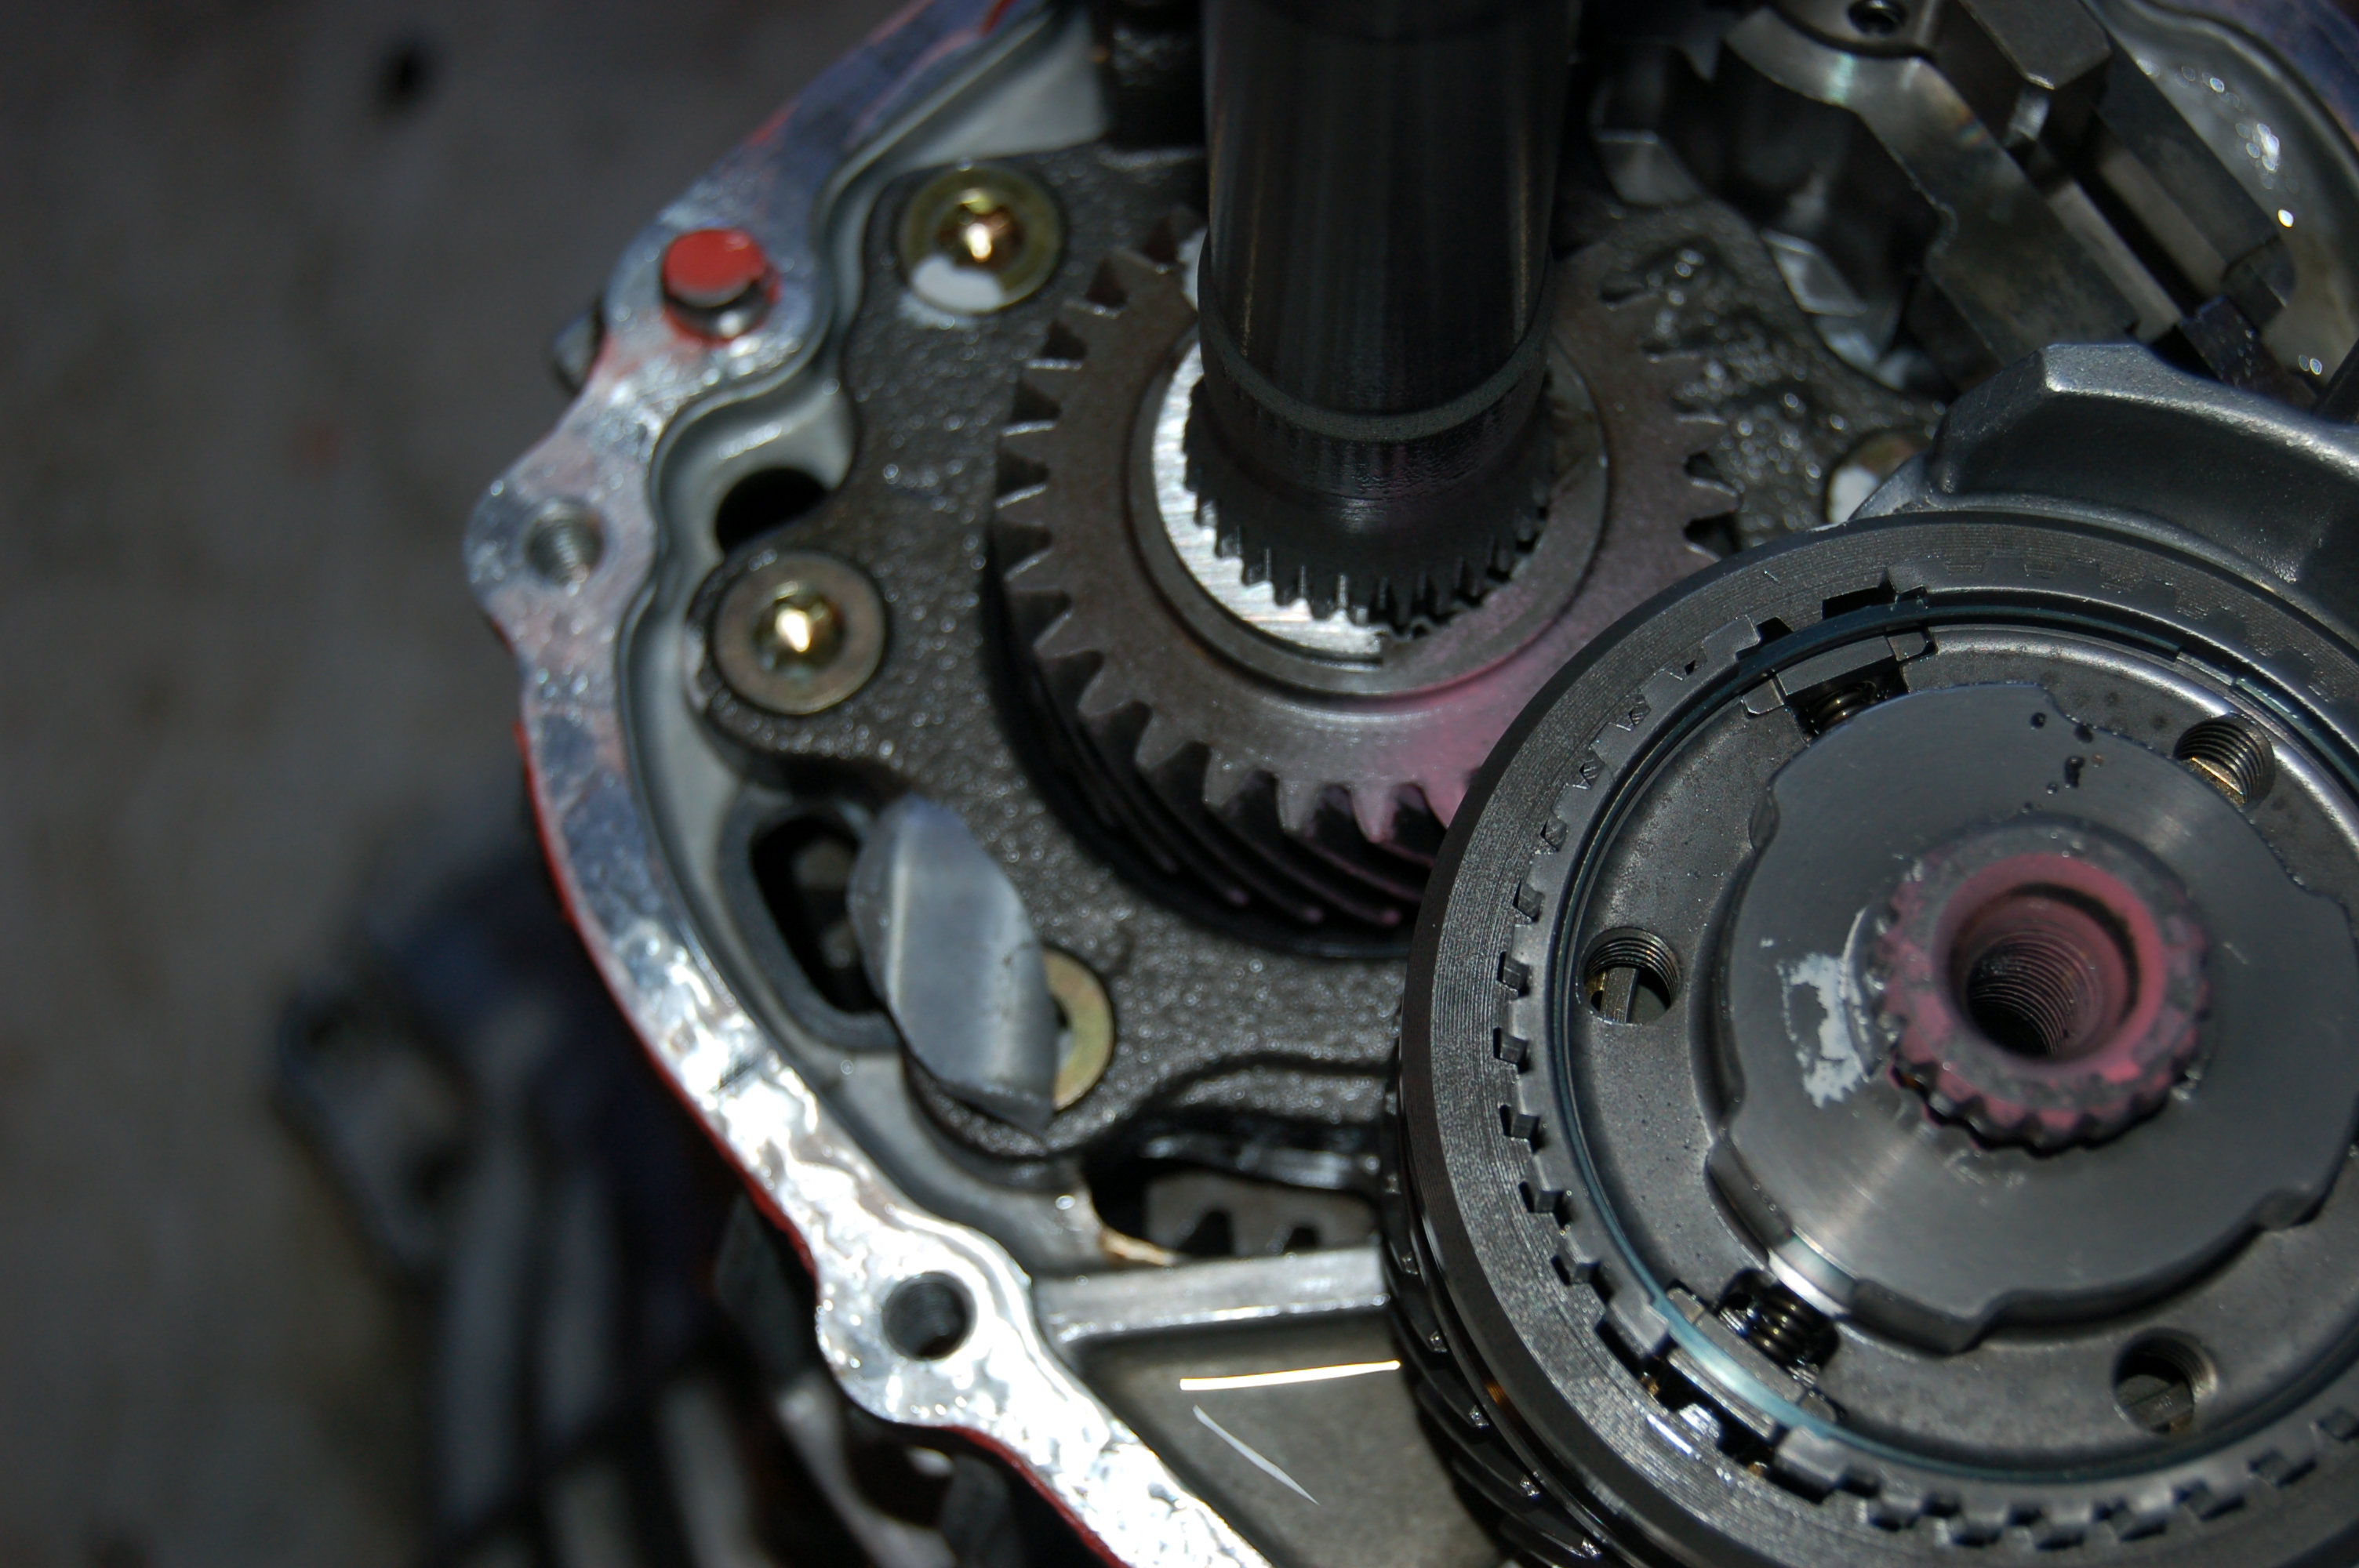
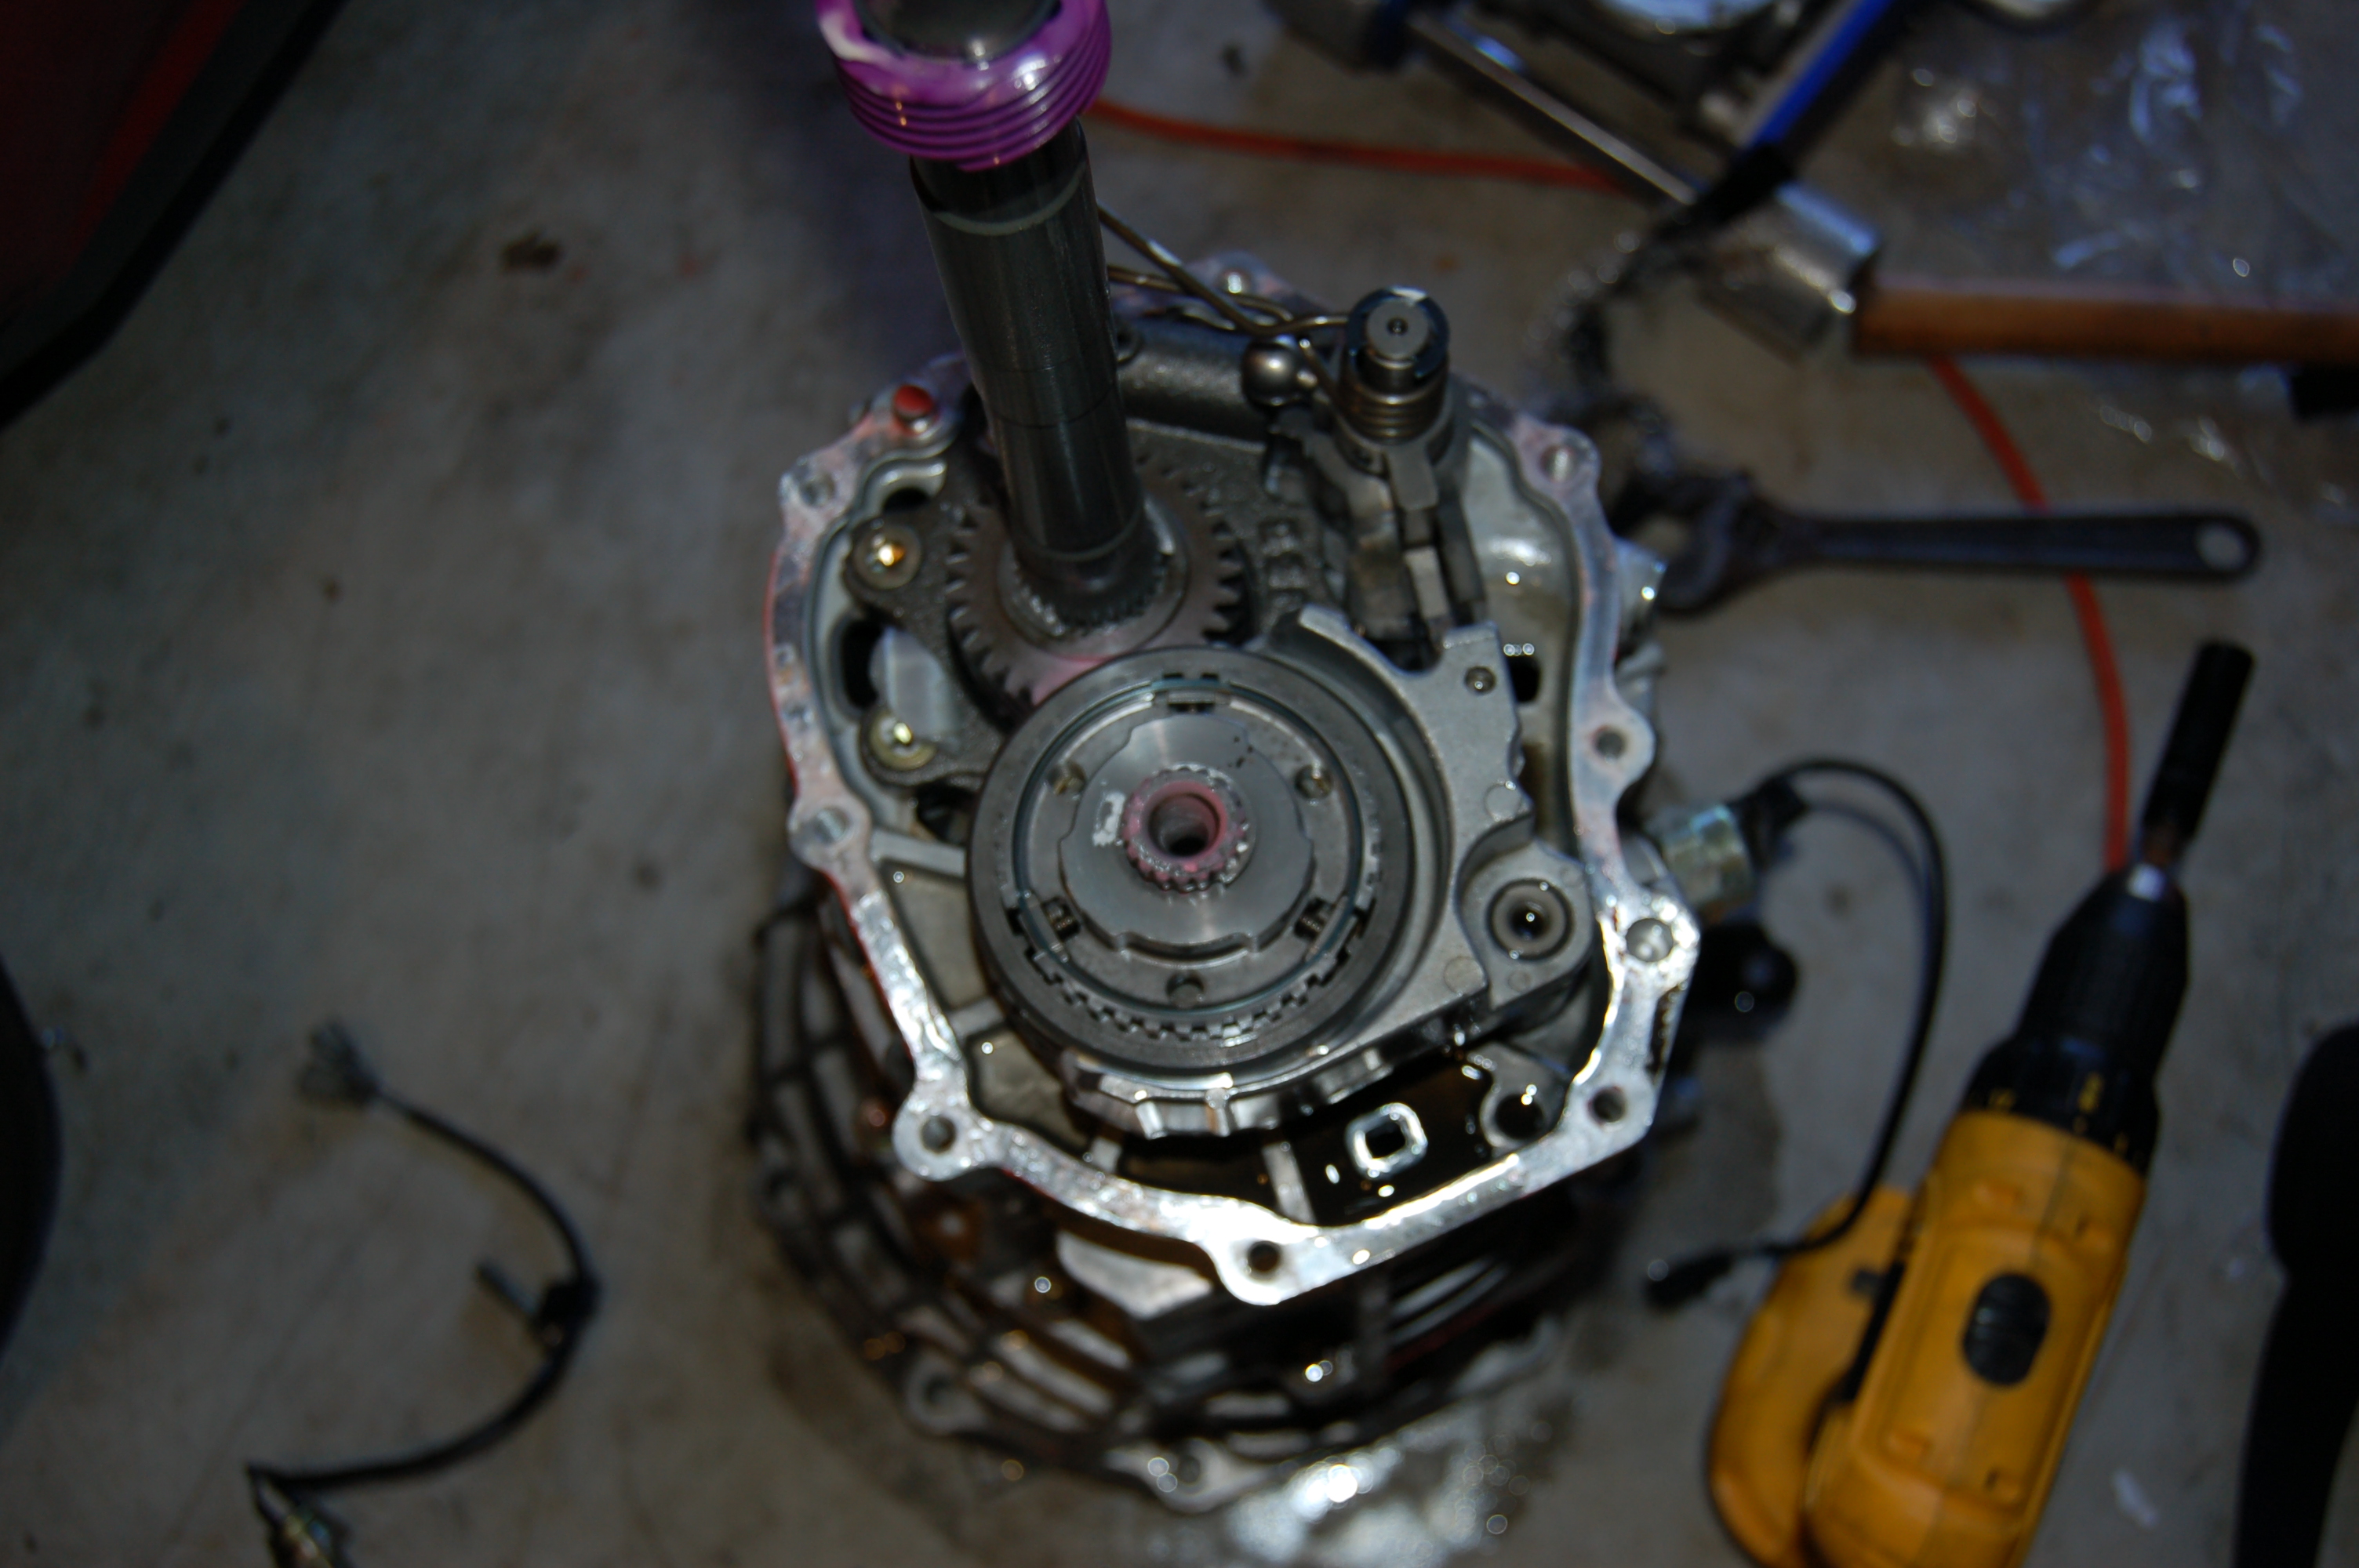
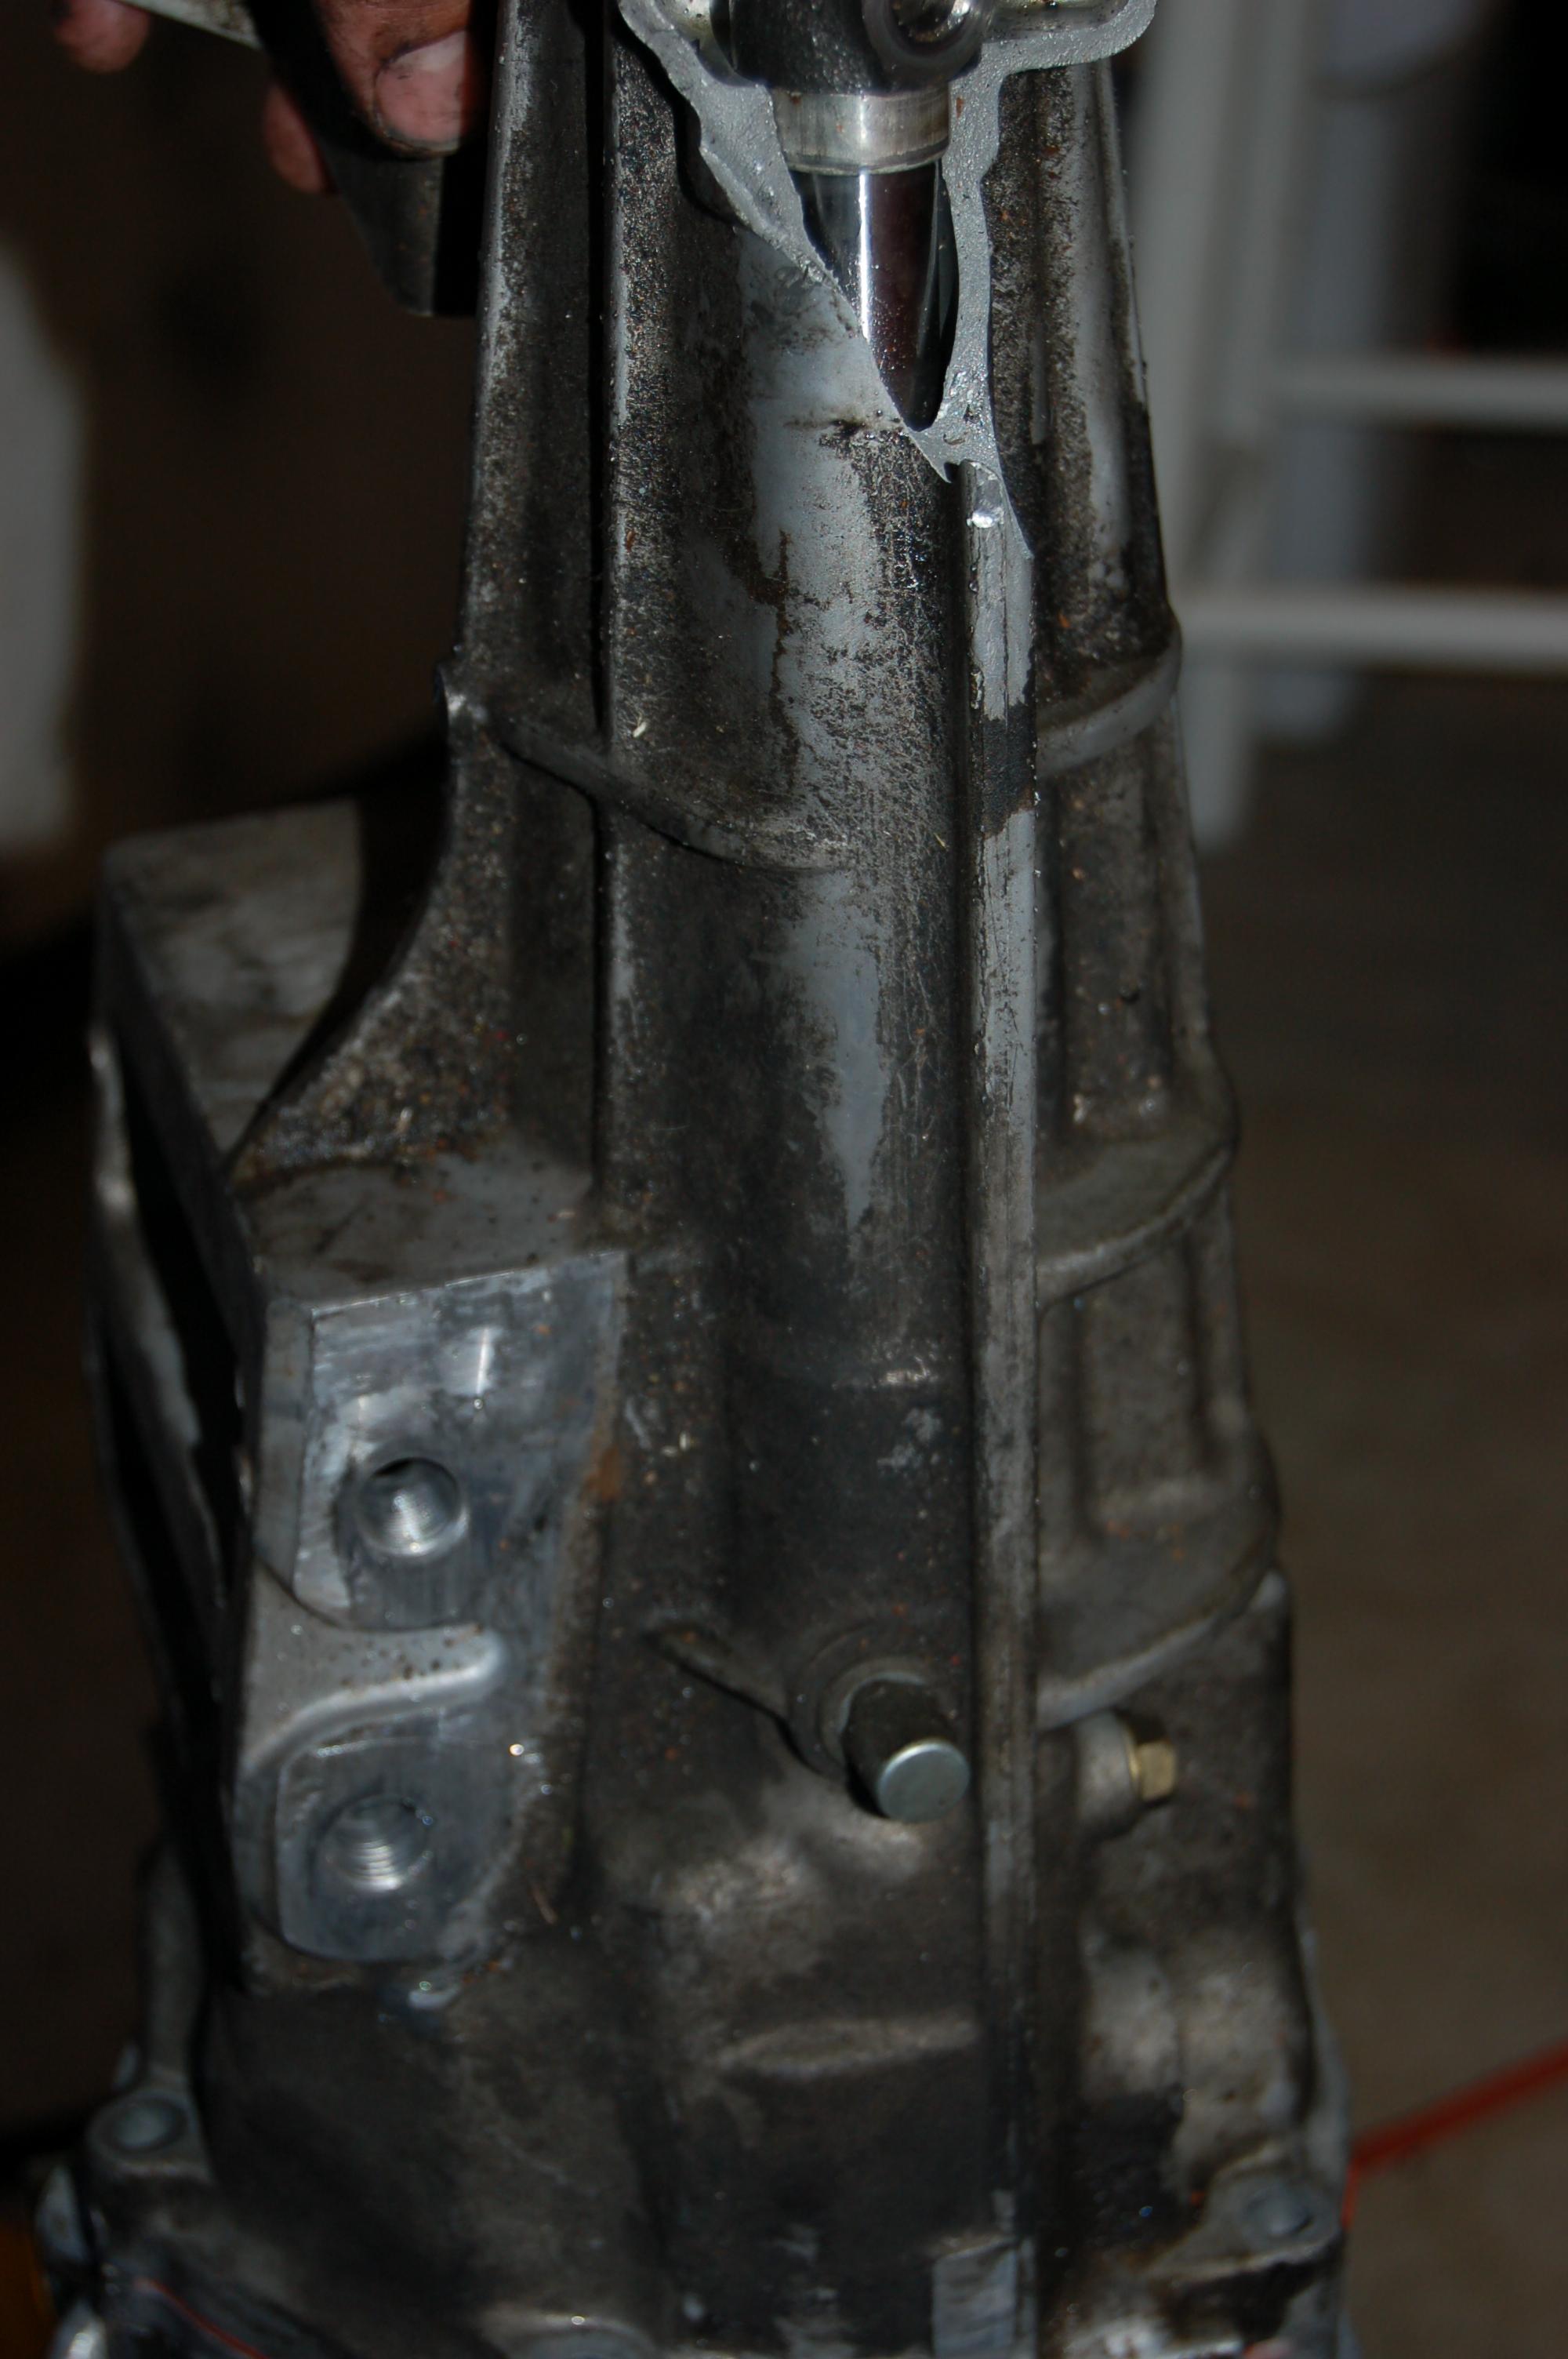
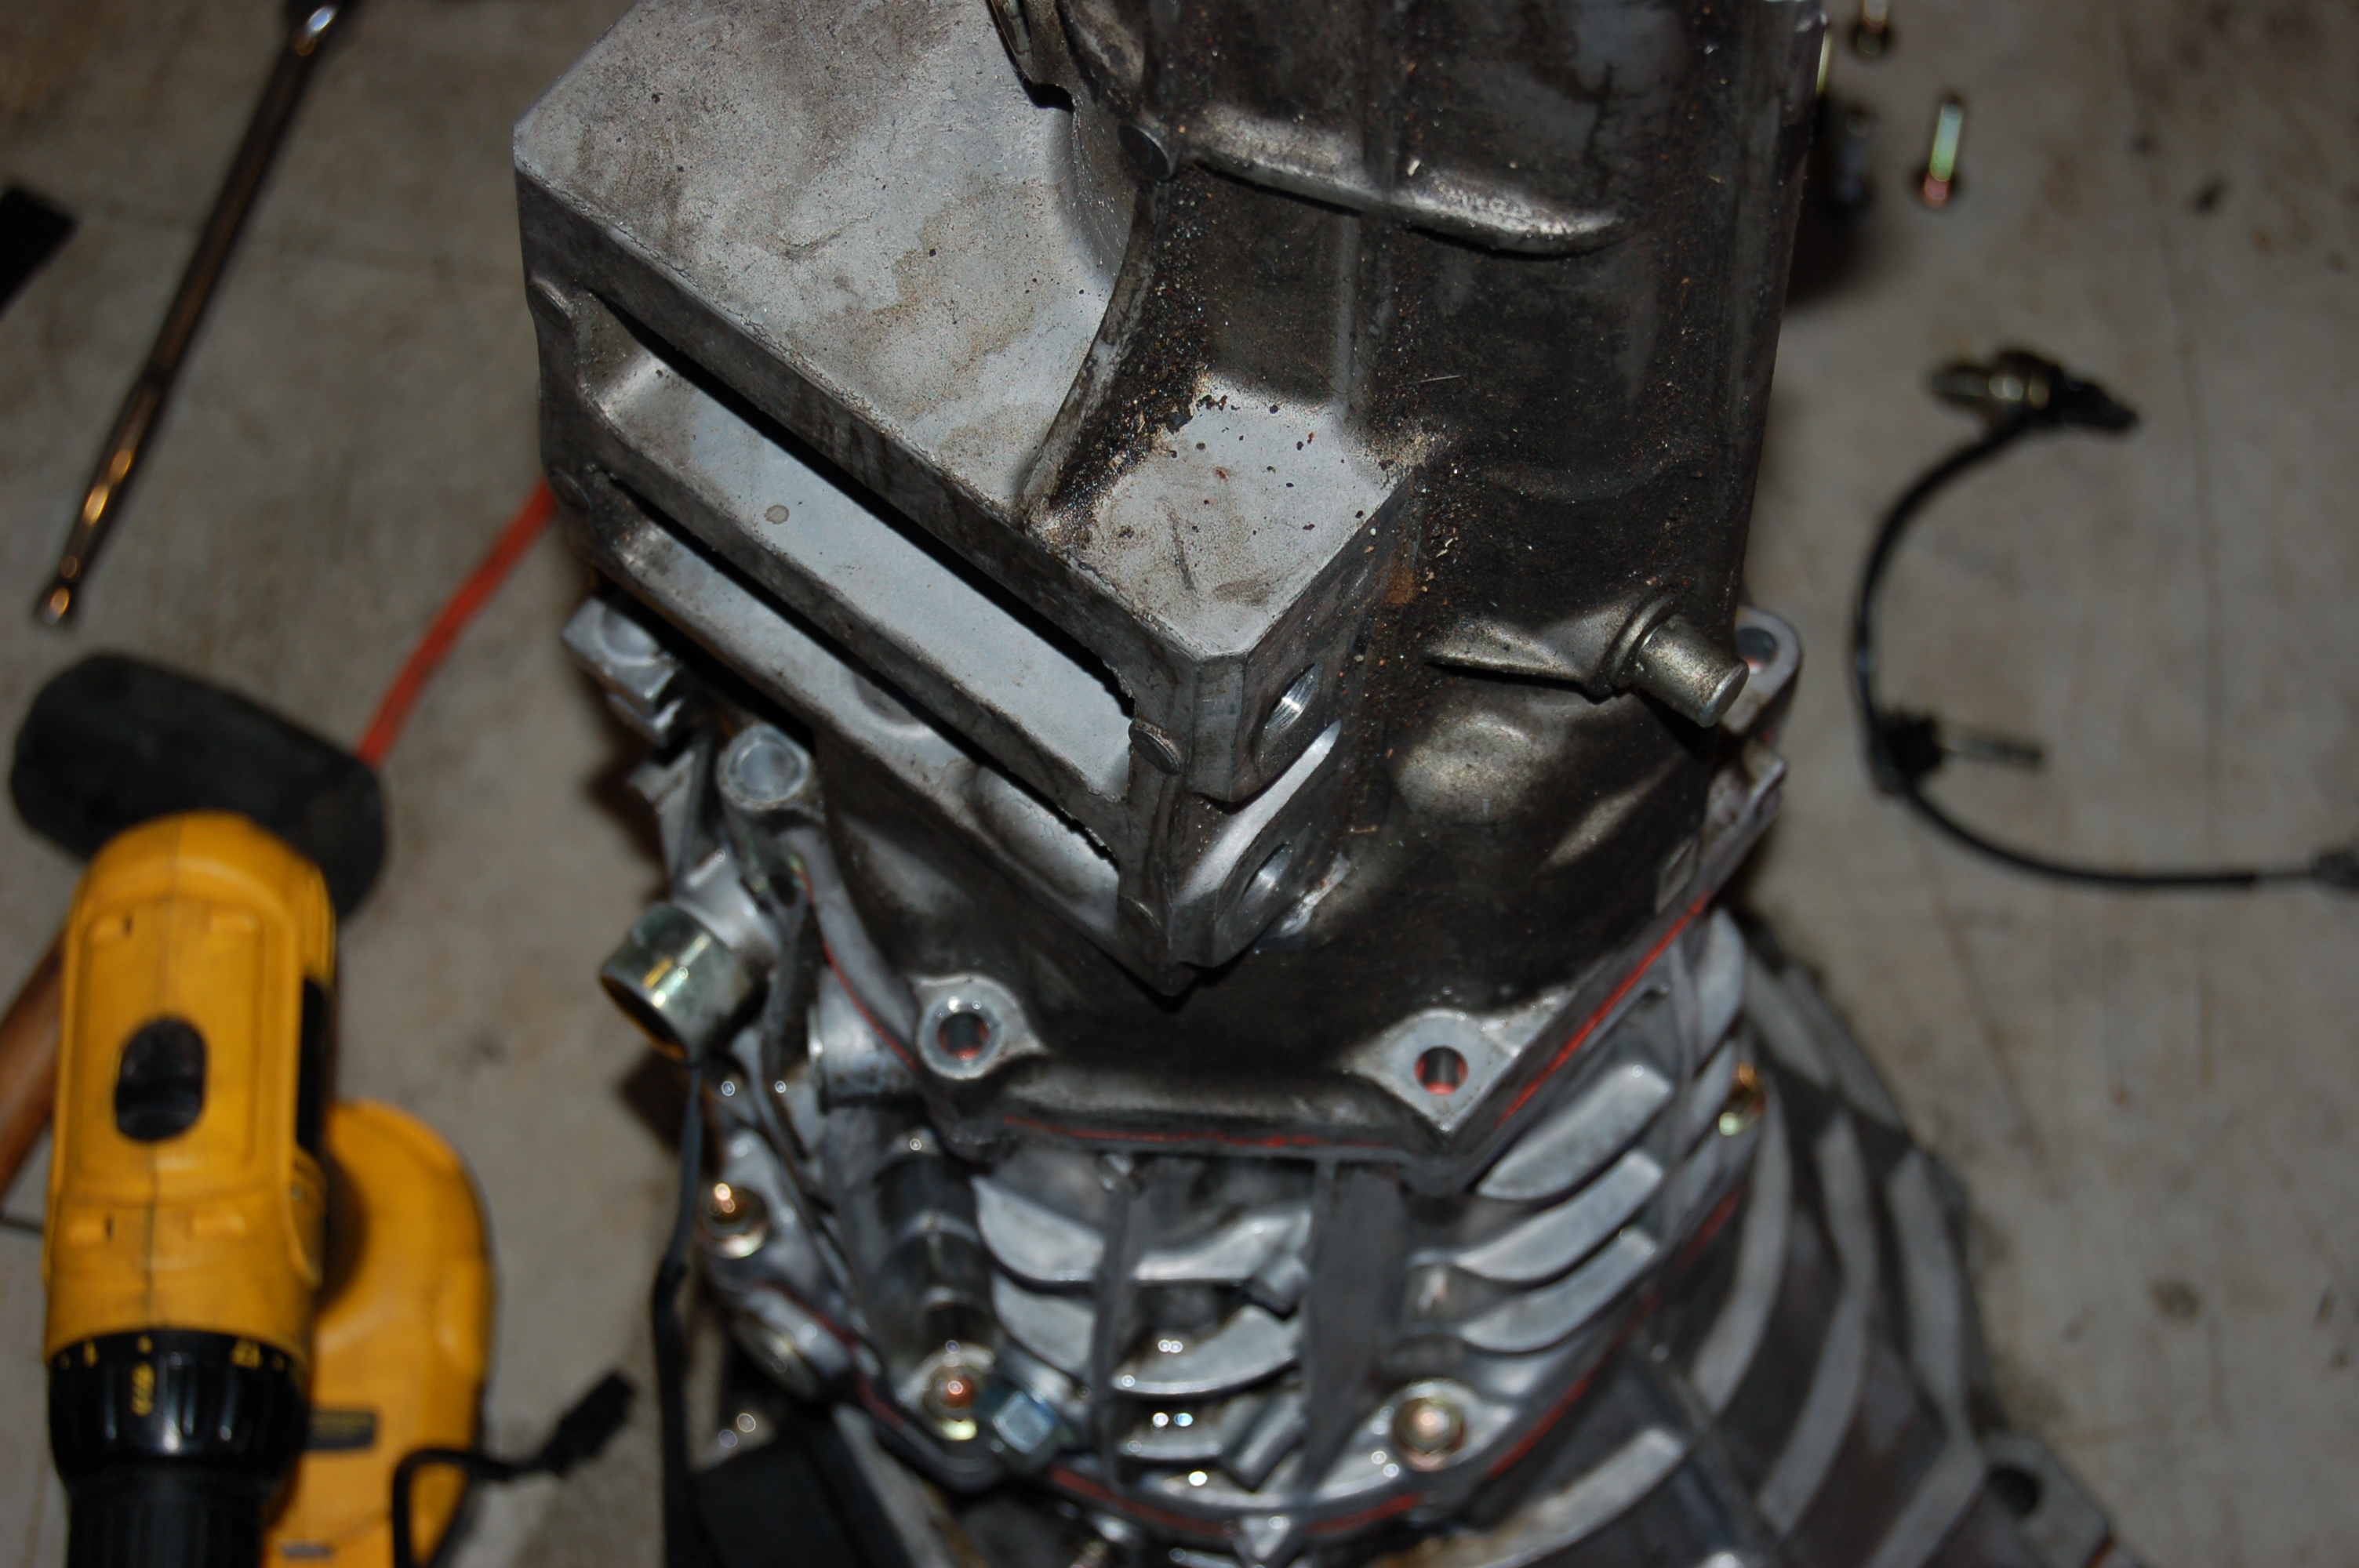
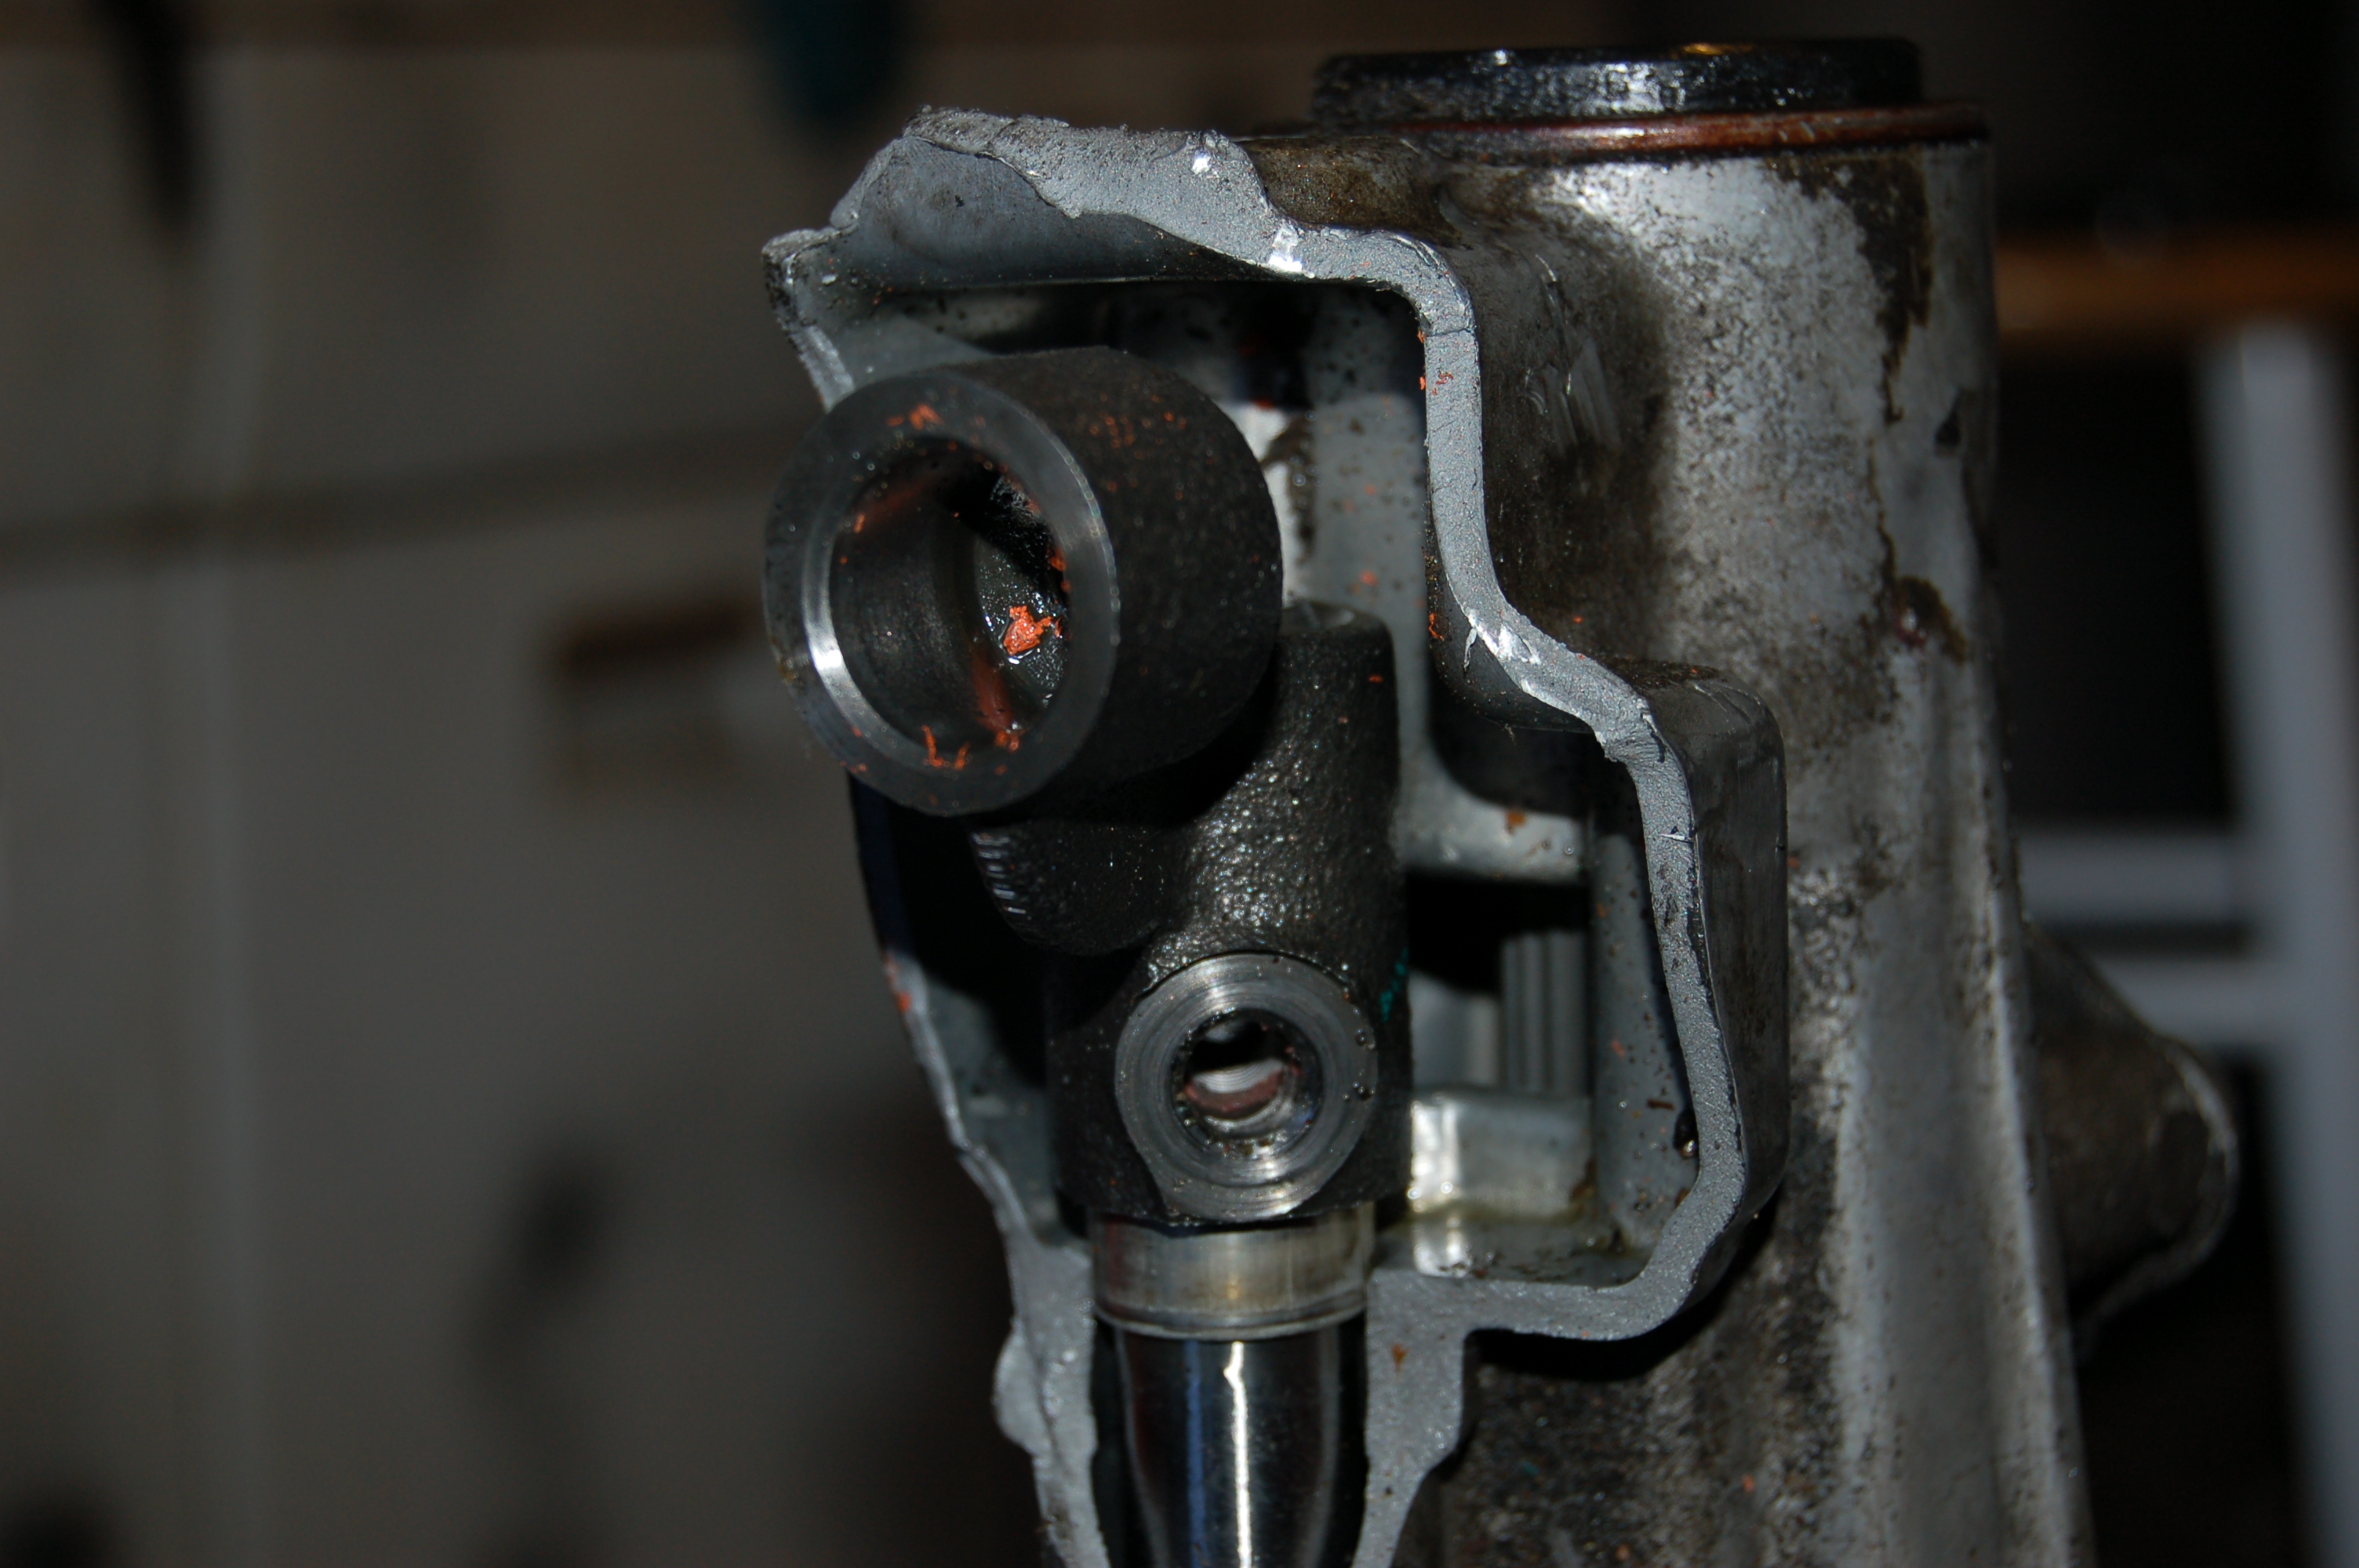
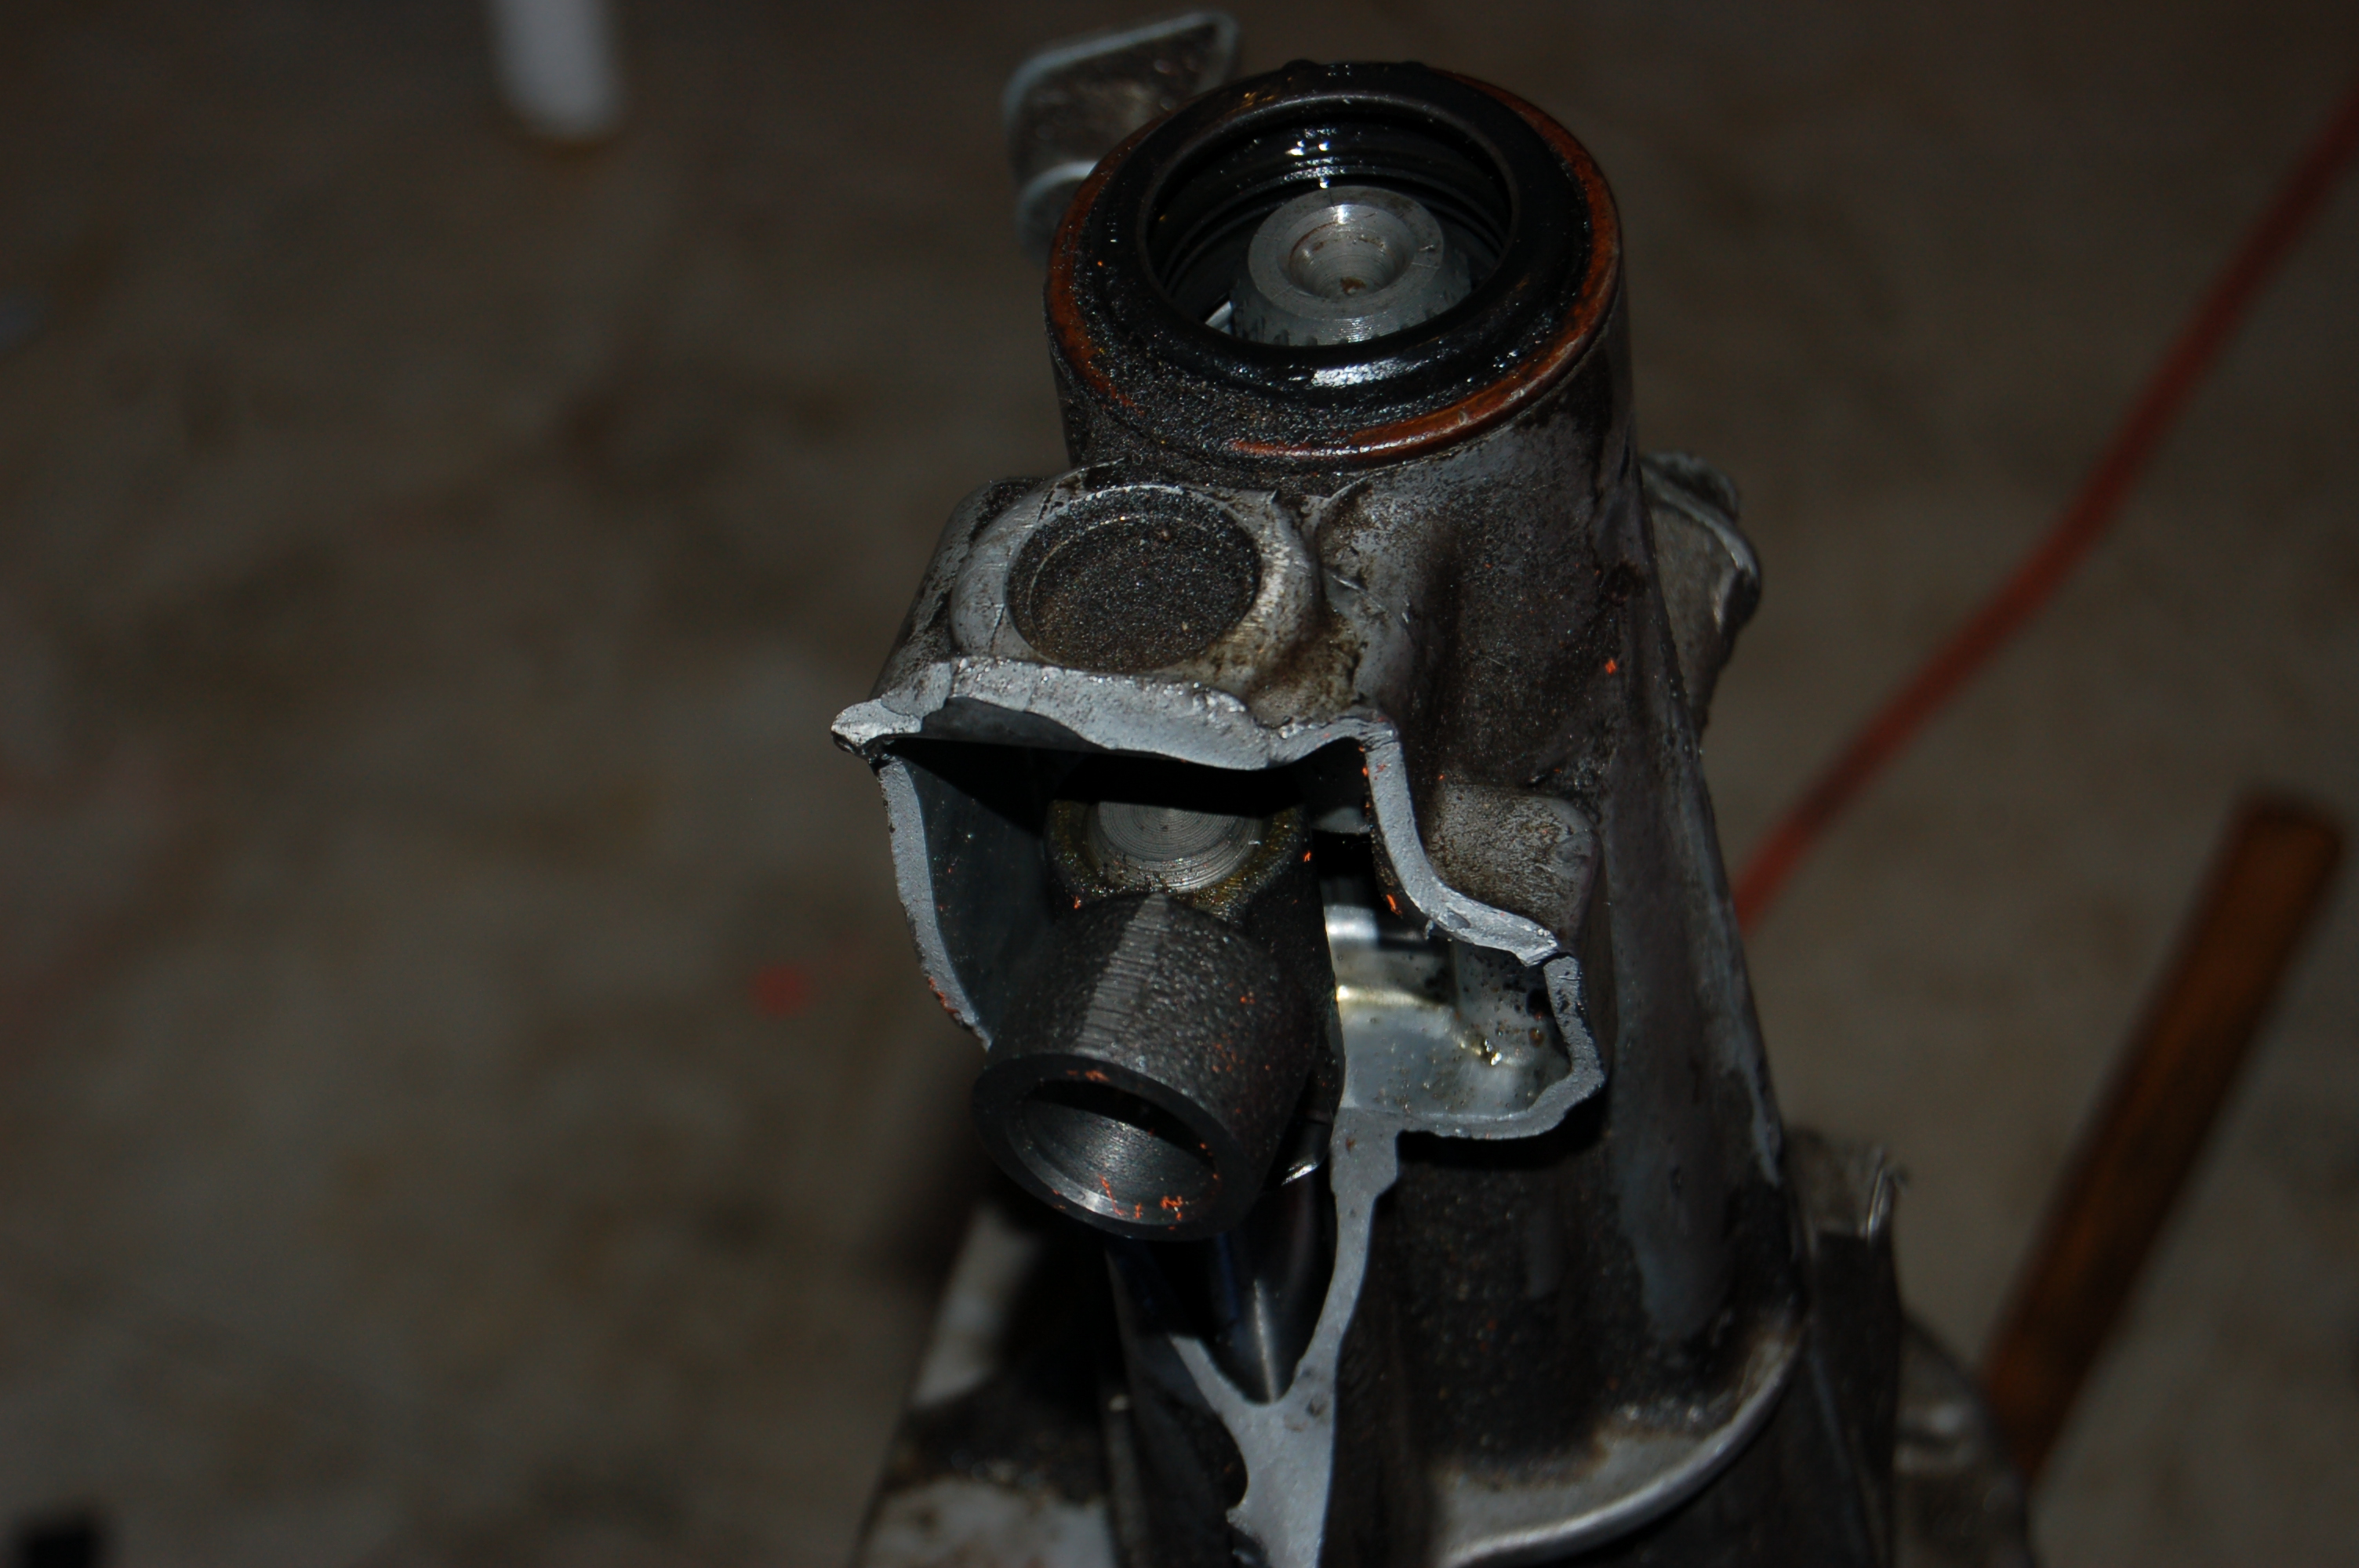
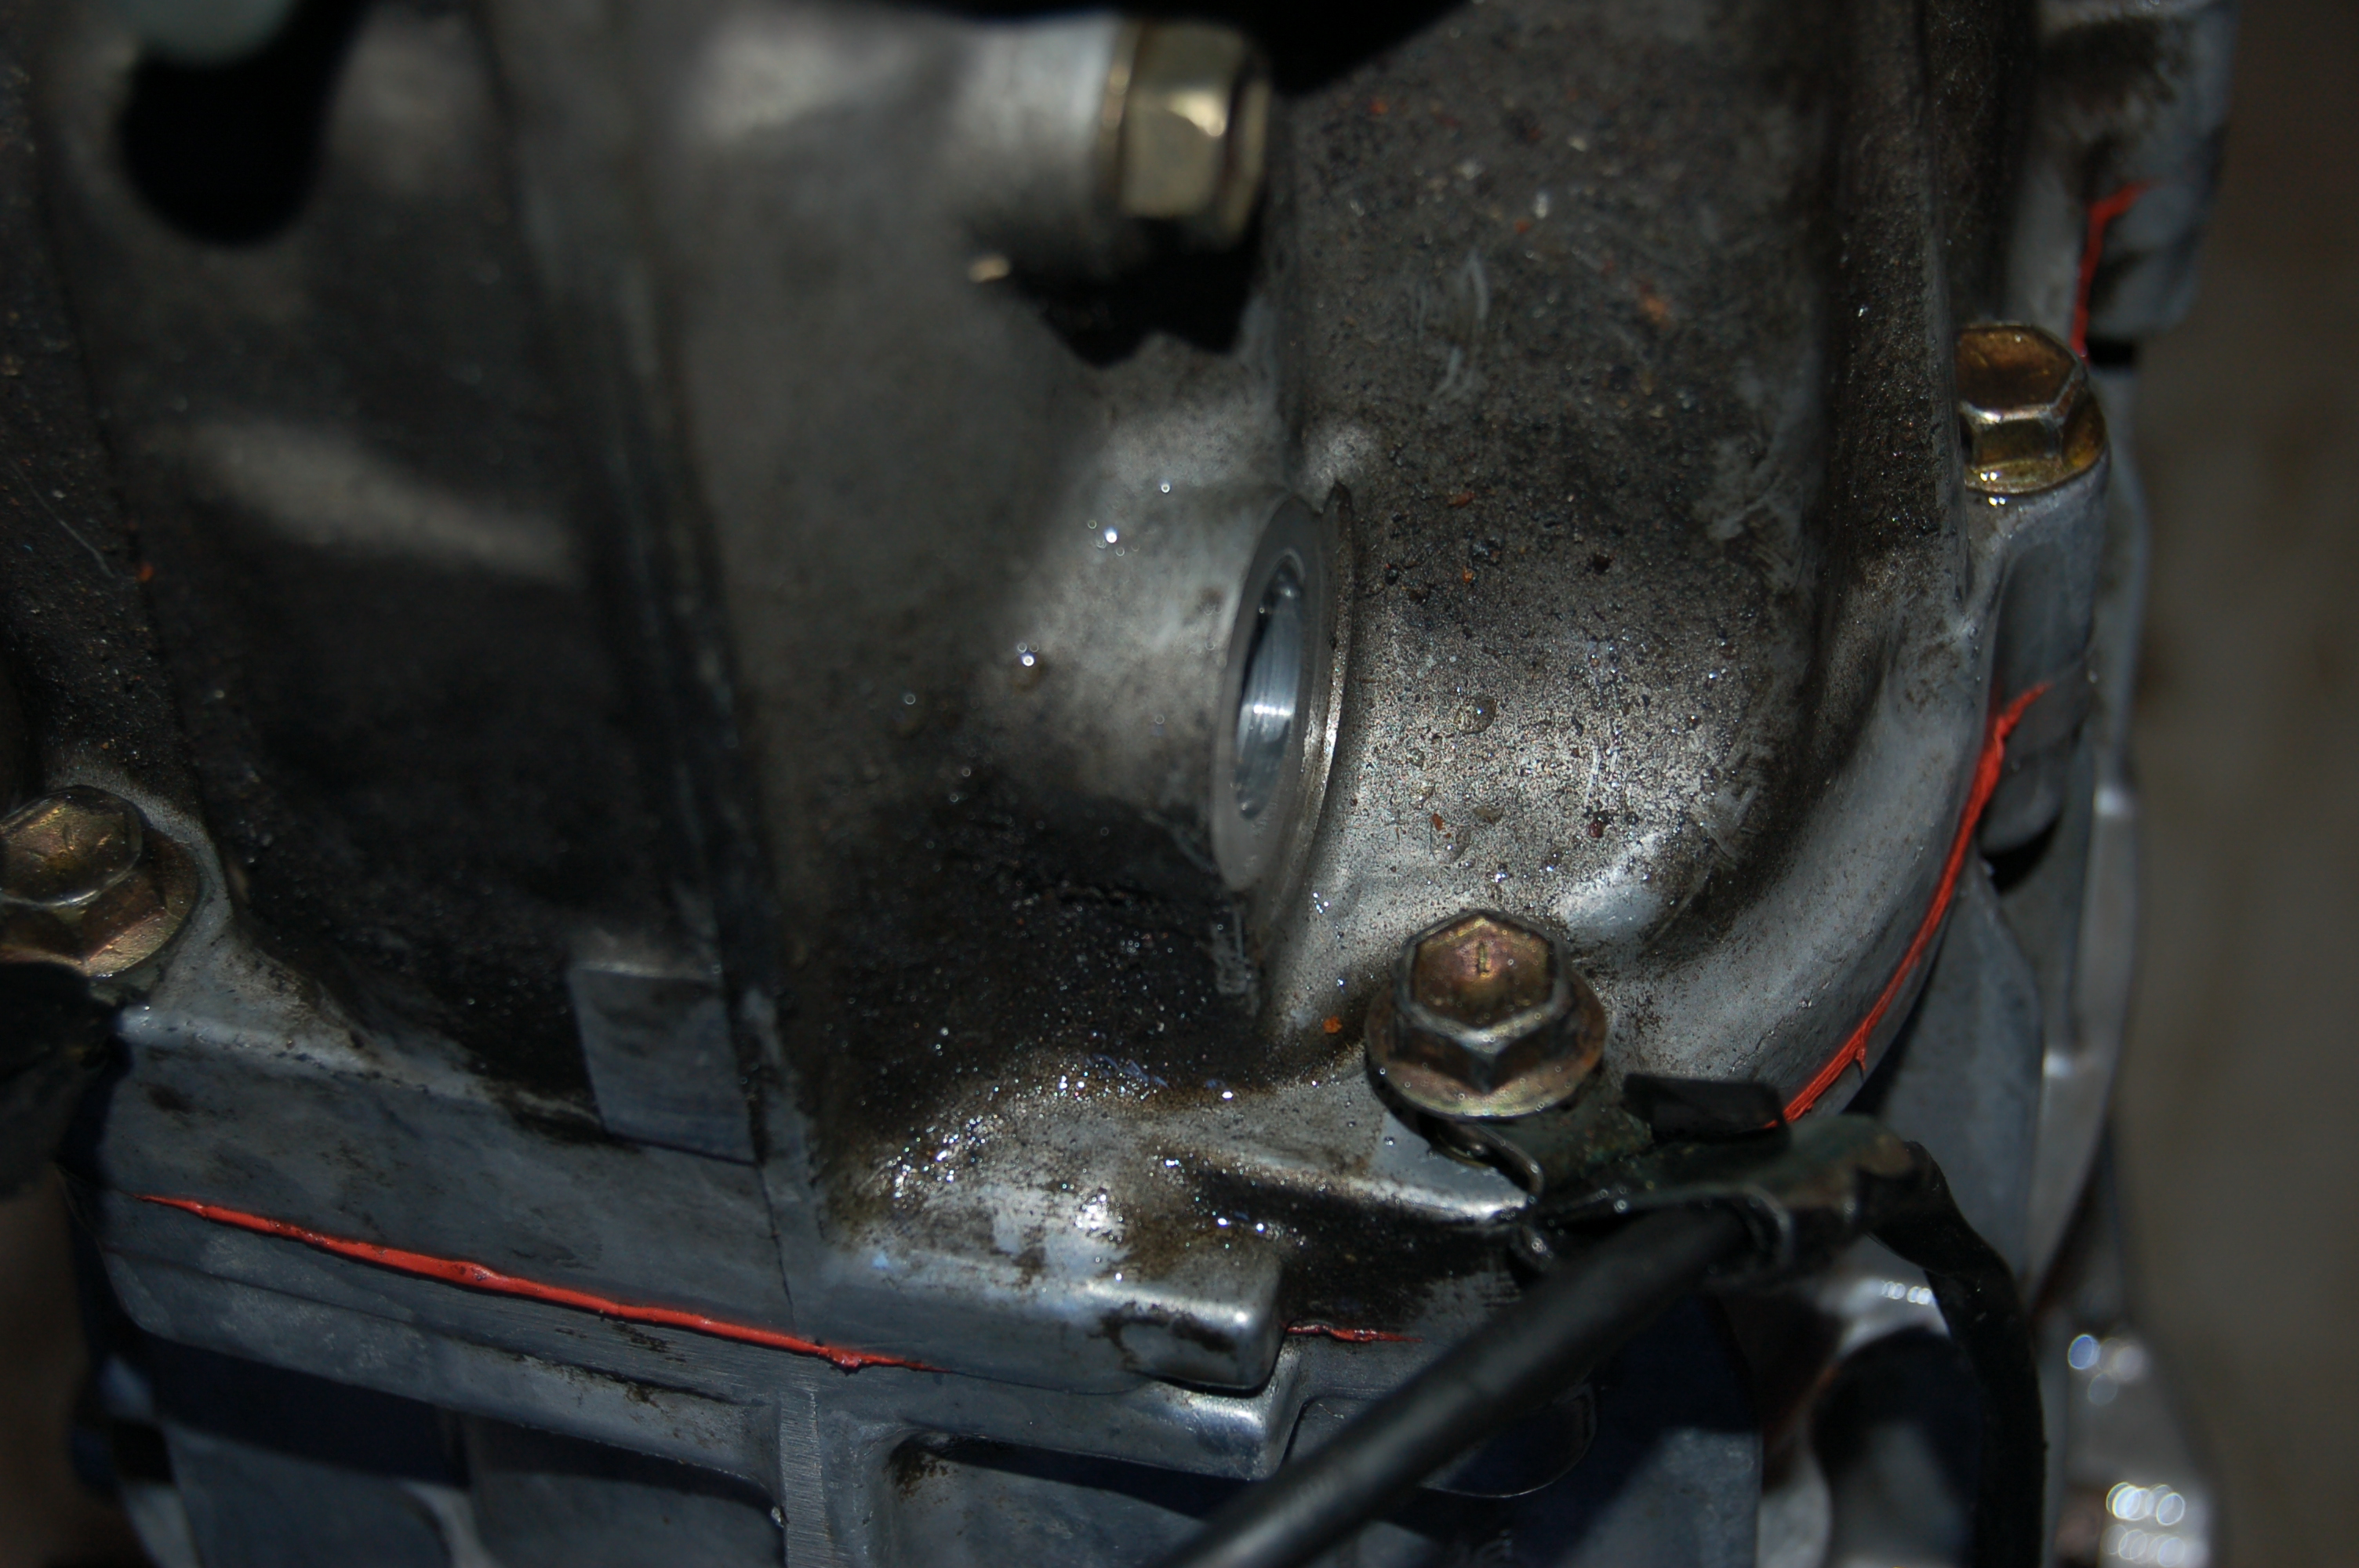
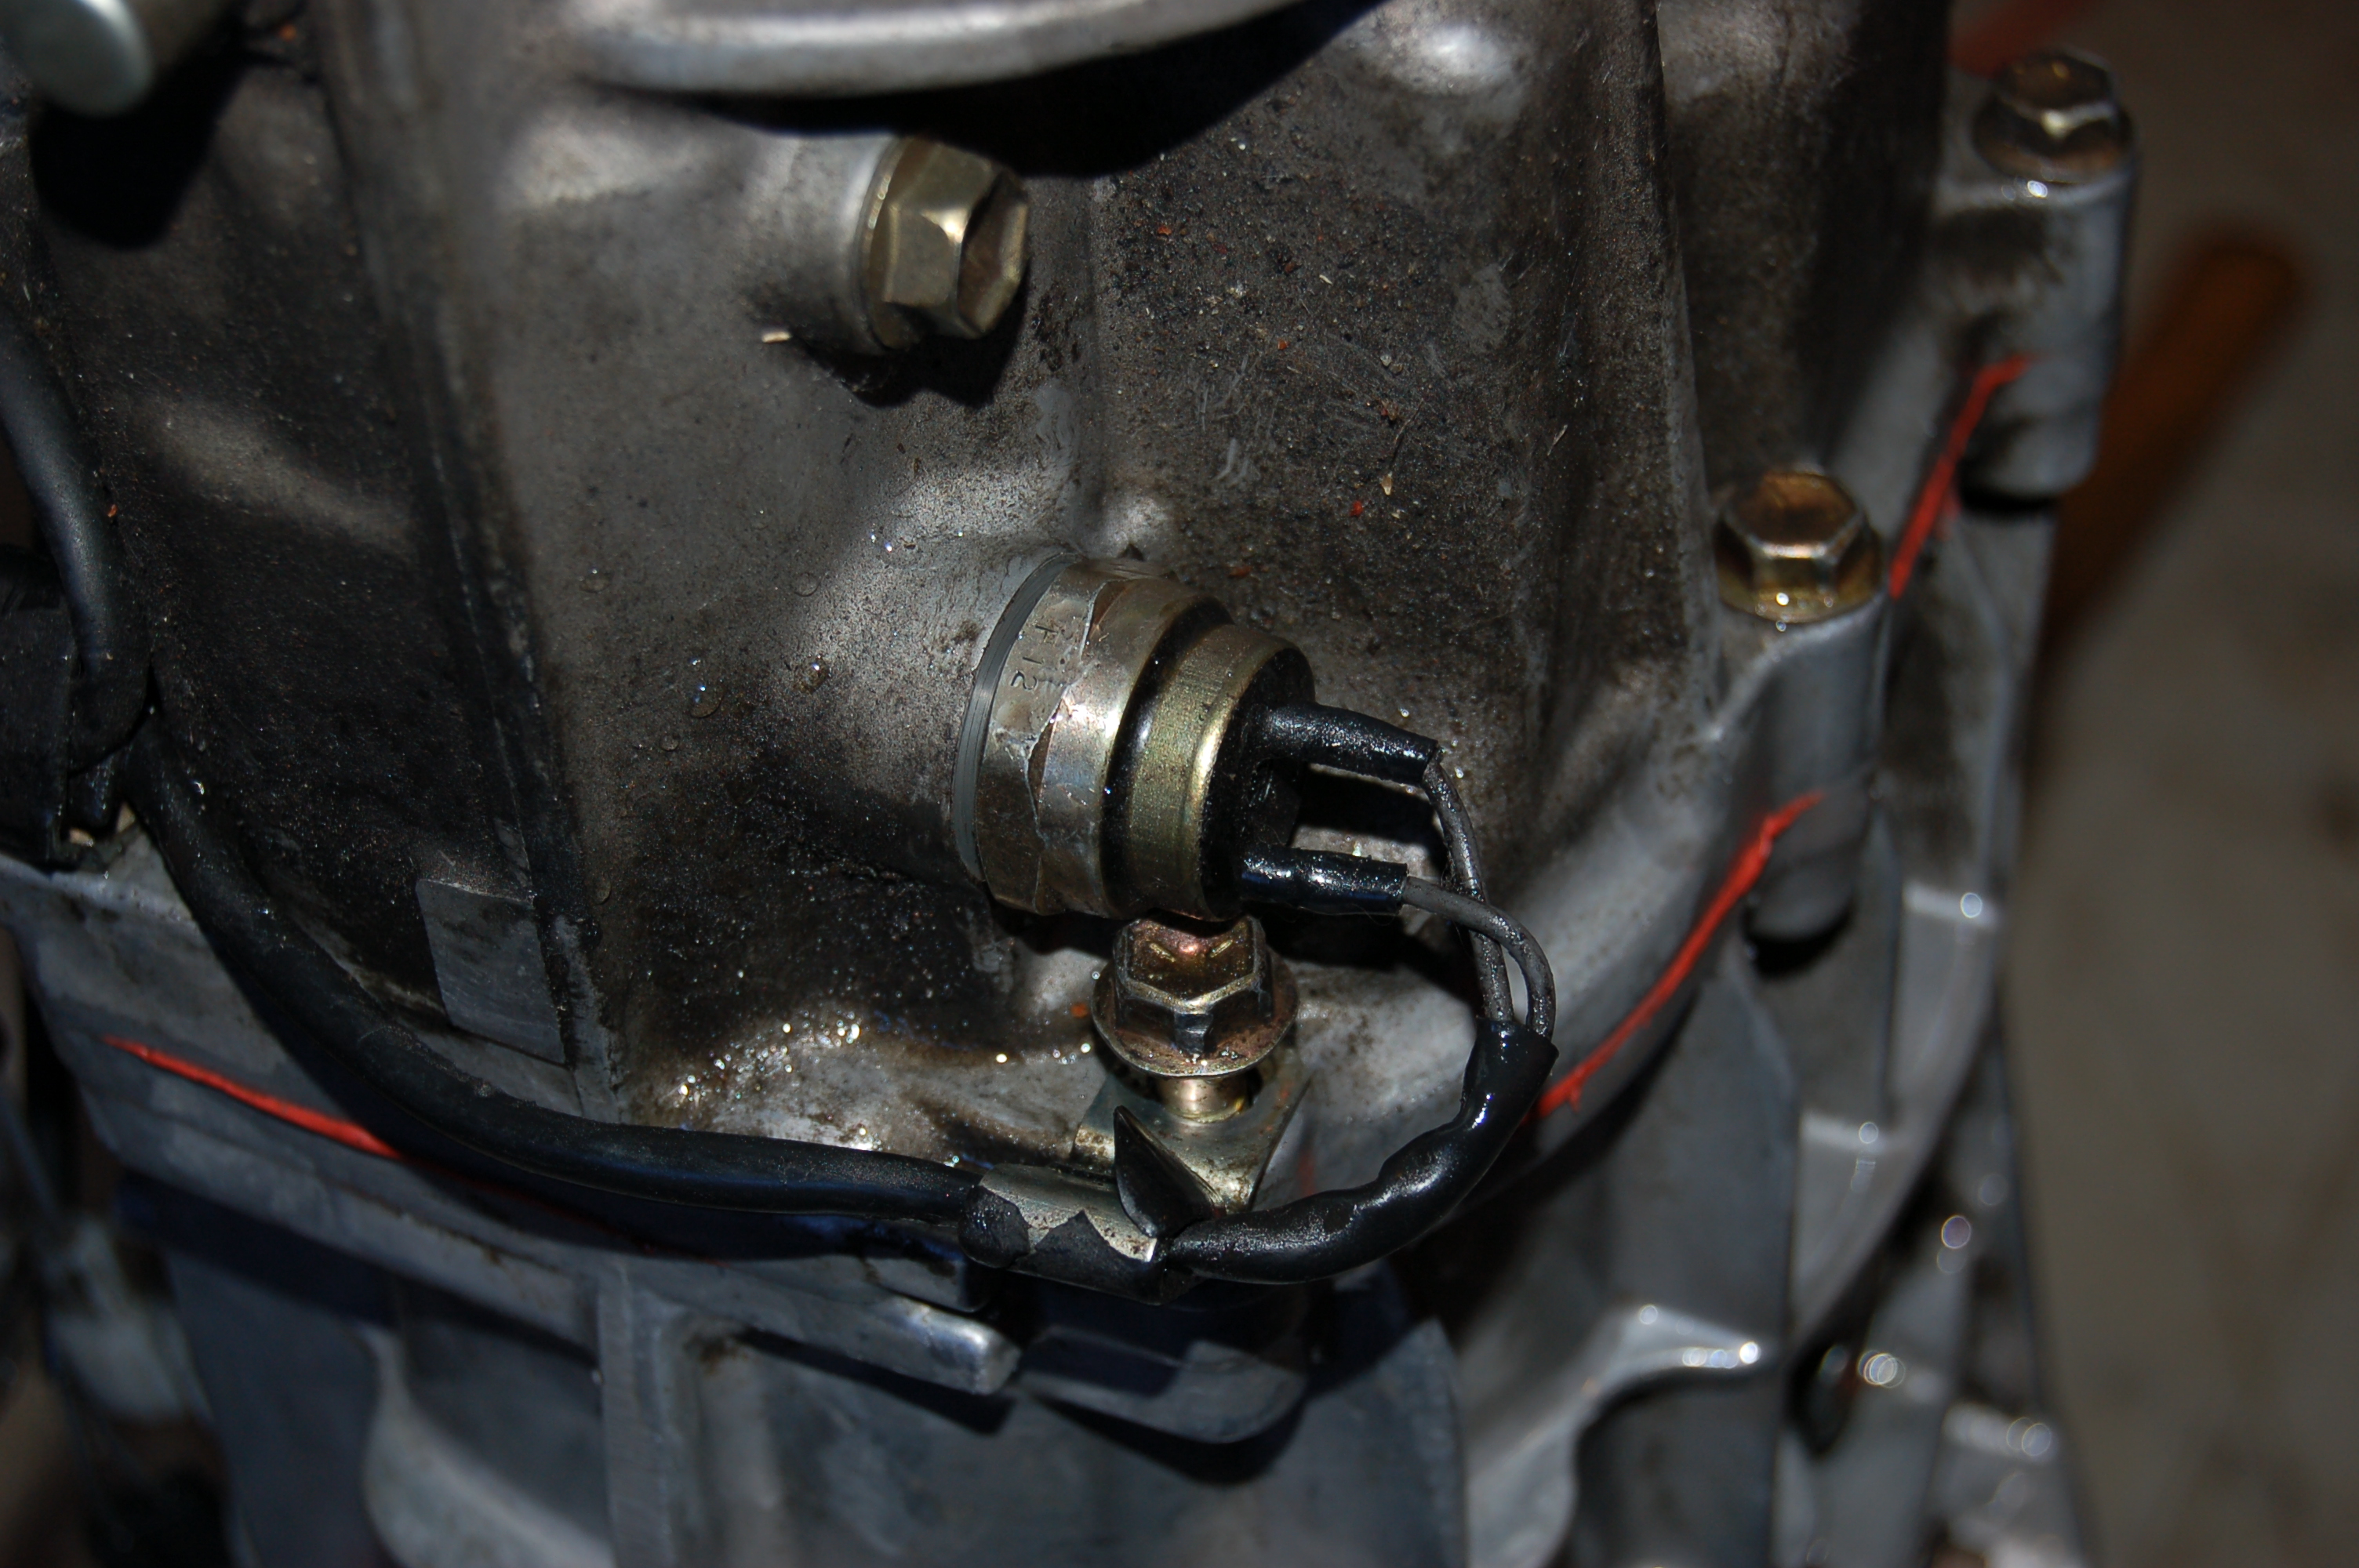
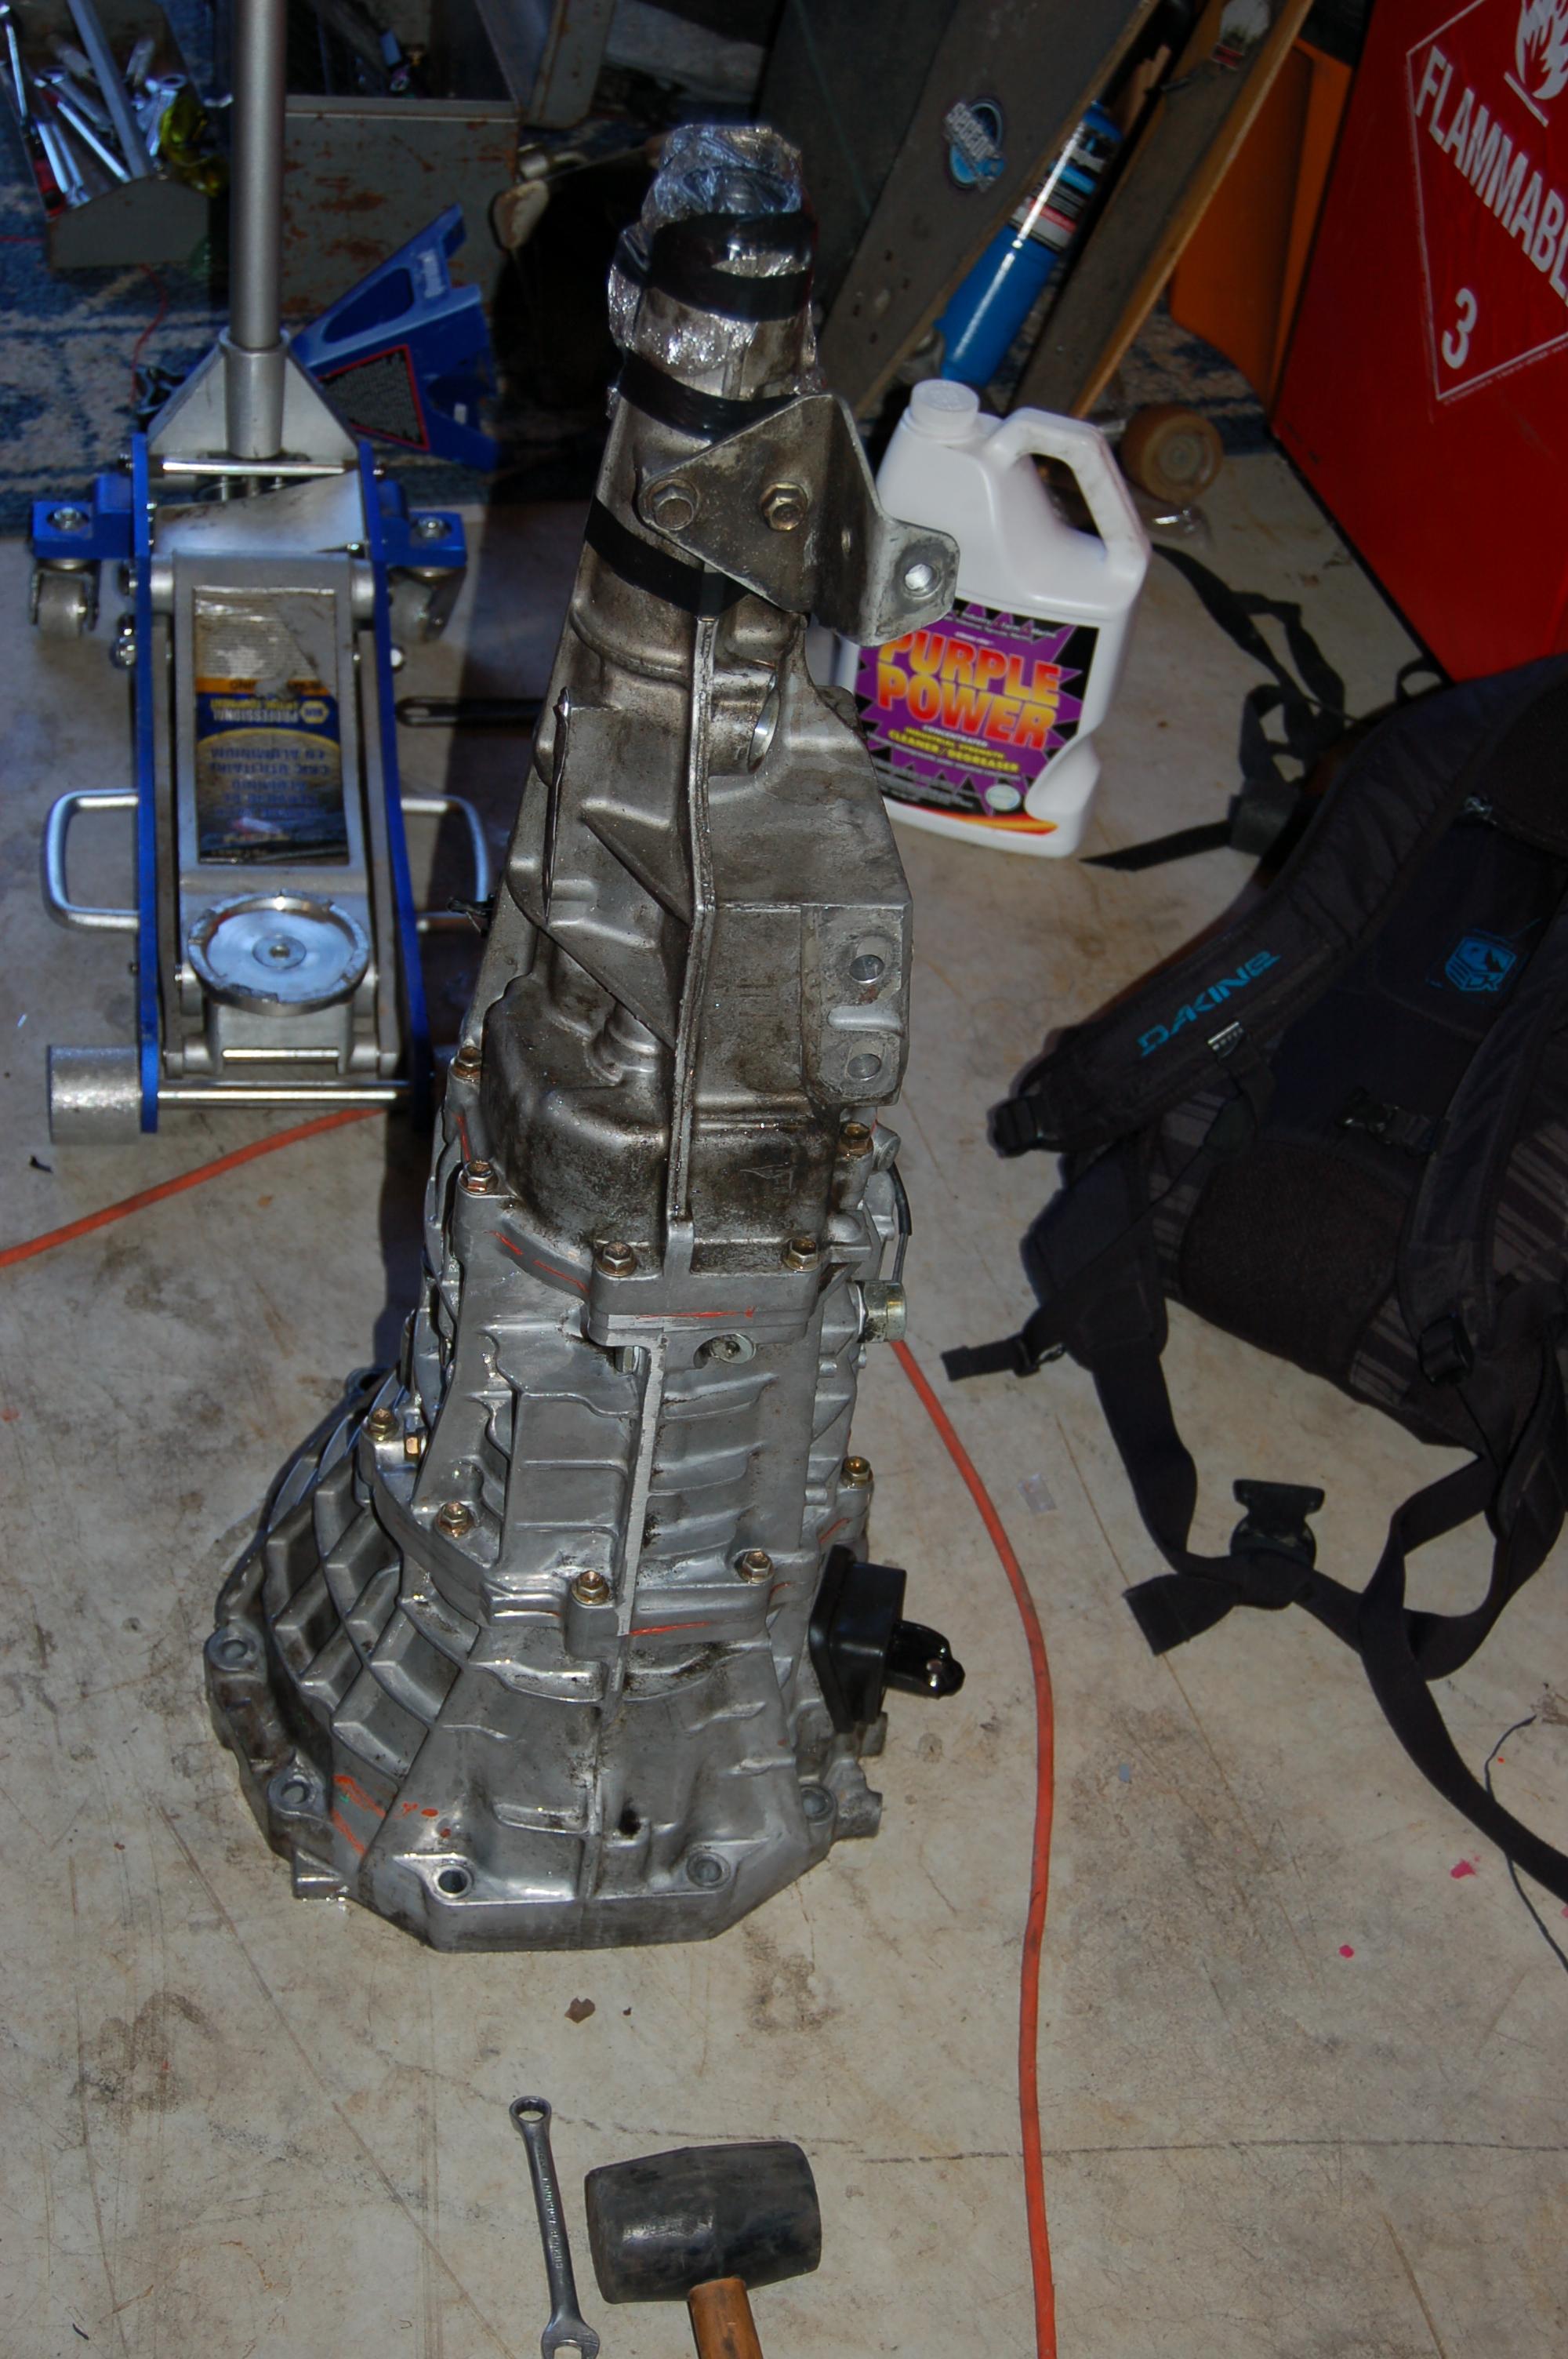
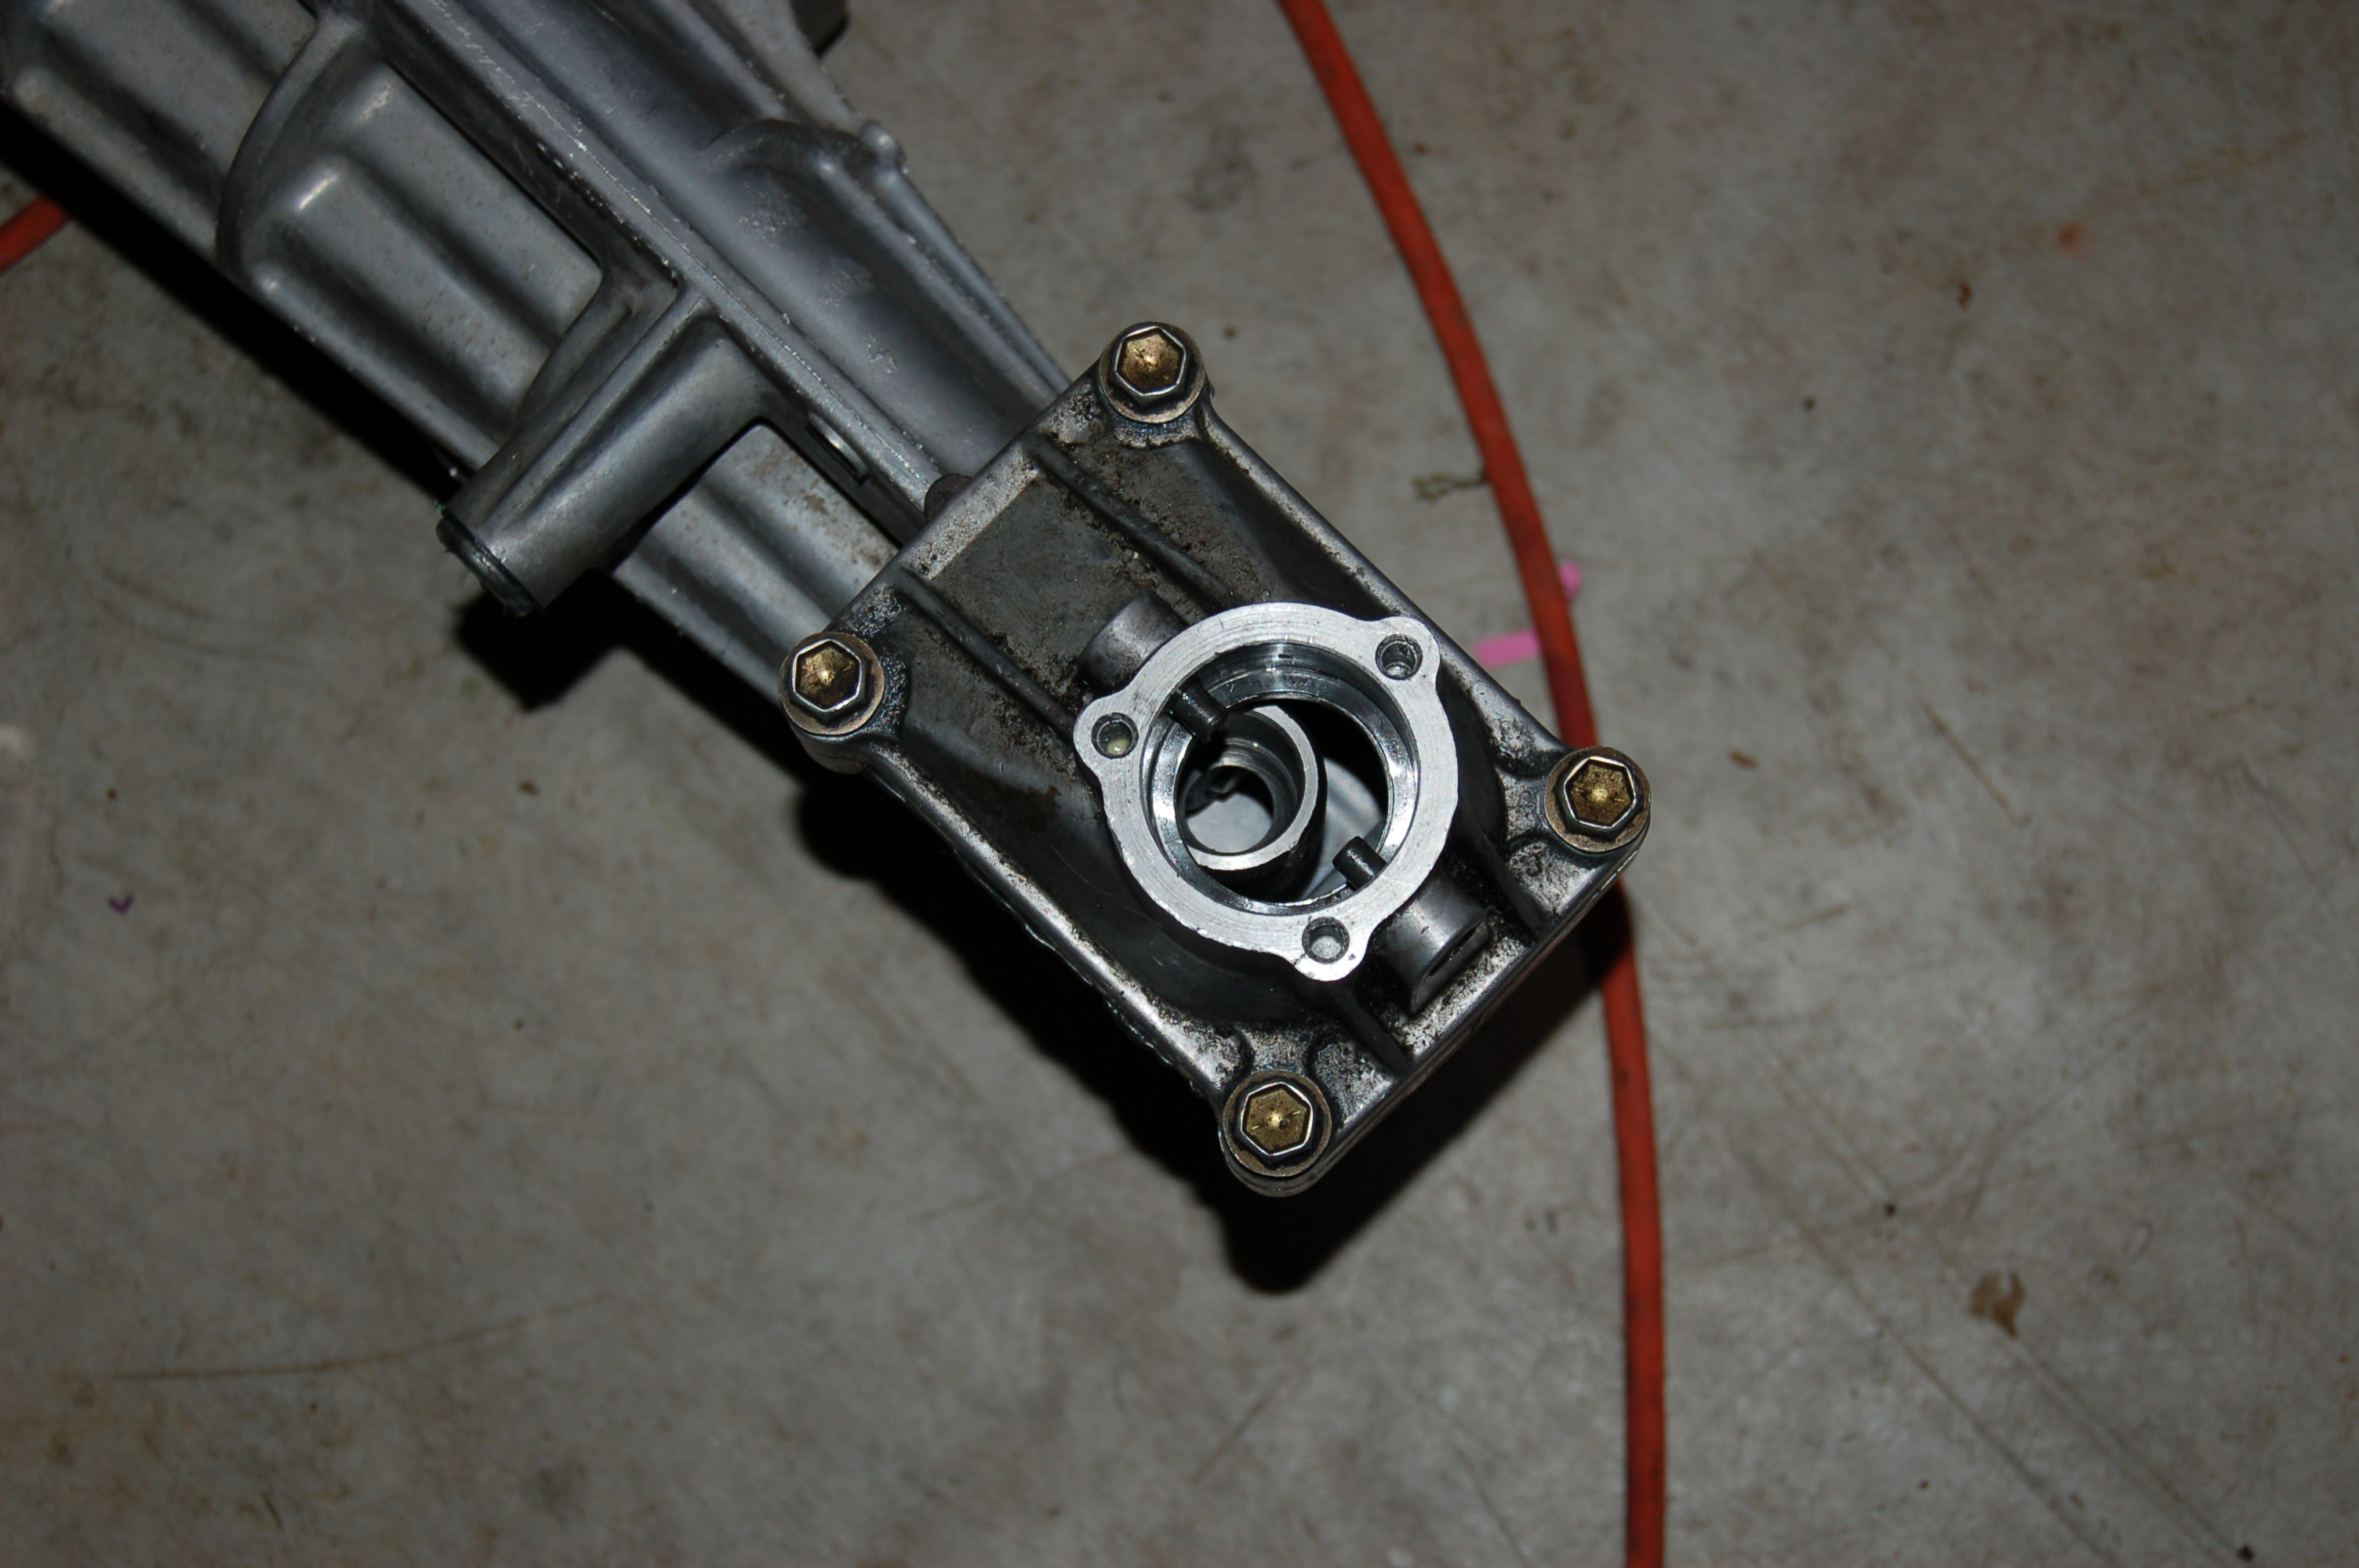
<a href="http://imgur.com/H7tcgYS" target="_blank"><img alt="" src="https://i.imgur.com/H7tcgYSl.jpg" /></a></p><p>Here is the new shifter control lever, with new shifter. Fun fact, the 6 speed shifters have a nice little curve in them. </p><p><a href="http://imgur.com/WcUv1kt" target="_blank"><img alt="" src="https://i.imgur.com/WcUv1ktl.jpg" /></a></p><p>Donor trans from an 01 I got at an insurance auction, notice the purple power. I did actually clean the thing a bit.</p><p><a href="http://imgur.com/RbbCtfc" target="_blank"><img alt="" src="https://i.imgur.com/RbbCtfcl.jpg" /></a></p><p>Start by pulling the neutral and reverse switch. I'm an idiot and didn't realize you could unfold the clips so I struggled with this bolt for way too long  </p><p><a href="http://imgur.com/CC43rgN" target="_blank"><img alt="" src="https://i.imgur.com/CC43rgNl.jpg" /></a></p><p>And its out</p><p><a href="http://imgur.com/qxWpbvK" target="_blank"><img alt="" src="https://i.imgur.com/qxWpbvKl.jpg" /></a></p><p>Here is where mine broke. You can see the "cup" that holds the shifter. This needs to be unbolted before the housing comes off.</p><p><a href="http://imgur.com/XDFf97g" target="_blank"><img alt="" src="https://i.imgur.com/XDFf97gl.jpg" /></a></p><p><a href="http://imgur.com/7ZNRLjF" target="_blank"><img alt="" src="https://i.imgur.com/7ZNRLjFl.jpg" /></a></p><p>Finish taking off the rest of the bolts.</p><p><a href="http://imgur.com/XiQpkKF" target="_blank"><img alt="" src="https://i.imgur.com/XiQpkKFl.jpg" /></a></p><p><a href="http://imgur.com/Mp396Gl" target="_blank"><img alt="" src="https://i.imgur.com/Mp396Gll.jpg" /></a></p><p>Then when you pull of the housing watch the "cup" go boucing off when the housing pops loose.</p><p><a href="http://imgur.com/q4h1BXe" target="_blank"><img alt="" src="https://i.imgur.com/q4h1BXel.jpg" /></a></p><p>Pull the control lever free from the spring clip thingy</p><p><a href="http://imgur.com/nUlqlxH" target="_blank"><img alt="" src="https://i.imgur.com/nUlqlxHl.jpg" /></a></p><p>All shiny and ready to hold allofthe1.6torques</p><p><a href="http://imgur.com/1Bqnn4s" target="_blank"><img alt="" src="https://i.imgur.com/1Bqnn4sl.jpg" /></a></p><p>Oops, whats that</p><p><a href="http://imgur.com/YqLZOeP" target="_blank"><img alt="" src="https://i.imgur.com/YqLZOePl.jpg" /></a></p><p>Yeah make sure to get rid of all the pieces of aluminum in your gearbox</p><p><a href="http://imgur.com/J784R8W" target="_blank"><img alt="" src="https://i.imgur.com/J784R8Wl.jpg" /></a></p><p>More pretty gear pics</p><p><a href="http://imgur.com/28rKzpB" target="_blank"><img alt="" src="https://i.imgur.com/28rKzpBl.jpg" /></a></p><p><a href="http://imgur.com/IWLekfC" target="_blank"><img alt="" src="https://i.imgur.com/IWLekfCl.jpg" /></a></p><p>To reasseble start by opening the spring clip with some snapring pliers, and then slipping in the control lever.</p><p><a href="http://imgur.com/utXf2Qg" target="_blank"><img alt="" src="https://i.imgur.com/utXf2Qgl.jpg" /></a></p><p>Here are the 2 different control levers. The top one is the newer lever and has some extra notches for feeling or something.</p><p><a href="http://imgur.com/UbIeXyY" target="_blank"><img alt="" src="https://i.imgur.com/UbIeXyYl.jpg" /></a></p><p><a href="http://imgur.com/PD6Dngk" target="_blank"><img alt="" src="https://i.imgur.com/PD6Dngkl.jpg" /></a></p><p>Apply some goo. I used the "right stuff" by permatex by recomendation from bbundy.</p><p><a href="http://imgur.com/5VuIfvR" target="_blank"><img alt="" src="https://i.imgur.com/5VuIfvRl.jpg" /></a></p><p>Here's what bit me in the ***. At some point, when the notches were added to the control lever a small spring loaded ball was added. Without pulling this ball out it was impossible for me to get the control lever in. So, while balancing the housing over the goo I grabbed my allen wrench and pulled it out. Save the spring and then push the ball out of the way.</p><p><a href="http://imgur.com/mzBMEnR" target="_blank"><img alt="" src="https://i.imgur.com/mzBMEnRl.jpg" /></a></p><p>Then as the housing slides on, forget to put the "cup" for the shifter and have to redo all of the goo....just kidding don't do that. Before the housing slips all the way on, get the shifter end over the control lever and slide the housing on the rest of the way.</p><p><a href="http://imgur.com/1WYud7r" target="_blank"><img alt="" src="https://i.imgur.com/1WYud7rl.jpg" /></a></p><p>(redoing the goo)</p><p><a href="http://imgur.com/gCZJfgg" target="_blank"><img alt="" src="https://i.imgur.com/gCZJfggl.jpg" /></a></p><p><a href="http://imgur.com/8pACEae" target="_blank"><img alt="" src="https://i.imgur.com/8pACEael.jpg" /></a></p><p><a href="http://imgur.com/XaGNgoR" target="_blank"><img alt="" src="https://i.imgur.com/XaGNgoRl.jpg" /></a></p><p>Slide the shifter end on and apply loctite and torque down to FSM specs.</p><p><a href="http://imgur.com/JXx1Jw7" target="_blank"><img alt="" src="https://i.imgur.com/JXx1Jw7l.jpg" /></a></p><p><a href="http://imgur.com/xRiO26E" target="_blank"><img alt="" src="https://i.imgur.com/xRiO26El.jpg" /></a></p><p><a href="http://imgur.com/1TA1Qon" target="_blank"><img alt="" src="https://i.imgur.com/1TA1Qonl.jpg" /></a></p><p>Put the bolts back on.</p><p><a href="http://imgur.com/BFmRWIq" target="_blank"><img alt="" src="https://i.imgur.com/BFmRWIql.jpg" /></a></p><p> </p><p><a href="http://imgur.com/T40f3k1" target="_blank"><img alt="" src="https://i.imgur.com/T40f3k1l.jpg" /></a></p><p>Torque to spec</p><p><a href="http://imgur.com/jW7NPrA" target="_blank"><img alt="" src="https://i.imgur.com/jW7NPrAl.jpg" /></a></p><p>Put the switches back in.</p><p><a href="http://imgur.com/xF7LlEa" target="_blank"><img alt="" src="https://i.imgur.com/xF7LlEal.jpg" /></a></p><p>In the above picture you can see a hole that I didn't realize was empty until everything was assembled. This is the breather hole. If your new extension housing doesn't come with a breather, do this before you put it all together. I had a mini heart attack until I realized that I could take the old one out and install it from the outside.</p><p>Apparently you can get the baffle in there out, without destroying it. But I couldn't. So I destroyed the baffle and tapped out the breather with a small extension.</p><p><a href="http://imgur.com/22Lhg6t" target="_blank"><img alt="" src="https://i.imgur.com/22Lhg6tl.jpg" /></a></p><p><a href="http://imgur.com/sFxAdpx" target="_blank"><img alt="" src="https://i.imgur.com/sFxAdpxl.jpg" /></a></p><p><a href="http://imgur.com/DZOiJJv" target="_blank"><img alt="" src="https://i.imgur.com/DZOiJJvl.jpg" /></a></p><p><a href="http://imgur.com/f9XiNE5" target="_blank"><img alt="" src="https://i.imgur.com/f9XiNE5l.jpg" /></a></p><p>Tap it back in with a socket. (I used a 14mm)</p><p><a href="http://imgur.com/dvDmKvq" target="_blank"><img alt="" src="https://i.imgur.com/dvDmKvql.jpg" /></a></p><p>I used lots of the "right stuff" to put on the top of the shifter.</p><p><a href="http://imgur.com/2Y7NSzF" target="_blank"><img alt="" src="https://i.imgur.com/2Y7NSzFl.jpg" /></a></p><p>All done! Next you just have to install it...</p><p><a href="http://imgur.com/dGvLY08" target="_blank"><img alt="" src="https://i.imgur.com/dGvLY08l.jpg" /></a></p><p> </p>
And here are the pictures...again
Last week I took my 6 speed with a broken tailshaft extension housing and put on a new one that I got thanks to bbundy. They FSM documents this proccess very well but I borrowed a DSLR and took a whole bunch of pictures. I'll also give some tips and things that I ran into while doing this swap.
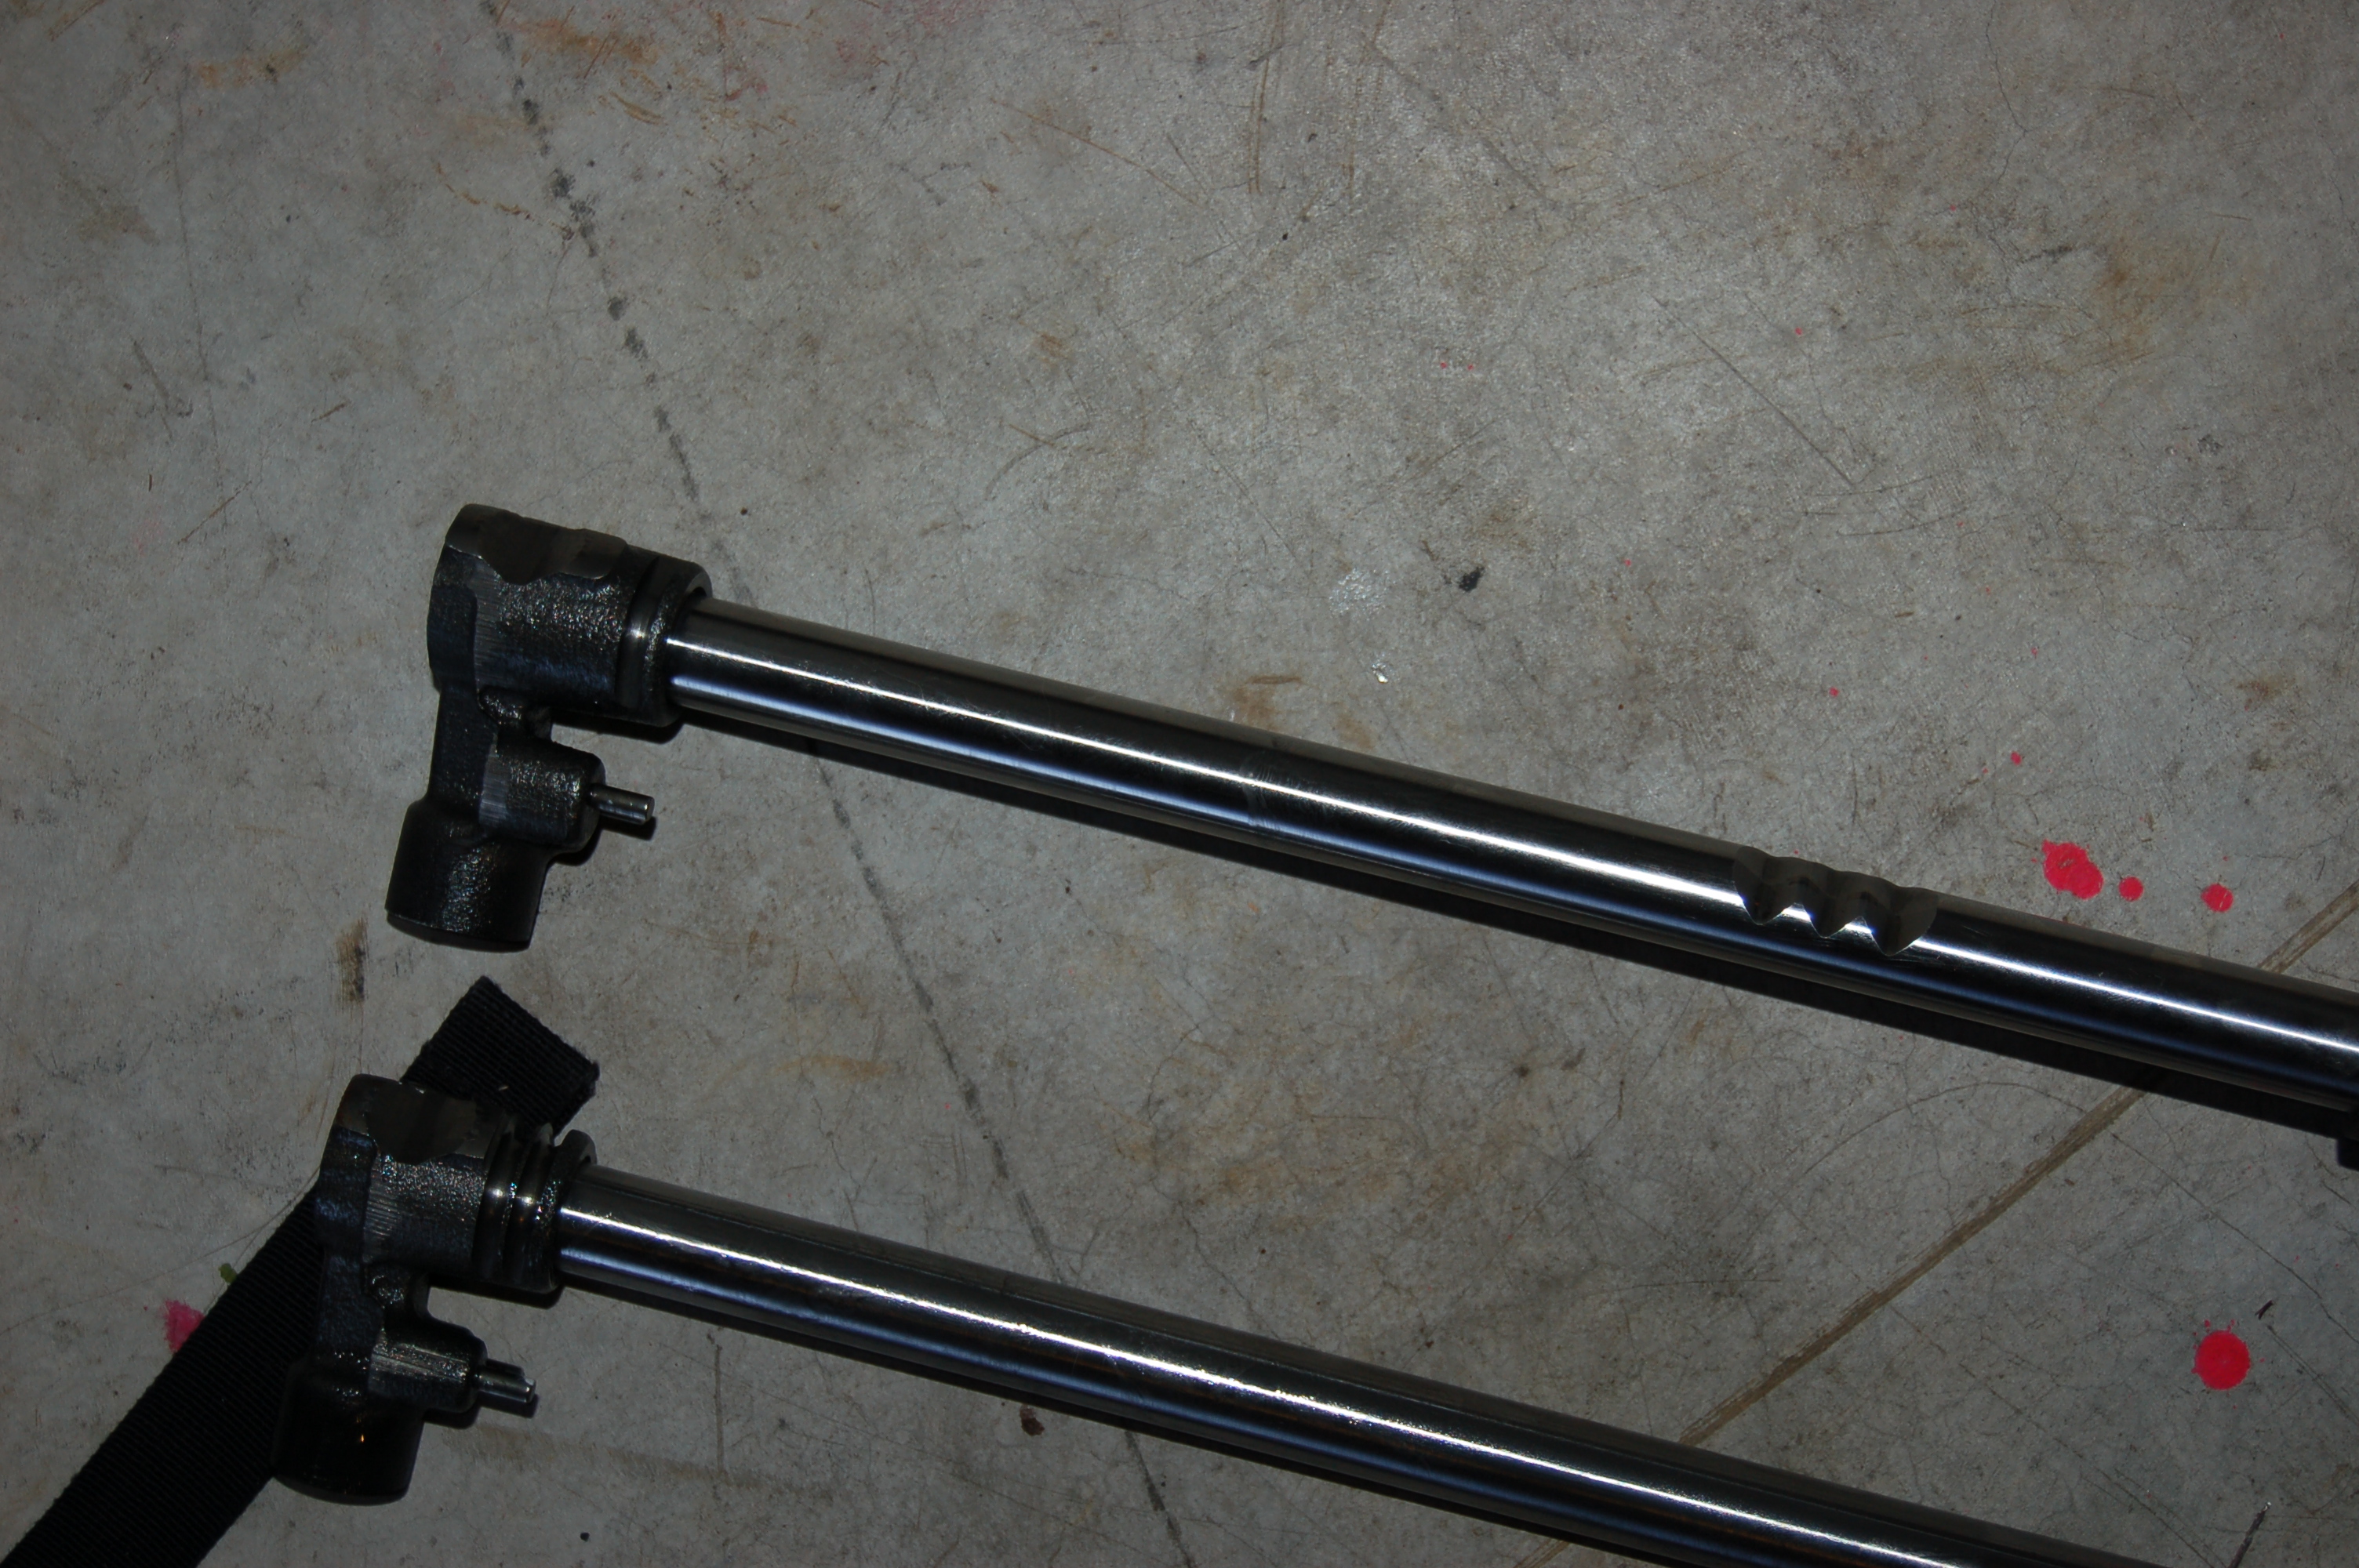
New tailshaft housing from Bob. This is from a later trans, mid-01 to 05. This fact will come back to bite me in the *** just wait. The main difference is the shifter though. Here is a quote from Bill at MiataRoadster.
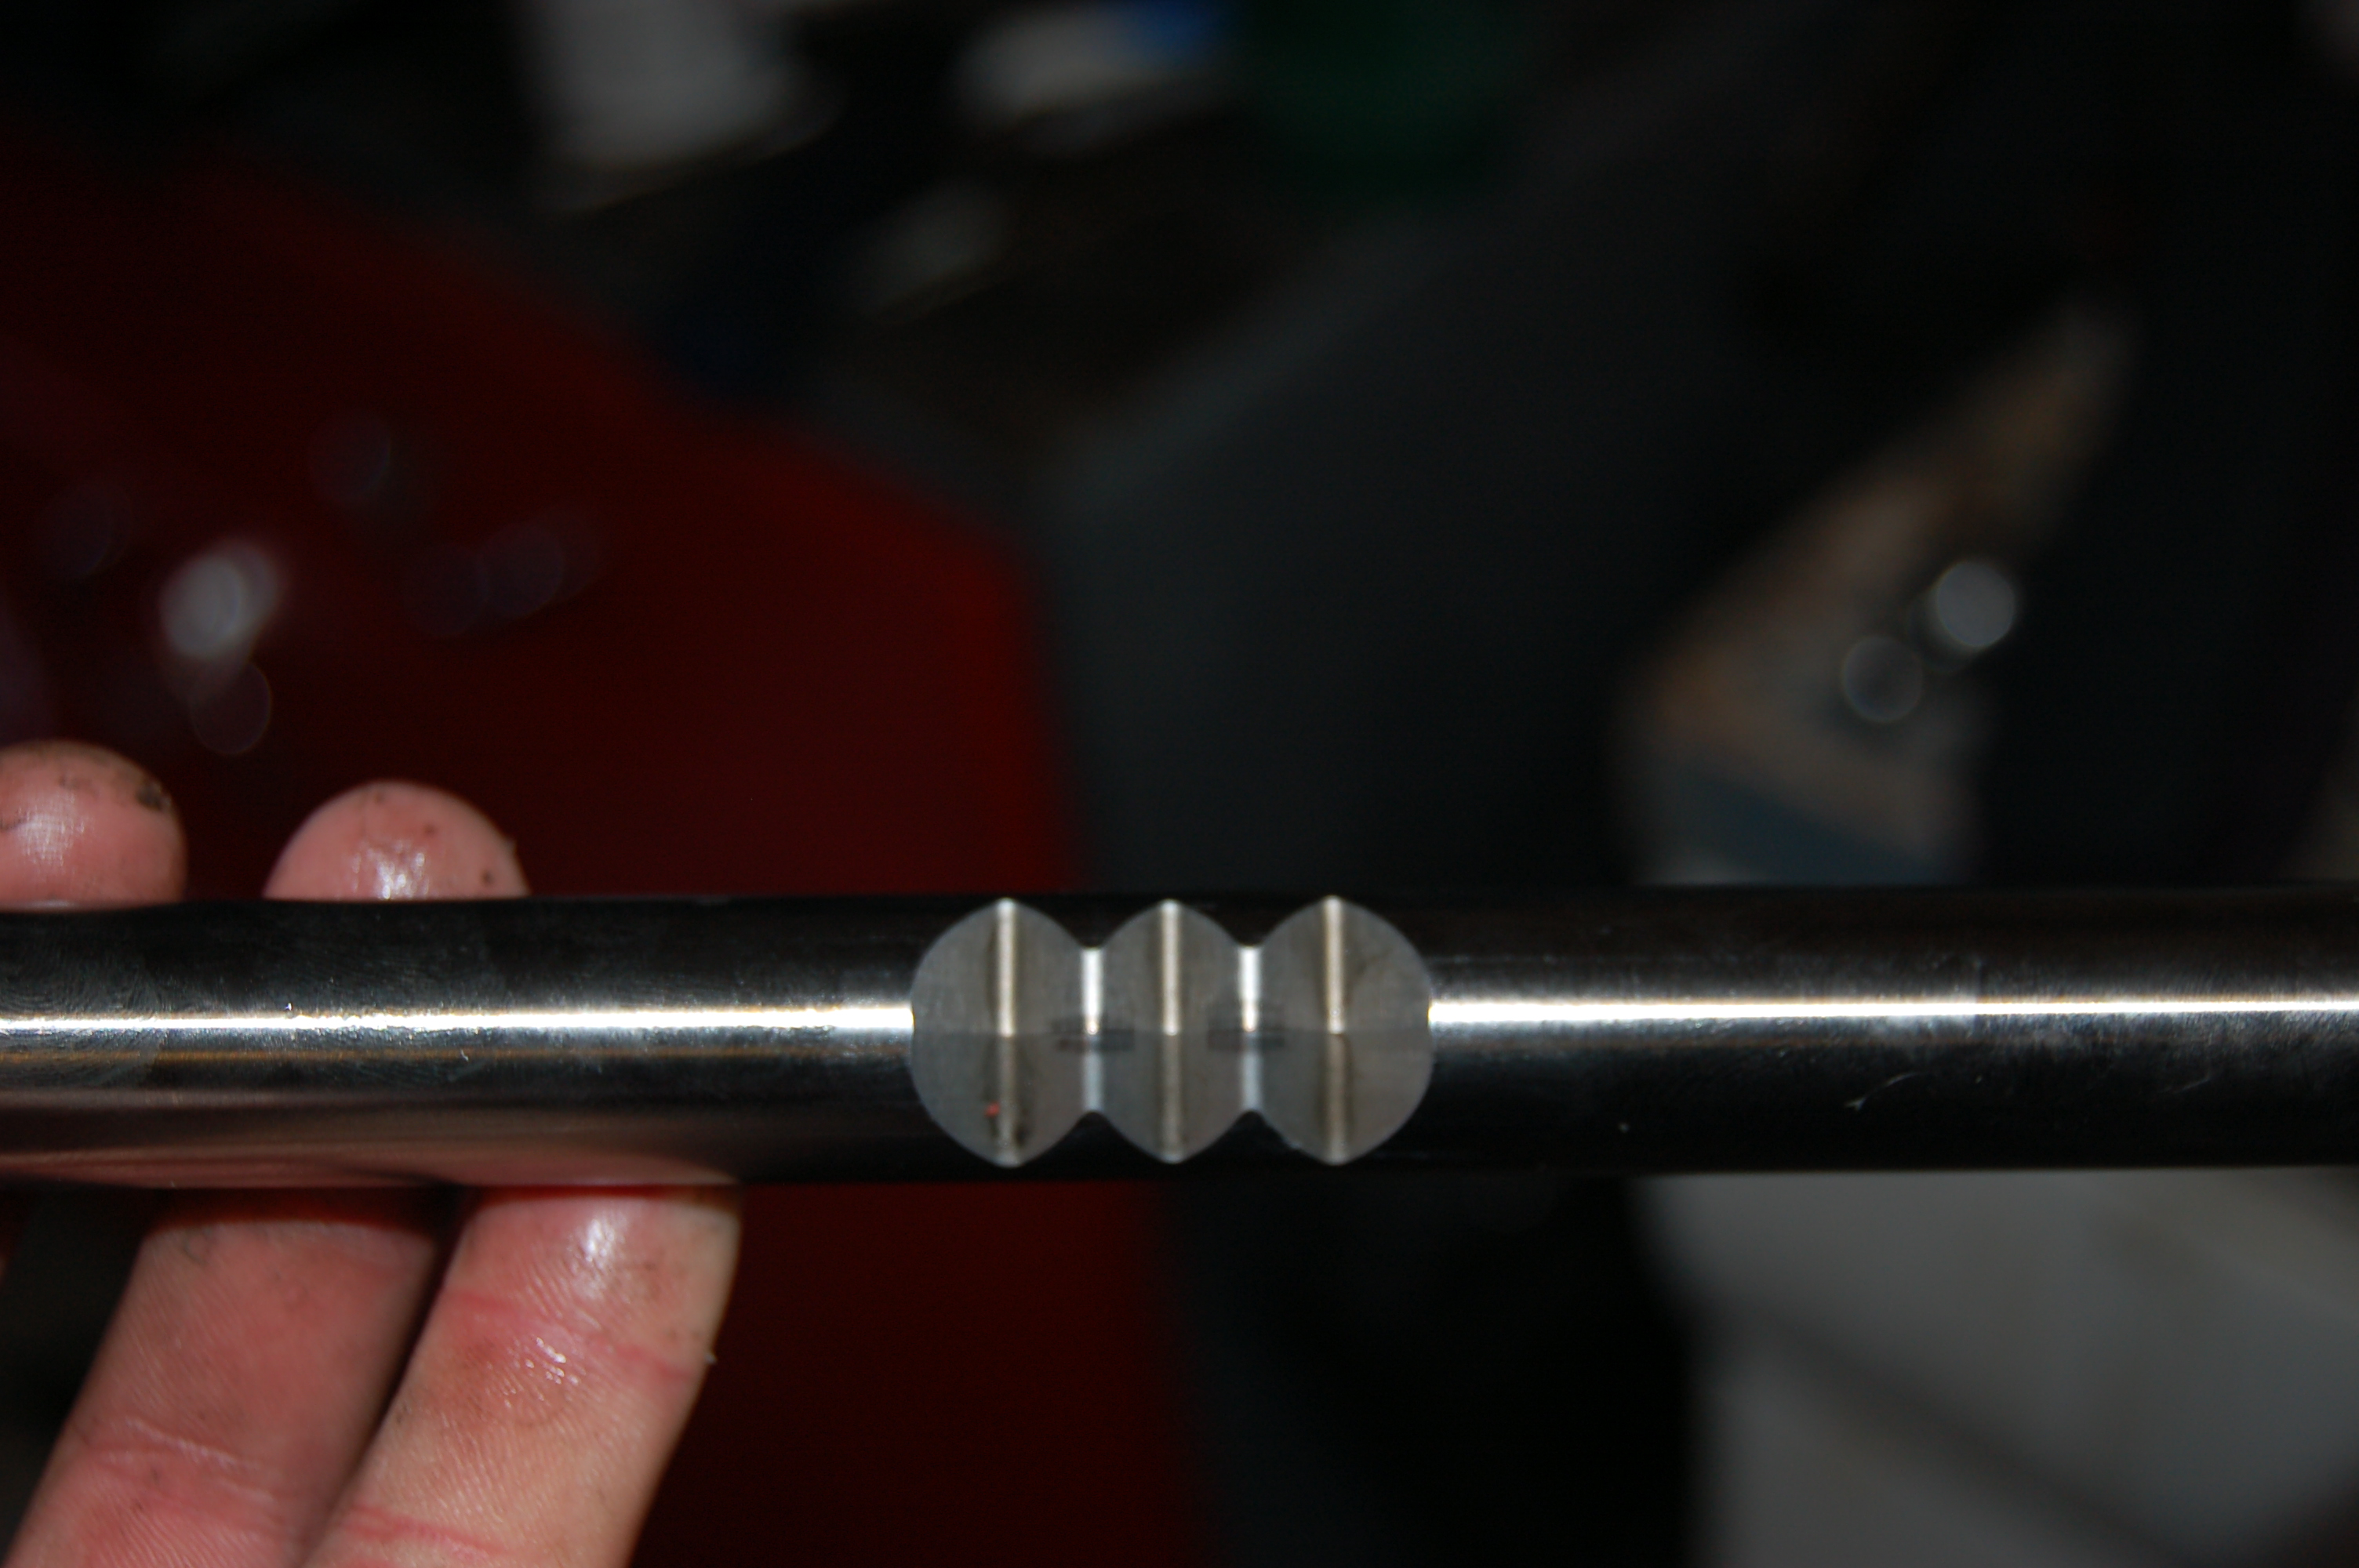
For NB2 6-speeds, Mazda enlarged the OD of the tip of the shaft (from 15mm to 17mm) and the ID of the hole in the turret (from 19mm to 21mm) vs. all NA/NB 5-speeds and NB1 6-speeds which share the smaller dimensions. To complicate matters, all NB1/NB2 6-speed shafts have the same shorter distance between the axes of the fulcrum ***** and tip ***** vs. all NA/NB 5-speeds. To economize on manufacturing our kits, MiataRoadster uses the same 15mm size tip on all shafts and uses proprietary thicker-walled bushings for NB2 6-speeds. If you’re swapping a tranny, the VIN riveted onto the side of its case will confirm its source. To the best of my knowledge, the breaking point between the NB1 and NB2 6-speeds is the VIN ending in -220738. This should apply worldwide.
</p><p><a href="http://imgur.com/CC43rgN" target="_blank"><img alt="" src="https://i.imgur.com/CC43rgNl.jpg" /></a></p><p>And its out</p><p><a href="http://imgur.com/qxWpbvK" target="_blank"><img alt="" src="https://i.imgur.com/qxWpbvKl.jpg" /></a></p><p>Here is where mine broke. You can see the "cup" that holds the shifter. This needs to be unbolted before the housing comes off.</p><p><a href="http://imgur.com/XDFf97g" target="_blank"><img alt="" src="https://i.imgur.com/XDFf97gl.jpg" /></a></p><p><a href="http://imgur.com/7ZNRLjF" target="_blank"><img alt="" src="https://i.imgur.com/7ZNRLjFl.jpg" /></a></p><p>Finish taking off the rest of the bolts.</p><p><a href="http://imgur.com/XiQpkKF" target="_blank"><img alt="" src="https://i.imgur.com/XiQpkKFl.jpg" /></a></p><p><a href="http://imgur.com/Mp396Gl" target="_blank"><img alt="" src="https://i.imgur.com/Mp396Gll.jpg" /></a></p><p>Then when you pull of the housing watch the "cup" go boucing off when the housing pops loose.</p><p><a href="http://imgur.com/q4h1BXe" target="_blank"><img alt="" src="https://i.imgur.com/q4h1BXel.jpg" /></a></p><p>Pull the control lever free from the spring clip thingy</p><p><a href="http://imgur.com/nUlqlxH" target="_blank"><img alt="" src="https://i.imgur.com/nUlqlxHl.jpg" /></a></p><p>All shiny and ready to hold allofthe1.6torques</p><p><a href="http://imgur.com/1Bqnn4s" target="_blank"><img alt="" src="https://i.imgur.com/1Bqnn4sl.jpg" /></a></p><p>Oops, whats that</p><p><a href="http://imgur.com/YqLZOeP" target="_blank"><img alt="" src="https://i.imgur.com/YqLZOePl.jpg" /></a></p><p>Yeah make sure to get rid of all the pieces of aluminum in your gearbox</p><p><a href="http://imgur.com/J784R8W" target="_blank"><img alt="" src="https://i.imgur.com/J784R8Wl.jpg" /></a></p><p>More pretty gear pics</p><p><a href="http://imgur.com/28rKzpB" target="_blank"><img alt="" src="https://i.imgur.com/28rKzpBl.jpg" /></a></p><p><a href="http://imgur.com/IWLekfC" target="_blank"><img alt="" src="https://i.imgur.com/IWLekfCl.jpg" /></a></p><p>To reasseble start by opening the spring clip with some snapring pliers, and then slipping in the control lever.</p><p><a href="http://imgur.com/utXf2Qg" target="_blank"><img alt="" src="https://i.imgur.com/utXf2Qgl.jpg" /></a></p><p>Here are the 2 different control levers. The top one is the newer lever and has some extra notches for feeling or something.</p><p><a href="http://imgur.com/UbIeXyY" target="_blank"><img alt="" src="https://i.imgur.com/UbIeXyYl.jpg" /></a></p><p><a href="http://imgur.com/PD6Dngk" target="_blank"><img alt="" src="https://i.imgur.com/PD6Dngkl.jpg" /></a></p><p>Apply some goo. I used the "right stuff" by permatex by recomendation from bbundy.</p><p><a href="http://imgur.com/5VuIfvR" target="_blank"><img alt="" src="https://i.imgur.com/5VuIfvRl.jpg" /></a></p><p>Here's what bit me in the ***. At some point, when the notches were added to the control lever a small spring loaded ball was added. Without pulling this ball out it was impossible for me to get the control lever in. So, while balancing the housing over the goo I grabbed my allen wrench and pulled it out. Save the spring and then push the ball out of the way.</p><p><a href="http://imgur.com/mzBMEnR" target="_blank"><img alt="" src="https://i.imgur.com/mzBMEnRl.jpg" /></a></p><p>Then as the housing slides on, forget to put the "cup" for the shifter and have to redo all of the goo....just kidding don't do that. Before the housing slips all the way on, get the shifter end over the control lever and slide the housing on the rest of the way.</p><p><a href="http://imgur.com/1WYud7r" target="_blank"><img alt="" src="https://i.imgur.com/1WYud7rl.jpg" /></a></p><p>(redoing the goo)</p><p><a href="http://imgur.com/gCZJfgg" target="_blank"><img alt="" src="https://i.imgur.com/gCZJfggl.jpg" /></a></p><p><a href="http://imgur.com/8pACEae" target="_blank"><img alt="" src="https://i.imgur.com/8pACEael.jpg" /></a></p><p><a href="http://imgur.com/XaGNgoR" target="_blank"><img alt="" src="https://i.imgur.com/XaGNgoRl.jpg" /></a></p><p>Slide the shifter end on and apply loctite and torque down to FSM specs.</p><p><a href="http://imgur.com/JXx1Jw7" target="_blank"><img alt="" src="https://i.imgur.com/JXx1Jw7l.jpg" /></a></p><p><a href="http://imgur.com/xRiO26E" target="_blank"><img alt="" src="https://i.imgur.com/xRiO26El.jpg" /></a></p><p><a href="http://imgur.com/1TA1Qon" target="_blank"><img alt="" src="https://i.imgur.com/1TA1Qonl.jpg" /></a></p><p>Put the bolts back on.</p><p><a href="http://imgur.com/BFmRWIq" target="_blank"><img alt="" src="https://i.imgur.com/BFmRWIql.jpg" /></a></p><p> </p><p><a href="http://imgur.com/T40f3k1" target="_blank"><img alt="" src="https://i.imgur.com/T40f3k1l.jpg" /></a></p><p>Torque to spec</p><p><a href="http://imgur.com/jW7NPrA" target="_blank"><img alt="" src="https://i.imgur.com/jW7NPrAl.jpg" /></a></p><p>Put the switches back in.</p><p><a href="http://imgur.com/xF7LlEa" target="_blank"><img alt="" src="https://i.imgur.com/xF7LlEal.jpg" /></a></p><p>In the above picture you can see a hole that I didn't realize was empty until everything was assembled. This is the breather hole. If your new extension housing doesn't come with a breather, do this before you put it all together. I had a mini heart attack until I realized that I could take the old one out and install it from the outside.</p><p>Apparently you can get the baffle in there out, without destroying it. But I couldn't. So I destroyed the baffle and tapped out the breather with a small extension.</p><p><a href="http://imgur.com/22Lhg6t" target="_blank"><img alt="" src="https://i.imgur.com/22Lhg6tl.jpg" /></a></p><p><a href="http://imgur.com/sFxAdpx" target="_blank"><img alt="" src="https://i.imgur.com/sFxAdpxl.jpg" /></a></p><p><a href="http://imgur.com/DZOiJJv" target="_blank"><img alt="" src="https://i.imgur.com/DZOiJJvl.jpg" /></a></p><p><a href="http://imgur.com/f9XiNE5" target="_blank"><img alt="" src="https://i.imgur.com/f9XiNE5l.jpg" /></a></p><p>Tap it back in with a socket. (I used a 14mm)</p><p><a href="http://imgur.com/dvDmKvq" target="_blank"><img alt="" src="https://i.imgur.com/dvDmKvql.jpg" /></a></p><p>I used lots of the "right stuff" to put on the top of the shifter.</p><p><a href="http://imgur.com/2Y7NSzF" target="_blank"><img alt="" src="https://i.imgur.com/2Y7NSzFl.jpg" /></a></p><p>All done! Next you just have to install it...</p><p><a href="http://imgur.com/dGvLY08" target="_blank"><img alt="" src="https://i.imgur.com/dGvLY08l.jpg" /></a></p><p> </p>
Last edited by aidandj; 08-28-2017 at 12:10 PM.

Reply
 0
0

0

 07-17-2015, 12:21 PM
#4
SADFab Destructive Testing Engineer
Thread Starter
iTrader: (5)
Join Date: Apr 2014
Location: Beaverton, USA
Posts: 18,642
Total Cats: 1,866
WTF are you talking about...
<br />I paid 75 dollars for the housing...trans costs 600 minimum.
<br />Your post also made no sense. Learn reading.
<br />I paid 75 dollars for the housing...trans costs 600 minimum.
<br />Your post also made no sense. Learn reading.
Reply
0
0
 07-22-2015, 09:38 PM
#8
SADFab Destructive Testing Engineer
Thread Starter
iTrader: (5)
Join Date: Apr 2014
Location: Beaverton, USA
Posts: 18,642
Total Cats: 1,866
<p>Full size pics.</p><p> <br />
 <br />
 <br />
 <br />
 <br />
 <br />
 <br />
 <br />
 <br />
 <br />
 <br />
 <br />
 <br />
 <br />
 <br />
 <br />
 <br />
 <br />
 <br />
 <br />
 <br />
 <br />
 <br />
 <br />
 <br />
 <br />
 <br />
 <br />
 <br />
 <br />
 <br />
 <br />
 <br />
 <br />
 <br />
 <br />
 <br />
 <br />
 <br />
 </p>
</p>
<br /><br /><br /><br /><br /><br /><br /><br /><br /><br /><br /><br /><br /><br /><br /><br /><br /><br /><br /><br /><br /><br /><br /><br /><br /><br /><br /><br /><br /><br /><br /><br /><br /><br /><br /><br /><br /><br /><br /></p>
Reply
0
0
07-22-2015, 09:40 PM
#9
SADFab Destructive Testing Engineer
Thread Starter
iTrader: (5)
Join Date: Apr 2014
Location: Beaverton, USA
Posts: 18,642
Total Cats: 1,866
<p>Full size pics.</p><p> <br />
 <br />
 <br />
 <br />
 <br />
 <br />
 <br />
 <br />
 <br />
 <br />
 <br />
 <br />
 <br />
 <br />
 <br />
 <br />
 <br />
 <br />
 <br />
 <br />
 <br />
 <br />
 <br />
 <br />
 <br />
 <br />
 <br />
 <br />
 <br />
 <br />
 <br />
 <br />
 <br />
 <br />
 <br />
 <br />
 <br />
 <br />
 <br />
 </p>
</p>
<br /><br /><br /><br /><br /><br /><br /><br /><br /><br /><br /><br /><br /><br /><br /><br /><br /><br /><br /><br /><br /><br /><br /><br /><br /><br /><br /><br /><br /><br /><br /><br /><br /><br /><br /><br /><br /><br /><br /></p>
Reply
0
0
07-22-2015, 09:40 PM
#10
SADFab Destructive Testing Engineer
Thread Starter
iTrader: (5)
Join Date: Apr 2014
Location: Beaverton, USA
Posts: 18,642
Total Cats: 1,866
<p>Full size pics.</p>
<br />
<br /><p> <br />
<br /> <br />
<br /> <br />
<br /> <br />
<br /> <br />
<br /> <br />
<br /> <br />
<br /> <br />
<br /> <br />
<br /> <br />
<br /> <br />
<br /> <br />
<br /> <br />
<br /> <br />
<br /> <br />
<br /> <br />
<br /> <br />
<br /> <br />
<br /> <br />
<br /> <br />
<br /> <br />
<br /> <br />
<br /> <br />
<br /> <br />
<br /> <br />
<br /> <br />
<br /> <br />
<br /> <br />
<br /> <br />
<br /> <br />
<br /> <br />
<br /> <br />
<br /> <br />
<br /> <br />
<br /> <br />
<br /> <br />
<br /> <br />
<br /> <br />
<br /> <br />
<br /> </p>
</p>
<br />
<br /><p>
<br /><br />
<br /><br />
<br /><br />
<br /><br />
<br /><br />
<br /><br />
<br /><br />
<br /><br />
<br /><br />
<br /><br />
<br /><br />
<br /><br />
<br /><br />
<br /><br />
<br /><br />
<br /><br />
<br /><br />
<br /><br />
<br /><br />
<br /><br />
<br /><br />
<br /><br />
<br /><br />
<br /><br />
<br /><br />
<br /><br />
<br /><br />
<br /><br />
<br /><br />
<br /><br />
<br /><br />
<br /><br />
<br /><br />
<br /><br />
<br /><br />
<br /><br />
<br /><br />
<br /><br />
<br /><br />
</p>
Reply
0
0
07-22-2015, 09:46 PM
#12
SADFab Destructive Testing Engineer
Thread Starter
iTrader: (5)
Join Date: Apr 2014
Location: Beaverton, USA
Posts: 18,642
Total Cats: 1,866
<p> <br />
 <br />
 <br />
 <br />
 <br />
 <br />
 <br />
 <br />
 <br />
 <br />
 <br />
 <br />
 <br />
 <br />
 <br />
 <br />
 <br />
 <br />
 <br />
 <br />
 <br />
 <br />
 <br />
 <br />
 <br />
 <br />
 <br />
 <br />
 <br />
 <br />
 <br />
 <br />
 <br />
 <br />
 <br />
 <br />
 <br />
 <br />
 <br />
 </p>
</p>
<br /><br /><br /><br /><br /><br /><br /><br /><br /><br /><br /><br /><br /><br /><br /><br /><br /><br /><br /><br /><br /><br /><br /><br /><br /><br /><br /><br /><br /><br /><br /><br /><br /><br /><br /><br /><br /><br /><br /></p>
Reply
0
0
07-22-2015, 09:46 PM
#13
SADFab Destructive Testing Engineer
Thread Starter
iTrader: (5)
Join Date: Apr 2014
Location: Beaverton, USA
Posts: 18,642
Total Cats: 1,866
<p> <br />
<br /> <br />
<br /> <br />
<br /> <br />
<br /> <br />
<br /> <br />
<br /> <br />
<br /> <br />
<br /> <br />
<br /> <br />
<br /> <br />
<br /> <br />
<br /> <br />
<br /> <br />
<br /> <br />
<br /> <br />
<br /> <br />
<br /> <br />
<br /> <br />
<br /> <br />
<br /> <br />
<br /> <br />
<br /> <br />
<br /> <br />
<br /> <br />
<br /> <br />
<br /> <br />
<br /> <br />
<br /> <br />
<br /> <br />
<br /> <br />
<br /> <br />
<br /> <br />
<br /> <br />
<br /> <br />
<br /> <br />
<br /> <br />
<br /> <br />
<br /> <br />
<br /> </p>
</p>
<br /><br />
<br /><br />
<br /><br />
<br /><br />
<br /><br />
<br /><br />
<br /><br />
<br /><br />
<br /><br />
<br /><br />
<br /><br />
<br /><br />
<br /><br />
<br /><br />
<br /><br />
<br /><br />
<br /><br />
<br /><br />
<br /><br />
<br /><br />
<br /><br />
<br /><br />
<br /><br />
<br /><br />
<br /><br />
<br /><br />
<br /><br />
<br /><br />
<br /><br />
<br /><br />
<br /><br />
<br /><br />
<br /><br />
<br /><br />
<br /><br />
<br /><br />
<br /><br />
<br /><br />
<br /><br />
</p>
Reply
0
0

Thread
Thread Starter
Forum
Replies
Last Post
JesseTheNoob
DIY Turbo Discussion
15
09-30-2015 02:44 PM


