When you click on links to various merchants on this site and make a purchase, this can result in this site earning a commission. Affiliate programs and affiliations include, but are not limited to, the eBay Partner Network.
Had the car running well enough to take it to the autocross yesterday. Dissapointed I didn't get to make all kinds of crazzy supercharger noises and be super slow in SSM (thougb I probably would have beat the manual V6 swapped Fiero on snow tires that was in SSM). Put it in STS and ran towards the back of the pack. My driving was crap, though I managed a 56/128 in pax and 61/128 in raw. My co-driver did 54 and 57. We were both about 5 seconds off the top STS car. I have to say the Xidas are amazing considering we were running on an old naval air strip that hasn't been redone si ce the 60s. Concrete, asphault, steel plates, lots of cracks. The Xidas just soaked them all up and let me suck at actually going fast.
I really need to get my extended ball joints in and get an alignment.
Spent today cleaning up and inspecting supercharger parts. Rebuilt the older pulley over nose M45 that I have had sitting around for a while as well. Mineral spirits work amazingly on years of caked on goo.
Parts for a full snout rebuild.
Sorry for blurry pictures. The press lives in the back of the shed.
Doing the rear rotor bearings. Duno if they were bad on this one, but for $19 for both and 5 minutes to swap them, may as well.
All put together. Just need to wait for the form a gasket to set up.
Also got a good look at the one that locked up. Looks like the rotors expanded and galled up with the case? There is a build up next to the right bearing in this picture. Rotor pack bearings seem to be fine as there is no detectable axial play on the rotors. There was some radial play when this supercharger was together after locking up and then getting it free again. I think the rear bearings may have taken the brunt of the lock up, so I will do those for piece of mind (again, $19 and 5 min to do.) I will be cleaning up the case and doing a test assembly tomorrow to see if everything looks like it will be ok. The plan is to test both of these on the car to make sure they are working and then I will be selling them over the winter to cover a new engine and possible rebuild/freshening up.
Quick picture for anyone googling. This is the difference between the 1.6 and 1.8 brackets for the JRSC Sebring Jackson Racing Supercharger for the Miata. (hope that is enough keywords). The 1.6 is the one without the extra bracket.
Old Sebring M45 fully assembled and oiled up. Just need to make up a proper throttle cable bracket for it for testing (and for when I eventually sell it.)
I filed down the built up aluminum on the other M45 as well. Looks like the rotor bearings are ok, so the only thing I can think is that rear bearings overheated and caused the aluminum case to expand and contact the rotors? The non driven side rear bearing is toast, you can easily move the rotor radially, so I will be replacing both. But it looks like this one can be rebuilt without having to be shipped off.
Had a decent day auto-crossing last sunday. Ran waaaaaay better, also swapped on the momo wheel again. Having it 2" further back made a huge difference. So nice to not have my knee against the wheel.
Anyway, used a piece of old bed frame and some CAD (Cardboard Aided Design) to make a throttle cable bracket bracket for single throttle body use and for when I sell the kit.
Ok, as the days are getting colder, I am running into cold start issues again. It fires fine down to around 50F or so. Below that, I start having trouble. I am learning that I apparently have no idea how to tune start up (or where to find such info). My wideband is run off the radio circuit, so it restarts during startup. Useless, need to fix that.
It cranks fine, catches, makes one good POFF and then stops dead, almost like it tried to spin backwards? It also seems my ECU freaks out during this, may be due to battery voltage? Though the battery is fairly new. I think about 1.5 years old at this point? Attaching my tune and a log for any insight you guys can give.
I am reading it may be too big an angle between where the CAS is set and where the engine actually is? Apparently they recommend between 0-14* and I am at 16* if I remember right. I will give that a check. Need to poke the setting some more and see if I can find the basemap I started with. I am waaaay off from it anymore...
Edit: Nevermind, that is set to 6*....
Edit Edit: I have some slight cold spark advance set. I will try turning that off and turning down the starting timing tomorrow morning and see how that goes.
Your cranking pulse is way too low. And watch over your VE table while cranking. Increase ve in those cells.
Cranked the cranking pulse up to 250 at 30f or so this morning. Also dropped cranking timing to 5* and it started and died once, then started right up. No bacl fire/stopping dead. So we will see how thos continues.
I still seem to be having a voltage or wiring issue that wigs the ecu out. Log again showd 65k rpm and 5.6v for a short bit on the first failed start. Battery isn't that old, but I will check it out.
I was wondering how one would go about testing for boost leaks with a SC. Are you going to hook it up to the SC inlet and wire the bypass open?
If your air compressor’s anything like mine, the regulator gauge is ***** at low PSI- wildly inaccurate. Start off gently.
That IAC check valve dongle idea that I stole from you wasn’t an issue at 5-6 psi, but it was a big issue for me at 8-10psi. I’ll be curious to see how yours tests out.
Oh yeah. It is super bad at low PSI. I plan on just cracking it and closing the valve I have on the cap when it gets to where I want.
I am actually fairly positive the supercharger and bypass are working well, as I make the expected pressure with the original cross over pipe in (nothing really to leak there). So this will just be connected where the supercharger outlet is and testing the rest of the system. Though I do suppose if I sealed up the valve cover vent tube and ziptied on the one other cap, I could run it through the supercharger as well.
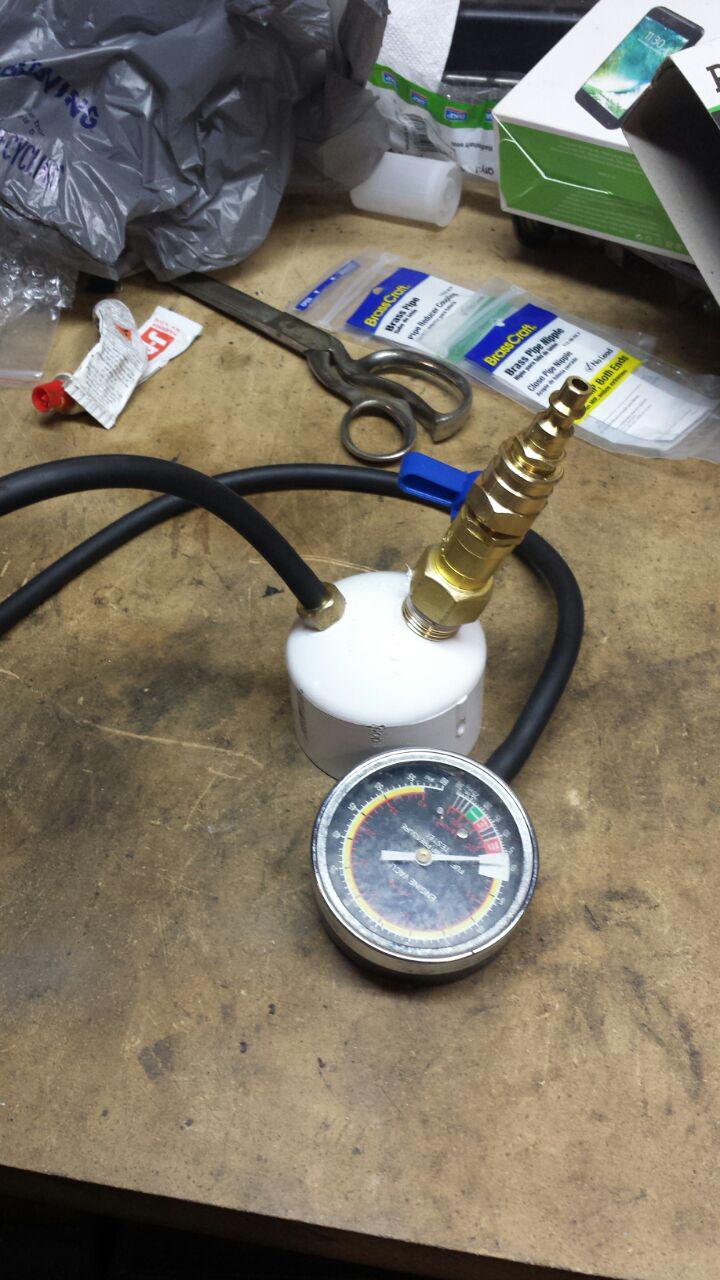
Glad I built that tester. There were leak on the leaks! holds up to 12psi before any hissing now, though I am fairly sure the last leak is either the IAC gasket or the throttle body itself. I can feel the air slightly, but it is not the 90* coupler onto the throttle body, or the coupler to the IAC check valve (which doesn't leak at all, btw. was expecting to have problems not having the IAC plumbed back into the piping).
Also, the evap system start gurgling at 9psi. I am gonna ignore that.
Ok, as the days are getting colder, I am running into cold start issues again. It fires fine down to around 50F or so. Below that, I start having trouble. I am learning that I apparently have no idea how to tune start up (or where to find such info). My wideband is run off the radio circuit, so it restarts during startup. Useless, need to fix that.
It cranks fine, catches, makes one good POFF and then stops dead, almost like it tried to spin backwards? It also seems my ECU freaks out during this, may be due to battery voltage? Though the battery is fairly new. I think about 1.5 years old at this point? Attaching my tune and a log for any insight you guys can give.
If your engine is kicking backwards when cranking you need to retard the cranking advance.
So, now that the inter-cooler is back in, I went out and did some tuning. Makes 4.5-5psi now instead of 5-5.5 or so (6.3 at redline). But the big thing is I had to add 8-12% more fuel everywhere in boost. I was not expecting THAT much of a denser air charger from an inter-cooler. At this pressure level. I am really impressed to say the least.
Originally Posted by vitamin j
If your engine is kicking backwards when cranking you need to retard the cranking advance.
Yup! I went down to 5* during cranking and it starts waaaay better now.
Glad I built that tester. There were leak on the leaks! holds up to 12psi before any hissing now, though I am fairly sure the last leak is either the IAC gasket or the throttle body itself. I can feel the air slightly, but it is not the 90* coupler onto the throttle body, or the coupler to the IAC check valve (which doesn't leak at all, btw. was expecting to have problems not having the IAC plumbed back into the piping).
Also, the evap system start gurgling at 9psi. I am gonna ignore that.
I found it interesting that my check valve was leaking to atmosphere out the edge of the canister where the rolled metal edge is, rather than through the valve itself. I don�t think it did that when I first got the valve. May have been a defect with my valve.

 09-18-2017 | 01:43 PM

 0
0