When you click on links to various merchants on this site and make a purchase, this can result in this site earning a commission. Affiliate programs and affiliations include, but are not limited to, the eBay Partner Network.
What exactly did you do to the tunnel to get it to fit?
I hit it with a hammer? Really, its trivial. The sheet metal needs to be "massaged" out of the way so you can get full left/right adjustability on the mount. Tappy-tap-tap, test fit, tappy-tap-tap some more, test fitment, etc. Its NBD.
Now what IS a big deal is that I've got an idea, and I'm going to force you to all follow along.
Fair warning, I'm going to be switching between DS and PS in these pics so try to keep up.
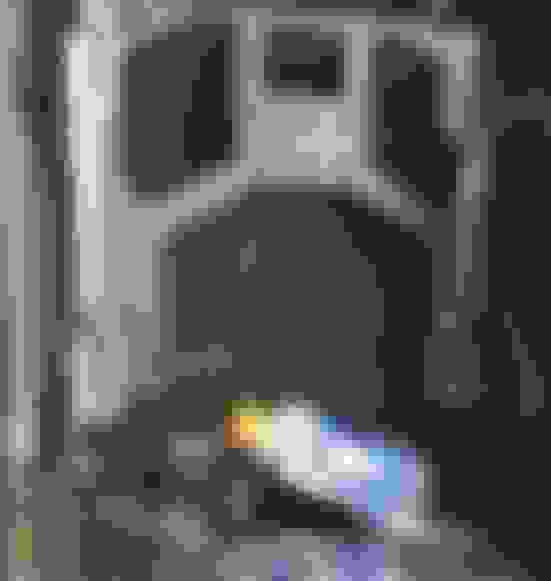
So the Schroth harnesses have these clever and convenient doodads attached to the ends of the lap and sub straps.
Schroth refers to these as B14 Snap-In Brackets for Eyebolts and Bolt-in Brackets.
And they designed to clip in to these equally convenient Eyebolts that Schroth also sells.
So as far as the sub straps go, I'm ordering 4x eyebolts with appropriate washers, nuts and washers (drivers side) or backing plates (passenger side) and I'm going to call that problem solved. You will notice the PCI mount comes with integrated mounting locations pre-drilled for both 5pt and 6pt sub strap hardware. It's like the gift that keeps on giving!
That's all well and good, but that leaves me to deal with the inboard (tunnel side) and outboard (door side) harness lap belt mount points.
We'll start with the outboard side, because its easier.
As you can clearly see in the lower corner of this picture, to the left of the Gatorade bottle, I have an OEM mount point that I feel would be ideal to use with the harness lap belt.
The angle looks good, and its an engineered point from the factory, so I think I'm going to use it. According to my reading, that bolt SHOULD be a fine thread 7/16-20 SAE bolt.
Remember this thing from earlier? If the bolt holes ARE in fact 7/16-20 (I'm going to try to buy a bolt today and confirm) then I "should" be able to order a set of eyes to replace the OEM bolts. I can retain the OEM belt anchor location and use the eyebolt for the harness.
Ok, so outboard is done, assuming the hardware all matches. I have a backup plan if this is not the case, but I won't bother you with it unless its needed.
So this brings us to the inboard side of things.
With the NB, Mazda changed things up a bit and bolted the seatbelt receiver to the side of the seat itself. While this allows the seatbelt to move while the seat is adjusted, it doesn't provide me with a mounting point for a harness like they did on the outboard side. I feel its only logical to attempt to duplicate the mounting point on the opposite side of the tub
Something like this. We already know the angle is good, now I just need to figure out how to create an anchor. Once again, Schroth is one step ahead of me:
These Backing Plates should be perfect. I can put these on the outside of the car in the tunnel, and run an Eyebolt through the OEM receiver bolt hole, through a hole in the tunnel and into the Backing Plate. The receiver might be a bit of a challenge to access, but the Backing Plate should provide a sufficiently solid mounting point regardless.
Basically, I intend to end up with this on both the inboard and outboard, both drivers and passenger sides:
Source: https://www.miataturbo.net/race-prep...17/#post773246
(I actually had this idea BEFORE I found the above thread and pictures, thus the edit to add this content to the post. It's good to know I'm not a special nor unique snowflake)
So, what do you all think? I've never done this before but this plan seems logical based on what I've read. If something does not look/sound right please speak up, because I'm probably going to order hardware to do this sometime this afternoon.
Last edited by EO2K; 09-04-2017 at 03:28 PM.
Reason: added some stuff I found that someone else already did
I hit it with a hammer? Really, its trivial. The sheet metal needs to be "massaged" out of the way so you can get full left/right adjustability on the mount. Tappy-tap-tap, test fit, tappy-tap-tap some more, test fitment, etc. Its NBD.
I did that too. Your, "Tappy-tap-tap" was more like "Swing as hard as you can with a 5lb sledge". No bueno. No moving. Much sads.
Originally Posted by EO2K
So, what do you all think? I've never done this before but this plan seems logical based on what I've read. If something does not look/sound right please speak up, because I'm probably going to order hardware to do this sometime this afternoon.
My PCI mount came with a seatbelt mount thingy. It bolts to the seat mount.
I did that too. Your, "Tappy-tap-tap" was more like "Swing as hard as you can with a 5lb sledge". No bueno. No moving. Much sads.
Tappy-tap-tap was with a 2.5lb shorty, but it could have easily been done with a framing or regular generic utility hammer. Were you beating on the hump that the mount bolts into or the tunnel? That sounds like you were beating on the hump. I'll snap a pic and highlight the part I had to hit.
Originally Posted by MiataMan00
My PCI mount came with a seatbelt mount thingy. It bolts to the seat mount.
As did mine, but it does not solve my harness lap belt issue, so I probably won't use it. :P
I didn't want (and didn't have room) for the eyebolts to be sticking up under the seat. So for the sub straps I removed the clip thing from the belts and looped them directly onto the B24 bolt in brackets:
and for the lap belts, I just piggybacked onto the OEM bolt with these B23a end fittings, which you put a little twist into to give clearance for the clip. I used the backing plates you listed, which are seatbelt thread.:
This allows me to retain the OEM belts, and these swivel on the seatbelt bolt like the OEM receiver on the driver's side does.
I did that too. Your, "Tappy-tap-tap" was more like "Swing as hard as you can with a 5lb sledge". No bueno. No moving. Much sads.
Yeah, not sure what you were banging on. Like G I had to massage the trans tunnel. That sheet metal is quite thin, bends easily, and it only took a few swings. Test fitting the bracket into place to see if it cleared took most of the time. Actual hammer swinging time was maybe 15 seconds total.
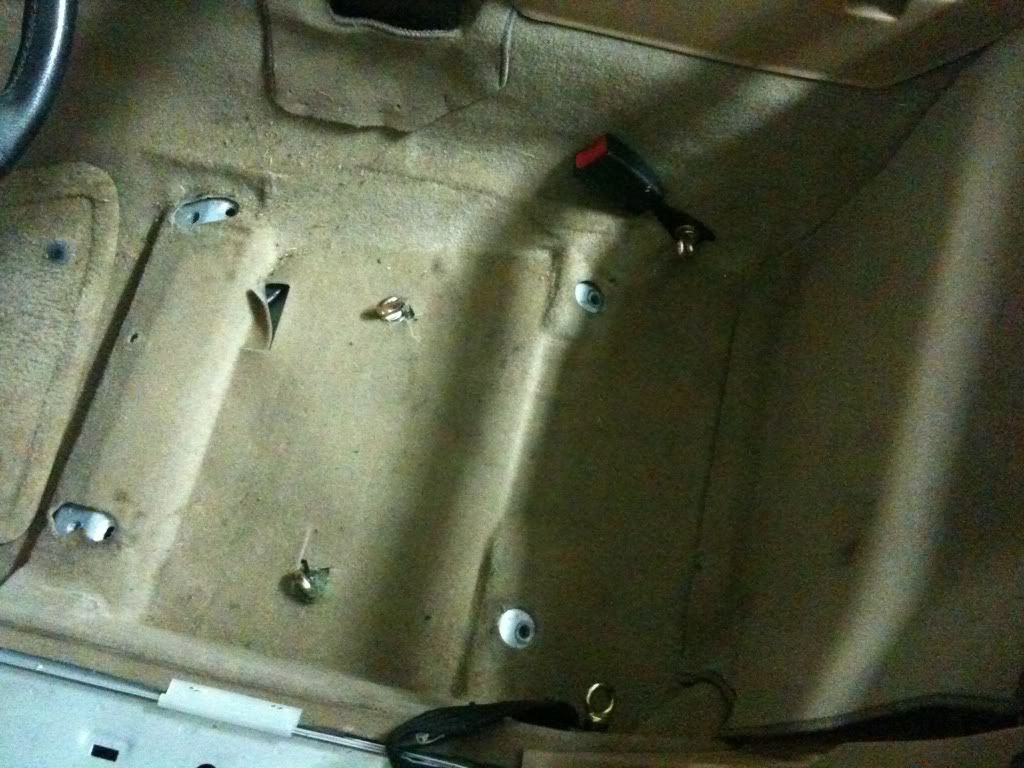
I use PCI mounts in my 99, and I was able to get one of these do-dads to bolt to the seat mount.
The angled piece on the right bolts to the inboard rear seat mount, then there is a bottom bolt for the bracket to be held in place. Then, you just use the buckle part from the seat, and bolt it to the right angle portion of the bracket. Clearance is realllly tight, but it works.
I didn't want (and didn't have room) for the eyebolts to be sticking up under the seat. So for the sub straps I removed the clip thing from the belts and looped them directly onto the B24 bolt in brackets:
Clearance will be an issue, for certain. I'll probably order a pair of the B24s as well, good call there! My only regret is that I really like the B14 clips, it really seems to make things super modular.
@Mobius, how did you bolt up your B24s? Do you have mounts in the base, or backing plate and through the floor?
Originally Posted by Mobius
and for the lap belts, I just piggybacked onto the OEM bolt with these B23a end fittings, which you put a little twist into to give clearance for the clip. I used the backing plates you listed, which are seatbelt thread.:
This allows me to retain the OEM belts, and these swivel on the seatbelt bolt like the OEM receiver on the driver's side does.
This was actually my backup plan that I mentioned but opted to not go into detail about in my already wordy and picture intensive post, so you really hit the nail on the head with this one. Of course now you've made me second guess myself and I'm trying to decide if I want to do the eyes as I described, or use these swivel jobs that you posted. Humm...
Originally Posted by cal_len1
I use PCI mounts in my 99, and I was able to get one of these do-dads to bolt to the seat mount.
<image>
The angled piece on the right bolts to the inboard rear seat mount, then there is a bottom bolt for the bracket to be held in place. Then, you just use the buckle part from the seat, and bolt it to the right angle portion of the bracket. Clearance is realllly tight, but it works.
Yep, my PCI came with the same but I'm opting not to use it. I figure if I'm already going to add a backing plate for the lap belt, I can't justify jamming another piece of hardware in there when I can just use one plate for both sets of belts.
Thanks guys, I really do appreciate the post feedback. It helps me make sure I'm not making terrible mistakes with this stuff, and maybe someone else can read this (if they can find it) and learn from it as well.
Backing plate you have already listed, and grade 8 bolts and washers from the hardware store.
How modular do you need it to be? It's not terribly hard to unbolt them, or to unthread the straps. But they're under the seat, not sure why they'd ever need to be removed unless you were doing something that would require their complete removal regardless.
Edit:. Sub straps use backing plates.
Door side lap belts piggyback onto OEM seat belt bolt.
Yep, my PCI came with the same but I'm opting not to use it. I figure if I'm already going to add a backing plate for the lap belt, I can't justify jamming another piece of hardware in there when I can just use one plate for both sets of belts.[/QUOTE]
I guess I should have said this the first time, but I used the eye bolt as the bolt to hold the belt buckle on, and it also has the eyelet for the harness. Two in one! Like I said, it's really tight if you do that.
Well this took about a billion times longer than expected.
It's very nice. I can tighten it down far enough that I can taste my lunch. Feels very secure. Sadly, pax side is still OEM 3 points, so I won't be giving any rides this year at MRLS, unless someone is feeling particularly brave.
And because I know someone will ask, this is what I did on the tunnel side:
After looking at it and scratching my head a bunch, I used the bracket and backing plates that @cal_len1 was talking about that came with my PC mount, AND one of the eyes and backing plates I bought from @afm. So PCI belt bracket is secured to the seat base point, through the floor with a backup plate, and through the tunnel with a backup plate. Thats 3 points of contact for that one mount. I feel like it's super duper secure now. I'll get a shot from underneath the car tonight so you can see how that all worked out. You'll notice no OEM belt receiver right now, but I'll add it later when I can get a slightly longer eyebolt.
I also did a shitload of other stuff and took zero pictures so I can't prove anything. I'm sitting in the jury duty holding room at the courthouse bored out of my mind, so I figured I might as well shitpost a lame update.
I'm not sure if I mentioned it here or not, but the Miata got a new battery. My 3/11 production date Optima Red Top had finally given up the ghost, so on @codrus recommendation I picked up a Optima Yellow Top D51R. It's taller but much narrower than the Group 35/75 it replaced, and also much much lighter. I've been struggling with what I thought was a failing starter for a while now, but it turns out it was the battery. With the new battery it's almost like the Hand Of God has come down and grabbed that starter and given it a twist. Amazing. I know you guys will want to see fitment so I'll try to remember to get a pic tonight.
Turbo, manifold, downpipe, oil feed, oil drain and full exhaust installed. VICS manifold is off and bottom half of squaretop is installed. Intercooler is mounted but not plumbed, ignition and injection harnesses are swapped, return fuel line is in place, along with mtuned rail, ID1k, and Fuelab regulator. I also removed the VEI pressure sender and swapped it out for the Accutech sender for my fancy new SMI oil pressure gauge.
At this point I need to install the MS, remove the regulator from the fuel tank, swap the lines around in the rear for the return setup, plumb all the fuel stuff under the hood, plumb the coolant for the turbo, plumb the intake tract, reinsall the nose of the car, unfuxor the wiring for my wideband and ...start the car?
Nice progress. Smog for my car is due at the end of the month, and I still cant find anyone to "smog" my car. I really dont want to revert it back to stock. But if I cant find anybody really soon, it the only option.
then I have to put it all back together for MRLS. Ughhh.
I've given up on the whole "pay a guy, cross your fingers, and hope no one get's a felony" smog song and dance. Look at it this way: removing/re-installing everything gives you a really good opportunity to look everything over, check everything, and make sure your setup is still tip-top, and fix/update whatever's lacking.

 09-04-2017, 03:09 PM

 Really, its trivial. The sheet metal needs to be "massaged" out of the way so you can get full left/right adjustability on the mount. Tappy-tap-tap, test fit, tappy-tap-tap some more, test fitment, etc. Its NBD.


 0
0