When you click on links to various merchants on this site and make a purchase, this can result in this site earning a commission. Affiliate programs and affiliations include, but are not limited to, the eBay Partner Network.
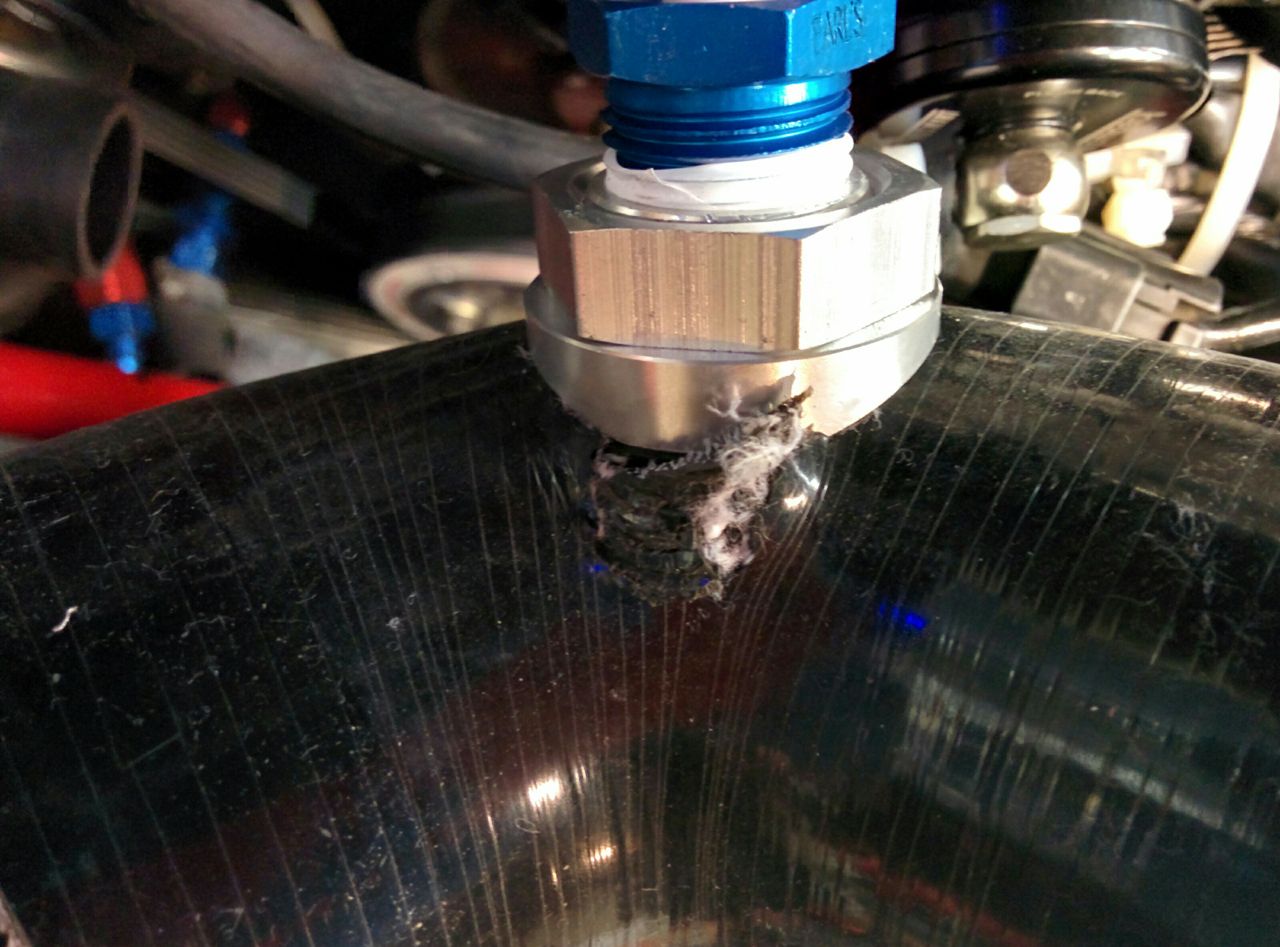
Be careful with those silicone intakes port adapters -- I had one as my boost signal source and it lasted all of 200 miles. This may have been because I had mounted it on a bend, but...
Where did all the crud in the fuel system come from? I've got most of the FM BFK in my car, and haven't seen any filtering issues -- yet?
Be careful with those silicone intakes port adapters -- I had one as my boost signal source and it lasted all of 200 miles. This may have been because I had mounted it on a bend, but...
Probably less of an issue with a vacuum-only motor. I'm probably going to tap it in to the manifold instead eventually. Intake replacement is on the horizon as well; my intake is too short - K motors like really long intake tubes for whatever reason.
How high were your oil temps when they got 'high'? That may also have hurt the bearings initially.
Gauge was pegged at 260. No telling how high they actually got.
Also, I had a massive oil leak from the KMiata/Moroso not-flat oil pan flange. Going through turn 1 I lost oil pressure enough the car went into limp mode - which is caused by the VTEC solenoid activating then detecting that it didn't actuate. This happened a few different times that day. I thought it was another issue until I realized oil pressure was going flat in higher G turns. I'd imagine that had a more damaging effect on the bearings than high oil temps.
First of all, great build and awesome thread. Thanks for sharing all the technical insights and challenges that go into building a race Miata with a K swap. Also, your livery is the coolest I've seen in a very long time.
Originally Posted by shuko
And a compilation of race starts to give you an idea of the madness I willingly participate in. Check out the 2:25 mark to see why I kill so many splitters.
What's up with the near pile up at the start of Race 2? Why did the field suddenly slow down to 30mph?
First of all, great build and awesome thread. Thanks for sharing all the technical insights and challenges that go into building a race Miata with a K swap. Also, your livery is the coolest I've seen in a very long time.
What's up with the near pile up at the start of Race 2? Why did the field suddenly slow down to 30mph?
Thanks!
We actually had a few cars make contact in the accordion in race 2. Just like on the freeway, someone ahead slows down unexpectedly and the effect amplifies and travels backwards. In this case, the leaders of the pack were going too quickly so the field was spread out. When they didn't see the green flag they slowed down, causing sudden compression of the field. There's almost always an accordion happening in a start, but rarely that extreme. Nothing sucks worse than being at the peak slowness of the accordion when the green gets thrown, just as few things are as satisfying as being on the other side of it, rocketing past the unfortunate caught in the deceleration wave.
On my quest for adding lightness, I went after the doors.
They were already "gutted" to fit around the cage, but still around 36 lbs each.
Angle grinder and cutoff wheel were pretty effective.
And now I have super floppy, but 11 lb doors. Painting is not my strongest skill, but bare metal needs corrosion protection!
I also added an accusump to hedge my oiling bets.
Between the weight shaved off of the doors and the added mass of the sump and oil, I think I've removed about a cat's worth of weight.
I also set about building a replacement air dam and splitter. Well, two of them anyway.
I built little plates with nuts welded to them and riveted them to the inside of the bumper. This is what I use as the attachment points.
12" high aluminum sheet for the air dam.
To attach the undertray/splitter to the air dam, I use angle aluminum cut every 1" or so with a jig saw.
This allows it to flex on one side to match the curve. I've also found that the little tabs will rip off pretty easily if I end up jamming the splitter into the ground. Sort of an engineered weak point. I know some people have the opposite approach: mount it to the frame and make everything strong enough to jump up and down on, but I've seen more than a few of these end a weekend when they end up mangled from an off-track-excursion.
Mounted on the car. It sticks 5" out from the bumper line. I'm already stuck taking the non-prod modification in ST3 since I have the tubular subframe, so I don't get dinged for exceeding 4".
Since I had the materials, I built two entire assemblies. I'll take one apart to keep in the trailer in the likely event it requires replacement at an event. I was carrying just the wood, but it was still a lot of work to re-bolt it to the dam.
I often get asked "does it even do anything" which really means "can you feel a difference if it's not there?"
YES. It makes a tremendous difference even at low speeds. With the AOA on the rear wing cranked down to balance it, the aero keeps the car planted and helps high speed turn-in immensely!
I try to avoid welding nuts to plates as it inevitably distorts the threads and fouls the zinc coating that provides corrosion protection and reduces bolt friction. I realize everyone has to work within a budget and with the time, skills, tools and materials they have at their disposal. But I've had great experience with floating nut plates. Available in standard and metric. There's always Dzus and Camloc quick disconnect fasteners also.
I try to avoid welding nuts to plates as it inevitably distorts the threads and fouls the zinc coating that provides corrosion protection and reduces bolt friction. I realize everyone has to work within a budget and with the time, skills, tools and materials they have at their disposal. But I've had great experience with floating nut plates. Available in standard and metric. There's always Dzus and Camloc quick disconnect fasteners also.
I've tried several of those to varying success. The steel welded nut plates have held up the best so far, not only to repeated impacts but to constant assembly and disassembly. Welding them definitely distorted the threads and blew away the zinc coating. We'll see how long they last! (I've already had to run a tap through a couple of them to keep bolts from cross threading and binding.)
On the weight loss front, I drained the fuel tank yesterday night and put it on the scales. Corner weight is off because I'm not in the car.
Accusump works AWESOME. Right before engine startup, you open the valve. Oil pressure goes up, you hit the starter and skip the dry start. It also kept the oil pressure at 50psi or greater the entire time; no more dips between shifts or under high G's.
Another weekend without breaking anything... well. Except a windshield and maybe my eyes.
Yikes! You okay man? I never understood the predilection for stock windshields on track-only Miatas. IMO plastic is way safer but I understand it represents a point of no return for many who have dual-purpose street/track cars. You want to carefully consider how you mount the plastic windshield to avoid cracks and to ensure it remains secure at all speeds and in the event of an object impact or crash. It's also a good idea to consider your roll cage design and how large of an aperture your windshield is. If you're going this far you might want to consider additional roof bars (double halo) and windshield (Earnhardt) bar. 949Racing suggests using "standard" metal drill bits for plastic windshield mounting holes. But they do make spiral flute drills with 60� point angle specifically for drilling holes in plastics.
Yikes! You okay man? I never understood the predilection for stock windshields on track-only Miatas. IMO plastic is way safer but I understand it represents a point of no return for many who have dual-purpose street/track cars. You want to carefully consider how you mount the plastic windshield to avoid cracks and to ensure it remains secure at all speeds and in the event of an object impact or crash. It's also a good idea to consider your roll cage design and how large of an aperture your windshield is. If you're going this far you might want to consider additional roof bars (double halo) and windshield (Earnhardt) bar. 949Racing suggests using "standard" metal drill bits for plastic windshield mounting holes. But they do make spiral flute drills with 60� point angle specifically for drilling holes in plastics.
Thanks, good info. And yeah, I'm OK I think. This car is certainly a "track only" vehicle. The car was an SM, which does not allow anything but glass. I'll check my class rules but I'm 99.9% sure I can go to plastic in ST. A few things keeping me from a plastic window:
1. Cost. Yeah they're not oem Porsche glass expensive, but expensive nonetheless. I can have Safelite come out and replace my glass 3 times for what it costs to replace a plastic window.
2. Scratchyness. I know if you're careful with them they last longer, and you can get them with fancy coatings, but plastic windows get haze and don't have near the optical clarity of glass, especially after they've weathered a bit. I don't imagine they like dirt+windshield wipers either.
I'll look into it a bit before I pull the trigger on replacement glass, but I'll probably end up with another glass windshield.
Originally Posted by flier129
Jesus! I bet ya some poo came out?
No, not really. Happened too fast! Much more the previous evening when I almost went into the wall after sliding up the banking!


 04-26-2017, 12:13 AM


 0
0