

Miata LFX Swap (Singular Motorsports & Good-Win Racing)
 03-31-2017, 01:48 AM
#521
Supporting Vendor

Thread Starter
iTrader: (3)

Join Date: Jul 2006
Location: San Diego
Posts: 3,304
Total Cats: 1,225
Ticking things off the list.
Final install of the front brakes is complete. Confirmed fitment with performance friction pads that clear the bridge bolt. The backing plates needed a fraction of a millimeter shaved off the sides to slide smoothly on the guide plates then they were perfect:

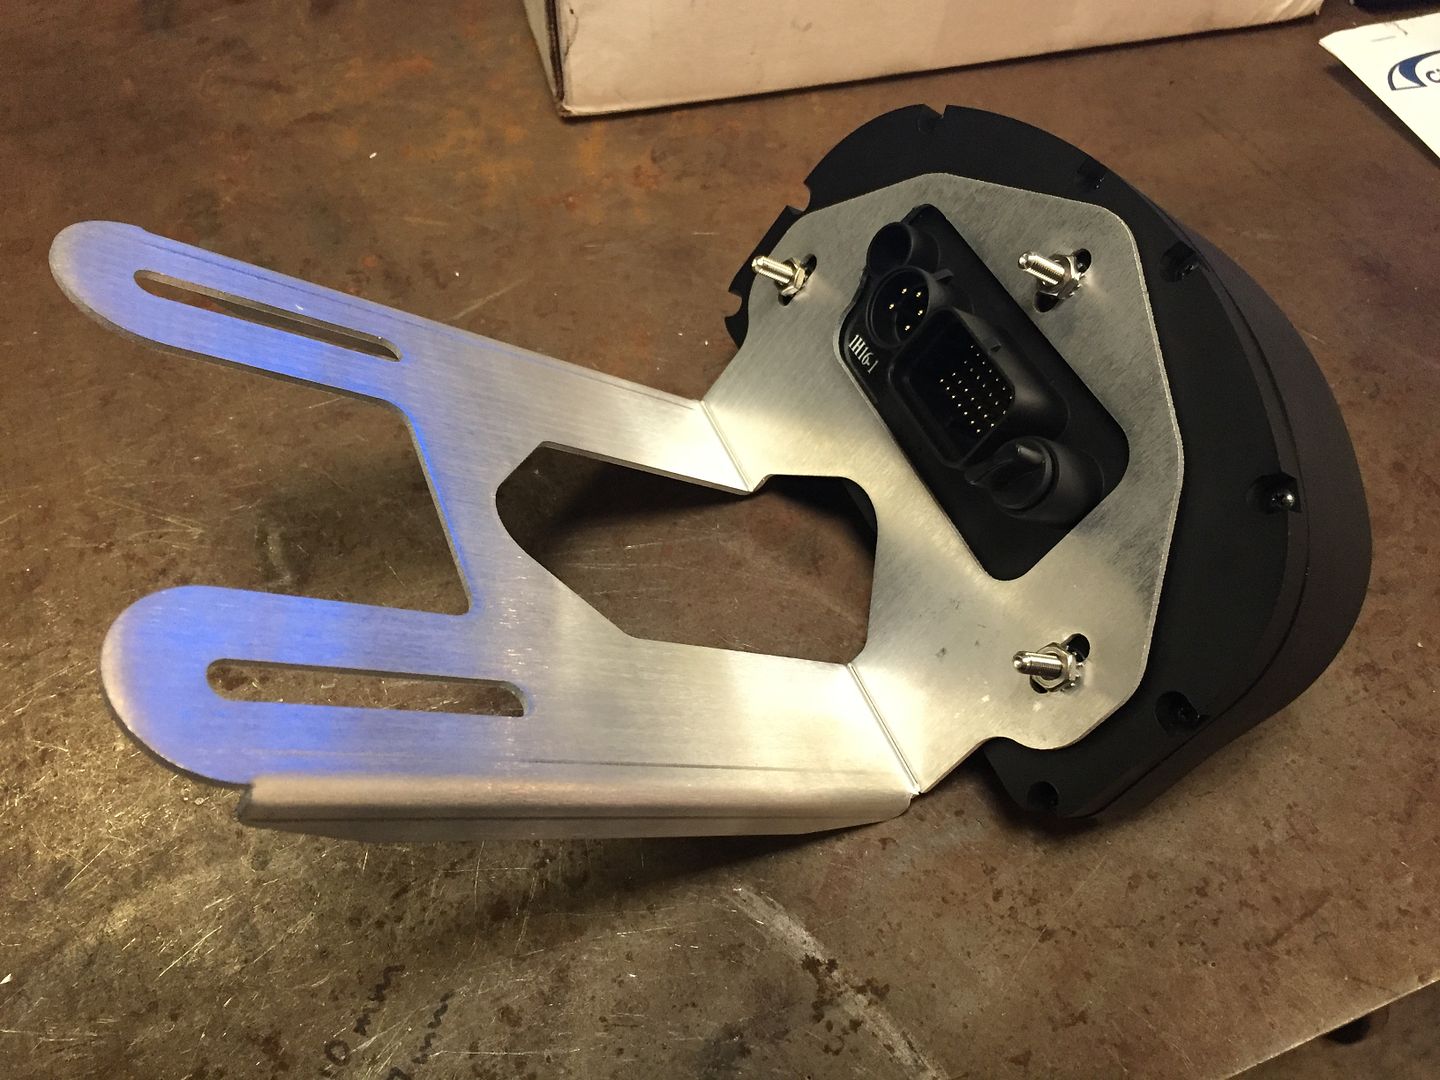
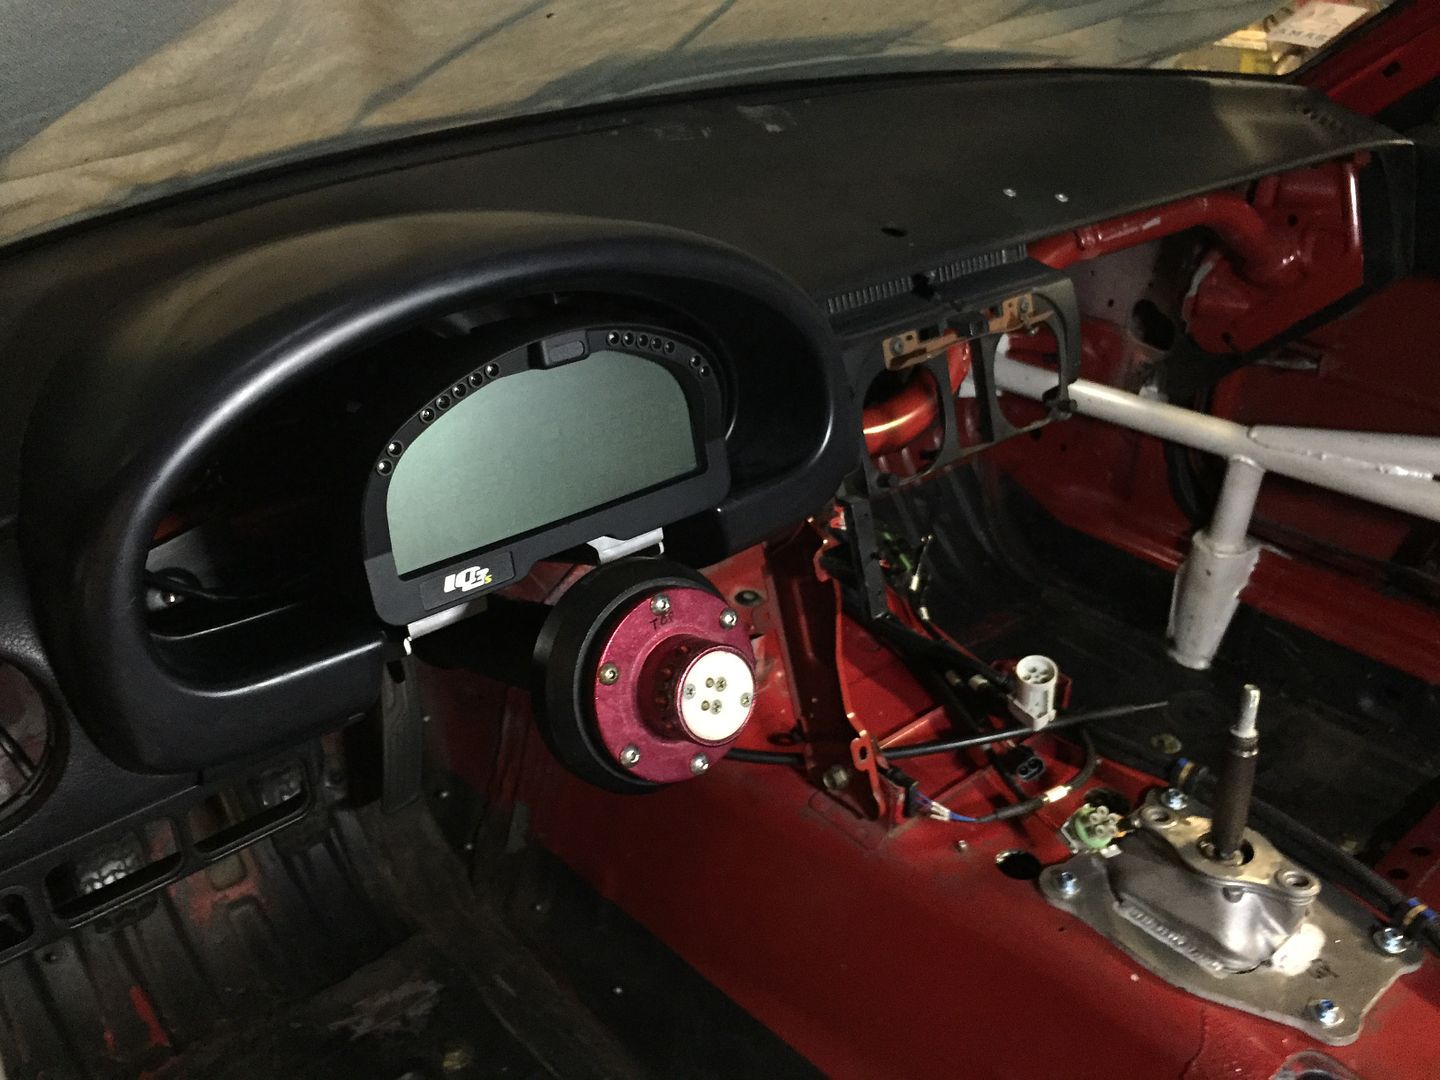
Before the weekend I need a steering wheel! Steering wheel needs a steering column, that means I need the dash... and if that's going in I should get the IQ3S display mounted as well.
Needed a bracket to hold the IQ3S so I made this:

It piggy-backs on the two bolts holding the steering column to the dash bar and is slotted for adjusting distance from the steering wheel and vertical placement.

Still much to do in the inside of the car but now we've got a dash, digital display and steering column all mounted up and ready for a steering wheel:
]img]https://photos.smugmug.com/LFXSwap/Racepak-and-Wiring/i-3spd687/0/31462517/XL/B460ED17-4CE3-4975-B0CE-E54385F1C42B_zpskopfo1yj-XL.jpg
Final install of the front brakes is complete. Confirmed fitment with performance friction pads that clear the bridge bolt. The backing plates needed a fraction of a millimeter shaved off the sides to slide smoothly on the guide plates then they were perfect:
Before the weekend I need a steering wheel! Steering wheel needs a steering column, that means I need the dash... and if that's going in I should get the IQ3S display mounted as well.
Needed a bracket to hold the IQ3S so I made this:
It piggy-backs on the two bolts holding the steering column to the dash bar and is slotted for adjusting distance from the steering wheel and vertical placement.
Still much to do in the inside of the car but now we've got a dash, digital display and steering column all mounted up and ready for a steering wheel:
]img]https://photos.smugmug.com/LFXSwap/Racepak-and-Wiring/i-3spd687/0/31462517/XL/B460ED17-4CE3-4975-B0CE-E54385F1C42B_zpskopfo1yj-XL.jpg

Last edited by ThePass; 07-13-2017 at 01:13 PM.

Reply
 5
5

5
03-31-2017, 08:46 AM
#522
Senior Member

Join Date: Sep 2011
Location: Sierra Vista, AZ
Posts: 1,306
Total Cats: 332
Ticking things off the list.
Before the weekend I need a steering wheel! Steering wheel needs a steering column, that means I need the dash... and if that's going in I should get the IQ3S display mounted as well.
Needed a bracket to hold the IQ3S so I made this:

It piggy-backs on the two bolts holding the steering column to the dash bar and is slotted for adjusting distance from the steering wheel and vertical placement.
Still much to do in the inside of the car but now we've got a dash, digital display and steering column all mounted up and ready for a steering wheel:
Before the weekend I need a steering wheel! Steering wheel needs a steering column, that means I need the dash... and if that's going in I should get the IQ3S display mounted as well.
Needed a bracket to hold the IQ3S so I made this:
It piggy-backs on the two bolts holding the steering column to the dash bar and is slotted for adjusting distance from the steering wheel and vertical placement.
Still much to do in the inside of the car but now we've got a dash, digital display and steering column all mounted up and ready for a steering wheel:

Reply
0
0
 04-01-2017, 12:28 AM
#525
Supporting Vendor
Thread Starter
iTrader: (3)
Join Date: Jul 2006
Location: San Diego
Posts: 3,304
Total Cats: 1,225
The final hurdle before our tech day was the axle boots rubbing the lower lock collar on the rear coilovers. The boots can be compressed a bit to improve clearance but I want to make sure this area is smooth and doesn't have anything that could damage the boot if they do make contact. Changing to a ring/collar that takes a pin type spanner wrench instead of the current notched rings I have would do the trick, but there wasn't enough time to source one among all the various shock body sizes/thread pitches out there.
Called Feal up and they sent down a spare lower shock mount... looks like it belongs to a Subaru or similar. That's perfect, all I needed was the threaded top portion. Cut two rings off the top to make new lock rings from:

Cleaned up the rings and drilled four holes in the outward side of each ring juuuust shallow enough that they didn't go through to the inner threaded side. Then we couldn't find the pin type spanner wrench at the shop so I threw a quick and dirty one together:

The lock ring now clears the boot, has the same OD as the lower portion of the coilover and has a smooth outer surface in the event of contact:

And with that I installed the rear coilovers and then the wheels and set her on the ground for the first time in a year! Tomorrow she'll be out in front of the shop for our tech day.
Called Feal up and they sent down a spare lower shock mount... looks like it belongs to a Subaru or similar. That's perfect, all I needed was the threaded top portion. Cut two rings off the top to make new lock rings from:
Cleaned up the rings and drilled four holes in the outward side of each ring juuuust shallow enough that they didn't go through to the inner threaded side. Then we couldn't find the pin type spanner wrench at the shop so I threw a quick and dirty one together:
The lock ring now clears the boot, has the same OD as the lower portion of the coilover and has a smooth outer surface in the event of contact:
And with that I installed the rear coilovers and then the wheels and set her on the ground for the first time in a year! Tomorrow she'll be out in front of the shop for our tech day.
Last edited by ThePass; 07-13-2017 at 01:07 PM.
Reply
3
3
04-01-2017, 09:26 PM
#526
Supporting Vendor
Thread Starter
iTrader: (3)
Join Date: Jul 2006
Location: San Diego
Posts: 3,304
Total Cats: 1,225
Out front for our tech day at the shop. Starting to look more and more like a car. Still many items on the to-do list but it felt great to have it out there even just rolling. We're getting there 


Last edited by ThePass; 07-10-2017 at 03:57 PM.
Reply
7
7
04-03-2017, 12:01 AM
#527
Supporting Vendor
Thread Starter
iTrader: (3)
Join Date: Jul 2006
Location: San Diego
Posts: 3,304
Total Cats: 1,225
Back on the lift and continuing to tick items off the list. Today I ran the main battery cable and engine grounds. This motorsports grade cable is awesome stuff and super flexible:

Last edited by ThePass; 07-10-2017 at 03:55 PM.
Reply
0
0
04-03-2017, 03:52 PM
#528

also, i did some side skirts made from Aluminum circle track parts. i'll send you the part number.

__________________
OG Racing
Your Source For Motorsports Safety Equipment
WWW.OGRACING.COM
800.934.9112
703.430.3303
info@ogracing.com
OG Racing
Your Source For Motorsports Safety Equipment
WWW.OGRACING.COM
800.934.9112
703.430.3303
info@ogracing.com
Reply
-1
-1
04-04-2017, 02:34 AM
#529
Supporting Vendor
Thread Starter
iTrader: (3)
Join Date: Jul 2006
Location: San Diego
Posts: 3,304
Total Cats: 1,225
The revised spacers for the control arm spherical bearing kit arrived. The kit is made by ESM Race up in Canada. I originally found the bearing spacers for the rear lower outer position were the wrong ID and length. It took them a while to get the corrected bits to me but, to be fair, just about every machinist I've known seems to operate on a different calendar than the rest of us. At any rate, parts are here now and right. I'm checking with them now to ensure that any Miata kits they make in the future have these corrections.
The final hitch was in the rear upper outer; the V8R arms have the cool feature of using an eccentric bolt there to adjust camber quickly without affecting toe, but the eccentric bolt is larger in diameter than the normal bolt in that location so the ESM bearing spacers for that spot didn't fit. Not ESM's fault, just particular needs of my setup. Had a local machinist drill those spacers out to match the eccentric bolt diameter and now everything is in:

The final hitch was in the rear upper outer; the V8R arms have the cool feature of using an eccentric bolt there to adjust camber quickly without affecting toe, but the eccentric bolt is larger in diameter than the normal bolt in that location so the ESM bearing spacers for that spot didn't fit. Not ESM's fault, just particular needs of my setup. Had a local machinist drill those spacers out to match the eccentric bolt diameter and now everything is in:
Last edited by ThePass; 07-10-2017 at 03:53 PM.
Reply
3
3
04-05-2017, 12:29 AM
#530
Supporting Vendor
Thread Starter
iTrader: (3)
Join Date: Jul 2006
Location: San Diego
Posts: 3,304
Total Cats: 1,225
Fuse/relay box and power distribution are now mounted and installed. Needed a bracket for these items so I made this:

Installed:

Also made the 6ga cable for starter to alternator :

Installed:
Also made the 6ga cable for starter to alternator :
Last edited by ThePass; 07-10-2017 at 02:10 PM.
Reply
3
3
04-07-2017, 02:43 AM
#531
Supporting Vendor
Thread Starter
iTrader: (3)
Join Date: Jul 2006
Location: San Diego
Posts: 3,304
Total Cats: 1,225
Finished the switch panel up yesterday. I wanted to keep the identifiably Miata "tombstone" center console shape. Switches for lights are preemptive - don't have lights in the car yet but planning to. Still need to add the brake bias ****.


Last edited by ThePass; 07-10-2017 at 02:11 PM.
Reply
8
8
04-07-2017, 07:35 AM
#532

Looks great! FYI, there's a company in the UK that makes a very similar carbon tombstone panel. I bought one for my NA a few years ago but never got around to installing it and eventually sold it to a local.
Performance Modifications | Carbon Fibre products | MK1 Mazda MX5 | Eunos Roadster | BC Cars Motorsport
Performance Modifications | Carbon Fibre products | MK1 Mazda MX5 | Eunos Roadster | BC Cars Motorsport
Reply
0
0
 04-11-2017, 03:10 PM
#535
Supporting Vendor
Thread Starter
iTrader: (3)
Join Date: Jul 2006
Location: San Diego
Posts: 3,304
Total Cats: 1,225
949Racing endlinks installed in the front. These are really nice. I really should pretty up the front sway bar, but it's probably going to end up only being in there temporarily...

Last edited by ThePass; 07-10-2017 at 01:18 PM.
Reply
0
0
04-14-2017, 12:58 AM
#536
Supporting Vendor
Thread Starter
iTrader: (3)
Join Date: Jul 2006
Location: San Diego
Posts: 3,304
Total Cats: 1,225
Checking something off the list each day.
The ECU is a bit of an awkward thing. It resides in the engine bay, plugged in to the engine wiring harness with options for its position severely limited by the wiring. Some day I'll build a new engine harness that allows relocating the ECU rearwards, but that's for another time.
A few bracket additions on the passenger side:

Which receives a GM plastic ECU tray, PN 22897960 (required trimming):

And ECU now has a home:

The ECU is a bit of an awkward thing. It resides in the engine bay, plugged in to the engine wiring harness with options for its position severely limited by the wiring. Some day I'll build a new engine harness that allows relocating the ECU rearwards, but that's for another time.
A few bracket additions on the passenger side:
Which receives a GM plastic ECU tray, PN 22897960 (required trimming):
And ECU now has a home:
Last edited by ThePass; 07-26-2017 at 01:30 AM.
Reply
0
0


