

Miata cooling system thread

 07-05-2016, 06:35 PM
#522

I am planning on cutting out the center of mine and replacing it with a steel hoop that follows the curve of the nose. I realize that it may result in worse damage but there are tons of guys with other makes running damn near complete tube front ends so that kind of stuff isn't a new river to cross.
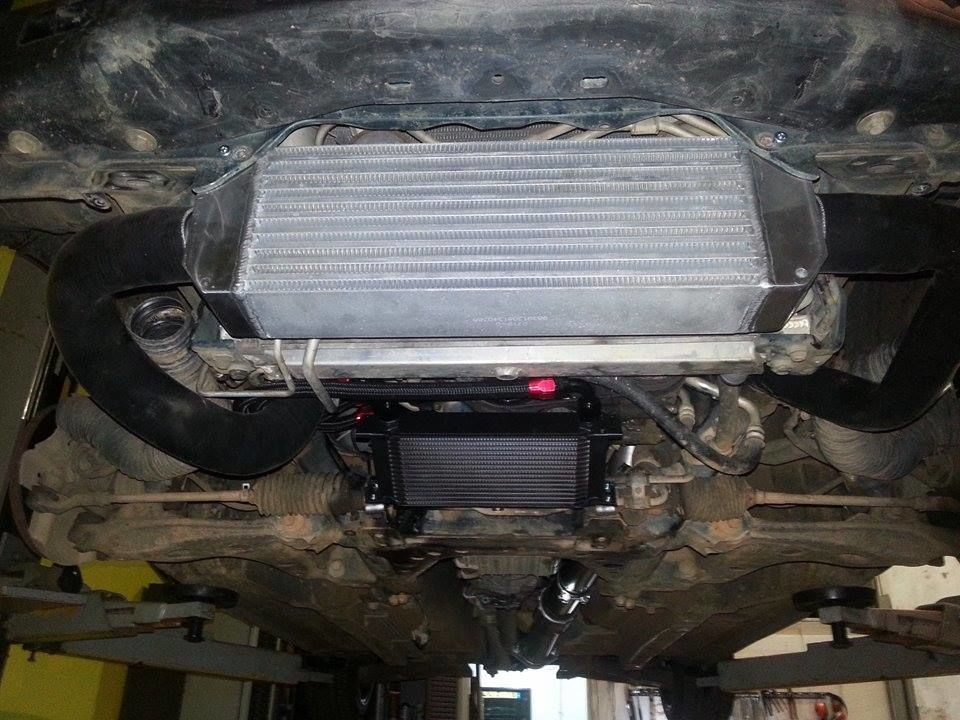
EDIT: Correct, I am running a shitty mishimoto with the dual fan shroud. My nose modifications are mainly so that I can run the oil cooler tucked in there.
EDIT: Correct, I am running a shitty mishimoto with the dual fan shroud. My nose modifications are mainly so that I can run the oil cooler tucked in there.

Reply
 0
0

0
 07-05-2016, 06:40 PM
#524

Even with hood vents, it's a warm car. Always has been. Oil even, 240�F cruising on the highway.
I'm still unsure how I want to run the oil cooler (or where)
Last edited by psyber_0ptix; 07-06-2016 at 08:09 AM.
Reply
0
0
07-05-2016, 06:47 PM
#526

Yes, I'm running the 5mph plastic bumper support piece.
Chiburbian, I seem to be doing a lot better than you are cooling-wise with the Stage 1. Here are details on my custom air-guide/ducting: https://www.miataturbo.net/build-thr...8/#post1244564. For DD, it works well-enough even when temperatures exceed 100F. I see about 220F on 100F days using AC -- warm but adequate (interestingly, you would never know you were running that warm based on the OEM gauge). On this morning's commute, I settled at 205F with outside temperature of 80F while using AC due to humidity.
Current setup:
FAB9 Stage 1
OEM Condenser with JEGS high-performance fan in pusher configuration -- wired to come on with AC
Koyo Hyper-V 37mm
OEM Radiator Fan
Tru-Cool (Racer Parts Wholesale) 48 row mounted on OEM AC Fan mounting pads
Custom air guide
OEM undertray
TrackDog Racing Top Cover
I'd like to improve cooling for occasional track use though. I really have to baby this car on track unless it's cold out. Considering:
1. CSX is coming out with a combined radiator/oil cooler marketed through Jackson Racing. That will be a nice packaging solution I think. Will let me restore the OEM AC Fan and remove the JEGS pusher fan on the condenser. My theory is that this will reduce my stack and improve fan performance.
2. Outlet vents. I may do an A/B test on venting the OEM undertray per TDR's recommendation. I also got a set of Singular Hood Vents, but haven't had the heart to cut my hood yet.
Last edited by hornetball; 07-05-2016 at 07:01 PM.
Reply
1
1
07-05-2016, 06:54 PM
#528

The theory about gap between heat exchangers is mainly to give the air room to change direction if needed.
What I'm talking about is that the FAB9 mounting position is right up against the mouth of an NA bumper cover. Leaves very little room for any air to get around the IC (small slot at top with Stage 1, probably nothing with Stage 2). It's also a thick/dense bar and plate core. I've been thinking about doing some Sixshooter style bumper support surgery to open the gap at the top, but am going to try relieving engine bay pressure first.
What I'm talking about is that the FAB9 mounting position is right up against the mouth of an NA bumper cover. Leaves very little room for any air to get around the IC (small slot at top with Stage 1, probably nothing with Stage 2). It's also a thick/dense bar and plate core. I've been thinking about doing some Sixshooter style bumper support surgery to open the gap at the top, but am going to try relieving engine bay pressure first.
Reply
0
0
07-05-2016, 07:01 PM
#529

I don't have the plastic bumper piece at all, it's ducted ok 4 sides from the IC to the radiator, I think you guys may have nailed it, the IC is so close to the mouth and it's so dense that it blocks flow. I'm wondering if I can just move it back further and then duct it from the mouth of the bunper.
Reply
0
0
 07-06-2016, 08:32 AM
#533

Do you think removing the plastic bumper helps. Mine looks similar to the pics above with a super Miata cross flow and reroute. I don't feel like I'm getting enough fresh air to the top half of the radiator and the bottom half is going though the IC. I have A/C also on an NB. Mine runs hotter cruising on the highway than stop and go in town.
Reply
0
0
07-06-2016, 08:36 AM
#534
Junior Member

Join Date: Sep 2010
Location: Portugal
Posts: 69
Total Cats: 2
Do you think removing the plastic bumper helps. Mine looks similar to the pics above with a super Miata cross flow and reroute. I don't feel like I'm getting enough fresh air to the top half of the radiator and the bottom half is going though the IC. I have A/C also on an NB. Mine runs hotter cruising on the highway than stop and go in town.
Reply
0
0
07-06-2016, 08:36 AM
#535
I'm tempted to remove that plastic bumper just to try.
Does anyone have any experience with the Miatacage Radiator Grill insert? Can't tell if this is generation specific but it looks NB in the photos. Anyone want to stencil out some sheet metal for NA? SADFab?
Miatacage.com. Radiator Grill Insert Panels
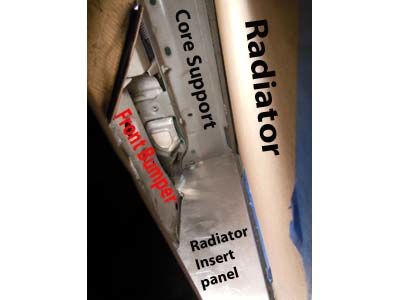


Does anyone have any experience with the Miatacage Radiator Grill insert? Can't tell if this is generation specific but it looks NB in the photos. Anyone want to stencil out some sheet metal for NA? SADFab?
Miatacage.com. Radiator Grill Insert Panels
Reply
0
0
07-06-2016, 09:12 AM
#539
Junior Member
Join Date: Sep 2010
Location: Portugal
Posts: 69
Total Cats: 2
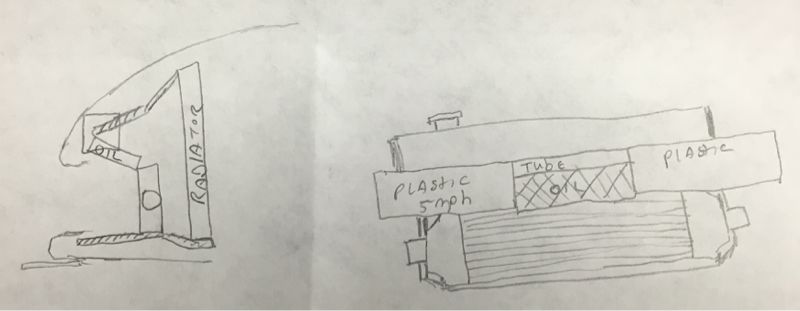
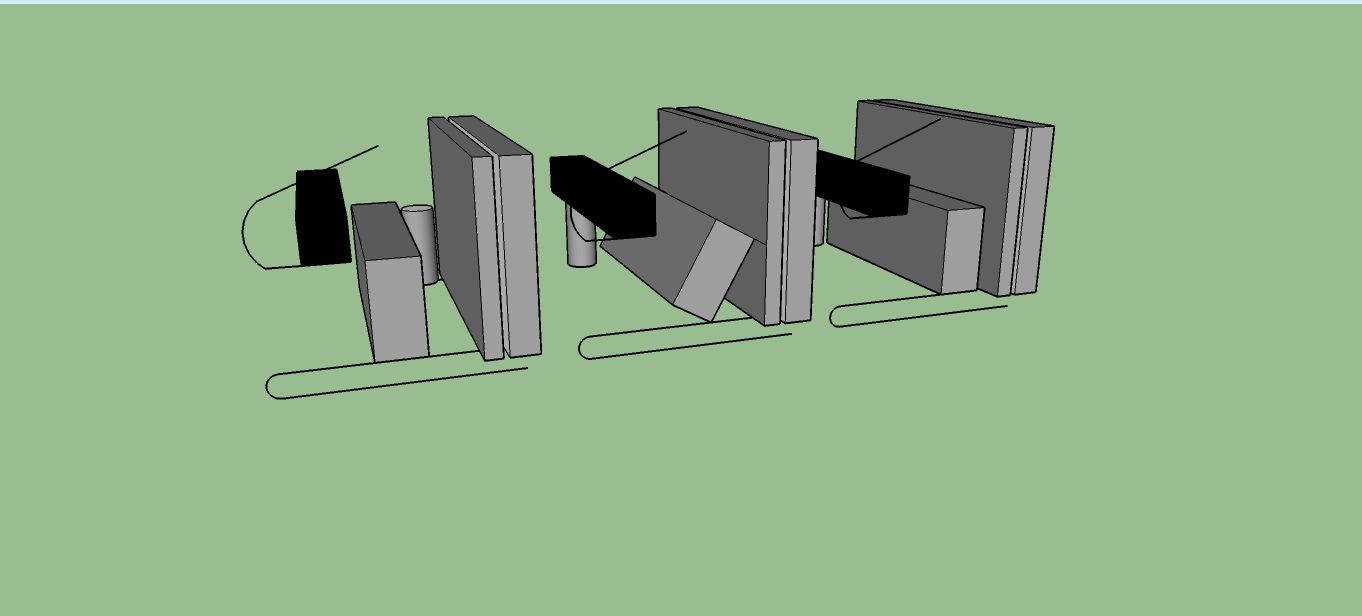
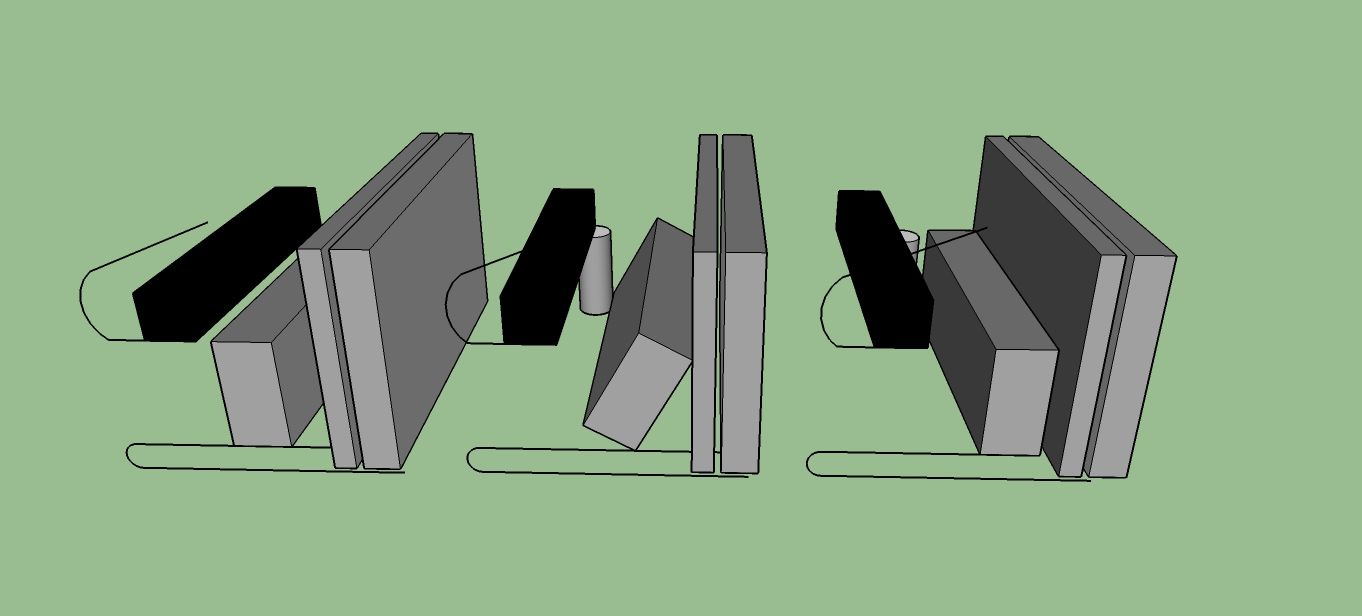
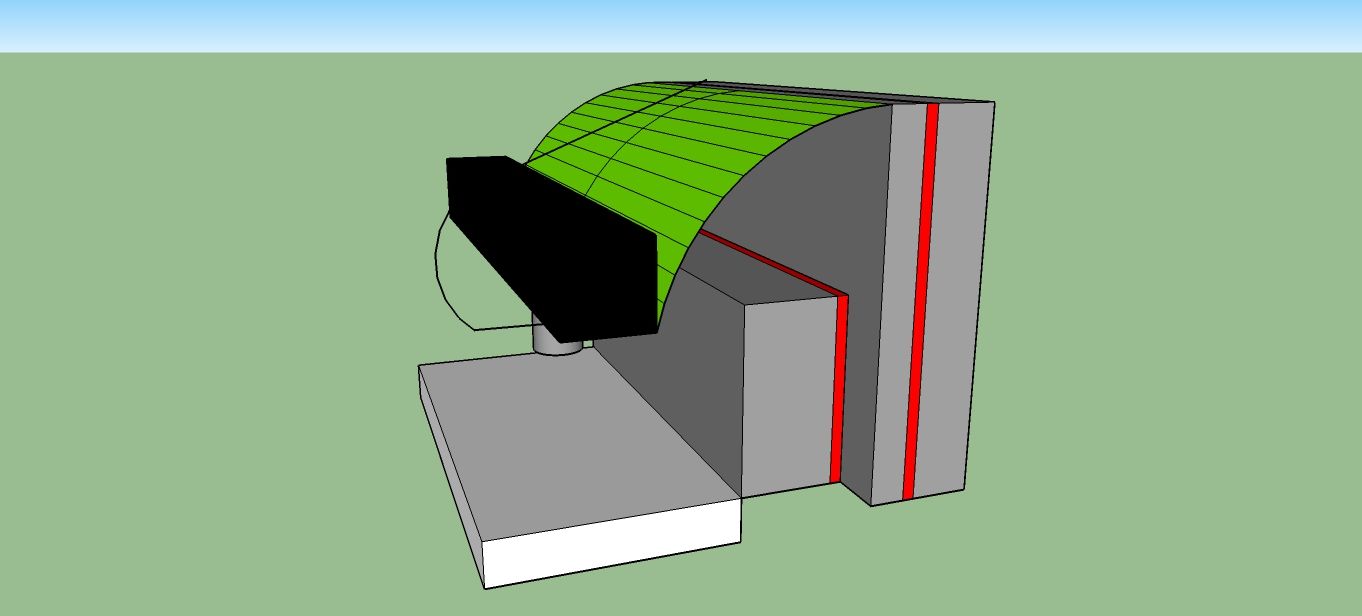
I was thinking, after move the IC further back and moving the dryer to the front of the IC keeping it vertigal (i think i found someone to make me custom pipes), moving horn's away, etc., to make aditional ducting, green on the sketch. Red ar rubber seals.
Reply
0
0
07-06-2016, 09:20 AM
#540
Moderator


iTrader: (12)
Join Date: Nov 2008
Location: Tampa, Florida
Posts: 21,076
Total Cats: 3,134
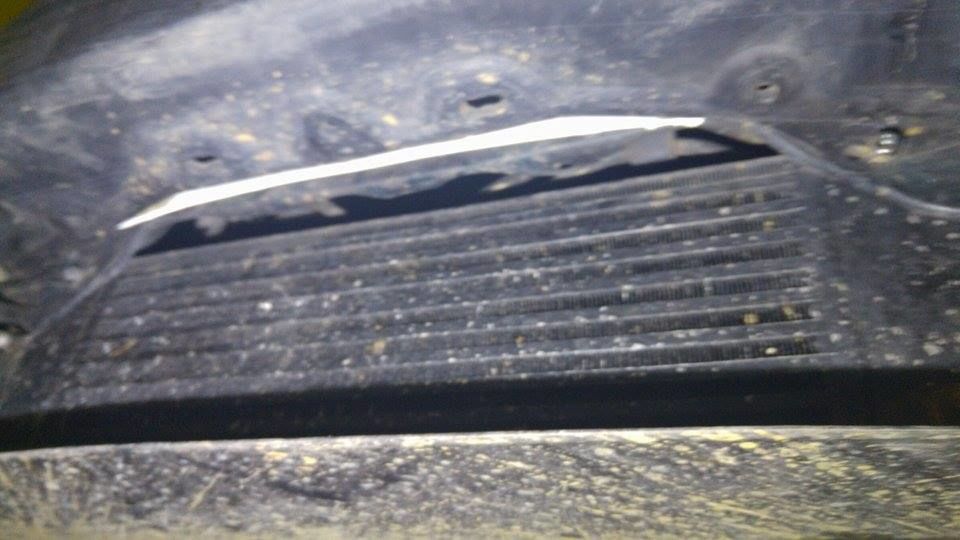
I'm seeing some problems here. There needs to be plenty of room between the intercooler and metal crossbar or you won't get enough air to the radiator. Mine overheated at only 6psi when there was a tiny 1in gap between them. I lowered the intercooler and tilted it rearward, still leaving room between it and the condenser. and was rewarded with much more cooling headroom for many more psi. Jamming the IC up against the opening is like stuffing a giant sock in the bumper mouth. Yeah, it can breathe, but just barely. And the IC is a less critical heat exchanger than the radiator, so don't rob from the radiator.
If you cut the rear underside of the black plastic bumper support in front of the metal crossbar it will open up additional flow from the topside of the mouth opening, over the metal crossbar, and to the top of the radiator. It is already designed for air to travel that way from the factory but a little extra trimming in a place nobody sees can open up many additional square inches of flow path.
Removing the black plastic bumper support entirely presents a couple of problems. It actually aids in holding up the bumper cover and the bumper cover will sag unless other provisions are engineered. Additionally, it would open up a detrimental flow path for air to enter the bumper mouth and then go left or right towards the wheel wells without traveling through the radiator.
An additional note, the bumper mouth is not sealed around the black plastic bumper support from the factory. If you have not taken steps to seal the topside of the bumper support to the bumper cover (towards the center of the car from the turn signals on an NA) and all of the other little paths seldom discussed here, you aren't really sealed properly. That opening near the turn signals is about 2 inches high and 4 inches deep as it tapers. Lots of air can move toward the lower pressure areas of the wheelwells within that fascia and bumper support structure. I am using cut pieces of upholstery foam wedged into the caverns and crevices, as well as aluminum foil tape where appropriate. I'm sure there are far more elegant solutions, but it is sufficient for little ol' me.
Reply
0
0


