
91 BRG 1.8BP MK turbo build
 05-20-2016, 09:05 PM
#46
Senior Member

Thread Starter
iTrader: (2)
Join Date: Nov 2015
Location: Seattle
Posts: 1,426
Total Cats: 266
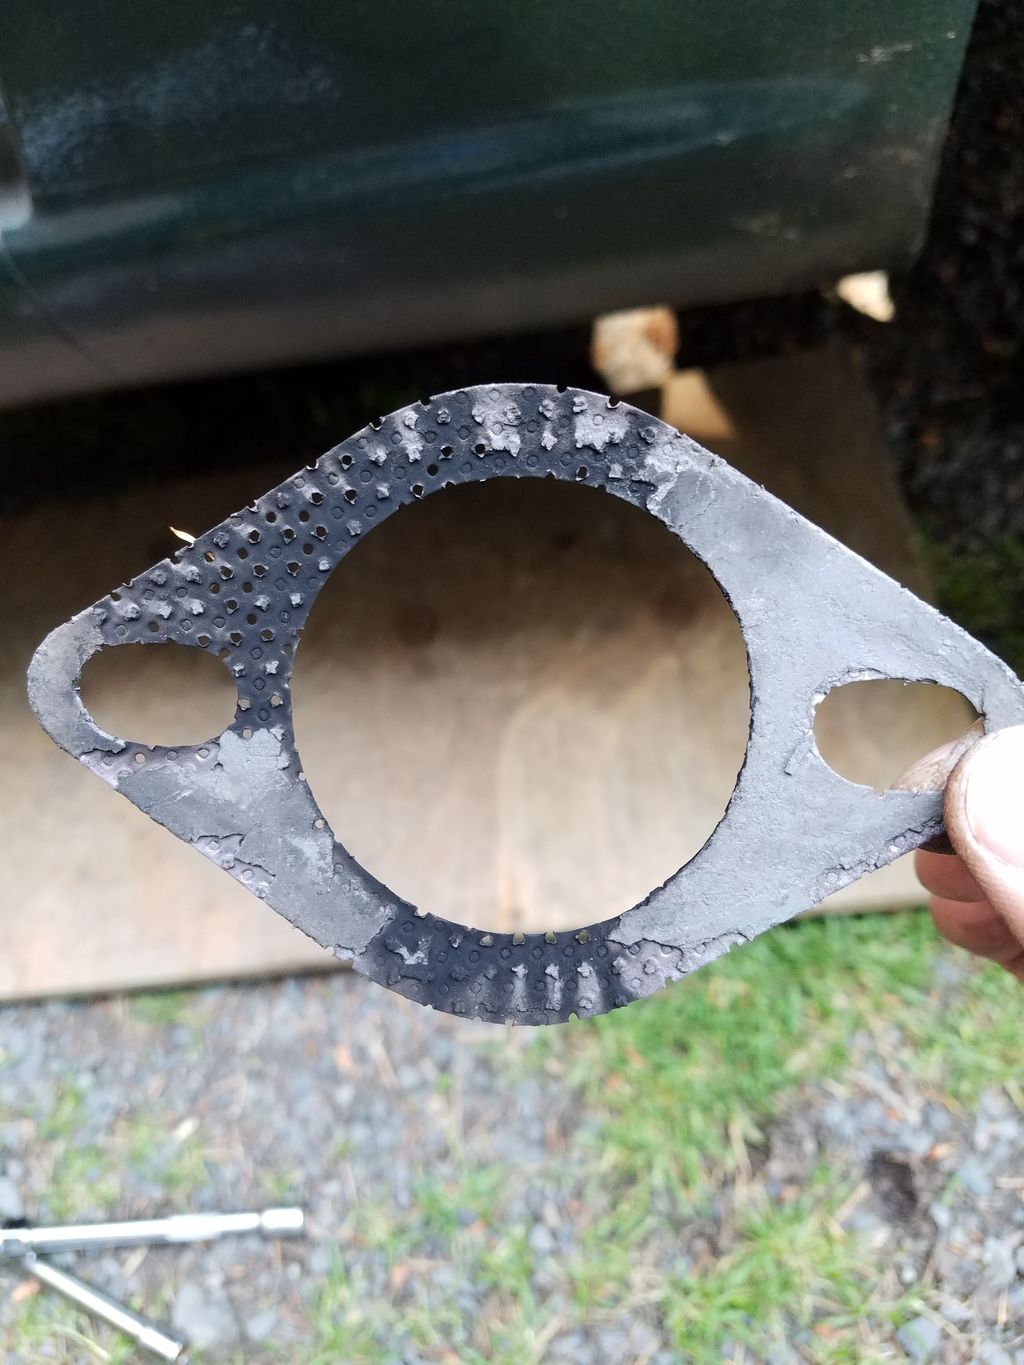
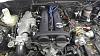
Fixed both the exhaust & coolant leaks. The exhaust leak was from a very dead gasket caused by incomplete clamp up. I bought stainless hardware, and the washers were riding on flange welds. I'm going to try just a plain gasket & see how it holds.
The coolant leak at the blockoff plate was due to the sheet stock of the plate being thinner than the sholder on the stud in the coolant neck, which prevented full clamp up. A couple washers solved this. The gasket was ruined though, and had to be replaced.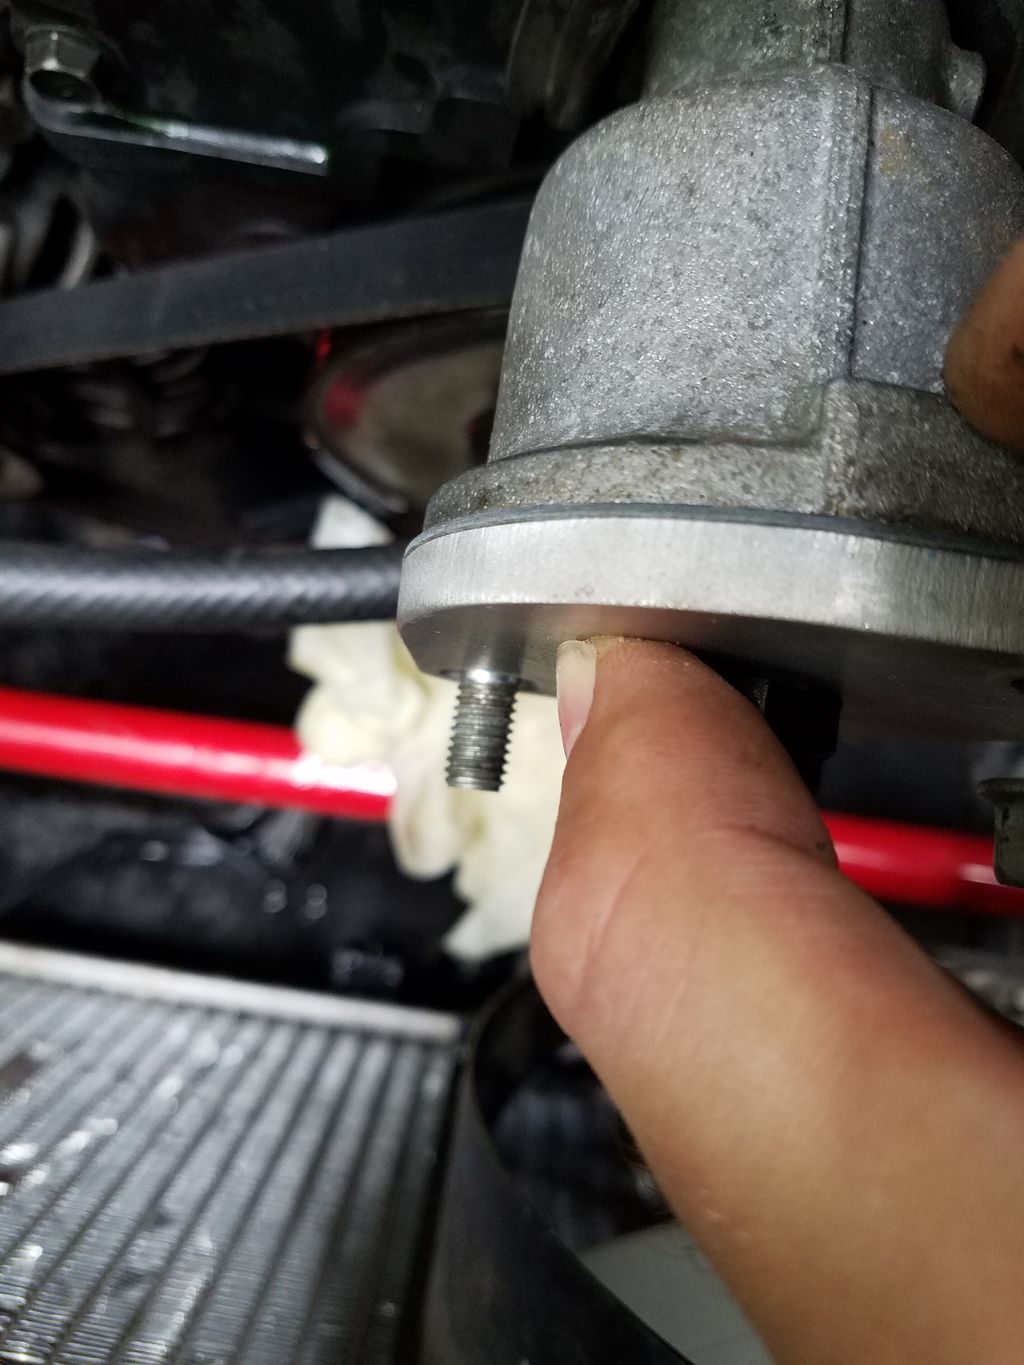
The coolant leak at the blockoff plate was due to the sheet stock of the plate being thinner than the sholder on the stud in the coolant neck, which prevented full clamp up. A couple washers solved this. The gasket was ruined though, and had to be replaced.
Last edited by wackbards; 05-20-2016 at 09:17 PM.

Reply
 0
0

0
05-26-2016, 12:09 AM
#47
Senior Member
Thread Starter
iTrader: (2)
Join Date: Nov 2015
Location: Seattle
Posts: 1,426
Total Cats: 266
I've been dicking around with my VE trying to get it to run ok. I've been chasing heat soak in the IAT, making tuning my idle cells a bitch, and giving me lean hot start issues. I spent some time sealing up the CAI box with some speed tape, and things are much better. I ended up telling it to ignore MAT correction during ASE. I am going to pay much closer attention to IAT while tuning idle, and see if I can settle on some values I like. I'll see if I can get a decent map & log up for critique tomorrow.
Reply
0
0
06-18-2016, 10:44 AM
#49
Senior Member
Thread Starter
iTrader: (2)
Join Date: Nov 2015
Location: Seattle
Posts: 1,426
Total Cats: 266
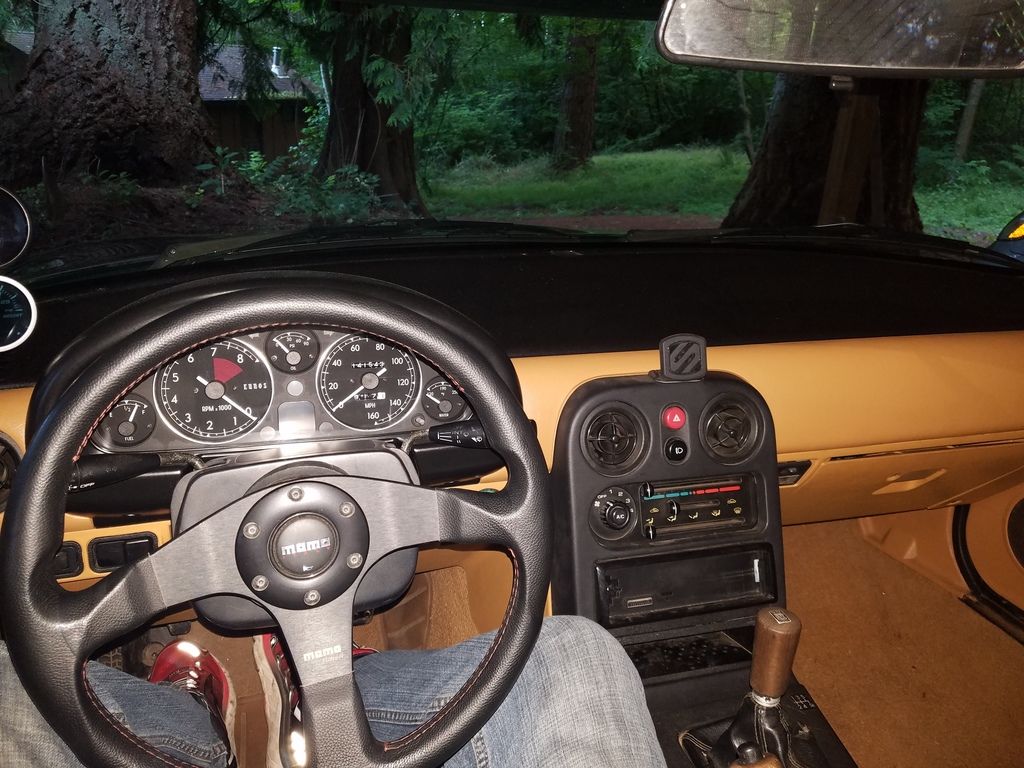
Time for a cosmetic project. Greg's Revlimiter video inspired me, so I'm cleaning up my dash. I've got one of the horrible painted dashboards, and it's super gooey.
The project will include painting the top and shroud black, the leading edge tan, swapping in a set of Revlimiter gauges (modified alpha), and swapping in a 1uF cap filter for the tach.
The project will include painting the top and shroud black, the leading edge tan, swapping in a set of Revlimiter gauges (modified alpha), and swapping in a 1uF cap filter for the tach.
Reply
0
0
06-18-2016, 11:03 AM
#50
Senior Member
Thread Starter
iTrader: (2)
Join Date: Nov 2015
Location: Seattle
Posts: 1,426
Total Cats: 266
Here's my shopping list in case someone wants to replicate:
SEM landau black
SEM camel tan
SEM Plastic prep
SEM adhesion promoter
1uF tantalum capacitor (they have these in the brick & mortar stores for $2, otherwise go digikey)
Version alpha Revlimiter gauge
SEM landau black
SEM camel tan
SEM Plastic prep
SEM adhesion promoter
1uF tantalum capacitor (they have these in the brick & mortar stores for $2, otherwise go digikey)
Version alpha Revlimiter gauge
Reply
0
0
06-27-2016, 11:06 PM
#51
Senior Member
Thread Starter
iTrader: (2)
Join Date: Nov 2015
Location: Seattle
Posts: 1,426
Total Cats: 266
Dash project went beautifully. It was labor intensive lifting the old paint without damaging the plastic (dot 3 & green scotch brite worked best).
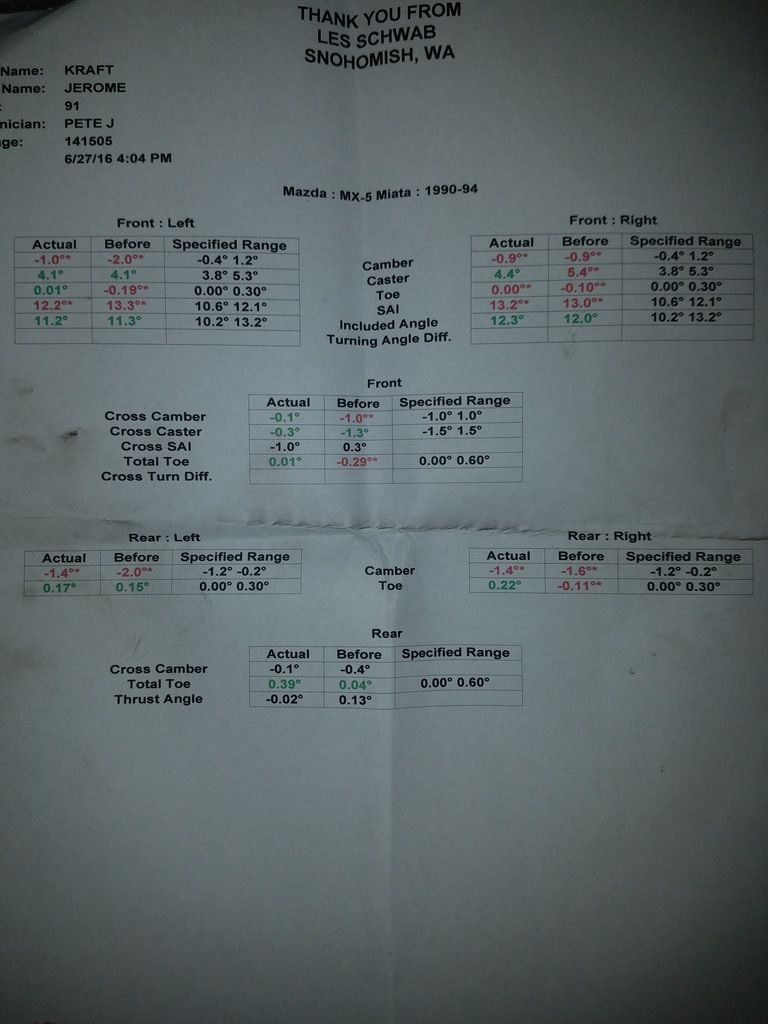
Got an alignment today, but didn't hit the numbers I was hoping for. I was aiming for a super miata dual duty with auto x rear toe, but I came up short ~1� of neg camber up front. My pax front is wonky, and the camber is the limiting factor. Here are the numbers I hit:
Front caster: L= 4.0�, R= 4.4�
Front camber: L=-1�, R=-.9�
Front toe = 0�
Rear camber= -1.4�
Rear total toe .38� (~1/8")
I'm thinking extended ball joints should give me what I need. Good thing an alignment only costs $83.
Reply
0
0
 07-06-2016, 09:34 PM
#54
Senior Member
Thread Starter
iTrader: (2)
Join Date: Nov 2015
Location: Seattle
Posts: 1,426
Total Cats: 266
I added 3 oz of weight to my shift **** with tungsten putty. They sell it as either fishing weight or pine car ballast. The putty has about the same density as lead. pine car hobby kits also sell more pure tungsten weights, but they are 3/8" OD, and won't fit up past the M10x1.25 threading in a miata shift ****.
Also, **** is apparently a censored word according to IB, you hoser.
Also, **** is apparently a censored word according to IB, you hoser.
Reply
0
0
07-06-2016, 10:41 PM
#55

Nice progress so far. Thought I was the only BRG MkTurbo kit, but I guess I'll be the only 1.6 BRG. I might be finished with mine first though.
My intercooler piping was just welded up today, now waiting on powder to be finished.
That dash looks great. I probably need to do that with mine eventually.
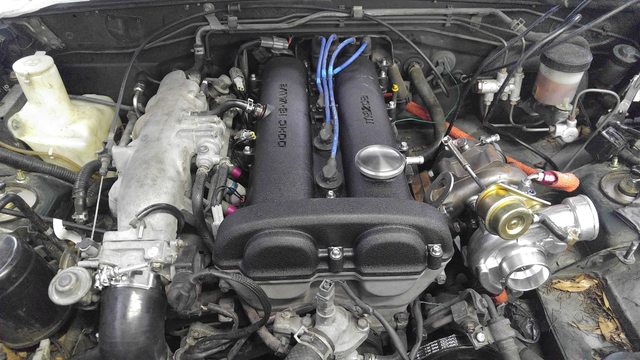
My intercooler piping was just welded up today, now waiting on powder to be finished.
That dash looks great. I probably need to do that with mine eventually.
Reply
0
0
07-06-2016, 11:06 PM
#56
Senior Member
Thread Starter
iTrader: (2)
Join Date: Nov 2015
Location: Seattle
Posts: 1,426
Total Cats: 266
Thanks! I'm just tinkering while I wait on my kit. Let me know if you decide to do the dash job, I'll walk you through my lessons learned. I think it set me back about $75.
Reply
0
0
07-07-2016, 08:16 AM
#60
mkturbo.com

iTrader: (24)
Join Date: May 2006
Location: Charleston SC
Posts: 15,194
Total Cats: 1,687
Yeah I am going slow. Currently waiting to get my diff back and bronze inserts for my bushings. Then I can get suspension back on my car and into the garage to finish exhausts. I rather not build the exhaust going around the diff without the diff there because I don't want it to be hitting there and such.
Reply
0
0


