Splitter Height
#1
I'm working on my air dam/splitter with ducting, etc. and will post pics in the other thread when I get it finished. In the meantime I don't want to muddy up that thread with a bunch of stupid questions... so I'll ask them here.  I'm also 4 beers in and it's frickin cold here. Thank baby Jesus for thermal coveralls...
My splitter is 11/32 ply and is attached in the normal methods including tapping M6 threads into the subframe. If I run level from that point forward, the front of the splitter is in the 2.5" range. That seems pretty low. Granted, I will do a full leveling before I button everything up, but I'm looking for suggestions.
Handyman reported his at around 3.5" and 949's airdam is around 2.5" at similar pinch weld heights. In all the splitter/air dam threads, there are comparably few mentions of the height.
~2200 pound caged, dedicated track '90 on 700/400 springs, 225/45/15, ~250whp and yes, it does need to get on the trailer.
Should the splitter be completely flat to the ground or is a bit of rake preferred? Should it follow the natural rake of the car (1/4" to 1/2" F/R)? Is 2.5" crazy? Am I going to self clearance under heavy braking or tear the whole damn thing off when I hop the wrong curb? Is lower better as long as I don't mind building a 20' ramp of lumber scraps to get on the trailer? Thanks for playing!
 I'm also 4 beers in and it's frickin cold here. Thank baby Jesus for thermal coveralls...
My splitter is 11/32 ply and is attached in the normal methods including tapping M6 threads into the subframe. If I run level from that point forward, the front of the splitter is in the 2.5" range. That seems pretty low. Granted, I will do a full leveling before I button everything up, but I'm looking for suggestions.
Handyman reported his at around 3.5" and 949's airdam is around 2.5" at similar pinch weld heights. In all the splitter/air dam threads, there are comparably few mentions of the height.
~2200 pound caged, dedicated track '90 on 700/400 springs, 225/45/15, ~250whp and yes, it does need to get on the trailer.

Should the splitter be completely flat to the ground or is a bit of rake preferred? Should it follow the natural rake of the car (1/4" to 1/2" F/R)? Is 2.5" crazy? Am I going to self clearance under heavy braking or tear the whole damn thing off when I hop the wrong curb? Is lower better as long as I don't mind building a 20' ramp of lumber scraps to get on the trailer? Thanks for playing!

#2
A bit of a rake might get some diffuser effect and catch a bit more air, drag MAY go up with considerable rake. Are those 225 hoosiers or street tires? Hoosiers I would say you will bottom out the splitter on braking with such soft spring rate in the front (only 700 pounds you *****  ). On streets I do think you can make enough braking grip for that. At 2.5" you might not be able to get it on the trailer depending on your ramps. The other car pulls the splitter/bumper combo off to make it onto and off of the trailer, the ramps are short.
 ). On streets I do think you can make enough braking grip for that. At 2.5" you might not be able to get it on the trailer depending on your ramps. The other car pulls the splitter/bumper combo off to make it onto and off of the trailer, the ramps are short.
#3
Generally lower is better. But, the number one thing you want to do is transition the airflow from the splitter to the underbody with a diffuser - smoothly transition the airflow from the splitter height to the underbody height. Notice the significantly greater lower pressure area with the diffuser for the same splitter.
Edit: too low and you start to decrease the mass of the airflow underneath the car and you start to lose downforce. I'd say build it so you can get it on the trailer, and use the diffuser. Brian since you are actually in the construction stage you really need this book :
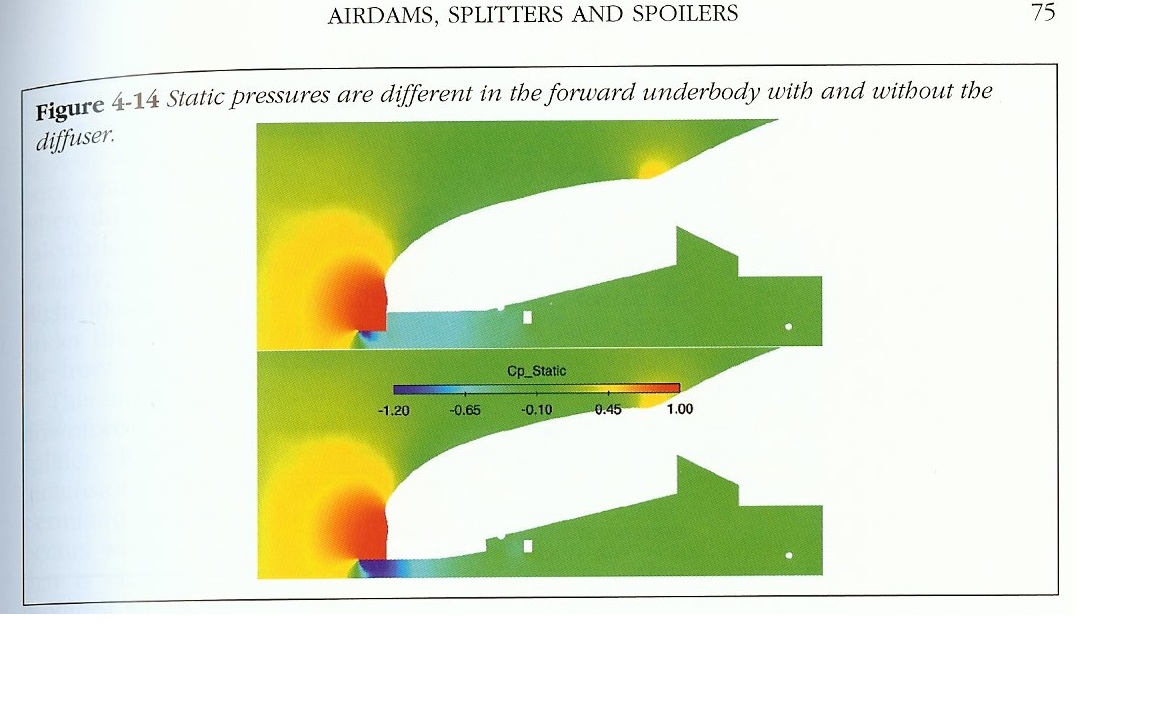
Edit: too low and you start to decrease the mass of the airflow underneath the car and you start to lose downforce. I'd say build it so you can get it on the trailer, and use the diffuser. Brian since you are actually in the construction stage you really need this book :

#4
But it is possible to go low enough to lose the aero effect. I haven't found any good information posted about it. Since finding that height is going to be really difficult (to do it accurately requires a wind tunnel with a rolling road), I doubt that anything would be publicly available for it. SO I would just go as low as you can without it bottoming under hard braking.
#5
But it is possible to go low enough to lose the aero effect. I haven't found any good information posted about it. Since finding that height is going to be really difficult (to do it accurately requires a wind tunnel with a rolling road), I doubt that anything would be publicly available for it. SO I would just go as low as you can without it bottoming under hard braking.
#7
For a wing, somewhere around 14% of chord is the optimum downforce height. One could treat the splitter as a simple wing for a height guesstimate. The presence of a diffuser behind the splitter will act to effectively increase the chord.
My .02 - tuning the front is hard. Tuning the rear wing, on the other hand, is quite simple. Set a "reasonable" splitter height, 2-3", give yourself at least enough height to not bottom out under braking nor disintegrate upon kerb contact, then tune the rear to balance the downforce.
My .02 - tuning the front is hard. Tuning the rear wing, on the other hand, is quite simple. Set a "reasonable" splitter height, 2-3", give yourself at least enough height to not bottom out under braking nor disintegrate upon kerb contact, then tune the rear to balance the downforce.
#9
I know little about aero, but would the splitter height affect how a diffuser is design. Wouldn't with a splitter angled up allow more air under for a steeper diffuser. Closer to the ground might force the diffuser to have a less aggressive angle. Once again my knowledge on aero is very little.
#10
I know little about aero, but would the splitter height affect how a diffuser is design. Wouldn't with a splitter angled up allow more air under for a steeper diffuser. Closer to the ground might force the diffuser to have a less aggressive angle. Once again my knowledge on aero is very little.
#11
I have Competition Car Aerodynamics - good read so far. I'm not planning on a diffuser this year both for time, money and with an interest to see how others do with transmission and differential temps. My splitter goes back just past the midpoint of the front wheels and I am going to do my best to seal the sides up to the frame to create as low a pressure through the engine bay as possible.
The tires are NT01s for now. I'll need new rubber soon but they will be DOT something. The air under the car is so turbulent without an undertray that I don't think it is possible to effect much downforce between the wheels even with a good nose system. Reducing lift and bulletproof cooling without crushing drag are my immediate goals this season.
The tires are NT01s for now. I'll need new rubber soon but they will be DOT something. The air under the car is so turbulent without an undertray that I don't think it is possible to effect much downforce between the wheels even with a good nose system. Reducing lift and bulletproof cooling without crushing drag are my immediate goals this season.
#14
I don't know the best answer here. I'm limited by my lack of a wind tunnel (aren't we all) and my current infantile incompetence with CFD. I am re-learning the Differential Equations I have forgotten for the past 25 years. So I'd eyeball it - the length of the splitter projecting from the front, and then some length of the diffuser following it. In the image above, I'd use the distance from the front of the splitter edge back to where the diffuser stops expanding in volume at that first notch. Treat that as the chord, then see if 15% of that is a reasonable ride height for the splitter.
#18
Since this is about front splitters and air dams, I will leave the info I have gathered with miatas using cfd. This is a watered down version 
1. Stock 1990-1997 Mazda Miata
2. Stock 1990-1997 Mazda Miata at a 4in Ride Height
3. Small Front Air Dam at 4in Ride Height
4. Small Air Dam with Splitter at 4 in Ride Height
5. Large Air Dam at 4in Ride Height
6. Large Air Dam with Splitter at 4in Ride Height
Note: The air dam and/or splitter is 2 inches off the ground in study 3-6
CFD Models
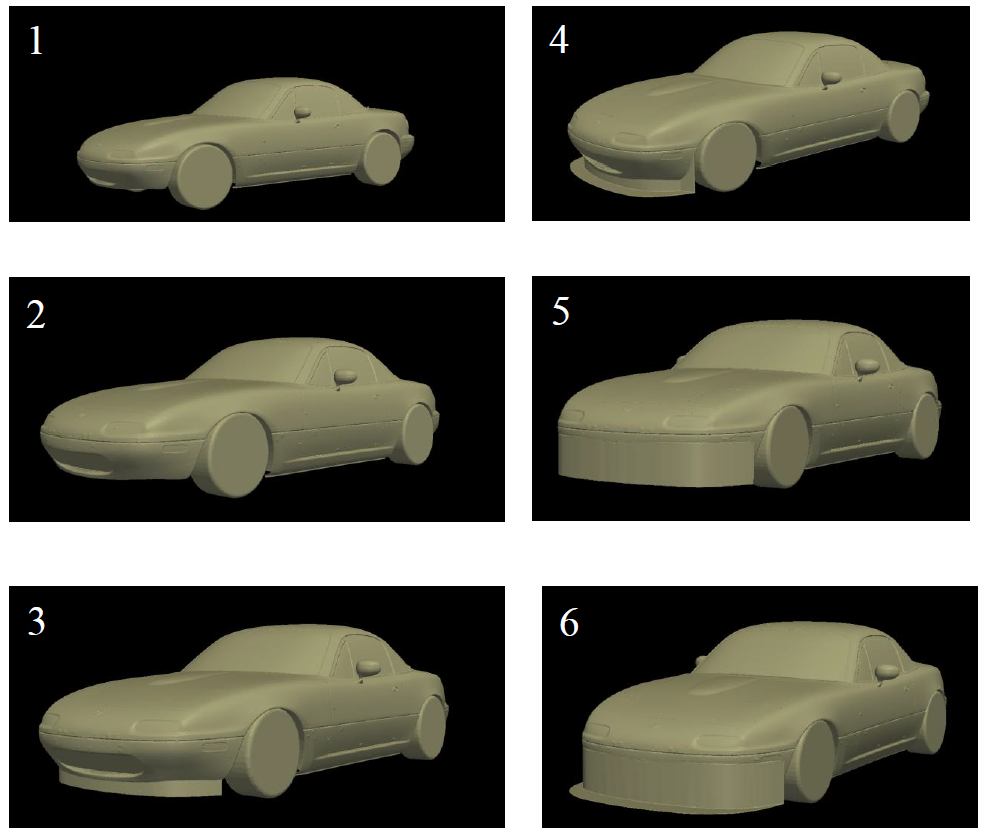
The solver used for these analysis is a steady state incompressible solver with a k-omega SST turbulence model.
Data

Cd = coefficient of drag
Cl = coefficient of lift
L/D = lift divided by drag / aerodynamic efficiency
Drag between all setups are all fairly close with the least drag being the setup with the large front splitter. The two splitter designs also makes significantly more downforce than the other setups. The two stock Miata setups makes lift instead of downforce which is expected since most road vehicles create lift from the factory.
Note: These are numbers and trends for common designs choices. Actual designs should be more refined after design goal is formulated.
The stock Miata simulation had a calculated coefficient of drag of 0.36. The 1990-1997 Mazda Miata had an indicated coefficient of drag of 0.38. The simulated Miata has a lower coefficient of drag; which was expected from the simplification of the vehicle. The simplification of the underside has an estimated coefficient of drag decrease of 0.015. That along with the simplified wheels and no internal flow, puts the coefficient of drag between the simulation and the indicated coefficient of drag within a reasonable error. This means the simulation passes the “sanity” check to ensure validity in the data.
XZ-Plane Pressure Cut Plot
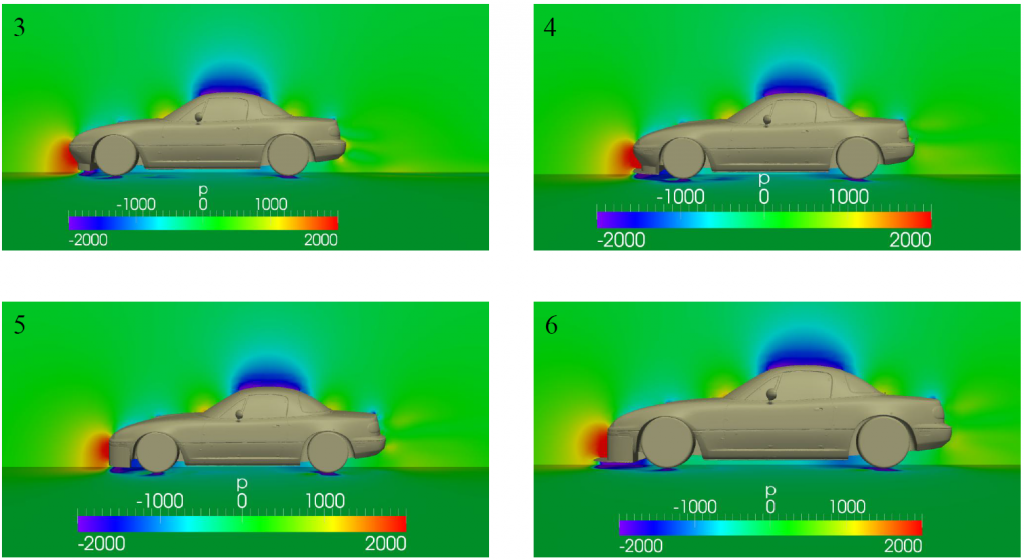
Ground Pressure Cut Plot
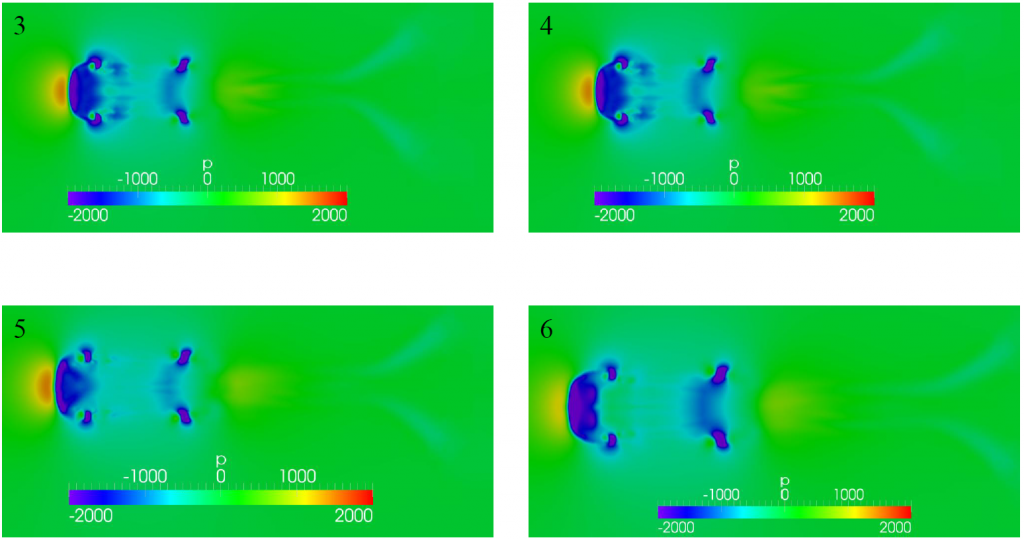
XZ-Plane Velocity Cut Plot
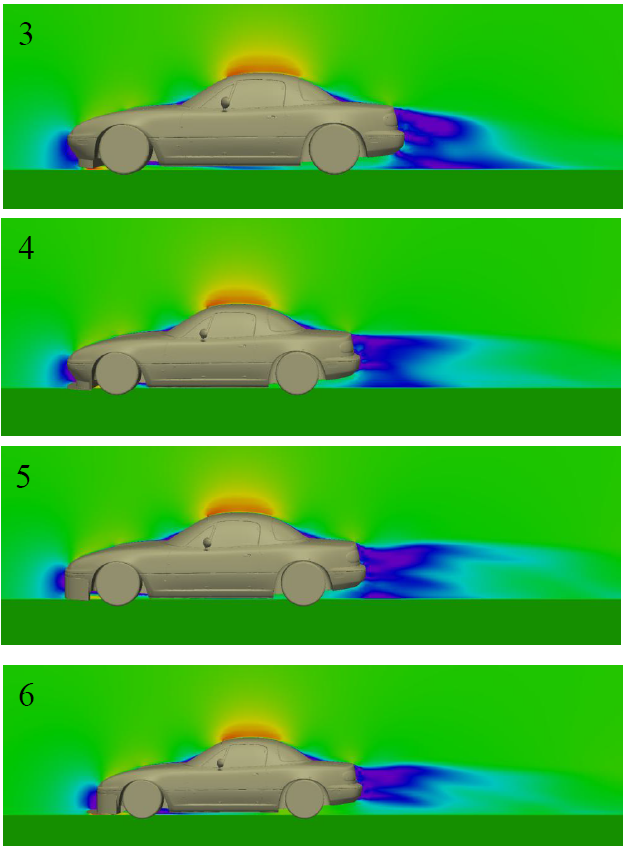
I hope posting this helps with design decisions for front splitter setups and design goals.

1. Stock 1990-1997 Mazda Miata
2. Stock 1990-1997 Mazda Miata at a 4in Ride Height
3. Small Front Air Dam at 4in Ride Height
4. Small Air Dam with Splitter at 4 in Ride Height
5. Large Air Dam at 4in Ride Height
6. Large Air Dam with Splitter at 4in Ride Height
Note: The air dam and/or splitter is 2 inches off the ground in study 3-6
CFD Models

The solver used for these analysis is a steady state incompressible solver with a k-omega SST turbulence model.
Data

Cd = coefficient of drag
Cl = coefficient of lift
L/D = lift divided by drag / aerodynamic efficiency
Drag between all setups are all fairly close with the least drag being the setup with the large front splitter. The two splitter designs also makes significantly more downforce than the other setups. The two stock Miata setups makes lift instead of downforce which is expected since most road vehicles create lift from the factory.
Note: These are numbers and trends for common designs choices. Actual designs should be more refined after design goal is formulated.
The stock Miata simulation had a calculated coefficient of drag of 0.36. The 1990-1997 Mazda Miata had an indicated coefficient of drag of 0.38. The simulated Miata has a lower coefficient of drag; which was expected from the simplification of the vehicle. The simplification of the underside has an estimated coefficient of drag decrease of 0.015. That along with the simplified wheels and no internal flow, puts the coefficient of drag between the simulation and the indicated coefficient of drag within a reasonable error. This means the simulation passes the “sanity” check to ensure validity in the data.
XZ-Plane Pressure Cut Plot

Ground Pressure Cut Plot

XZ-Plane Velocity Cut Plot

I hope posting this helps with design decisions for front splitter setups and design goals.
#20

On the rare occasions NASCAR drivers use that strange pedal in the middle, their dams slam right down to the track - self clearance for sure. I'm hoping to have enough spring and clearance to keep it from scraping all but the most poorly approached curbs. I was anticipating this problem so I built a pair of 8' ramps for the trailer last winter. The downside is they are too long to store across the width of the trailer itself but they fit perfectly in the back of the truck and make less mass on the trailer to control. Hopefully, I can get it on the trailer without too many tricks. I'll definitely do a test loading earlier than the night before I have to leave for the track just in case.


