
Ducting the interf00ler, it's a go.
 05-24-2011, 10:24 AM
#1
Senior Member
Thread Starter
iTrader: (2)

Join Date: Nov 2007
Location: Saint Paul, MN
Posts: 1,489
Total Cats: 28
Well guys, after some reading, I decided to duct and cowl my IC/Radiator as I have been having temps soar to 208+ under boost, and intake temps heatsoaking fast as well. I knew this wouldn't hold up on the up and coming road races, so here I am. I will be using GeneSplicer's setup as a template, thanks for the images! 
I've been working on this for about four days and I haven't had time to post the images, but now that I have time here they are.
I've been working on this for about four days and I haven't had time to post the images, but now that I have time here they are.
Last edited by Der_Idiot; 05-24-2011 at 10:34 AM.

Reply
 0
0

0
05-24-2011, 10:33 AM
#2
Senior Member
Thread Starter
iTrader: (2)
Join Date: Nov 2007
Location: Saint Paul, MN
Posts: 1,489
Total Cats: 28
I located an IC that was of sufficient size to allow me to duct, but also be larger then the stock FM2 IC. I went with a CXRacing 22x8x3.5 with 2.5 in/out. Not a bad way to spend $150..

Turns out the IC is measured at 24 at top, larger then I had thought but not wide enough to hit the frame rails. Looks like I have about another inch to go before I do that, which allows me to use the stock FM2 IC hangars. I drilled bolt holes 3/4" up to bring the bottom bolt holes level with the radiator. The bolt bungs are wider then the FM2 IC so I went to Menards and picked up a 1"x3/16 piece of steel and drilled as needed.. turned out really well!
FM2 IC:

CX Racing IC:

I had to ... modify the power steering cooler line to fit, I mentioned it to my dad while going to grab some parts from the hardware store. I come back to him having brute forced it forward and out of the way.. Oh well, it may not be quite as aesthetic as I would like, but it's a bonus free cooling for the power steering (not that it needed it, really) and it's damn near bolt-in, just slide the brackets over a few inches (I had to drill the driver's side one, but it's a small hole).
Turns out the IC is measured at 24 at top, larger then I had thought but not wide enough to hit the frame rails. Looks like I have about another inch to go before I do that, which allows me to use the stock FM2 IC hangars. I drilled bolt holes 3/4" up to bring the bottom bolt holes level with the radiator. The bolt bungs are wider then the FM2 IC so I went to Menards and picked up a 1"x3/16 piece of steel and drilled as needed.. turned out really well!
FM2 IC:
CX Racing IC:
I had to ... modify the power steering cooler line to fit, I mentioned it to my dad while going to grab some parts from the hardware store. I come back to him having brute forced it forward and out of the way..
Oh well, it may not be quite as aesthetic as I would like, but it's a bonus free cooling for the power steering (not that it needed it, really) and it's damn near bolt-in, just slide the brackets over a few inches (I had to drill the driver's side one, but it's a small hole).
Reply
0
0
05-24-2011, 10:38 AM
#3
Senior Member
Thread Starter
iTrader: (2)
Join Date: Nov 2007
Location: Saint Paul, MN
Posts: 1,489
Total Cats: 28
I managed to score a piece of aluminum 4'x4' from a local truck repair place, free because it was used. I thanked them, folded it as best I could and hammered the hell out of it in to my WRX like a bawsss. 

Reply
0
0
05-24-2011, 10:45 AM
#4
Senior Member
Thread Starter
iTrader: (2)
Join Date: Nov 2007
Location: Saint Paul, MN
Posts: 1,489
Total Cats: 28
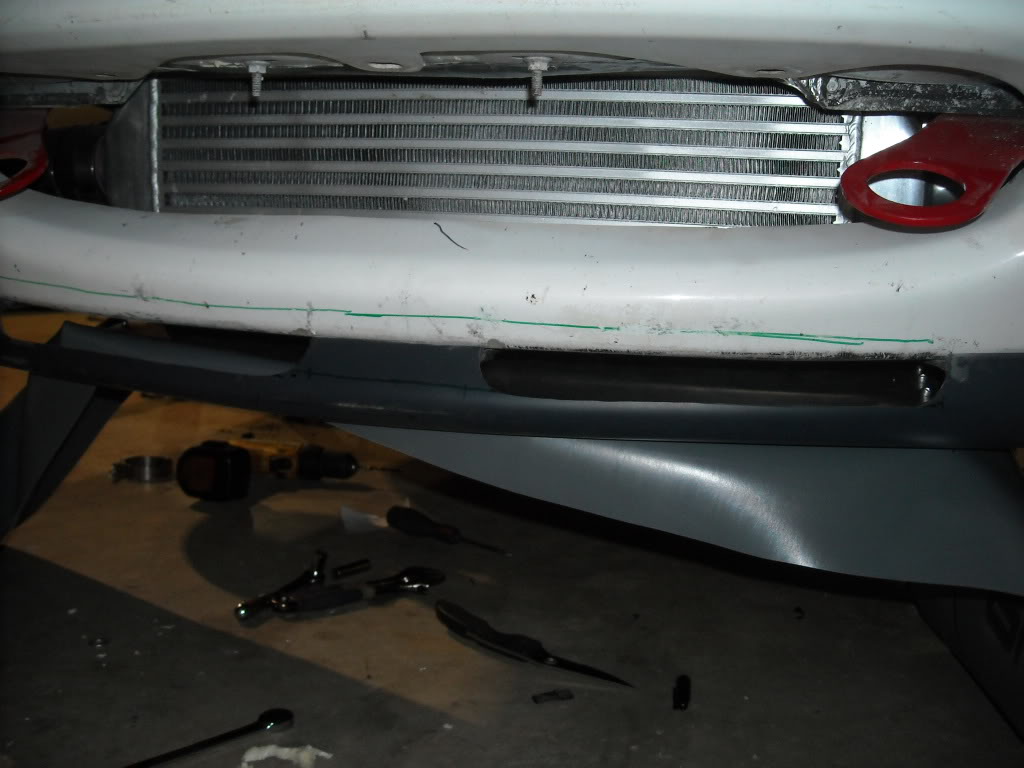
Friday night, after much fighting, cussing, and beers with the old man, we spit out this little beauty:

The slots allow for the stock attachment points for the mouth cowl. Bolt holes to lock the IC in place and a hole for the radiator drain, a notch on the top-left for the radiator feed and IC charge piping.
Saturday, after bribing my dad with food we went to the body shop and used the break to create this gorgeous wonder:

Electric tin snips for the win!
Once the piece was finished, we bolted it in, using the bottom four fan bracket bolts, two IC bolts, and five bumper-to-bracket holes and J-clips. Came out really well, IMO:

With a slight gap between the IC and the cowl, it will allow for some air to flow around and to the radiator. Not much, but anything helps;

I think it turned out very well. Installed:

On to the sides!
The slots allow for the stock attachment points for the mouth cowl. Bolt holes to lock the IC in place and a hole for the radiator drain, a notch on the top-left for the radiator feed and IC charge piping.
Saturday, after bribing my dad with food we went to the body shop and used the break to create this gorgeous wonder:
Electric tin snips for the win!
Once the piece was finished, we bolted it in, using the bottom four fan bracket bolts, two IC bolts, and five bumper-to-bracket holes and J-clips. Came out really well, IMO:
With a slight gap between the IC and the cowl, it will allow for some air to flow around and to the radiator. Not much, but anything helps;
I think it turned out very well. Installed:
On to the sides!
Reply
0
0
05-24-2011, 10:51 AM
#5
Senior Member
Thread Starter
iTrader: (2)
Join Date: Nov 2007
Location: Saint Paul, MN
Posts: 1,489
Total Cats: 28
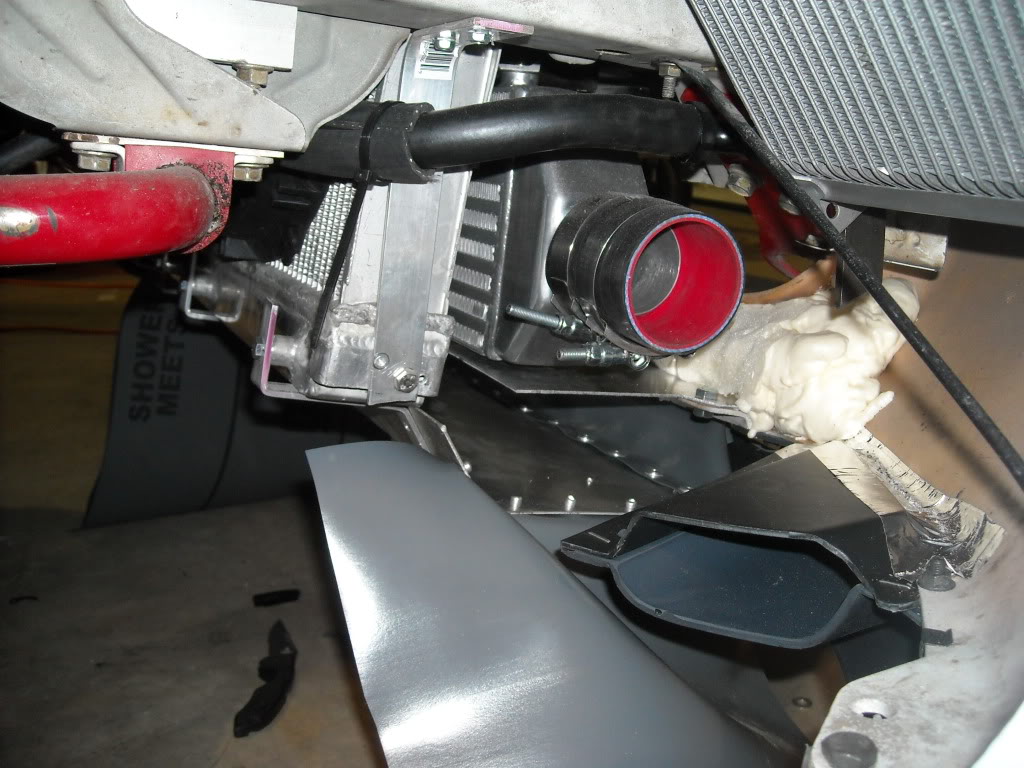
Got bored last night and decided to beat my hands up again and fabricate the sides. I wound up only being able to do the passenger side as it was a lot more work then I anticipated.. 
Here's the bracket after about 1.5-2 hours of fabrication, some of it spent cursing when I cut my hand with the razor..

That slot allows the use of the stock radiator or A/C condenser or WTF ever bolt hole thing back there. It's god awful to get to since I can't reach it with a ratchet and extentions since the IC is too close, so I have to reach down from the top through the two holes and the latch hole to reach it. Not to mention if I drop my wrench I have to fish it out, but that thing isn't going ANYWHERE. I spent the better part of 2 hours tweaking it so it would not rub against the IC, charge pipe or the radiator but in the end, it was worth it.


Just the driver's side to go, and that's the one I'm dreading with the power steering lines being over there.. but I'm up to the challenge.
Here's the bracket after about 1.5-2 hours of fabrication, some of it spent cursing when I cut my hand with the razor..
That slot allows the use of the stock radiator or A/C condenser or WTF ever bolt hole thing back there. It's god awful to get to since I can't reach it with a ratchet and extentions since the IC is too close, so I have to reach down from the top through the two holes and the latch hole to reach it. Not to mention if I drop my wrench I have to fish it out, but that thing isn't going ANYWHERE. I spent the better part of 2 hours tweaking it so it would not rub against the IC, charge pipe or the radiator but in the end, it was worth it.
Just the driver's side to go, and that's the one I'm dreading with the power steering lines being over there.. but I'm up to the challenge.
Reply
0
0
05-24-2011, 11:27 AM
#6
Newb

Join Date: Feb 2011
Posts: 3
Total Cats: 0
I read about all the ducting and decided I'd try it before upgrading from the 37mm Koyo I currently have. My before ducting set up is coolent reroute, 37 mm Koyo, 180 thermostat, FM oil cooler and no undertray. I have a 96 1.8 with a BEGI S4 kit making 236 whp. On the track at Summit Point, WV last weekend I saw water temps of 250+ and oil got to 280 before I had to back out of it. Could only go hard about 12 minutes of 25 minute session
I purchased the same shower liner material as Genesplicer but ended up only using it to better seal the top in front on the radiator by the hood latch. I fabed up .050 aluminum panels and pop riveted them to the existing steel radiator mounts and each other. I then sealed everything I could see light through with aluminum HVAC tape. On the street, I'd regularly see 210 to 230 water temps. I have a VDO gauge tapped into the thermostat housing in the front of the motor so it may read a little high, about 10 degrees according to a temp gauge stuck in the radiator water.
Today I drove in and it never got above 200. I have a cummute of 25 miles in a ton of traffic. When I could get going, temps dropped right down to 180 and stayed there. Ran half the way in with the AC on and still at 180. It was only about 72 and raining today. So far, this it the best solution. Thanks for all that posted.
Last edited by 851duck; 05-24-2011 at 12:41 PM.
Reply
0
0
05-24-2011, 01:30 PM
#7
Supporting Vendor

iTrader: (3)

Join Date: Jul 2006
Location: San Diego
Posts: 3,303
Total Cats: 1,216
Makes me happy to see the ducting bug spreading.
Feels very similar to the aero revolution that took place just a few years ago; there was a time when most miata guys would say it wasn't worth the effort, until the track heads amounted enough evidence to prove otherwise and change the game.
I've still got more work to do on my own ducting. I recently took "racer's tape" from saferacer (glorified duct tape from the looks of it) and sealed up any cracks in the ducting to the IC and radiator. I'm now looking at ways to seal the top and also cut down on the mouth opening size.

Reply
0
0


 Let us know if it works. I spent about 5 hours doing mine...so far.


 05-24-2011, 04:11 PM
#14

for aluminum and sheet metal i use a craftsman jigsaw with the right blade for the material. i tried everything intially to cut aluminum and it sucked. the right aluminum blade in my jigsaw cuts through like butter. even some thick alum. i used for my wing supports was easy. i'm about to do some ducting. never needed it before with my oem bumper cutout. but now that i installed a new bumper with a small opening in front it starting heating up at the last event. i was only hitting 235* before my temp. cutout was limiting me to 3500rpm. i was too scared to raise it any higher. i was getting 3 laps on a high speed 2.9 mile track before that would happen though, so it wasn't too bad. But it was also only 85* that day, soon it'll be 95-105* so i hope the ducting works.
Reply
0
0

 05-25-2011, 10:23 AM
#16
Senior Member
Thread Starter
iTrader: (2)
Join Date: Nov 2007
Location: Saint Paul, MN
Posts: 1,489
Total Cats: 28
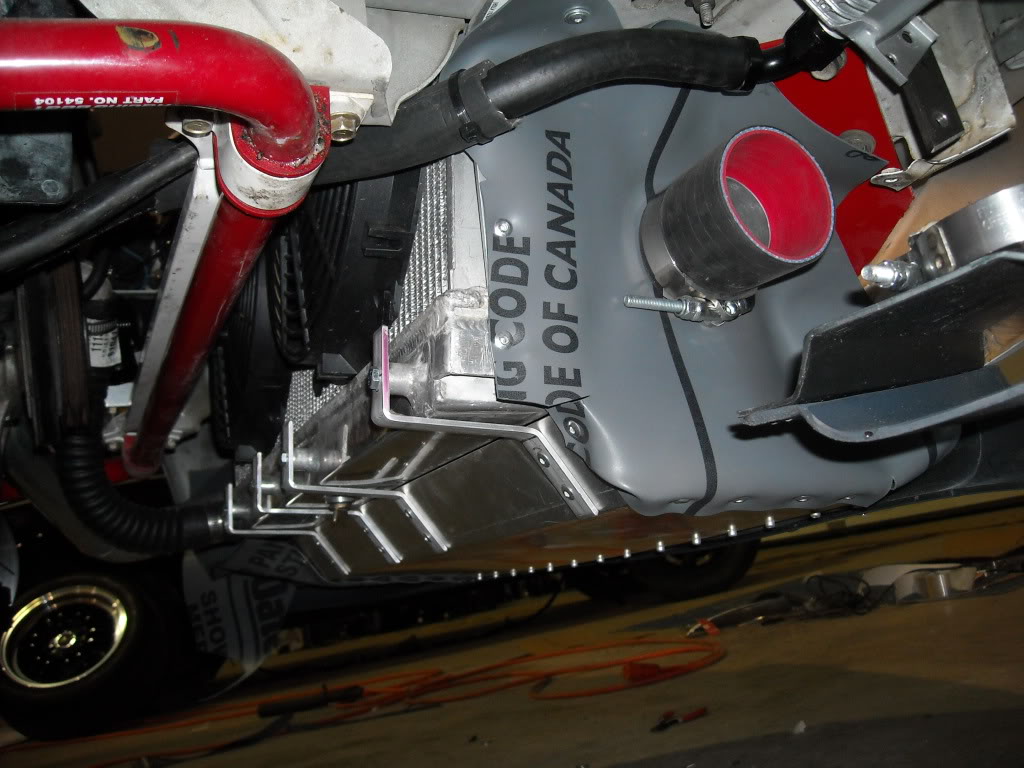
Final step completed. That one was a nightmare to think up, especially getting the right size and the location for the power steering lines. The shape was essentially the same but everything was a little off. The tow hook attachment points are rusty and I was in a rush to get it done, so I haven't pulled them out yet, but I'll have to to relocate my plate.

This side was easier because I was able to get access to the bolt hole between the IC and radiator from the front, saving me 10-15 minutes bolting and guessing the location of the bolt hole.


And as you can see here, I need some aluminum tape to seal my gaps as there's quite a few smallish ones, but that adds up..

Overall I'm satisfied with how easy this was, and I would have tested the performance last night but it started raining. Again. Oh well..
This side was easier because I was able to get access to the bolt hole between the IC and radiator from the front, saving me 10-15 minutes bolting and guessing the location of the bolt hole.
And as you can see here, I need some aluminum tape to seal my gaps as there's quite a few smallish ones, but that adds up..
Overall I'm satisfied with how easy this was, and I would have tested the performance last night but it started raining. Again. Oh well..
Reply
0
0
05-25-2011, 10:57 AM
#17
Newb

Join Date: Aug 2010
Posts: 19
Total Cats: 0
My last ducting job I ended up doing top/bottom/sides in 1/32" aluminum, and in order to get the cuts as close as possible before sealing it took probably about 12 hours of work. My ducting completely sealed the racingbeat front bumper, went around the intercooler and completely sealed to the radiator. On the track I never had cooling issues, even in 95 F weather at Homestead, FL running a rotary turbo engine. Water temps never got above 210 F using water wetter and 70/30 water/coolant mix.
If I had to do it over again I'd do the top/bottom in aluminum and use the thick shower liner for the sides, it really wasn't worth the extra work and the sides have a lot of cutouts and are just a pain to do. I'd think 4 hours could do it (includes removing the intercooler so you can seal the top). Some people think a radiator cowl is enough, but there are enough holes around that area to lose some real pressure in front of the radiator.
If I had to do it over again I'd do the top/bottom in aluminum and use the thick shower liner for the sides, it really wasn't worth the extra work and the sides have a lot of cutouts and are just a pain to do. I'd think 4 hours could do it (includes removing the intercooler so you can seal the top). Some people think a radiator cowl is enough, but there are enough holes around that area to lose some real pressure in front of the radiator.
Reply
0
0
05-25-2011, 04:49 PM
#18
Senior Member
Thread Starter
iTrader: (2)
Join Date: Nov 2007
Location: Saint Paul, MN
Posts: 1,489
Total Cats: 28
I still have a 3'x4' section left, I'm thinking of making a rear diffuser, or making a makeshift aero plate and engineering a diffuser setup onto it. Lotta work for that though, and it'll have to be completely removable, so probably a 3-4+pc setup.. and I'm still researching just how diffusers actually work.
Not to mention the fact that the exhaust will make it stupid hot down there, I imagine.
Not to mention the fact that the exhaust will make it stupid hot down there, I imagine.
Reply
0
0
05-25-2011, 05:07 PM
#19

One tip I may suggest when cutting with tin snips is when you are going to be cutting a square like you did for on the drivers side piece (I dont know if those lines are power steering or AC) or if you are cutting a corner is to drill the corners of the square and cut to the holes. I will demonstrate what I mean in a little bit with pictures.
Reply
0
0


Thread
Thread Starter
Forum
Replies
Last Post
StratoBlue1109
Miata parts for sale/trade
21
09-30-2018 01:09 PM


