
PALM corrupted firmware. cant reinstall
 06-04-2009 | 06:54 PM
#1

Thread Starter
Elite Member
iTrader: (2)
Joined: May 2007
Posts: 2,608
Total Cats: 16
From: Cromwell, Connecticut
I was trying to get the palmlog software to work on my HI-RES code today, i took it down the road and all of the sudden the temps went wacky , the car shut off and wont turn back on. When i hook up my laptop and try to open megatune it shows this:
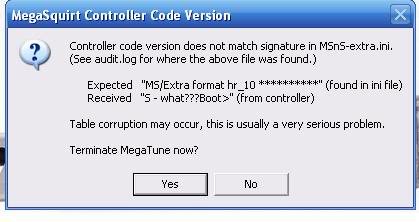
So i figured i would re-flash the firmware (using the stim)
and i get this:
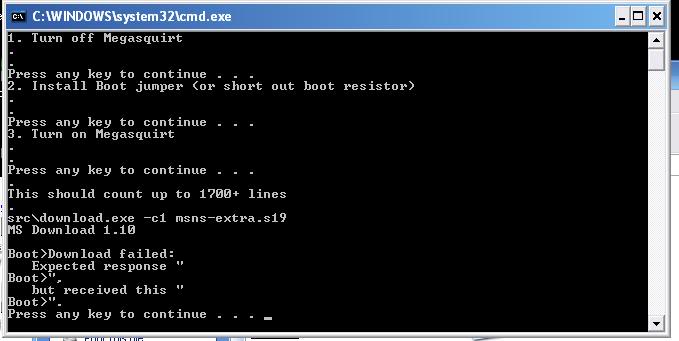
Is the chip toast?
Any help would be great. I need my car ASAP
So i figured i would re-flash the firmware (using the stim)
and i get this:
Is the chip toast?
Any help would be great. I need my car ASAP
Reply
 0
0

0
06-04-2009 | 07:15 PM
#2


Joined: Sep 2005
Posts: 33,516
Total Cats: 6,913
From: Chicago. (The less-murder part.)
Try this:
Bootloader Download Instructions - Hyperterm
Here are instructions for using Hyperterm.exe for updating the embedded software (all Windows installations has the Hyperterminal application - use a "find-file" function to search for "hypertrm.exe"):
For Version V1.01 boards, short out the bootloader resistor (R6) on the board, for Version 2.2 put on th Bootloader jumper pin, hook upa serial cable from the computer to the MS box, and fire up Hyperterminal (Hypertrm.exe). You do not use the PC Configurator to perform the firmware upload - this is done with the terminal program Hyperterm (or similar, see below), and do not havePC Configurator, MegaTune, or any other serial data application running on your PC. At this point, leave the MS unit unpowered.
You will see a Hyperterminal screen when you execute - type in any name you want in the box, and make sure the Red telephone with the little yellow telephone next to it is highlighted.
Now, a new screen appears. On the "Connect Using" selection, select either COM1 or COM2, depending on your serial connection.
New screen with comm port settings pops up. Select 9600 baud, 8 data bits, no parity, 1 stop bit, and set flow control to "None" - this is very important.
Hyperterm terminal screen is now up. Apply power to the MS board, then hit . You should see the "Boot>" prompt appear in the terminal screen. Type "H" and you will be shown the options available in bootloader mode.
Hit "W" for "Wipe" - this erases the entire flash array (except the section running the bootloader).
Hit "P" for "Program," which will respond with the text "wait ...". Then under the "Transfer" menu, select "Send Text File..." (do not use the "Send file" mode - you are sending a text file). Set "Files of type" to "All files" and select the .s19 file containing your assembled code (megasquirt.s19).
You will see no activity on the screen for about 40 seconds. Then the prompt will come back, which means the operation is finished. Turn off power to MS and shut down Hyperterminal. Remove the jumper, and you are ready to go.
Reply
0
0
06-04-2009 | 07:17 PM
#3
Joined: Sep 2005
Posts: 33,516
Total Cats: 6,913
From: Chicago. (The less-murder part.)
... or:
Programming a Blank MS-I Processor
The steps to program a blank processor (i.e. not a group buy unit) are listed below. Make sure you have the latest version of the Prog08sz software. Get the latest version at 68hc908pgm : 68HC908 programmer kit files/software/prog08sz.zip.
1. For MegaSquirt� code (not Tomtek ignition), download the megasquirt.s19 file(s) you wish to use OR assemble megasquirt.asm(or megasquirtDT.asm, etc.) into its respective �.s19� file. See how to do this in the �CODE� section of the MegaSquirt� FAQ. (Tomtek ignition code, dual table MS code, and version 2 and later standard MegaSquirt� code already contain the boot loader, so you only need to assemble the megasquirt.asm file.)
2. Start up prog08sz, you might have to retry several times to connect. If you cannot get a connection, read the 908 archives for some hints on debugging.
3. Often the connect problem is low voltage due to a wimpy serial port, so you might want to eliminate this problem by connecting an external power source. (e.g., a 9 volt battery) to the circuit. Connect the positive (+) side of the battery to the banded side of D2 (or D1) and the negative (-) side to a ground point (e.g., the mounting lug on the 9 pin connector).
4. Select the 908_gp32.08p module when asked to "Specify Programming Algorithm to Use".
5. If this chip has been programmed before, you need to erase it (if in doubt, do this anyhow). Click on the button with the �pencil erasing� icon (6th from the left) to Erase Module. When this is done, it says "Erasing. Module has been erased" in the lower left corner of the screen, after which you should verify the chip with Blank Check Module (the button beside Erase Module). You should get a message saying "Erased."
6. For version 1.0 of the code only, click on "SS Specify S Record" in the window on the middle left [or the 19diskette19 button in the menu], and select "boot_r12.s19".
Note that Version 2 and later .s19 files include the boot_r12 file, and this step should be skipped. Click on "Program Module" [on the menu on the left, or use the button beside the �diskette�/Specify Recordbutton]. After a few seconds, it should complete. Then you can then click on "VM Verify Module" [on the menu on the left, or use the button beside the �Program Module� button]. You should get a message that the module was �verified�.
7. Click on Specify S Record as above, this time selecting "megasquirt.s19" Follow this with "Program Module", then "Verify Module".
8. Disconnect the serial cable from the programmer, unlatch the ZIF lever, remove the chip, and you should be ready to insert the chip into a MegaSquirt� controller and run.
Reply
0
0
06-04-2009 | 07:20 PM
#4
Thread Starter
Elite Member
iTrader: (2)
Joined: May 2007
Posts: 2,608
Total Cats: 16
From: Cromwell, Connecticut
wish i saw this before i ordered an overnight from DIY. I decided having an extra on hand was a good idea anyway.
Thanks for the quick and VERY detailed response, ill try that in a few
Thanks for the quick and VERY detailed response, ill try that in a few
Reply
0
0
 06-05-2009 | 07:33 PM
#9
Joined: Sep 2005
Posts: 33,516
Total Cats: 6,913
From: Chicago. (The less-murder part.)
That's about right. (a tad high by the math, but close.) The bootloader pins straddle the lower half of a 5/1 voltage divider, which is pulled up at the top by +12.

Matt, what are you thinking here? Bad ground perhaps?
Matt, what are you thinking here? Bad ground perhaps?
Reply
0
0
06-06-2009 | 02:30 PM
#12
Thread Starter
Elite Member
iTrader: (2)
Joined: May 2007
Posts: 2,608
Total Cats: 16
From: Cromwell, Connecticut
I dont even know where to go now.....
The new chip did not solve the problem. I plugged it in and powered up and the lights flashed on the stim... all is well, so i tried to install the Hi res firmware...first using the downloader in the hi res folder, no luck, then in hyperterminal. Now the lights dont even flash when megasquirt is powered up and the boot jumper is removed. I am back to square one. I need my ******* car asap..
HELP
Reply
0
0
06-06-2009 | 02:39 PM
#13
Thread Starter
Elite Member
iTrader: (2)
Joined: May 2007
Posts: 2,608
Total Cats: 16
From: Cromwell, Connecticut
EDIT! IT WORKS!!!!!!!!
I didnt need the new chip afterall. I can not load the firmware using the USB - serial addapter i had. i swapped over to my other one (the one DIY sells) and it worked fine.
Funny how the DIY one can load firmware but gives me timeouts and the other one wont load firmware but works great in the car....
Reply
0
0

Thread
Thread Starter
Forum
Replies
Last Post
StratoBlue1109
Miata parts for sale/trade
7
09-24-2015 03:50 PM


