How to use the TinyIOx
#1
Thread Starter
Joined: Apr 2014
Posts: 18,642
Total Cats: 1,866
From: Beaverton, USA
Going to start off with just a writeup getting the serial wideband data passing over CAN. I will dig into the more advanced features later after I can get all the circuits built. This will cover connecting the tinyIOx to power, and to the megasquirt, updating the firmware on the tinyIOx, project setup (adding the tinyIOx to your TunerStudio Project), and configuring your project to use CAN wideband data.
This guide assumes you are using an MS3/3x, other variants may differ. It also assumes that the tinyIOx is the only CAN device. Other setups will need different configuration.
Make sure to update to 1.4.1 if you are on 1.4. There is a bug that affects CAN in 1.4. Here is 1.4.1 Megasquirt Support Forum (MSEXTRA) ? MS3 firmware 1.4.1 released - use this (View topic)
All info was gathered from jbperf.com.
Mostly from these 2 links.
TinyIOx v1.0 Board
jbperf.com ? View topic - TinyIOx
Powering the tinyIOx:
Rumor is you can connect a tinyIOx to the MegaSquirt 5v power supply, but I know gesso had issues with that, so I skipped that, and connected it directly to main 12v power supply (with a voltage regulator in the middle).
I used this voltage regulator:
 Amazon.com: Addicore 5V 1.5A Positive Voltage Regulator L7805CV in Antistatic Foam (5pcs): Industrial & Scientific
because it was easy to get and should provide plenty of power. I soldered it onto the tinyIOx proto area and hooked up the power.
Connecting the tinyIOx to the MegaSquirt:
Here is the MS3 manual CAN Comms page.
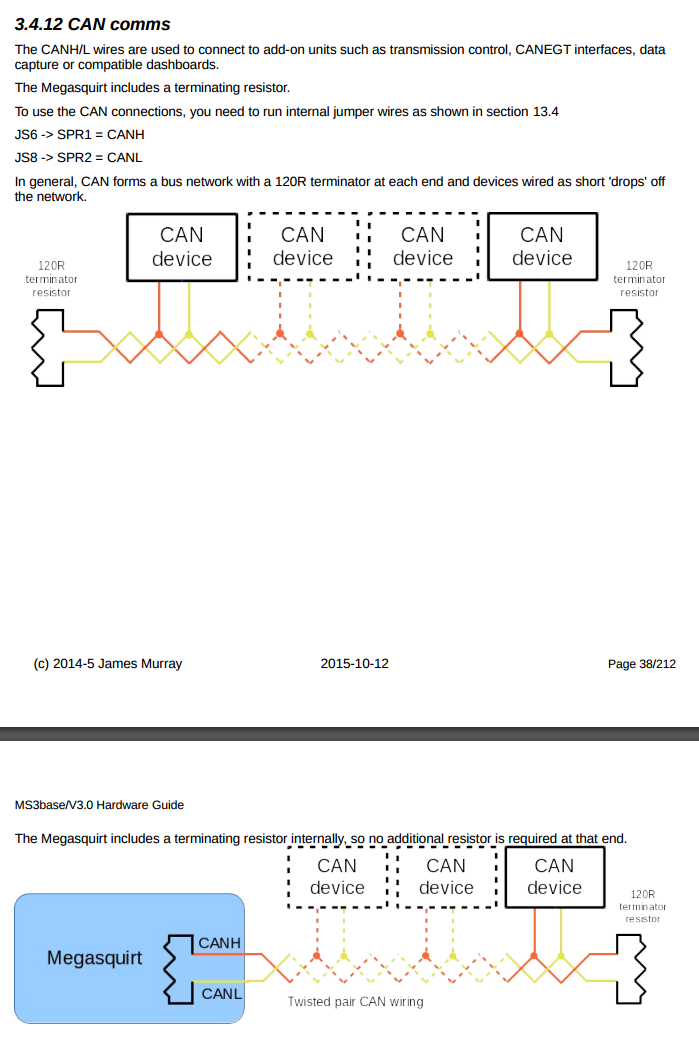
As you can see you need to somehow connect JS6 (CANH) and JS8 (CANL) to the tinyIOx. I used some weatherpack connectors, you can do whatever you want. This is how the manual suggest to do it.
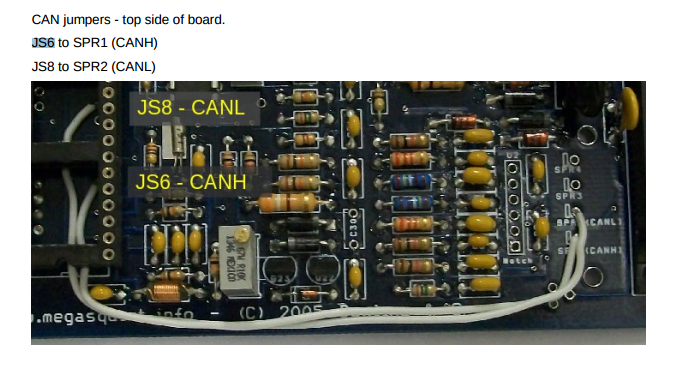
JS6 -> SPR1
JS8 -> SPR2
Then you can connect the tinyIOx to the respective pins on the MS3 DB37.
Here is the pinout for the tinyIOx. You can see the CANH and CANL pins.
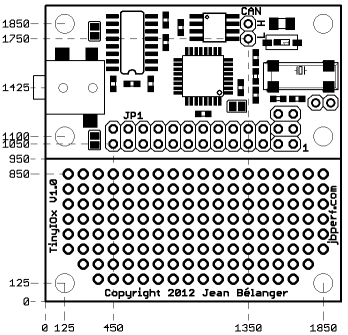
There is a DIP switch next to the CAN pins that enables or disables the 120Ohm terminating resistor. If the tinyIOx device is the only device on the CAN network then make sure it is set to ON.
Communicating with the tinyIOx and Updating the Firmware:
TinyIOx firmware thread: jbperf.com ? View topic - TinyIOx firmware and ini
Latest firmware (As of 5/25/2016): jbperf.com ? View topic - TinyIOx release 0.2.0
Latest portscanner (As of 5/25/2016): jbperf.com ? View topic - Port scanner
Make sure to disable any CAN polling or broadcasting before updating firmware. If you haven't ever setup CAN on your MS3 this shouldn't be an issue.
Now we need to see if you did the last few steps correctly. For this step you will need a windows computer and the latest port scanner (which can be found at the link above).
Make sure that any applications using the port are closed (tuner studio, etc) and scan the ports. If done correctly you should see something similar to this picture (from jbperf.com)
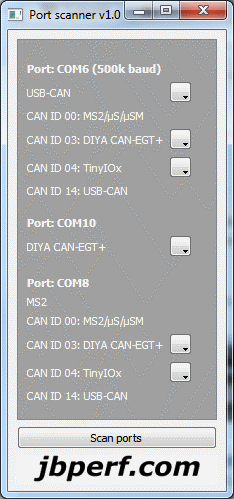
Except yours will only have one megasquirt, and one CAN device below it.
Make sure that the CAN ID is 4 (if it is the only other CAN device, if you have multiple devices, you can change the ID. Either way remember the ID for later)
Click on the drop down arrow and update the firmware.
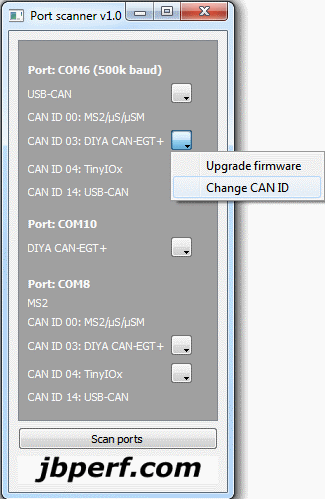
Make sure it says that it completed successfully. If not go sign up on jbperf.com and ask him. He knows his ****.
Now you have an updated tinyIOx that communicates with the MegaSquirt.
Project setup (adding the tinyIOx to your TunerStudio Project):
There are 2 ways to do this. Setup a project only for the tinyIOx (on your own for this). Or do it how I did, and add it to your project.
Make sure you have the ini file that you downloaded with the latest firmware.
Open your project in tuner studio.
File -> Project -> Project Properties.
Go to the CAN Devices Tab
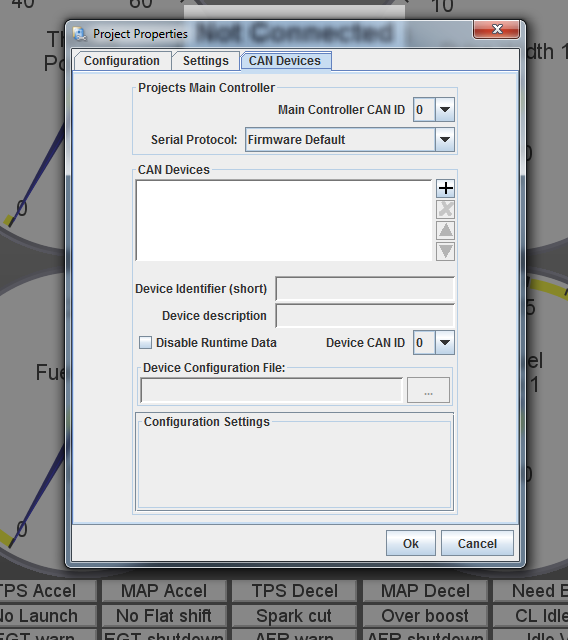
Click the + button to add a new device.
Set the Device Identifier, Device Description, and Device CAN ID (Probably 4, unless you changed it). Also make sure to check Disable runtime data.
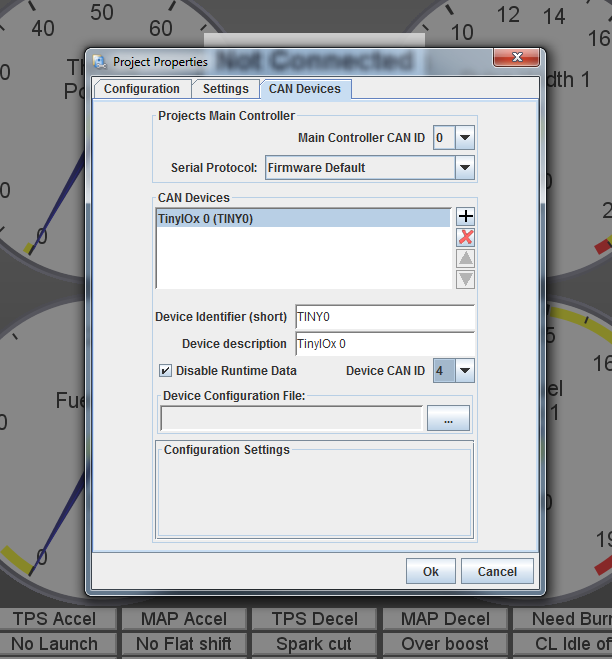
Now click on the 3 dots and set the Device Configuration file to the ini file you downloaded with the latest firmware.
Make sure that you set the SERIAL to Deactivated.
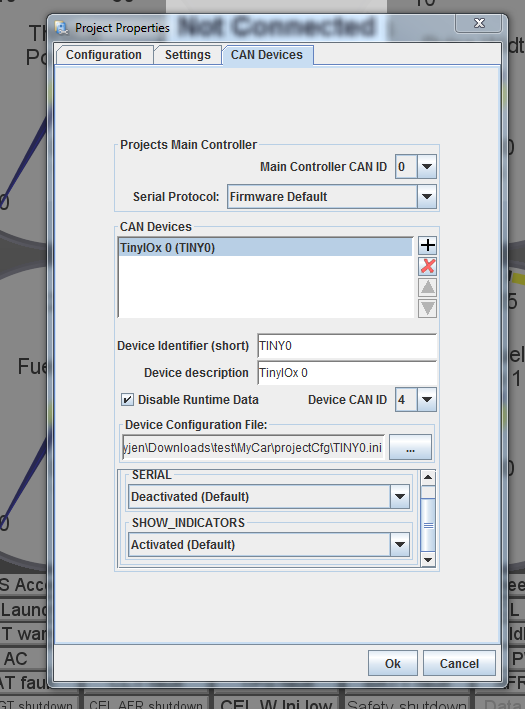
Press OK (Project will close and reopen)
You now have a menu in the upper left to change between tinyIOx and MegaSquirt settings.
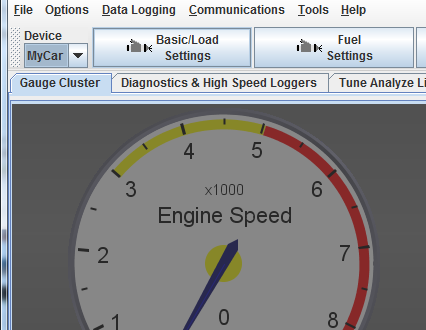
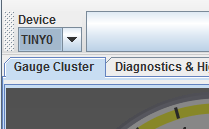
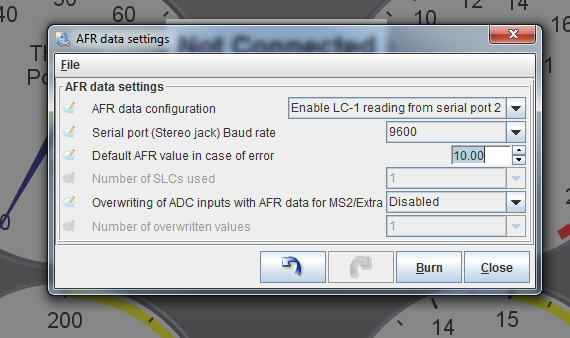
Go to TinyIOx setup and open AFR data settings. Change to the following.
Connecting your LC-1/2 to the TinyIOx:
If you have an LC-1 then you should already have the 3.5mm plug to connect. You might need an adapter cable.
If you have an LC-2 then you will need to build/buy an adapter. This was a pain, but I will post this info later tonight when I get home and have pictures.
Configuring your project to use CAN wideband data:
This may vary depending on firmware. But the basic info is the same.
Open the CAN EGO, GPS menu under the CAN-bus/testmodes menu. (This might also be called the 'CAN VSS,gear' menu)
Set Fetch EGO Data to Innovate format
Set Remote CAN Id to your tinyIOx ID (Probably 4)
Set the Table to 7
Set the Offset to 76
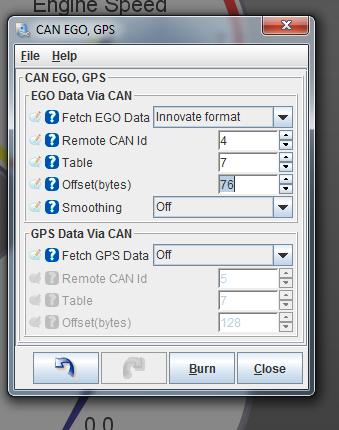
Now that the megasquirt is polling for the info we need to use it.
Fuel Settings -> AFR/EGO Control
EGO 1 Port set to CAN EGO
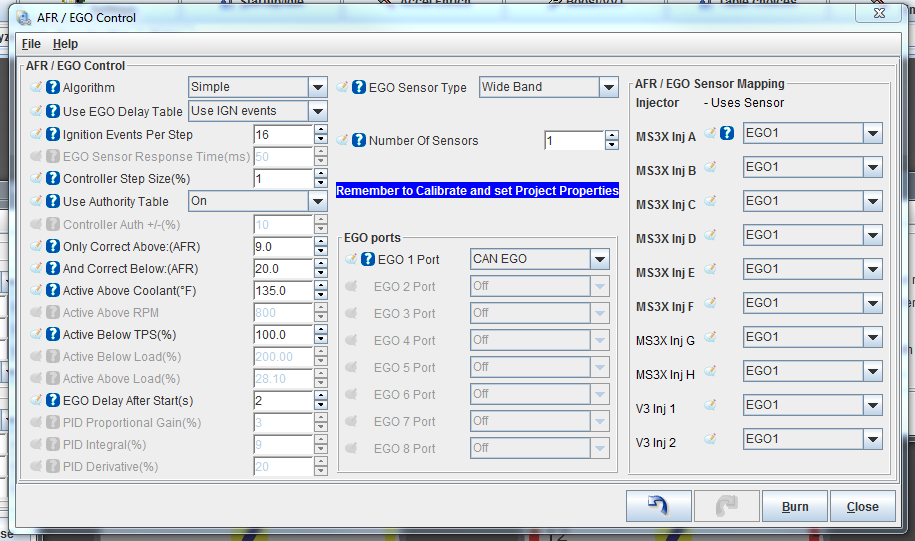
Thats a wrap. This worked for me, hopefully it will work for you too.
References:
http://forum.jbperf.com/
http://jbperf.com/io_extender/tinyIOx.html
http://www.msextra.com/doc/pdf/MS3ba...rdware-1.4.pdf
This guide assumes you are using an MS3/3x, other variants may differ. It also assumes that the tinyIOx is the only CAN device. Other setups will need different configuration.
Make sure to update to 1.4.1 if you are on 1.4. There is a bug that affects CAN in 1.4. Here is 1.4.1 Megasquirt Support Forum (MSEXTRA) ? MS3 firmware 1.4.1 released - use this (View topic)
All info was gathered from jbperf.com.
Mostly from these 2 links.
TinyIOx v1.0 Board
jbperf.com ? View topic - TinyIOx
Powering the tinyIOx:
Rumor is you can connect a tinyIOx to the MegaSquirt 5v power supply, but I know gesso had issues with that, so I skipped that, and connected it directly to main 12v power supply (with a voltage regulator in the middle).
I used this voltage regulator:
Connecting the tinyIOx to the MegaSquirt:
Here is the MS3 manual CAN Comms page.

As you can see you need to somehow connect JS6 (CANH) and JS8 (CANL) to the tinyIOx. I used some weatherpack connectors, you can do whatever you want. This is how the manual suggest to do it.

JS6 -> SPR1
JS8 -> SPR2
Then you can connect the tinyIOx to the respective pins on the MS3 DB37.
Here is the pinout for the tinyIOx. You can see the CANH and CANL pins.

There is a DIP switch next to the CAN pins that enables or disables the 120Ohm terminating resistor. If the tinyIOx device is the only device on the CAN network then make sure it is set to ON.
Communicating with the tinyIOx and Updating the Firmware:
TinyIOx firmware thread: jbperf.com ? View topic - TinyIOx firmware and ini
Latest firmware (As of 5/25/2016): jbperf.com ? View topic - TinyIOx release 0.2.0
Latest portscanner (As of 5/25/2016): jbperf.com ? View topic - Port scanner
Make sure to disable any CAN polling or broadcasting before updating firmware. If you haven't ever setup CAN on your MS3 this shouldn't be an issue.
Now we need to see if you did the last few steps correctly. For this step you will need a windows computer and the latest port scanner (which can be found at the link above).
Make sure that any applications using the port are closed (tuner studio, etc) and scan the ports. If done correctly you should see something similar to this picture (from jbperf.com)

Except yours will only have one megasquirt, and one CAN device below it.
Make sure that the CAN ID is 4 (if it is the only other CAN device, if you have multiple devices, you can change the ID. Either way remember the ID for later)
Click on the drop down arrow and update the firmware.

Make sure it says that it completed successfully. If not go sign up on jbperf.com and ask him. He knows his ****.
Now you have an updated tinyIOx that communicates with the MegaSquirt.
Project setup (adding the tinyIOx to your TunerStudio Project):
There are 2 ways to do this. Setup a project only for the tinyIOx (on your own for this). Or do it how I did, and add it to your project.
Make sure you have the ini file that you downloaded with the latest firmware.
Open your project in tuner studio.
File -> Project -> Project Properties.
Go to the CAN Devices Tab

Click the + button to add a new device.
Set the Device Identifier, Device Description, and Device CAN ID (Probably 4, unless you changed it). Also make sure to check Disable runtime data.

Now click on the 3 dots and set the Device Configuration file to the ini file you downloaded with the latest firmware.
Make sure that you set the SERIAL to Deactivated.

Press OK (Project will close and reopen)
You now have a menu in the upper left to change between tinyIOx and MegaSquirt settings.


Go to TinyIOx setup and open AFR data settings. Change to the following.

Connecting your LC-1/2 to the TinyIOx:
If you have an LC-1 then you should already have the 3.5mm plug to connect. You might need an adapter cable.
If you have an LC-2 then you will need to build/buy an adapter. This was a pain, but I will post this info later tonight when I get home and have pictures.
Configuring your project to use CAN wideband data:
This may vary depending on firmware. But the basic info is the same.
Open the CAN EGO, GPS menu under the CAN-bus/testmodes menu. (This might also be called the 'CAN VSS,gear' menu)
Set Fetch EGO Data to Innovate format
Set Remote CAN Id to your tinyIOx ID (Probably 4)
Set the Table to 7
Set the Offset to 76

Now that the megasquirt is polling for the info we need to use it.
Fuel Settings -> AFR/EGO Control
EGO 1 Port set to CAN EGO

Thats a wrap. This worked for me, hopefully it will work for you too.
References:
http://forum.jbperf.com/
http://jbperf.com/io_extender/tinyIOx.html
http://www.msextra.com/doc/pdf/MS3ba...rdware-1.4.pdf
#4
WooHoo, it's all in "Idiot Guide" format - please keep it up.
For those not familiar with the term: "Idiot Guide"s show/describe all steps involved so that almost any "idiot" can follow them, they don't make broad statements such as "configure the XYZ" when that actually involves multiple actions or assumes a lot of associated knowledge.
For those not familiar with the term: "Idiot Guide"s show/describe all steps involved so that almost any "idiot" can follow them, they don't make broad statements such as "configure the XYZ" when that actually involves multiple actions or assumes a lot of associated knowledge.
#6
Strange, I've had 0 issues using the MS 5V power supply. Nice writeup though. It would be nice if the TinyIOx had a user manual or something.
Just want to add that for those using MS2, to get the digital wideband signal you need to set it up like so:
Ignore the port polling settings (using that for outputs on the TinyIOx). AFR data is located on CAN ID: 4, table: 7, offset: 76
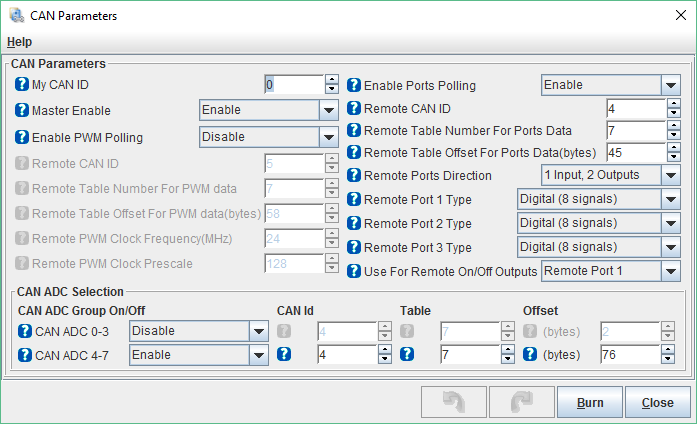
Signal comes through on remote ADC4.
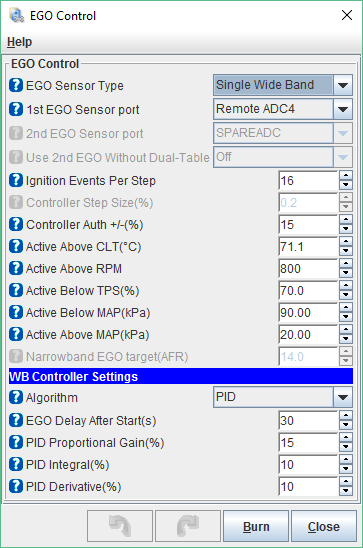
Just want to add that for those using MS2, to get the digital wideband signal you need to set it up like so:
Ignore the port polling settings (using that for outputs on the TinyIOx). AFR data is located on CAN ID: 4, table: 7, offset: 76

Signal comes through on remote ADC4.

#17
I have a MSpnpPRO so I don't believe I have a heck of a lot of space available to me. Maybe I will order one and bring it to Fry's and see if they have a box on the shelf sitting around that will fit.
I already have the Trackspeed Engineering MSLabs CAN wideband controller sitting in a drawer ready to be installed. Should I just skip the MSLabs box and install a TinyIOx or does the MSLabs do something that the MSLabs box doesn't?
I realize you might not be able to compare, but if anyone knows I would like to know. Ideally I would like to add some more analog sensor inputs so the tinyIOx would be a nice addition.
#19
Just thought I'd add some more info on how to use the output ports. This is for ms2, however it should be similar for ms3x but it's highly unlikely that you'd need the extra outputs.
Port polling needs to be enabled on megasquirt with the following settings:
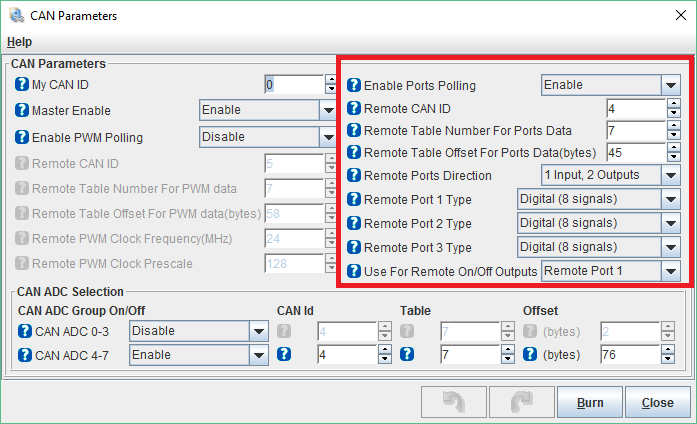
Next the ports need to be setup on the TinyIOx and linked with the outputs PTE2 or PTE3:
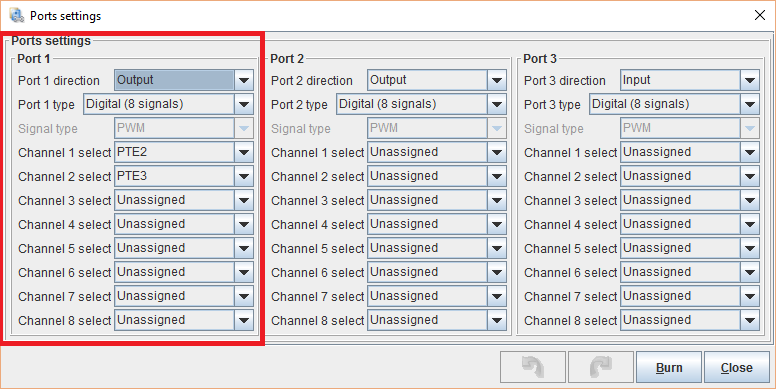
Then you can choose the parameters that turn on/off the remote port:
(this one is set up to active VICS)

.
Port polling needs to be enabled on megasquirt with the following settings:

Next the ports need to be setup on the TinyIOx and linked with the outputs PTE2 or PTE3:

Then you can choose the parameters that turn on/off the remote port:
(this one is set up to active VICS)

.


