
92 Miata no Spark - DIYPNP
 11-11-2012, 12:19 AM
#1
Junior Member
Thread Starter

Join Date: Nov 2012
Posts: 45
Total Cats: 0
Car: 92 Turbo Miata 1.6L manual.
Problem: Will not start with DIYPNP MS2. Car starts with stock ECU.
I am getting fuel but no spark when checked with timing light or with in-line spark test bulb.
When I do the Output test for coil in TunerStudio (TS) I hear some tapping sound in sequence but timing light shows nothing.
I do not see RPM move while cranking in TS. The only gauges that work is Fuel Load and AFR because I have AEM Wideband.
Am I suppose to wire the CAS signals to DIYPNP or they are already in the pin-outs in car harness because I seem to find all kind of different info online which is confusing me even more.
I have uploaded my msq file.
I followed installation instructions here:
DIYPNP MegaSquirt installation for the Mazda Miata

Reply
 0
0

0
11-11-2012, 08:20 AM
#2
Boost Czar


iTrader: (62)
Join Date: May 2005
Location: Chantilly, VA
Posts: 79,742
Total Cats: 4,126
Was your project in TS setup for microsquirt and not megasquirt?
When I open your MSQ I got errors that suggested your project is not setup properly. If not, TS changes a bunch of Input and Outputs to ones that make sense on a v3.0 Mainboard and not a Microquirt module. This would prevent the unit from working properly.
for example, sparkout was set to D14...which is not a DIYPNP output.
Fix your project properties by hitting cntrl+p, go to settings, and select "micosquirt module" under the megasquirt selection.
Then reload the basemap (NOT your map you uploaded) and try again.
Reply
0
0
11-11-2012, 09:28 AM
#3
Junior Member
Thread Starter
Join Date: Nov 2012
Posts: 45
Total Cats: 0
I started new project and when setting up I clicked on Detect ECU and it came up "MS2Extra Serial324"
Then I selected the Microsquirt Module DIYPNP under Settings tab.
When I try to Open the base map (91 miata 240cc injectors.msq) that is provided at DIYautotune I get the following error:
Signatures do not match!
Tune File signature:MS2Extra Rel 3.0.3s
Configuration signature:MS2Extra Serial324
Do you want to load it anyway?
Reply
0
0
11-11-2012, 11:41 AM
#11
Junior Member
Thread Starter
Join Date: Nov 2012
Posts: 45
Total Cats: 0
DIYPNP wiring: Starting from left on main board.
Main board ---> Connector Board
IAT --> 4P
CLT --> 4Q
TPS --> GND on main board.
O2 --> 4N
VR+
VR-
OP+
OP- --> 4E
VR2 --> 4G
IAC --> 4W
TACH
FUEL --> IN on High side driver next to proto area.
INJ2 --> 4V
INJ1 --> 4U
12V --> 1B
SG --> 4C
SG --> 4D
GND --> 4B
GND --> 4A
GND --> *TPS with resistor
IG1 --> 1G
IG2 --> 1H
WLD
ALD --> 1R
High Side out --> 1C
AEM Analog signal --> 4N
Reply
0
0
 11-16-2012, 10:12 AM
#20
Junior Member
Thread Starter
Join Date: Nov 2012
Posts: 45
Total Cats: 0
I don't think I need to jump these for 1992 Miata because I didn't do that on my v1.5 board?
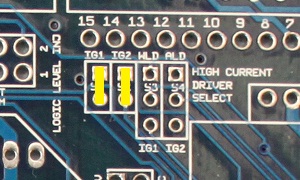
"Using only the first two jumpers as in the above image would control a 4cyl wasted spark configuration, such as controlling either one 4 tower coil pack, or two dual tower packs. This setup would use only outputs S1 and S2."
"Using only the first two jumpers as in the above image would control a 4cyl wasted spark configuration, such as controlling either one 4 tower coil pack, or two dual tower packs. This setup would use only outputs S1 and S2."
Reply
0
0


