Yet another CAI thread
 02-02-2008, 10:32 PM
#1
Elite Member
Thread Starter
iTrader: (15)

Join Date: Dec 2007
Location: San Antonio, Texas
Posts: 4,847
Total Cats: 27
OK check out my megahellastylin cowl induction CAI system. I was going to get a turbo, but dude according to the butt dyno this thing doubled my RWHP! Who needs a turbo? I mean I totally smoked that guy in that Geo Metro. I hear they are fast so this system must me making lots of power, right?
Hope that was good for a laugh
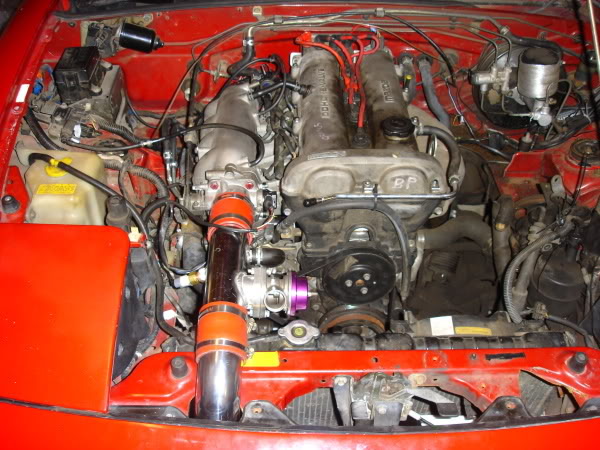
At any rate, thought I would share pictures of yet another DIY cowl CAI system. This was pretty easy to do. All I needed was the 3" Spectre hose from Pep Boys, and a 3" bimetal hole saw from Home Depot. Install time was less than 1 hour. The cruise control actuator and the diagnostic port had to be relocated. I also relocated the stock airbox... to the underside of my workbench.
I know there are some ghetto-tastic aspects to this 'install' such as the bungee cord intake retention system (look at the radiator and the power steering reservoir) and the lack of an air filter. This is temporary since all of that will be changing with the upcoming turbo installation. I'll still use the cowl feed though for the cold air which is the whole idea of doing this.
Some notes:
1. The airbox sensor relocation was easy. I just drilled a 5/8" hole in the intake tube, moved over the grommet, and plugged in the sensor. Easy.
2. Relocating the cruise actuator was pretty easy. There are some existing holes/studs on the wheel well that work nicely if you bend the mount bracket just a bit. It still works just fine, and clears the brake MC.
3. The tightest part is the reservoir for the clutch MC. It is OK for now, but I think I'll fab a remote reservoir setup and relocate it slightly for more clearance. This is pretty common on sport bikes (I race them) so it should be fine here.
Now, for a couple of related questions:
1. I grabbed a picture from another similar thread posted by an Aussie showing a canister that presumably holds a cone style filter. See the last image. I could fab something like this, but would rather buy if they are cheap enough. I sent him a PM asking where he got it. Anyone know where to get these? I have poked around Ebay, Google, K&N, Jegs, etc. and cannot find one.
2. Deleted by OP
Now back to my regularly scheduled Saturday night beer. Go Cowboys! Oh.. wait...
Hope that was good for a laugh
At any rate, thought I would share pictures of yet another DIY cowl CAI system. This was pretty easy to do. All I needed was the 3" Spectre hose from Pep Boys, and a 3" bimetal hole saw from Home Depot. Install time was less than 1 hour. The cruise control actuator and the diagnostic port had to be relocated. I also relocated the stock airbox... to the underside of my workbench.
I know there are some ghetto-tastic aspects to this 'install' such as the bungee cord intake retention system (look at the radiator and the power steering reservoir) and the lack of an air filter. This is temporary since all of that will be changing with the upcoming turbo installation. I'll still use the cowl feed though for the cold air which is the whole idea of doing this.
Some notes:
1. The airbox sensor relocation was easy. I just drilled a 5/8" hole in the intake tube, moved over the grommet, and plugged in the sensor. Easy.
2. Relocating the cruise actuator was pretty easy. There are some existing holes/studs on the wheel well that work nicely if you bend the mount bracket just a bit. It still works just fine, and clears the brake MC.
3. The tightest part is the reservoir for the clutch MC. It is OK for now, but I think I'll fab a remote reservoir setup and relocate it slightly for more clearance. This is pretty common on sport bikes (I race them) so it should be fine here.
Now, for a couple of related questions:
1. I grabbed a picture from another similar thread posted by an Aussie showing a canister that presumably holds a cone style filter. See the last image. I could fab something like this, but would rather buy if they are cheap enough. I sent him a PM asking where he got it. Anyone know where to get these? I have poked around Ebay, Google, K&N, Jegs, etc. and cannot find one.
2. Deleted by OP
Now back to my regularly scheduled Saturday night beer. Go Cowboys! Oh.. wait...
Last edited by ZX-Tex; 02-02-2008 at 11:31 PM.

Reply
 0
0

0


 02-02-2008, 10:51 PM
#5
Elite Member
Thread Starter
iTrader: (15)
Join Date: Dec 2007
Location: San Antonio, Texas
Posts: 4,847
Total Cats: 27
Yeah... it was fun 
BTW scratch that second question. I found this thread:
https://www.miataturbo.net/forum/showthread.php?t=10554
Linked to this one at miata.net
http://forum.miata.net/vb/showthread...7&page=1&pp=25
That crew picture in post 73 of the mt.n thread is ******* hilarious
BTW scratch that second question. I found this thread:
https://www.miataturbo.net/forum/showthread.php?t=10554
Linked to this one at miata.net
http://forum.miata.net/vb/showthread...7&page=1&pp=25
That crew picture in post 73 of the mt.n thread is ******* hilarious
Reply
0
0
02-02-2008, 10:56 PM
#6
Elite Member
Thread Starter
iTrader: (15)
Join Date: Dec 2007
Location: San Antonio, Texas
Posts: 4,847
Total Cats: 27
HEY SamS! I had that same exact idea for my filter as well. In fact I was on the K&N web site earlier today sizing filters. Kind of tight in the cowl but obviously it worked for you. What filter did you use? Happy with that setup, likes/dislikes? I am guessing the NA cowl is the same size as the NB.
Reply
0
0
02-02-2008, 11:04 PM
#8
Elite Member
Thread Starter
iTrader: (15)
Join Date: Dec 2007
Location: San Antonio, Texas
Posts: 4,847
Total Cats: 27
I found the uofacats thread, not sure how I missed it before. Got to avoid being a hypocrite considering my sig.
https://www.miataturbo.net/forum/showthread.php?t=4829
Thanks for the part# for the K&N. I also had an idea of taking several small diameter filters and modifying them to connect in series, then running them along the cowl to get more filter area for lower pressure drop. But then again, I like the filter canister too, just got to find or fab one.
Last edited by ZX-Tex; 02-02-2008 at 11:34 PM.
Reply
0
0
02-02-2008, 11:15 PM
#10
Yeah... it was fun
BTW scratch that second question. I found this thread:
https://www.miataturbo.net/forum/showthread.php?t=10554
Linked to this one at miata.net
http://forum.miata.net/vb/showthread...7&page=1&pp=25
That crew picture in post 73 of the mt.n thread is ******* hilarious
BTW scratch that second question. I found this thread:
https://www.miataturbo.net/forum/showthread.php?t=10554
Linked to this one at miata.net
http://forum.miata.net/vb/showthread...7&page=1&pp=25
That crew picture in post 73 of the mt.n thread is ******* hilarious

Reply
0
0
 02-04-2008, 05:38 AM
#13
Junior Member

Join Date: Feb 2005
Posts: 65
Total Cats: 0
The 2nd photo in the original thread shows a CAI developed by the MX-5 factory in Melbourne, Australia
www.mx5factory.com.au
Here is one of the original (if not THE original) CAI for the down under MX-5
http://www.miata.net.au/loch.html
And yet another one.
http://www.mx5mania.com.au/product630.htm
J
Reply
0
0
02-04-2008, 07:30 AM
#14

Reply
0
0
02-04-2008, 10:25 AM
#15
Elite Member
Thread Starter
iTrader: (15)
Join Date: Dec 2007
Location: San Antonio, Texas
Posts: 4,847
Total Cats: 27
Yow! Expensive from both sources! The Apollo is $200+ on EBay and the other one is $200+ as well. I think I will be fabricating my own for sure now.
Thanks for the links; I missed it in both cases.
Thanks for the links; I missed it in both cases.
Reply
0
0
02-13-2008, 10:33 PM
#16
Elite Member
Thread Starter
iTrader: (15)
Join Date: Dec 2007
Location: San Antonio, Texas
Posts: 4,847
Total Cats: 27
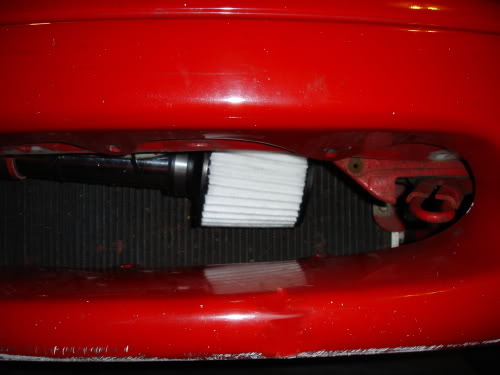
OK fabrication updates. Still not 100% cosmetic, but now 100% functional. Note the addition of the 90-deg bend tube in the cowl area and the addition of the K&N filter ( more info here http://www.knfilters.com/search/prod...x?Prod=RD-0720 )
The 90-deg pipe really changed the character of the sound. It removed some of the high-frequency ricer exhaust can tinniness and gave it a deeper sound, much better IMO. It is still very audible at mid-throttle up.
Note I added the foam seal at the edge of the cowl rain diverter. It seals against the bottom of the hood and prevents rain from having a direct shot at the filter. The filter also does not sit on the tray in the bottom of the cowl so any collecting water will flow beneath it. I also spaced it in the center as best I could to allow air flow from the full perimeter. Also, though it looks like it from this photo, it does not interfere with the wiper arm.
Reply
0
0
02-13-2008, 10:46 PM
#17
Elite Member
Thread Starter
iTrader: (15)
Join Date: Dec 2007
Location: San Antonio, Texas
Posts: 4,847
Total Cats: 27
Oh yeah and it is REALLY loud when you hit the rev limiter. brrrrrrrrrrr BRAP-BRAP-BRAP  **** it, I think I'll grab the camcorder and record the sound.
**** it, I think I'll grab the camcorder and record the sound.
Reply
0
0
 02-13-2008, 11:29 PM
#19
Elite Member
iTrader: (11)

Join Date: Jun 2007
Location: Overland Park, Kansas
Posts: 5,360
Total Cats: 43
SERIOUSLY!? How the **** did I miss this thread??
If his ***** hurt so much about the "loud annoying whistle of my turbo" why the **** did he waste his money on it??? Man, I bet he killed at least 40hp with that foam bullshit, what a loser!
Reply
0
0