

99 mazda miata, Hard to start, shaken engine after head gasket replacement ~!
 06-06-2012, 07:32 PM
#1

Hi,
I recently had a crack cylinder head so replaced it along the head gasket since everything has to be out anyways.
I bought the head off from crasiglist. I was told that it has 60K miles only. He bought it from project-G. However, he totaled his miata before putting it on. That's the reason he sold it
after doing all the installing, it turns out not so great
Engine is hard to start and the engine is a bit shaken.
some smoke coming out from the oil cap. (Hard to tell from the video below)
and it makes a ton of noise..
Would you help? please
O..i forgot to mention. It is a 99 miata with 89k miles. thanks
below is a youtube video that i took.
http://youtu.be/BeRTT0j0iq8
new information updated
finally i bought the right feeler gauges.
Below is the numbers that i got. Do they look right?
Intake: 0.06 / 0.07 / 0.07 / 0.09 / 0.07 / 0.08 / 0.08 / 0.08
Exhaust: 0.08 / 0.09 / 0.08 / 0.07 / 0.06 / 0.09 / 0.10 / 0.07
It looks like exhaust side is a bit too tight, right?
according to Bog's rule is 0.007-0.009 on the intake
0.010-0.012 on the exhaust
Last edited by thomas18a; 06-15-2012 at 02:36 AM.

Reply
 -1
-1

-1
 06-06-2012, 08:50 PM
#6
I listened to your vid... yes your valve lash is off.
Check and set as needed
My rule of thumb is .007-.009 on the intake
.010-.012 on the exhaust
The FSM may state a diffrent spec.
Also run a compression test and a leak down.
As loose as that one sounds ( I would guess .020-.022 loose) you may have a slightly tinked valve.
But do not rev it any more... if you spit the puck you will have real issues.
Do you still have your old head? with the buckets and pucks?
Reply
0
0
06-06-2012, 10:17 PM
#7
thanks, I have been following up ur threats. They are knowledgeable.
I followed all ur step to replace the head. Good Job..
I dont know anything about the valve job. if you dont mind, would u tell me how it can be set it back to ur rule?
yes, i do still have everything ( Camshaft, head, valve, Intake manifold, 4 OEM injector..) they will be up for sale after my car runs fine.
thanks for your advise
I listened to your vid... yes your valve lash is off.
Check and set as needed
My rule of thumb is .007-.009 on the intake
.010-.012 on the exhaust
The FSM may state a diffrent spec.
Also run a compression test and a leak down.
As loose as that one sounds ( I would guess .020-.022 loose) you may have a slightly tinked valve.
But do not rev it any more... if you spit the puck you will have real issues.
Do you still have your old head? with the buckets and pucks?
Check and set as needed
My rule of thumb is .007-.009 on the intake
.010-.012 on the exhaust
The FSM may state a diffrent spec.
Also run a compression test and a leak down.
As loose as that one sounds ( I would guess .020-.022 loose) you may have a slightly tinked valve.
But do not rev it any more... if you spit the puck you will have real issues.
Do you still have your old head? with the buckets and pucks?
Reply
-1
-1
06-06-2012, 10:46 PM
#8
Its easier with the head off the car.....
You will need...
Set of feeler gauges
Notebook and pen
Venier Calipers (Cheap Harbor freight ones will work)
Sharpie marker
Small pic or flat head screwdriver
Basic hand tools
Rags
18 x 18 chunk of cardboard, clean
And time......
First go over to the cracked head and pull the cams out, then lift the buckets.
Once the buckets are out, flip the "pucks" out of the top of the byckets with the small screwdriver/pic
Whipe clean the pucks with the rag and place on the cardboard.
Take the calipers and measure the thickness of each puck
Stack the same thickness pucks together on the card board, write thickness of the puck on the cardboard.
Now, I bet there is a way to do this with the cams left in the head, but I do not know it...
Gain acess to the timing belt, and pull the VC off
Now with #1 cyl at TDC, rotate the crank 90*, this moves the pistons to mid stroke in the block.
Drop the timing belt
Now find a ratchet and socket that fits the cam gear bolt.
Take the note book and pen, Draw 2 colums of 8 circles, and mark one end front
One colum of circles is the intake pucks the other colum is the exhaust pucks.
Pick a side to start with, Say Intake side first.
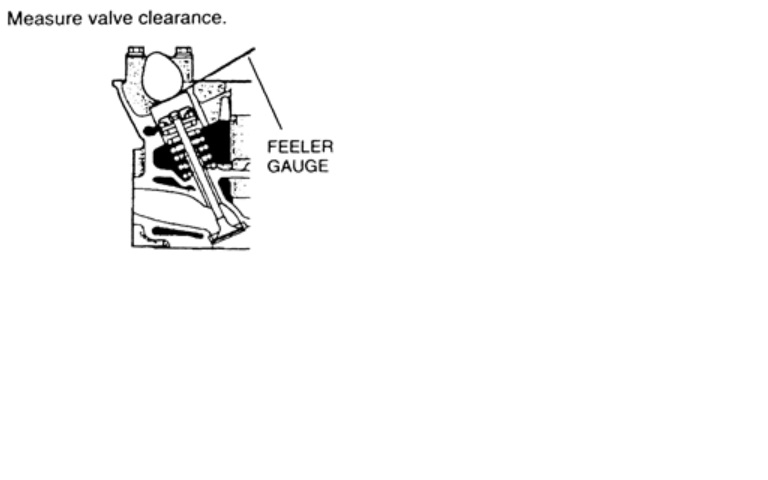
Rotate the cam, so the heel is closest to the puck, now with the feeler gauge, measure the clearance between cam and puck. write down the clearance by the circle in the notebook.
Repete untill you have all the clearances measured for that side.
If any of the clearances are in spec, take a sharpie marker and draw a hash mark on the VC rail, this just lets you know that it is ok and not to mess with it.
Now pull the cam caps and cams.
Now one at at time, flip the puck out, wipe clean amd measure it.
Now go to your stock pile and find a thicker or thinner shim to get the clearance you want.
it will go sort of like this.....
Measured cleance/lash .016
Spec is .010
The puck you pulled out is .100 thick
to get the cleance find a puck about .106
Now move to the next one....
once the one side is done, install the cam, and torque the cam caps
Spin the cam 3-4 full turns... Measure the clearance again.... repete till they are in spec or as close as you can get them. An extra .001 or .002 loose or tight will not kill the engine.
Now do the other side.
(if you are smart you will keep the extra pucks in a safe place)
The closer the lash is all the way down one side, the smoother the engine will run.
You will need...
Set of feeler gauges
Notebook and pen
Venier Calipers (Cheap Harbor freight ones will work)
Sharpie marker
Small pic or flat head screwdriver
Basic hand tools
Rags
18 x 18 chunk of cardboard, clean
And time......
First go over to the cracked head and pull the cams out, then lift the buckets.
Once the buckets are out, flip the "pucks" out of the top of the byckets with the small screwdriver/pic
Whipe clean the pucks with the rag and place on the cardboard.
Take the calipers and measure the thickness of each puck
Stack the same thickness pucks together on the card board, write thickness of the puck on the cardboard.
Now, I bet there is a way to do this with the cams left in the head, but I do not know it...
Gain acess to the timing belt, and pull the VC off
Now with #1 cyl at TDC, rotate the crank 90*, this moves the pistons to mid stroke in the block.
Drop the timing belt
Now find a ratchet and socket that fits the cam gear bolt.
Take the note book and pen, Draw 2 colums of 8 circles, and mark one end front
One colum of circles is the intake pucks the other colum is the exhaust pucks.
Pick a side to start with, Say Intake side first.
Rotate the cam, so the heel is closest to the puck, now with the feeler gauge, measure the clearance between cam and puck. write down the clearance by the circle in the notebook.
Repete untill you have all the clearances measured for that side.
If any of the clearances are in spec, take a sharpie marker and draw a hash mark on the VC rail, this just lets you know that it is ok and not to mess with it.
Now pull the cam caps and cams.
Now one at at time, flip the puck out, wipe clean amd measure it.
Now go to your stock pile and find a thicker or thinner shim to get the clearance you want.
it will go sort of like this.....
Measured cleance/lash .016
Spec is .010
The puck you pulled out is .100 thick
to get the cleance find a puck about .106
Now move to the next one....
once the one side is done, install the cam, and torque the cam caps
Spin the cam 3-4 full turns... Measure the clearance again.... repete till they are in spec or as close as you can get them. An extra .001 or .002 loose or tight will not kill the engine.
Now do the other side.
(if you are smart you will keep the extra pucks in a safe place)
The closer the lash is all the way down one side, the smoother the engine will run.
Reply
1
1
06-06-2012, 11:40 PM
#9
excellent! write up
thanks! I am going to buy the tool and work on it this weekend.
thanks! I am going to buy the tool and work on it this weekend.
Its easier with the head off the car.....
You will need...
Set of feeler gauges
Notebook and pen
Venier Calipers (Cheap Harbor freight ones will work)
Sharpie marker
Small pic or flat head screwdriver
Basic hand tools
Rags
18 x 18 chunk of cardboard, clean
And time......
First go over to the cracked head and pull the cams out, then lift the buckets.
Once the buckets are out, flip the "pucks" out of the top of the byckets with the small screwdriver/pic
Whipe clean the pucks with the rag and place on the cardboard.
Take the calipers and measure the thickness of each puck
Stack the same thickness pucks together on the card board, write thickness of the puck on the cardboard.
Now, I bet there is a way to do this with the cams left in the head, but I do not know it...
Gain acess to the timing belt, and pull the VC off
Now with #1 cyl at TDC, rotate the crank 90*, this moves the pistons to mid stroke in the block.
Drop the timing belt
Now find a ratchet and socket that fits the cam gear bolt.
Take the note book and pen, Draw 2 colums of 8 circles, and mark one end front
One colum of circles is the intake pucks the other colum is the exhaust pucks.
Pick a side to start with, Say Intake side first.
Rotate the cam, so the heel is closest to the puck, now with the feeler gauge, measure the clearance between cam and puck. write down the clearance by the circle in the notebook.
Repete untill you have all the clearances measured for that side.
If any of the clearances are in spec, take a sharpie marker and draw a hash mark on the VC rail, this just lets you know that it is ok and not to mess with it.
Now pull the cam caps and cams.
Now one at at time, flip the puck out, wipe clean amd measure it.
Now go to your stock pile and find a thicker or thinner shim to get the clearance you want.
it will go sort of like this.....
Measured cleance/lash .016
Spec is .010
The puck you pulled out is .100 thick
to get the cleance find a puck about .106
Now move to the next one....
once the one side is done, install the cam, and torque the cam caps
Spin the cam 3-4 full turns... Measure the clearance again.... repete till they are in spec or as close as you can get them. An extra .001 or .002 loose or tight will not kill the engine.
Now do the other side.
(if you are smart you will keep the extra pucks in a safe place)
The closer the lash is all the way down one side, the smoother the engine will run.
Reply
-1
-1
 06-09-2012, 06:25 PM
#16
Elite Member

Join Date: Mar 2010
Location: Detroit
Posts: 1,524
Total Cats: 31
Yeah, that's the right way. It's best to have the lobe facing away from the tappet. If you can't fit even the thinnest feeler in between, then you have issues that need to be fixed. Make a chart and record all 16. You may be able to swap them around to fix the problem, or you may have messed up valve seats and/or damaged valves.
Reply
0
0
06-10-2012, 12:20 AM
#17
http://youtu.be/rmEtGkpg2SQ
this is how i checked the gap, but no luck, it cant fit the thinnest feeler
this is how i checked the gap, but no luck, it cant fit the thinnest feeler
Reply
-1
-1
06-10-2012, 07:21 PM
#19
I bought the head off from crasiglist. I was told that it has 60K miles only. He bought it from project-G. However, he totaled his miata before putting it on. That's the reason he sold it
How much would that be for fixing it? i have to save some $$ before taking any further.
How much would that be for fixing it? i have to save some $$ before taking any further.
Reply
-1
-1


