Over the top 18x12x4 (yeah 4) intercooler
 06-07-2008, 01:17 AM
#1
Elite Member
Thread Starter
iTrader: (15)

Join Date: Dec 2007
Location: San Antonio, Texas
Posts: 4,847
Total Cats: 27
So after reading up on all of the different home brew IC installations, I finally settled on an over the top (of the radiator) setup. What follows is a brief description of my installation accompanied of course by the requisite photos.
To make space for the IC I relocated the stock lower radiator brackets to move the radiator and A/C condenser about 1.5" lower. I then removed the stock fans and replaced them with two 11" Spals, allowing me to tilt the radiator and condenser about 6" towards the engine. This created a large gap between the front of the condenser and the rear of the bumper assembly. The gap was large enough to easily fit a 18"x12"x4" CXRacing intercooler. I like this particular unit because it is cheap ($75), decent sized, and has a bit more mass and cross sectional area than the 18"x12"x3" that is commonly used.
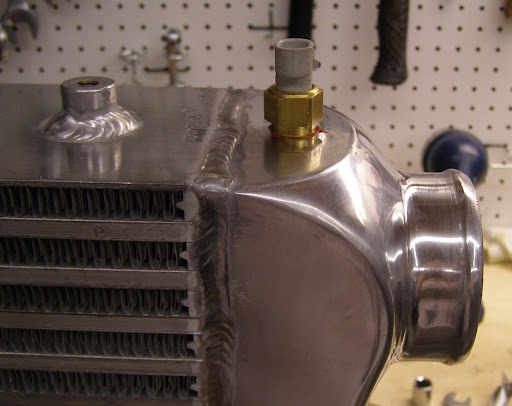
Here is the IC. I think I get extra megahellastylin points since it is intended for a "Mercedes Audi Saab"
http://cgi.ebay.com/ebaymotors/CXRac...mZ230259251169
For the piping, I went with the silicone approach. Immediately at the IC I used 3"-2.5" reducing elbows, with 2.5" couplers running to the throttle body, and 2.5" couplers and a 2.5"-2" reducing elbow to the compressor outlet. Most of this stuff came from siliconeintakes.com.
I fabricated the brackets that hold the IC to the chassis. The upper brackets support the weight of the IC and also hold the top of the radiator in place. The lower brackets are just there to keep the bottom of the IC stable, preventing movement front to rear.
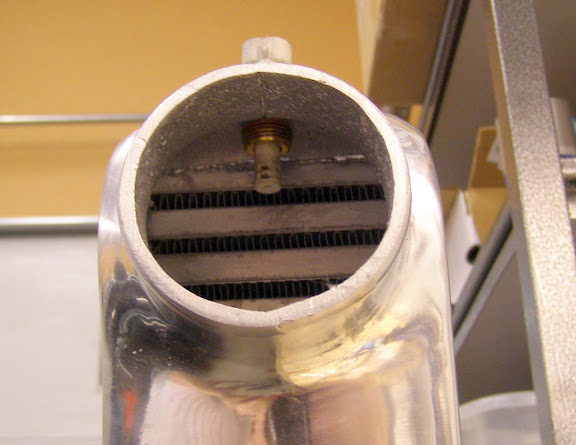
I tapped a 3/8" NPT hole in the IC and mounted the AIT right at the outlet of the IC. I like this approach... It keeps the AIT in front of the radiator and condenser so it will not heat soak as bad while sitting at idle. Also the temperature measurement will be very close to the intake temp since the run to the throttle is very short, and is all silicone, so there is little heat transfer from the engine bay.
I will have to check my receipts, but all together I believe it cost less than $300 in parts.
OK so I could go on and on, but let's get to the pictures, shall we?
To make space for the IC I relocated the stock lower radiator brackets to move the radiator and A/C condenser about 1.5" lower. I then removed the stock fans and replaced them with two 11" Spals, allowing me to tilt the radiator and condenser about 6" towards the engine. This created a large gap between the front of the condenser and the rear of the bumper assembly. The gap was large enough to easily fit a 18"x12"x4" CXRacing intercooler. I like this particular unit because it is cheap ($75), decent sized, and has a bit more mass and cross sectional area than the 18"x12"x3" that is commonly used.
Here is the IC. I think I get extra megahellastylin points since it is intended for a "Mercedes Audi Saab"
http://cgi.ebay.com/ebaymotors/CXRac...mZ230259251169
For the piping, I went with the silicone approach. Immediately at the IC I used 3"-2.5" reducing elbows, with 2.5" couplers running to the throttle body, and 2.5" couplers and a 2.5"-2" reducing elbow to the compressor outlet. Most of this stuff came from siliconeintakes.com.
I fabricated the brackets that hold the IC to the chassis. The upper brackets support the weight of the IC and also hold the top of the radiator in place. The lower brackets are just there to keep the bottom of the IC stable, preventing movement front to rear.
I tapped a 3/8" NPT hole in the IC and mounted the AIT right at the outlet of the IC. I like this approach... It keeps the AIT in front of the radiator and condenser so it will not heat soak as bad while sitting at idle. Also the temperature measurement will be very close to the intake temp since the run to the throttle is very short, and is all silicone, so there is little heat transfer from the engine bay.
I will have to check my receipts, but all together I believe it cost less than $300 in parts.
OK so I could go on and on, but let's get to the pictures, shall we?
Last edited by ZX-Tex; 06-07-2008 at 02:09 AM.

Reply
 0
0

0
06-07-2008, 01:19 AM
#2
Elite Member
Thread Starter
iTrader: (15)
Join Date: Dec 2007
Location: San Antonio, Texas
Posts: 4,847
Total Cats: 27
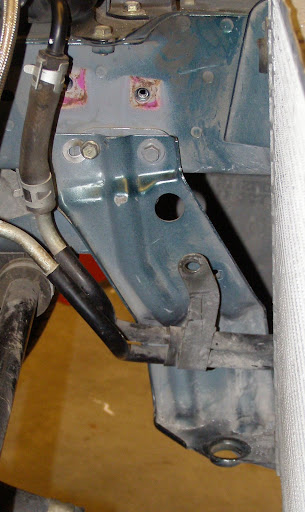
Here are the relocated lower radiator brackets. Notice I used the existing bolts for the sway bar bushing brackets. I drilled a new hole in the radiator bracket and they bolted right in.

Last edited by ZX-Tex; 06-07-2008 at 01:35 AM.
Reply
0
0
06-07-2008, 01:21 AM
#3
Elite Member
Thread Starter
iTrader: (15)
Join Date: Dec 2007
Location: San Antonio, Texas
Posts: 4,847
Total Cats: 27
Here are the upper and lower IC brackets.

Here they are in place with the IC
You can see in the front shot that the IC does not obscure the radiator-condenser very much at all.
Here they are in place with the IC
You can see in the front shot that the IC does not obscure the radiator-condenser very much at all.
Last edited by ZX-Tex; 06-07-2008 at 01:41 AM.
Reply
0
0
 06-07-2008, 01:27 AM
#6
Elite Member
Thread Starter
iTrader: (15)
Join Date: Dec 2007
Location: San Antonio, Texas
Posts: 4,847
Total Cats: 27
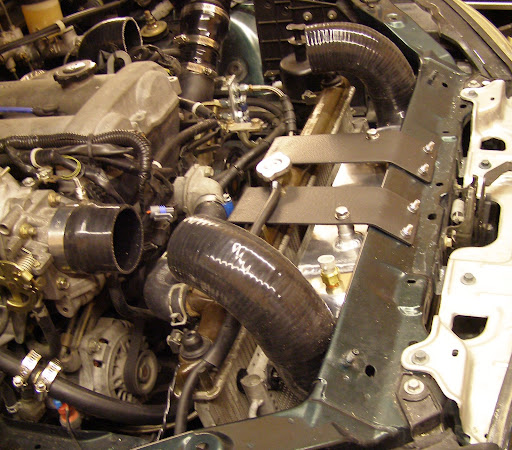
Here is the finished installation with the piping in place. I am going to fabricate a cowl next to fill in the gaps around the radiator. I have a sheet of black ABS ready to go, just need to finish the pattern. I did drive it tonight as it is shown here and did not have any coolant temperature problems. Plus the AIT stayed within 10 degrees F of ambient temp. I think it was actually much better than that, but I need to look at the data logs a bit more to be sure. And, this is a BIG improvement over my non-IC air inlet temps, which were spiking as high as 120 degs F over ambient.


Last edited by ZX-Tex; 06-07-2008 at 01:49 AM.
Reply
0
0
06-07-2008, 01:32 AM
#8
Elite Member
Thread Starter
iTrader: (15)
Join Date: Dec 2007
Location: San Antonio, Texas
Posts: 4,847
Total Cats: 27
Yeah that is temporary fo sho. I am waiting for a nice stainless steel mandrel bent piece to get here next week, then I am taking it out. It only cost $6 so it is a cheap temporary measure.
Reply
0
0
06-07-2008, 01:53 AM
#11
Elite Member
Thread Starter
iTrader: (15)
Join Date: Dec 2007
Location: San Antonio, Texas
Posts: 4,847
Total Cats: 27
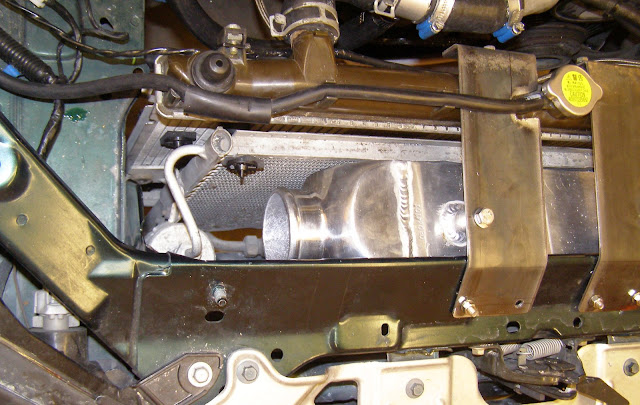
I also bent the a/c dryer way over to the right to allow space for the IC. I also had to bend the upper mount tabs for the condenser out of the way. Here is a picture showing the relocated dryer. The a/c tubing was surprisingly malleable; I was able to bend it farther than expected.
Reply
0
0
 06-07-2008, 12:36 PM
#13
Senior Member

iTrader: (8)
Join Date: Mar 2006
Location: Indianapolis, IN
Posts: 1,108
Total Cats: 232
I think I would try to make a shroud of some sort to seal the area around the radiator opening so all the air coming in there goes through the IC /rad /condenser instead of up the rad into the engine bay. Nice simple solution with the bracket relocation though!
Reply
0
0
 06-07-2008, 01:38 PM
#16
Junior Member

Join Date: Aug 2005
Location: Iowa
Posts: 338
Total Cats: 0
sweet install, i may have to try something similar when i get my engine back in...
also where in SA are you at, i'm visiting a friend of mine by west 410 and 90... i'd like to check it out if you got time...
also where in SA are you at, i'm visiting a friend of mine by west 410 and 90... i'd like to check it out if you got time...
Reply
0
0

 06-07-2008, 07:45 PM
#20
Senior Member

Join Date: Jun 2006
Location: Orlando FL - UCF
Posts: 684
Total Cats: 1
I found the same thing out while bending my A/C lines.
Also you are going to crack the plastic endtank on the radiator if that is a solid mount...ask me how I know.
My suggestion is to use some kind of bushing to allow the radiator to move a little bit. If (when) the radiator cracks use this stuff called Cold Steel (available at the nearest Wal-Mart) to fix it.
Reply
0
0


