1.8L DIY Turbo Set-up with BorgWarner EFR-6258
#1
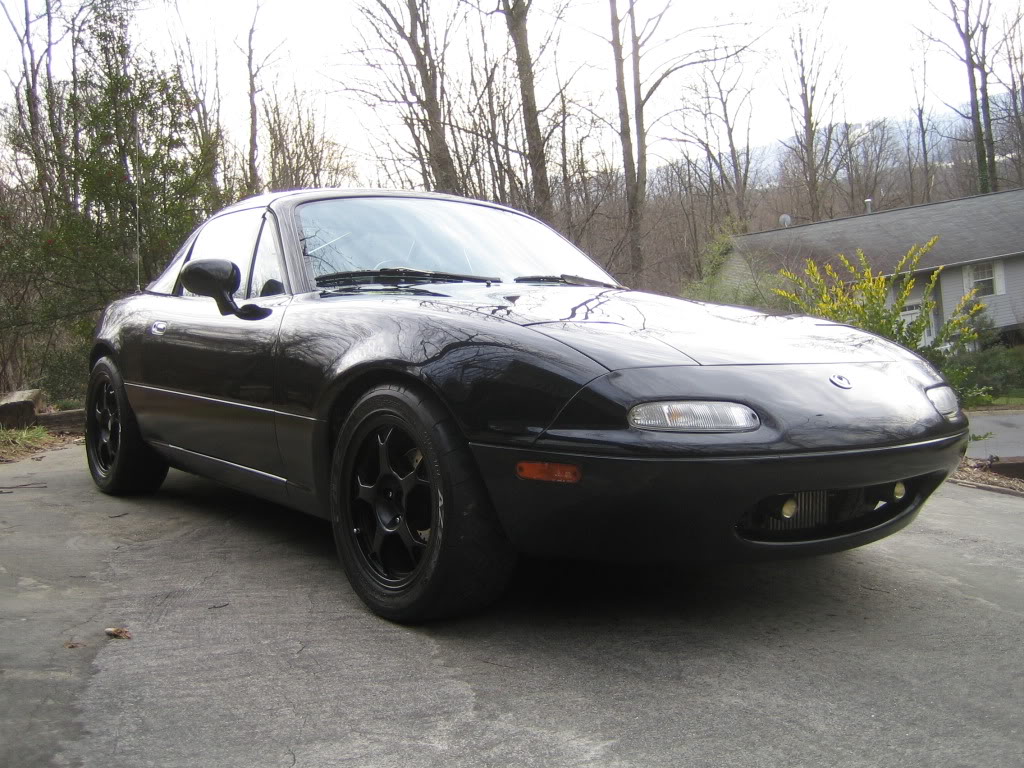
1994 Mazda Miata 1.8L Turbo Project
This is a summary of my DIY turbocharger project for my 1994 1.8L Mazda Miata. While I’ve never actually posted on this forum, I have used this forum for countless hours of research. I thought it was time to give something back to the forum community.
Original Purchase
The car was purchased back in 2005 with minor suspension modifications. The only modifications on the engine were an intake and headers.
Goal of Project
The Miata is a wonderful car, but it needs more power. My goal of the project was to maximize reliable performance using the stock engine.
Link ECU
The first modification was the installation of the FM Link ECU. Like many other posts I’ve read, I recommend installing a standalone ECU prior the turbocharger system. Understand and familiarize yourself with the tuning first. This will make troubleshooting your DIY turbo kit that much easier. The FM tech support is top notch and I appreciate their feedback during past few years.
Turbocharger #1
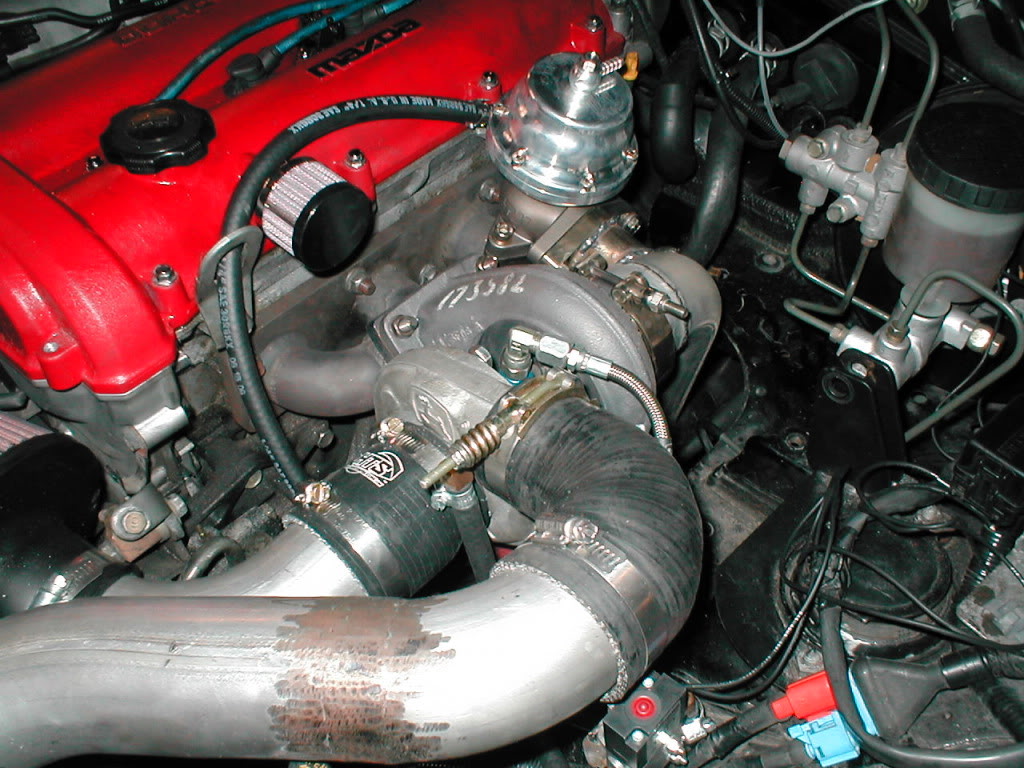
I originally started out with a Schwitzer S100 turbocharger (think T25 size) and used this in conjunction with an external Tial 38mm wastegate. This is a simple sleeve bearing, non-watercooled turbocharger which is typically used on diesel engines. The compressor exducer diameter = 53mm and turbine inducer diameter = 53mm. This system was installed without removing power steering or air-conditioning. If I did it all over again, I would first remove A/C and de-power the steering race. Removal opens up so much room and obviously saves weight.
(If you look closely below, you will notice the John Deere logo on the compressor cover!)
Exhaust Manifold
Exhaust manifold was the semi-custom option from JGS. They ship you a welded manifold and you cut and weld on your own flanges. I found the gas-less flux core option on my Hobart 135 MIG welder to be able to handle the material thickness without issue. The welds aren’t the prettiest in the world, but they also haven’t cracked! I would recommend this product to anyone.
Injectors
I experienced many problems after ‘upgrading’ to modified Venom RX-7, 550cc injectors purchased from TLF Performance Parts. After weeks of frustration, I finally sent the injectors off to be flow tested. Third party measurements showed unacceptable variation between the four injectors (545 to 625cc). The customer service from TLF Performance Parts was… well… let’s just call it ‘way less than desirable’. I finally switched to a new set of RC 550 injectors and all my problems went away.
Intake / Exhaust Piping
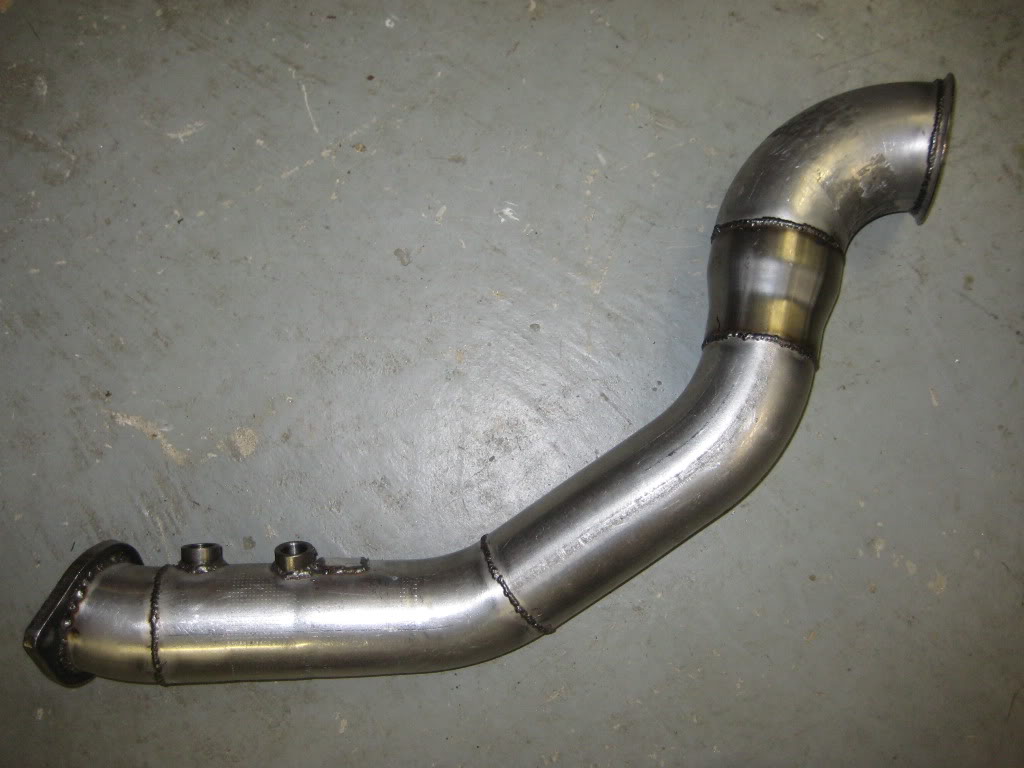
All intake, downpipe and exhaust piping was fabricated using steel tubing, chop saw, MIG welder and very tall jack stands. I’ve made some modifications to the exhaust over the last few years and I’m very happy with the performance and sound of using the two resonators listed in the part list below. I receive a lot of compliments at the Auto-X course.
Intercooler
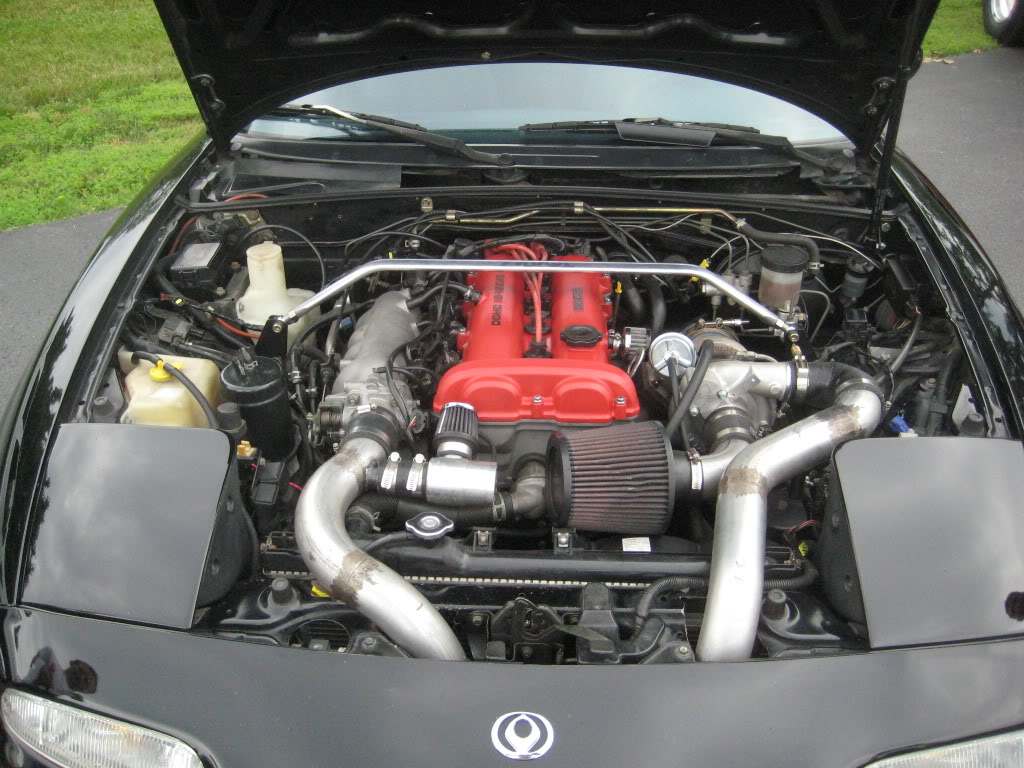
My set-up also uses a modified Saab 9000 intercooler. I chose this IC due to the compact design. You’ll notice from the pics that I took the routing over the radiator for both the IC inlet and IC outlet. This option proved difficult and required removing quite a bit of material from the hood and the steel support between the headlights. All intake piping is 2.5”. I/C inlet and outlet ports were both modified to come straight out of the core. Radiator was leaned back using ½” spacer on either side.
The other, more popular, option is to route the I/C piping down and around the radiator. My set-up makes the tube routing much shorter than the other popular method. There are pros/cons to each option.
Turbocharger #2
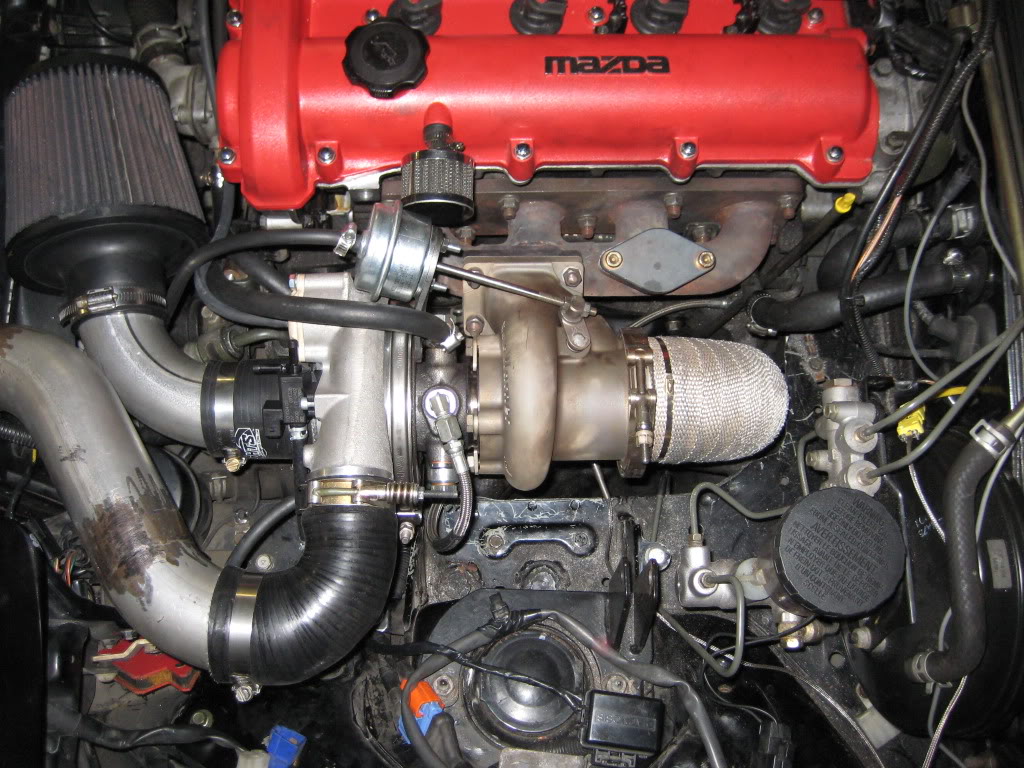
I’ve recently switched over to the new BorgWarner EFR-6258 turbocharger. This turbocharger features ball bearings and low inertia titanium aluminide turbine wheel. The compressor wheel exducer diameter (62mm) and turbine wheel inducer diameter (58mm) are much bigger than my previous turbo, but the boost response is very similar. The biggest benefit is 40+ additional whp at the same boost level (12 psi) compare to the old turbo.
This EFR turbo has a T2 inlet flange so I didn’t have to modify my exhaust manifold. The EFR turbos come standard with an internal wastegate. I simply capped the external wastegate flange which remains on the exhaust manifold.
Other features of the EFR turbo include an internal compressor bypass and electronic boost controller. I haven’t swapped over to using these components, but that next on the list.
Clutch
The stock clutch could handle the torque output from the S100 turbocharger but it started to slip after upgrading to the EFR-6258 turbocharger. The FM Level-1 clutch kit made all those problems go away.
Performance Data
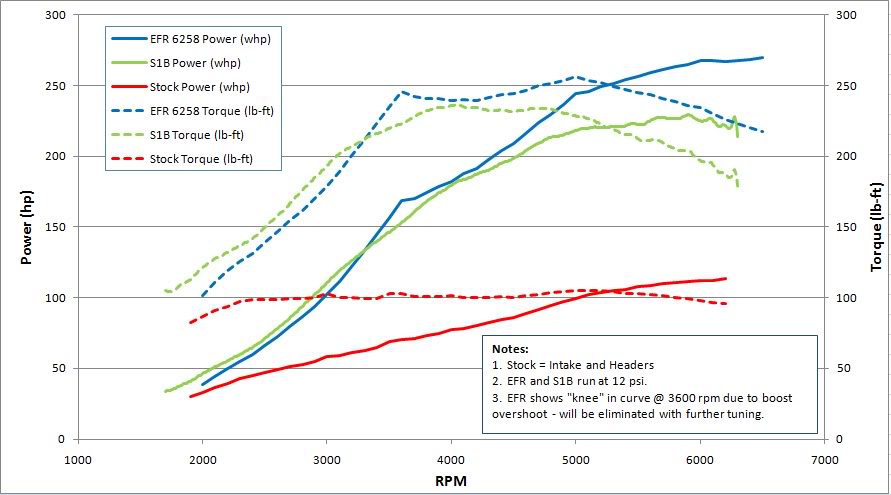
Now the good stuff… data! This car has been on the Dynojet chassis dynamometer a few times over the last five years. Below I’ve attached a comparison of three specific runs. The first run (red) is in the stock configuration in 2006 with Racing Beat Intake and Racing Beat Headers. The second run (green) is with the Schwitzer S100 configuration in 2008. The third run (blue) is using the new BorgWarner EFR-6258 configuration. Both turbo set-ups were conducted at 12psi on stock engine. More performance is likely with additional tuning.
Summary
Stock
113 whp @ 6200 rpm
105 lb-ft @ 5100 rpm
S100
229 whp @ 5900 rpm
236 lb-ft @ 4000 rpm
EFR-6258
270 whp @ 6500 rpm
256 lb-ft @ 5000 rpm
Parts List
Included below is a list of all the modifications and specific parts which I used for my build. I’ve tried to include p/n’s where possible. Hopefully this will prove helpful to the next person who builds a DIY Miata turbo kit.
Drivetrain Modifications:
1. Turbocharger – BorgWarner EFR 6258 (p/n XXXXXX)
5. Injectors – RC 550
6. WBO2 – Innovate LC-1 Wideband Oxygen Sensor
7. Mazda Torsen Differential
8. Exhaust – Custom w/ 2 Resonators
10. Spark Plugs - NGK BKR7E Spark Plugs
11. Spark Plug Wires - Magnecore Miata KV85 8.5mm Spark Plug Wires (red)
12. Clutch – Flyin’ Miata Level 1 Clutch Kit 318 lb-ft (p/n 08-19010)
13. EGR disabled
Suspension / Tire / Brake Modifications:
1. KYB AGX Adjustable Shocks
2. Ground Control Coil Over Kit
3. Springs 375F / 250R
4. Drilled / Slotted Rotors
5. Brakes Pads - Axxis F&R Ultimate
6. Tires - 205/50R-15 Kumho Ecsta XS
7. Wheels – Team Dynamics Race 2
8. Shock Tower Strut Brace
Interior / Exterior Modifications:
1. Steering Wheel – Momo Corse
2. Steering Wheel Hub Adapter (R-Speed p/n 518-100)
3. Hard Dog Sport Stainless Roll Bar
4. Rear Lip Spoiler
5. Hardtop
6. Boost Gauge – Auto Meter Phantom (Summit p/n ATM-5701)
7. AFR Gauge – Innovate G2 (p/n 3803)
Next Steps
I plan on experimenting with the compressor bypass and electric boost control valve which are integrated into the BorgWarner EFR-Series turbochargers. I also plan to run the car in about 7 or 8 autox events this year and quite possibly a few track days.
This is a summary of my DIY turbocharger project for my 1994 1.8L Mazda Miata. While I’ve never actually posted on this forum, I have used this forum for countless hours of research. I thought it was time to give something back to the forum community.
Original Purchase
The car was purchased back in 2005 with minor suspension modifications. The only modifications on the engine were an intake and headers.

Goal of Project
The Miata is a wonderful car, but it needs more power. My goal of the project was to maximize reliable performance using the stock engine.
Link ECU
The first modification was the installation of the FM Link ECU. Like many other posts I’ve read, I recommend installing a standalone ECU prior the turbocharger system. Understand and familiarize yourself with the tuning first. This will make troubleshooting your DIY turbo kit that much easier. The FM tech support is top notch and I appreciate their feedback during past few years.
Turbocharger #1
I originally started out with a Schwitzer S100 turbocharger (think T25 size) and used this in conjunction with an external Tial 38mm wastegate. This is a simple sleeve bearing, non-watercooled turbocharger which is typically used on diesel engines. The compressor exducer diameter = 53mm and turbine inducer diameter = 53mm. This system was installed without removing power steering or air-conditioning. If I did it all over again, I would first remove A/C and de-power the steering race. Removal opens up so much room and obviously saves weight.
(If you look closely below, you will notice the John Deere logo on the compressor cover!)

Exhaust Manifold
Exhaust manifold was the semi-custom option from JGS. They ship you a welded manifold and you cut and weld on your own flanges. I found the gas-less flux core option on my Hobart 135 MIG welder to be able to handle the material thickness without issue. The welds aren’t the prettiest in the world, but they also haven’t cracked! I would recommend this product to anyone.
Injectors
I experienced many problems after ‘upgrading’ to modified Venom RX-7, 550cc injectors purchased from TLF Performance Parts. After weeks of frustration, I finally sent the injectors off to be flow tested. Third party measurements showed unacceptable variation between the four injectors (545 to 625cc). The customer service from TLF Performance Parts was… well… let’s just call it ‘way less than desirable’. I finally switched to a new set of RC 550 injectors and all my problems went away.
Intake / Exhaust Piping
All intake, downpipe and exhaust piping was fabricated using steel tubing, chop saw, MIG welder and very tall jack stands. I’ve made some modifications to the exhaust over the last few years and I’m very happy with the performance and sound of using the two resonators listed in the part list below. I receive a lot of compliments at the Auto-X course.


Intercooler
My set-up also uses a modified Saab 9000 intercooler. I chose this IC due to the compact design. You’ll notice from the pics that I took the routing over the radiator for both the IC inlet and IC outlet. This option proved difficult and required removing quite a bit of material from the hood and the steel support between the headlights. All intake piping is 2.5”. I/C inlet and outlet ports were both modified to come straight out of the core. Radiator was leaned back using ½” spacer on either side.
The other, more popular, option is to route the I/C piping down and around the radiator. My set-up makes the tube routing much shorter than the other popular method. There are pros/cons to each option.
Turbocharger #2
I’ve recently switched over to the new BorgWarner EFR-6258 turbocharger. This turbocharger features ball bearings and low inertia titanium aluminide turbine wheel. The compressor wheel exducer diameter (62mm) and turbine wheel inducer diameter (58mm) are much bigger than my previous turbo, but the boost response is very similar. The biggest benefit is 40+ additional whp at the same boost level (12 psi) compare to the old turbo.
This EFR turbo has a T2 inlet flange so I didn’t have to modify my exhaust manifold. The EFR turbos come standard with an internal wastegate. I simply capped the external wastegate flange which remains on the exhaust manifold.
Other features of the EFR turbo include an internal compressor bypass and electronic boost controller. I haven’t swapped over to using these components, but that next on the list.

Clutch
The stock clutch could handle the torque output from the S100 turbocharger but it started to slip after upgrading to the EFR-6258 turbocharger. The FM Level-1 clutch kit made all those problems go away.
Performance Data
Now the good stuff… data! This car has been on the Dynojet chassis dynamometer a few times over the last five years. Below I’ve attached a comparison of three specific runs. The first run (red) is in the stock configuration in 2006 with Racing Beat Intake and Racing Beat Headers. The second run (green) is with the Schwitzer S100 configuration in 2008. The third run (blue) is using the new BorgWarner EFR-6258 configuration. Both turbo set-ups were conducted at 12psi on stock engine. More performance is likely with additional tuning.

Summary
Stock
113 whp @ 6200 rpm
105 lb-ft @ 5100 rpm
S100
229 whp @ 5900 rpm
236 lb-ft @ 4000 rpm
EFR-6258
270 whp @ 6500 rpm
256 lb-ft @ 5000 rpm
Parts List
Included below is a list of all the modifications and specific parts which I used for my build. I’ve tried to include p/n’s where possible. Hopefully this will prove helpful to the next person who builds a DIY Miata turbo kit.
Drivetrain Modifications:
1. Turbocharger – BorgWarner EFR 6258 (p/n XXXXXX)
a. Coolant Fittings 14mm to 3/8" barb x2 (ATP p/n ATP-FTG-004)
b. Oil Supply (FM p/n 02-60020)
c. Oil Drain (FM p/n 02-60030)
2. ECU – Flyin’ Miata Link (p/n 39-71900)b. Oil Supply (FM p/n 02-60020)
c. Oil Drain (FM p/n 02-60030)
a. FM Manifold Air Pressure Sensor (p/n 07-16010)
b. FM Air Intake Temp Sensor (p/n 07-76000)
c. FM Knock Sensor (p/n 07-36500)
d. FM Boost Controller (p/n 07-26500) – plan to test boost controller w/ EFR turbo
e. FM Blow-Off Valve (p/n 05-90105) – plan to test comp recirculation w/ EFR turbo
3. Exhaust Manifold - JGS Semi-Custom b. FM Air Intake Temp Sensor (p/n 07-76000)
c. FM Knock Sensor (p/n 07-36500)
d. FM Boost Controller (p/n 07-26500) – plan to test boost controller w/ EFR turbo
e. FM Blow-Off Valve (p/n 05-90105) – plan to test comp recirculation w/ EFR turbo
a. p/n TK010
b. I.D. = 1.37”
4. Intercooler – Saab 9000b. I.D. = 1.37”
5. Injectors – RC 550
6. WBO2 – Innovate LC-1 Wideband Oxygen Sensor
7. Mazda Torsen Differential
8. Exhaust – Custom w/ 2 Resonators
a. Custom 3.5 – 3.0” Downpipe
b. Resonator #1 (Summit p/n WLK-24238)
c. Resonator #2 (Summit p/n WLK-24219)
d. Flex Pipe (Summit p/n JEX-FLX3010B)
e. Exhaust Wrap 1” (Summit p/n DEI-010120)
f. O2 exhaust bungs (Summit p/n 35-4005)
g. Heatshield for Underside of Hood (Summit p/n DEI-010401)
h. Gasket, 3-bolt exhaust (Summit p/n SUM-610130)
i. Flange, 3-bolt exhaust (Summit p/n SUM-G4761)
9. Motor Mounts – Mazda Competitionb. Resonator #1 (Summit p/n WLK-24238)
c. Resonator #2 (Summit p/n WLK-24219)
d. Flex Pipe (Summit p/n JEX-FLX3010B)
e. Exhaust Wrap 1” (Summit p/n DEI-010120)
f. O2 exhaust bungs (Summit p/n 35-4005)
g. Heatshield for Underside of Hood (Summit p/n DEI-010401)
h. Gasket, 3-bolt exhaust (Summit p/n SUM-610130)
i. Flange, 3-bolt exhaust (Summit p/n SUM-G4761)
10. Spark Plugs - NGK BKR7E Spark Plugs
11. Spark Plug Wires - Magnecore Miata KV85 8.5mm Spark Plug Wires (red)
12. Clutch – Flyin’ Miata Level 1 Clutch Kit 318 lb-ft (p/n 08-19010)
13. EGR disabled
Suspension / Tire / Brake Modifications:
1. KYB AGX Adjustable Shocks
2. Ground Control Coil Over Kit
3. Springs 375F / 250R
4. Drilled / Slotted Rotors
5. Brakes Pads - Axxis F&R Ultimate
6. Tires - 205/50R-15 Kumho Ecsta XS
7. Wheels – Team Dynamics Race 2
8. Shock Tower Strut Brace
Interior / Exterior Modifications:
1. Steering Wheel – Momo Corse
2. Steering Wheel Hub Adapter (R-Speed p/n 518-100)
3. Hard Dog Sport Stainless Roll Bar
4. Rear Lip Spoiler
5. Hardtop
6. Boost Gauge – Auto Meter Phantom (Summit p/n ATM-5701)
7. AFR Gauge – Innovate G2 (p/n 3803)
Next Steps
I plan on experimenting with the compressor bypass and electric boost control valve which are integrated into the BorgWarner EFR-Series turbochargers. I also plan to run the car in about 7 or 8 autox events this year and quite possibly a few track days.
Last edited by derber; 04-10-2011 at 10:21 AM. Reason: Modified layout of Parts List...
#7
Two things, do my eyes deceive me, or does your exhaust transition from 3' down to 2.5? Do you think that the EFR would spool even faster going to 3 inch all the way? And is that little air filter attached to a BOV, I cant tell what that is, how soon until you try out the bw bypass?
Thing is awesome dude thanks for being i think the first miata running one!
Thing is awesome dude thanks for being i think the first miata running one!
#11
Two things, do my eyes deceive me, or does your exhaust transition from 3' down to 2.5? Do you think that the EFR would spool even faster going to 3 inch all the way? And is that little air filter attached to a BOV, I cant tell what that is, how soon until you try out the bw bypass?
Thing is awesome dude thanks for being i think the first miata running one!
Thing is awesome dude thanks for being i think the first miata running one!
#15
Yes, two resonators... no muffler. I first tried a single 3" resonator in the strait section near the drive shaft. This was simply to loud. I then added a second 3" resonator where the stock muffler typically is. This proved to be much more tolerable.
Now don't get me wrong... it isn't "quiet". However, I think it has the right combination of respectable sound at idle with deeper tone when the throttle is applied.
#16
Two things, do my eyes deceive me, or does your exhaust transition from 3' down to 2.5? Do you think that the EFR would spool even faster going to 3 inch all the way? And is that little air filter attached to a BOV, I cant tell what that is, how soon until you try out the bw bypass?
I'm currently running the FM BOV which has a filter attached to it.
I'm not yet running the EFR BOV... currently just a block-off plate. I'll probably start experimenting with the EFR BOV within the next month.
#17
The graph does show slight overboost at 3600 rpm. It overboosts to about 13-14 psi but quickly settles to 12 psi. All the power numbers between 4000 - 6500 rpm are at 12 psi. I'm confident a little more tuning will fix this overboost issue.
The turbo definitely is my "limiting" factor... it is capable of so much more. My limiting factors are engine, injectors, time, money.... :-)
#18
The downpipe has a 3.5" to 3.0" transition. The entire exhaust is 3".
I'm currently running the FM BOV which has a filter attached to it.
I'm not yet running the EFR BOV... currently just a block-off plate. I'll probably start experimenting with the EFR BOV within the next month.
I'm currently running the FM BOV which has a filter attached to it.
I'm not yet running the EFR BOV... currently just a block-off plate. I'll probably start experimenting with the EFR BOV within the next month.
#19
My peak whp number is at 12 psi.
The graph does show slight overboost at 3600 rpm. It overboosts to about 13-14 psi but quickly settles to 12 psi. All the power numbers between 4000 - 6500 rpm are at 12 psi. I'm confident a little more tuning will fix this overboost issue.
The turbo definitely is my "limiting" factor... it is capable of so much more. My limiting factors are engine, injectors, time, money.... :-)
#20
Faeflora,
I'll try to snap some good pics of the exhaust. Most of the hardware was from Summit Racing. Part numbers of the specific components can be found in my parts list.
8. Exhaust – Custom w/ 2 Resonators
I'll try to snap some good pics of the exhaust. Most of the hardware was from Summit Racing. Part numbers of the specific components can be found in my parts list.
8. Exhaust – Custom w/ 2 Resonators
a. Custom 3.5 – 3.0” Downpipe
b. Resonator #1 (Summit p/n WLK-24238)
c. Resonator #2 (Summit p/n WLK-24219)
d. Flex Pipe (Summit p/n JEX-FLX3010B)
e. Exhaust Wrap 1” (Summit p/n DEI-010120)
f. O2 exhaust bungs (Summit p/n 35-4005)
g. Heatshield for Underside of Hood (Summit p/n DEI-010401)
h. Gasket, 3-bolt exhaust (Summit p/n SUM-610130)
i. Flange, 3-bolt exhaust (Summit p/n SUM-G4761)


