
Yet Another Trackspeed S1/ST4 Build Thread
 12-11-2017, 10:14 PM
#1
Former Vendor

Thread Starter
iTrader: (31)

Join Date: Nov 2006
Location: Sunnyvale, CA
Posts: 15,442
Total Cats: 2,104
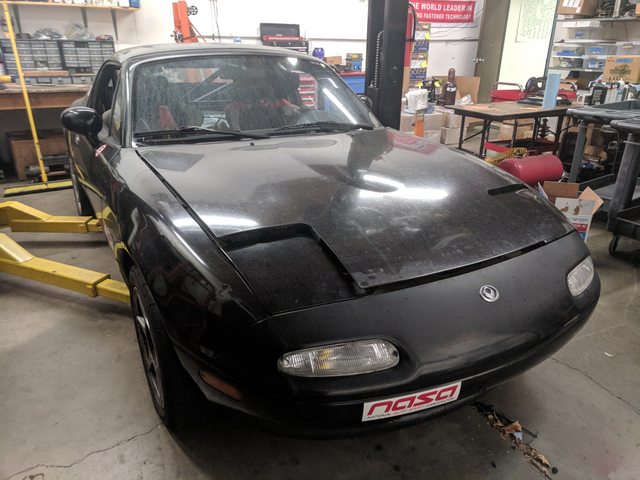
My big winter build for this year is a full S1/ST4 turbo build for a local customer. This '94 has been his for a few years and it has good bones, but it's been sitting around for most of that time. Time to change that. The car is almost completely stock, save for the TC Design rollcage and safety gear inside, and the Tokico/Eibach combo underneath, so it will be a big transformation.
There's a lot of parts being changed, so disassembly is first. All the suspension, brakes, and rear diff come out to make room for new bits.
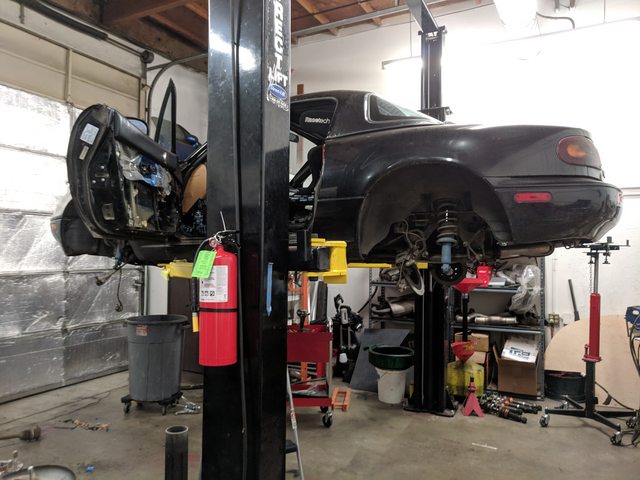
Just prepping parts for install for now, since I'm still waiting on the front subframe to arrive.
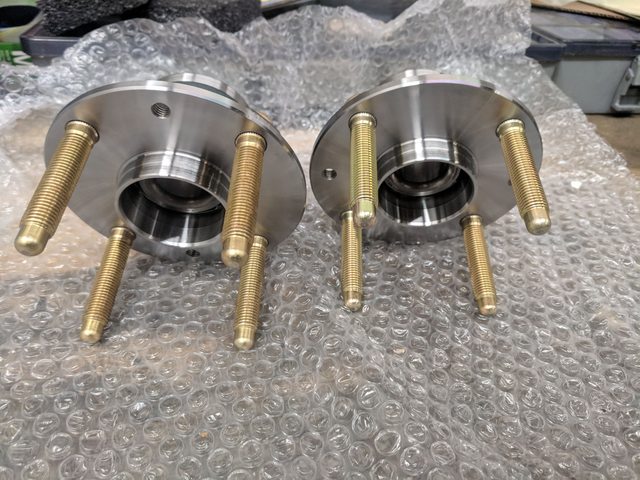
One of the NA uprights did not want to give up the axle, so the fresh hubs and bearings go into NB uprights instead. OEM Mazda hubs and ARP studs.
55q4uFv.ljpg
Fresh Mazdacomp HD hubs with ARP studs, need to swap the ABS tone rings over to them.
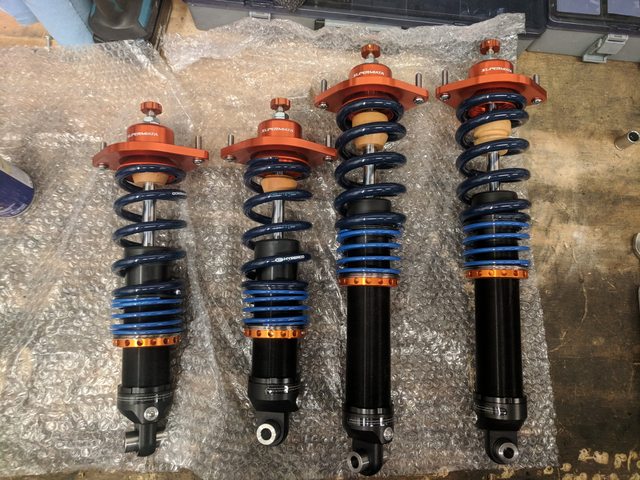
XIDAs, of course. Gen2 race, 1000/500 springs, helper springs, spherical tophats.
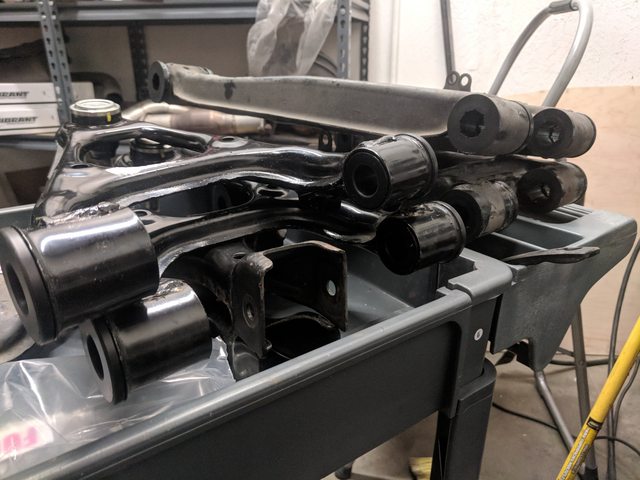
Most of the control arms here. Brand new NB front uppers get SADFab delrins, everything else gets ES poly bushings with SAE863 bearings and steel sleeves. Still need to de-gunk the front lowers and add some Bauer ELBJs.
Next up is more disassembly (engine/trans), then some cleanup before all the new suspension bits go on.
There's a lot of parts being changed, so disassembly is first. All the suspension, brakes, and rear diff come out to make room for new bits.
Just prepping parts for install for now, since I'm still waiting on the front subframe to arrive.
One of the NA uprights did not want to give up the axle, so the fresh hubs and bearings go into NB uprights instead. OEM Mazda hubs and ARP studs.
55q4uFv.ljpg
Fresh Mazdacomp HD hubs with ARP studs, need to swap the ABS tone rings over to them.
XIDAs, of course. Gen2 race, 1000/500 springs, helper springs, spherical tophats.
Most of the control arms here. Brand new NB front uppers get SADFab delrins, everything else gets ES poly bushings with SAE863 bearings and steel sleeves. Still need to de-gunk the front lowers and add some Bauer ELBJs.
Next up is more disassembly (engine/trans), then some cleanup before all the new suspension bits go on.

Reply
 2
2

2


 12-14-2017, 09:50 AM
#9
SADFab Destructive Testing Engineer

iTrader: (5)
Join Date: Apr 2014
Location: Beaverton, USA
Posts: 18,642
Total Cats: 1,866
Also not speaking for Savington but the delrin kit is quite a bit more expensive than a bronze retrofit (which Andrew did a small run of and probably had in the shelf). But you can't do a bronze retrofit in the FUCA without drilling out the poly bushing (requires a lathe and a sharp bit), so delrin is the easy button in that location.
Reply
2
2

 01-18-2018, 08:56 PM
#14
Former Vendor
Thread Starter
iTrader: (31)
Join Date: Nov 2006
Location: Sunnyvale, CA
Posts: 15,442
Total Cats: 2,104
This car is g-r-o-s-s. Apparently it sat outside for quite a while before the current owner got it, and he didn't do much cleanup. I vac'd a full mouse nest out of the windshield cowl and I'm really not looking forward to gutting the HVAC hardware under the dash.
A little progress over the holidays. Motor is all unbuttoned and out. Goodbye, BP05 and 5-speed.
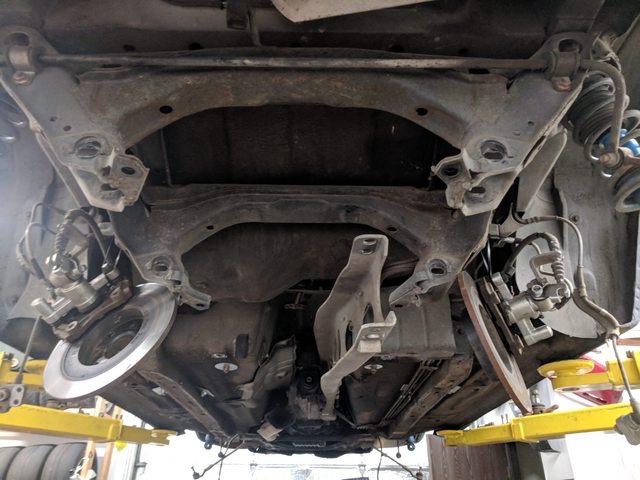
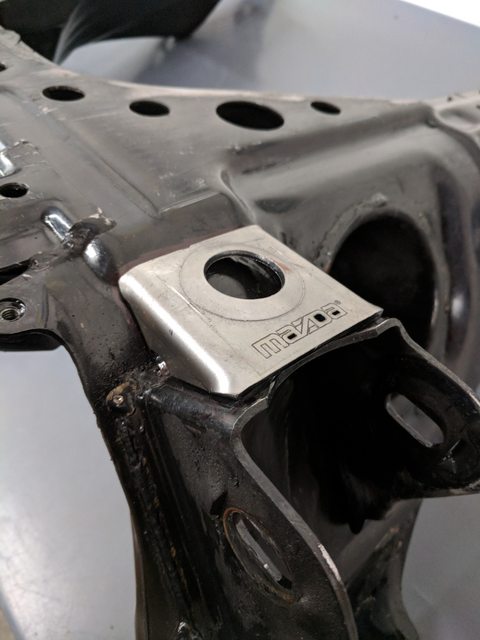
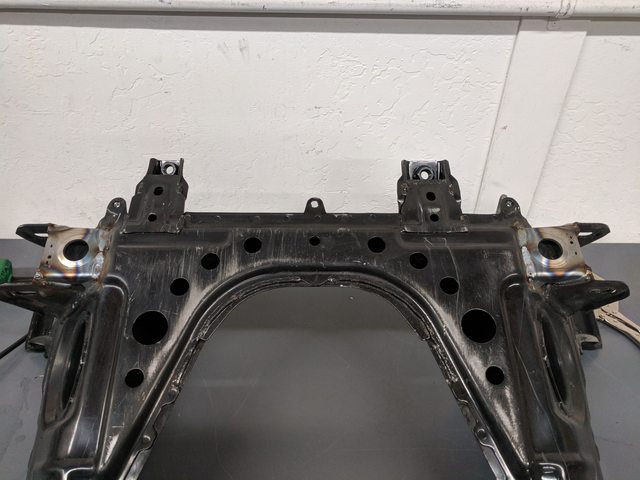
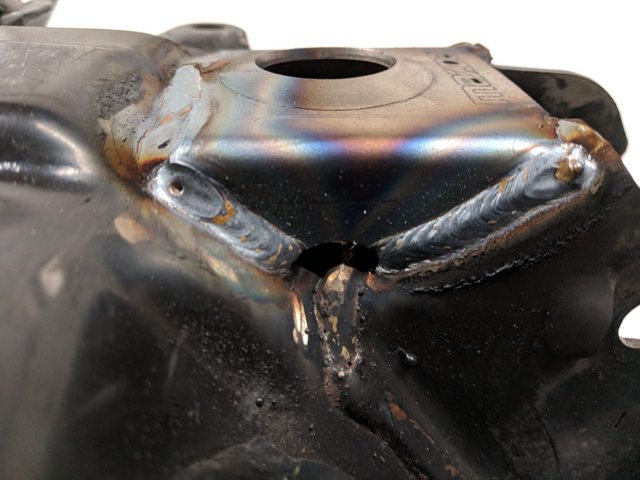
Spent a couple of hours today cleaning up the NB subframe and welding in the Mazdacomp tabs. I don't weld very often so forgive the lack of weld **** here.
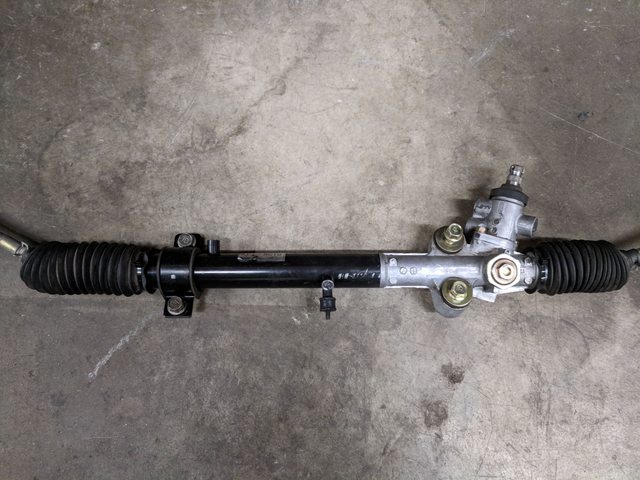
Also did the rack. Full depower with welded pinion, filled the ports with RTV, cleaned and reassembled.
Next up is the NB subframe and suspension install.
A little progress over the holidays. Motor is all unbuttoned and out. Goodbye, BP05 and 5-speed.
Spent a couple of hours today cleaning up the NB subframe and welding in the Mazdacomp tabs. I don't weld very often so forgive the lack of weld **** here.
Also did the rack. Full depower with welded pinion, filled the ports with RTV, cleaned and reassembled.
Next up is the NB subframe and suspension install.
Reply
0
0

 01-19-2018, 09:33 PM
#17
Elite Member
iTrader: (1)

Join Date: Apr 2014
Location: SF Bay Area, CA
Posts: 3,102
Total Cats: 559
Unfortunately I was only hung over from last night this morning. I won't be home till 9 again tonight, and I want a few beers, so I will likely be hung over again tomorrow morning. So look out for more ridiculous posts tomorrow.
It was supposed to say that you did a better weld than Mazda. 
Reply
0
0
02-15-2018, 01:07 AM
#18
Former Vendor
Thread Starter
iTrader: (31)
Join Date: Nov 2006
Location: Sunnyvale, CA
Posts: 15,442
Total Cats: 2,104
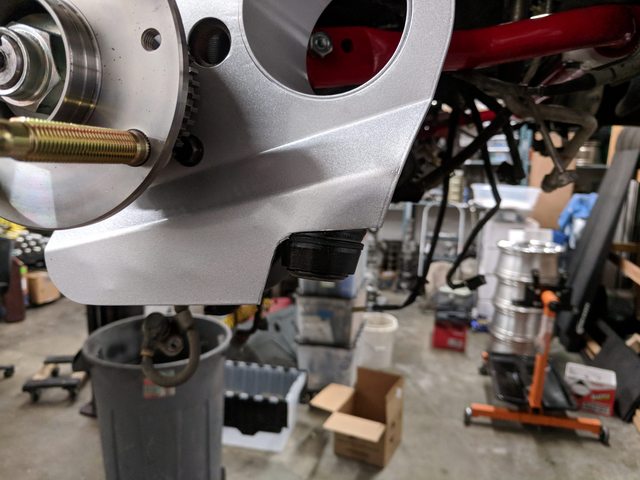
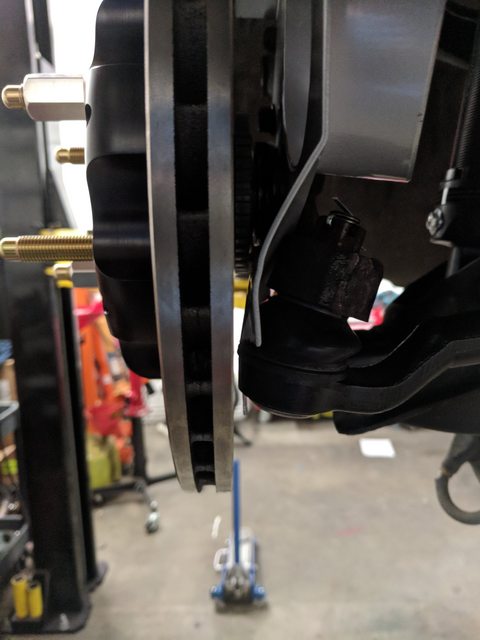
Finally have all the front suspension bits installed. 1000/500 XIDAs with sphericals and helpers, ES poly bushings with our own copper sleeve setup and SADFAB delrin FUCA bushings, 1.25" RB front bar, SPM endlinks, NB subframe and steering rack, 94R tie rod ends, Bauer ELBJs, and Mazdacomp HD hubs all installed. Looks a bit more like a car and less like a dirty shell sitting on the lift now. 
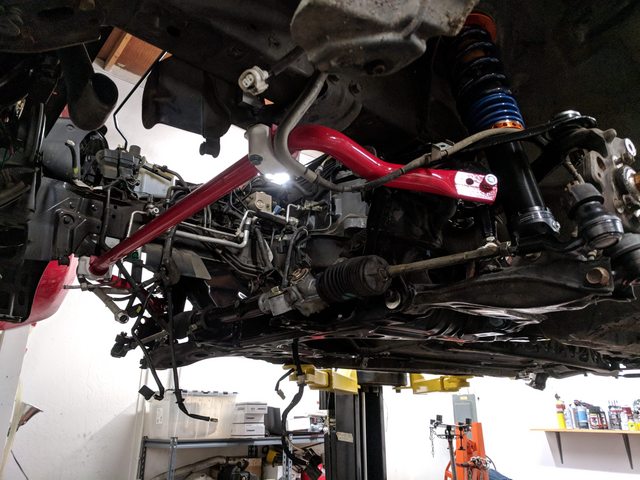
This car is also getting a set of 3" Singular ducts and our Gen2 11.75" BBK with Dynapros and directional rotors. Getting the Singular ducts to play nice with our BBK requires a little fiddling and trimming, since there's not enough room between the tie rod casting and the rotor to fit much of anything, let alone a brake duct. I trim the duct plate in that area, leaving enough to cover the dust boot, and then bend the plate to ensure it stays clear of the rotor. It's a tight fit, but it all works. Since this is an ABS car, I also took the time to remove the front sensors, swap the metal routing brackets side to side, and then swap the sensors themselves side to side. Ryan mentioned this tip at some point, and it makes a big difference in the fitment of the sensor around the duct plate.
The rest of the brakes will be rounded out by a set of our NA8 to Sport rotor adapters (finally getting these made!), an NB1 boost, and an OEM Sport master cylinder.
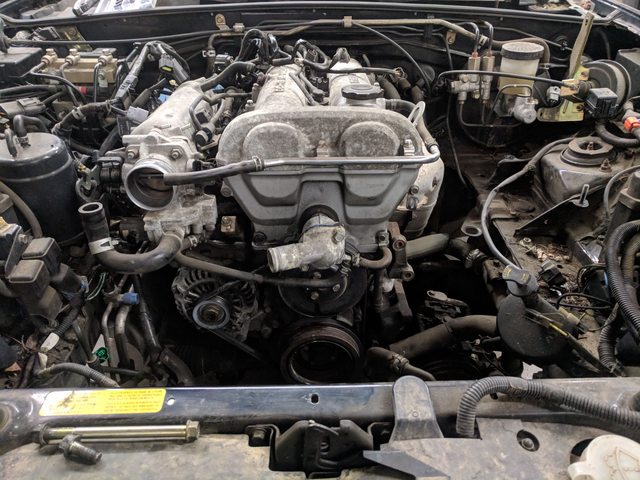
Next task is to get the drivetrain prepped for installation. There are a lot of small prep details that are very easy to do right now, so I've spent the last few days making sure that everything I want to do to the motor is done before it goes into the car and access gets much harder.
The longblock is nothing special, just our standard Stage 2 shortblock (pistons, rods, ARP hardware, BE pump, etc) and a stock BP6D head with Supertech heavy doubles. It has an SPM damper and, of course, a Trackspeed manifold and EFR6258. This setup will get a VICS manifold instead of a squaretop, which will make it a little easier to generate a good torque curve for S1 and ST4 power levels. We have seen 300whp through a VICS manifold at reasonable boost levels, so for this car's goals, it's the right manifold.
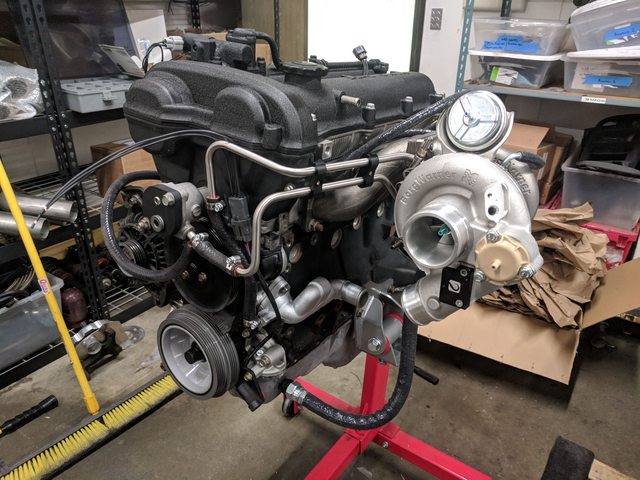
I trim the Stage 8 locking tabs pretty aggressively when I mate the turbo and the manifold. The studs and nuts both get coated in Resbond, and then the tabs are trimmed to fit snugly against the turbine housing.
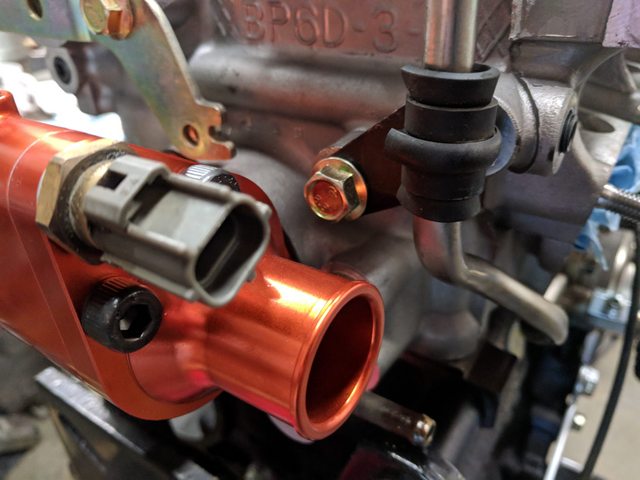
On the back of the motor, there's a Supermiata reroute housing, the first one I've played with. Very nice piece. The small sensor on the left is a water pressure sensor. I may end up blocking off the heater core port entirely.
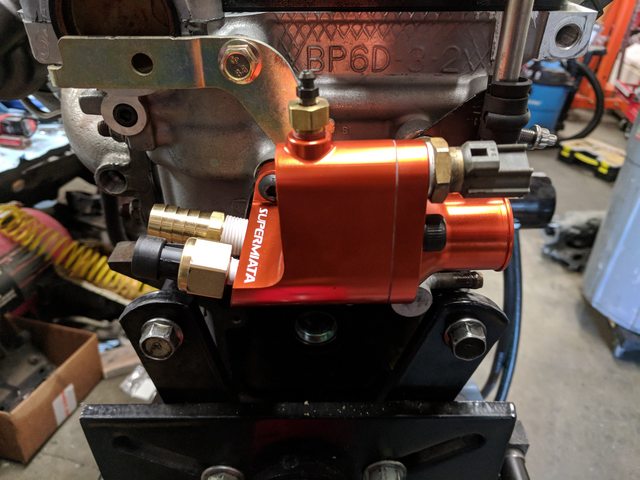
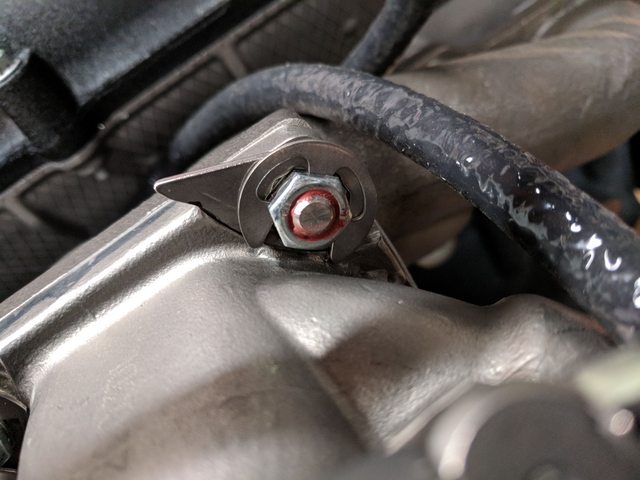
The VICS manifold doesn't have a provision to attach the OEM VVT hardline brace. The brace is critical to prevent the hardline from cracking over time, so I move it to the back of the head and trim-redrill to attach it to an existing threaded boss.
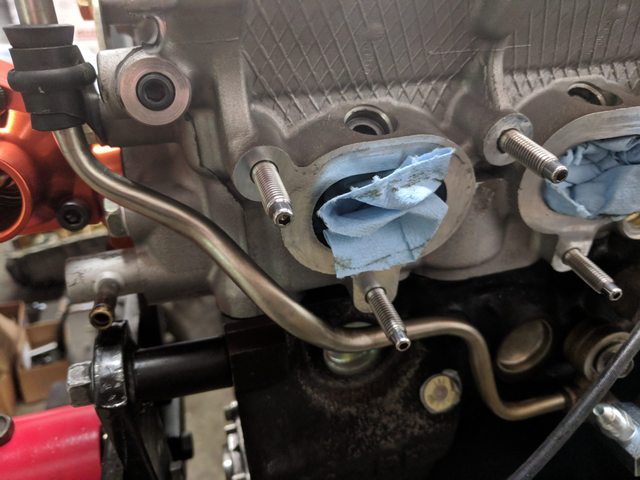
I consistently find broken intake manifold studs on the race cars I interact with, so I swapped them all for high-strength ARP accessory studs on the advice of TNTUBA, who uses the same bits with good results. They will work for this application but the installation was painful - each stud had to be shortened by roughly 5mm on the short side. I will need a better solution than this moving forward.
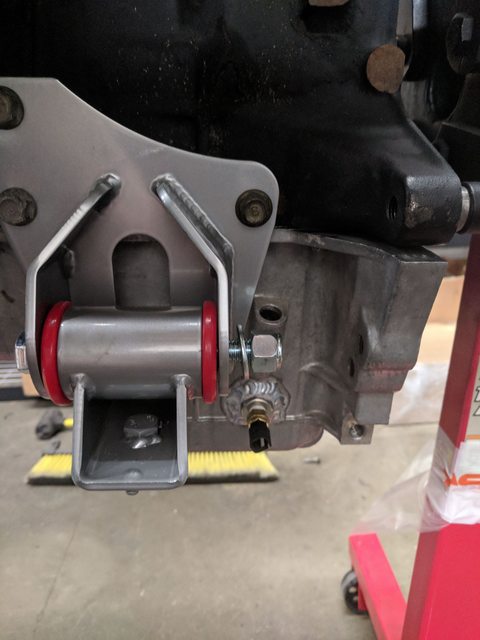
On the passenger side, an AWR 70D race motor mount sits above a -10AN drain for the air/oil separator which will be installed later.
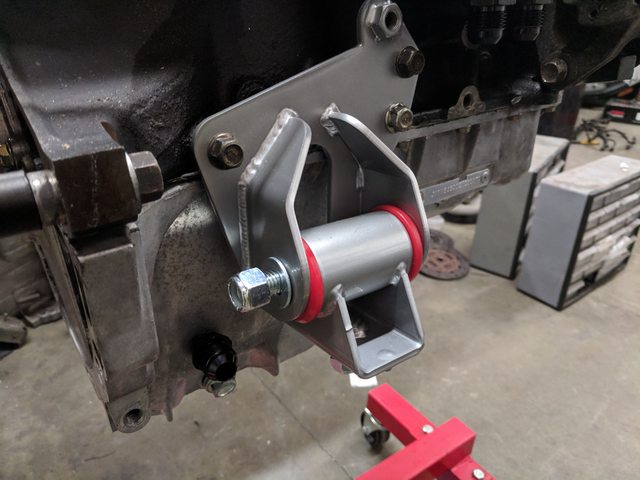
On the driver's side, another race mount sits above a GM-style oil temp sensor.
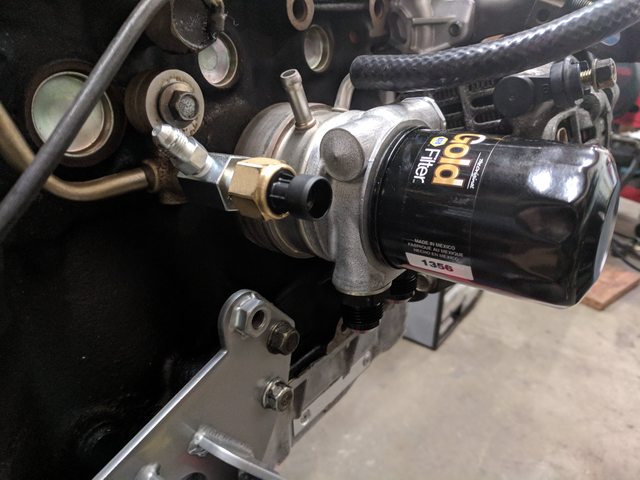
Under the intake manifold sits an OEM NB knock sensor which will talk to the MS3 Basic. Our standard Trackspeed oil adapter provides a -4AN feed to the turbo, and another pressure sensor will provide oil pressure data to the MS3 as well. The Mocal sandwich plate will feed a 19-row oil cooler.
Next up is a full degreasing of the engine bay, drivetrain installation, and then it's on to wiring, fuel system plumbing, and front end assembly (intercooler, oil cooler, ducting). Slow progress, but progress
This car is also getting a set of 3" Singular ducts and our Gen2 11.75" BBK with Dynapros and directional rotors. Getting the Singular ducts to play nice with our BBK requires a little fiddling and trimming, since there's not enough room between the tie rod casting and the rotor to fit much of anything, let alone a brake duct. I trim the duct plate in that area, leaving enough to cover the dust boot, and then bend the plate to ensure it stays clear of the rotor. It's a tight fit, but it all works. Since this is an ABS car, I also took the time to remove the front sensors, swap the metal routing brackets side to side, and then swap the sensors themselves side to side. Ryan mentioned this tip at some point, and it makes a big difference in the fitment of the sensor around the duct plate.
The rest of the brakes will be rounded out by a set of our NA8 to Sport rotor adapters (finally getting these made!), an NB1 boost, and an OEM Sport master cylinder.
Next task is to get the drivetrain prepped for installation. There are a lot of small prep details that are very easy to do right now, so I've spent the last few days making sure that everything I want to do to the motor is done before it goes into the car and access gets much harder.
The longblock is nothing special, just our standard Stage 2 shortblock (pistons, rods, ARP hardware, BE pump, etc) and a stock BP6D head with Supertech heavy doubles. It has an SPM damper and, of course, a Trackspeed manifold and EFR6258. This setup will get a VICS manifold instead of a squaretop, which will make it a little easier to generate a good torque curve for S1 and ST4 power levels. We have seen 300whp through a VICS manifold at reasonable boost levels, so for this car's goals, it's the right manifold.
I trim the Stage 8 locking tabs pretty aggressively when I mate the turbo and the manifold. The studs and nuts both get coated in Resbond, and then the tabs are trimmed to fit snugly against the turbine housing.
On the back of the motor, there's a Supermiata reroute housing, the first one I've played with. Very nice piece. The small sensor on the left is a water pressure sensor. I may end up blocking off the heater core port entirely.
The VICS manifold doesn't have a provision to attach the OEM VVT hardline brace. The brace is critical to prevent the hardline from cracking over time, so I move it to the back of the head and trim-redrill to attach it to an existing threaded boss.
I consistently find broken intake manifold studs on the race cars I interact with, so I swapped them all for high-strength ARP accessory studs on the advice of TNTUBA, who uses the same bits with good results. They will work for this application but the installation was painful - each stud had to be shortened by roughly 5mm on the short side. I will need a better solution than this moving forward.
On the passenger side, an AWR 70D race motor mount sits above a -10AN drain for the air/oil separator which will be installed later.
On the driver's side, another race mount sits above a GM-style oil temp sensor.
Under the intake manifold sits an OEM NB knock sensor which will talk to the MS3 Basic. Our standard Trackspeed oil adapter provides a -4AN feed to the turbo, and another pressure sensor will provide oil pressure data to the MS3 as well. The Mocal sandwich plate will feed a 19-row oil cooler.
Next up is a full degreasing of the engine bay, drivetrain installation, and then it's on to wiring, fuel system plumbing, and front end assembly (intercooler, oil cooler, ducting). Slow progress, but progress
Reply
1
1
02-15-2018, 10:37 PM
#20

Something to look out for (which you may already know) if it is: it doesn't have the same RTC curve as the normal MS "GM" sensors. However, the resistance at the 3 quoted points is 4x higher, so if you use a 4x higher value for the bias resistor (~10k) you can use the stock GM curve.
Reply
0
0


