TacoTaco / Volvo Turbo
 09-13-2011, 07:28 AM
#1
Junior Member
Thread Starter

Join Date: Oct 2009
Location: The Netherlands
Posts: 200
Total Cats: 1
Hi all,
I have been here for about 1 year now, reading the stuff I need to know before getting my Miata turbo-ed. Now it is time. Here is the story of my car.
I have bought this Miata in 2010. It is made in 1989. One of the first editions. It has PS, AC, CC. Got it with a broken engine (No oil,big-end bearing died).
All and all it was in a sad, realy sad state. But.. No rust anywhere, leather seats, hardtop for only $1500.
The paint pas pale, took me a ages to polish it back to shiny red.
The soft top was worn and torn, renewed it with a pleasant to touch mahair one. I keep petting it.. The job itself was good fun and easy.
I replaced all bushings with the ES master kit. The rear shocks were almost empty, launching me on rebound. I mean realy launching me aut of the car if not secured by seatbelts. Scary as hell. I replaced those worn shocks with Koni sports and FCM mounts. I renewed the rear brake pads as they were metal to metal. The front was fine but I renewed the dust seals and placed new brakelines from one of the sponsors. Renewed the brakefluid on the fly.
All and all I brought it back to original specs, little modified though.
A little TLC and now it is getting a pretty NA to look at.
As for the engine:
I bought a second engine, used the best parts out both engines and did some resurfacing and had the cylinder bore resurfaced. Got new exhaust valves as they were sharp as a razor and allmost gone.
Got the engine back together with some modifications:
Lighter 1.8 flywheel (F1 11.7lbs) and Exedy stage 1 clutch. I love it.
H-beam con-rods.
Free programmable engine management system.
1.8 injectors (NBFL) 273cc/min
Samco hoses
All heating hoses unplugged from the manifold.
Air flow sensor blocked in open position (it does make a difference).
As I wanted to use it this summer I just putted it back together in stock form.
Getting a car in nice shape in stock form is an art to, you know !
We had lot's of fun and took the car out on a trip to France. It is even cheap to run. It did 2000 miles without any problem. Well... Sagging suspension...

Now summer get's to its end and the weather isn't great at all it is not much fun to drive the car in the rain anyway. So....
Time to do new things on the car:
Suspension:
1.8 diff (bought) + half- and drivshafts (these are from a NBFL, do I need the uprights too ?)
1.8 subframe + brace, sent it out for powdercoating in bright red. OMG... LOL.
OBX LSD + bolt and spacer kit, just got in.
Koni coilover sleeves + Eibach springs (375front 7", 250 rear 8") (waiting to arrive from Summit)
Engine (Turbo!):
I have a I'l TacoTaco manifold ready, bought from a MT member.
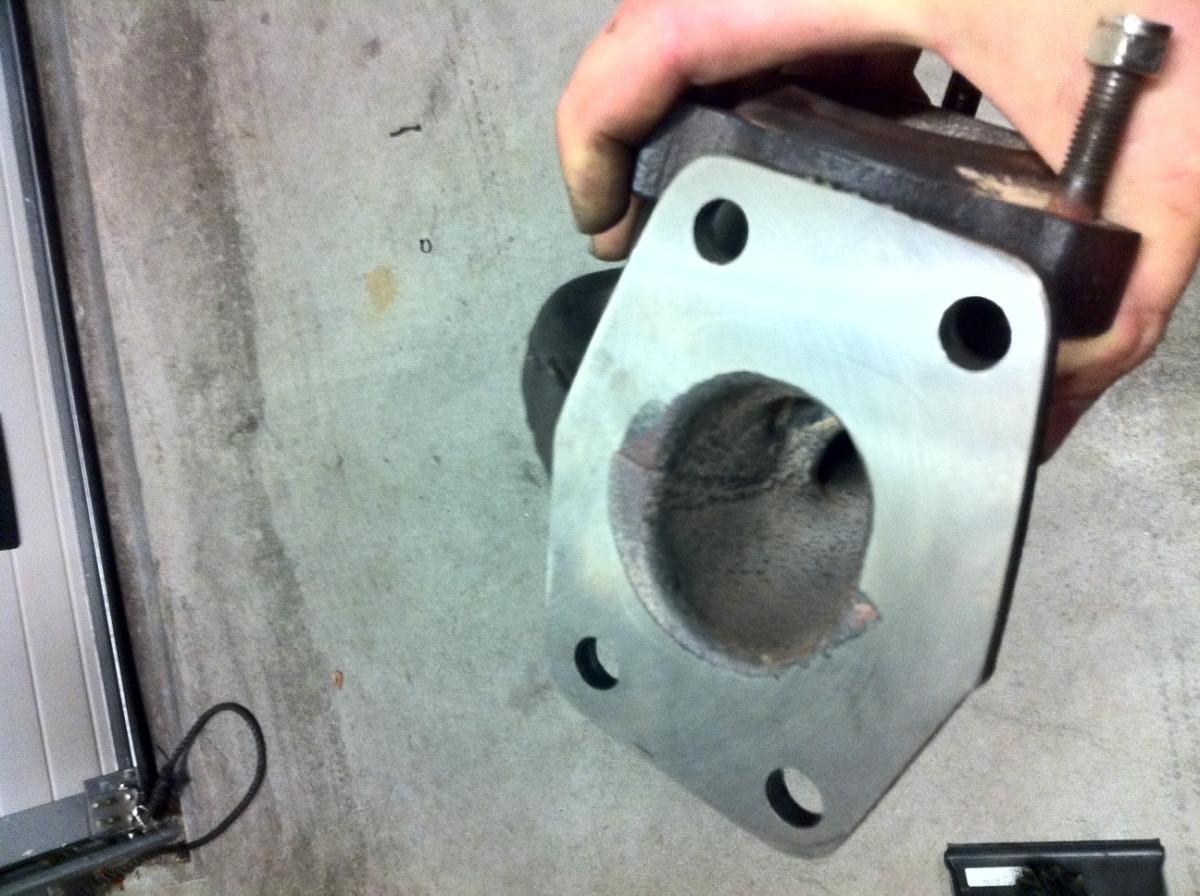
I also have a TD04H-13C from a Volvo 740/940. I had it resurfaced so it would fit the T3 mounting without leaking (this turbo has some awkward hole it the middle of the manifold mount).
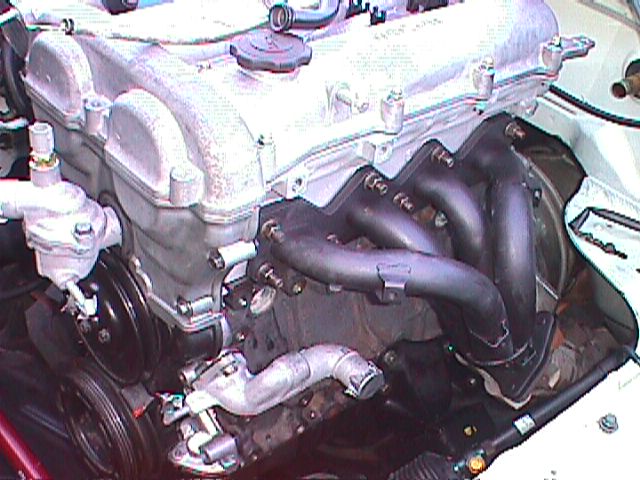
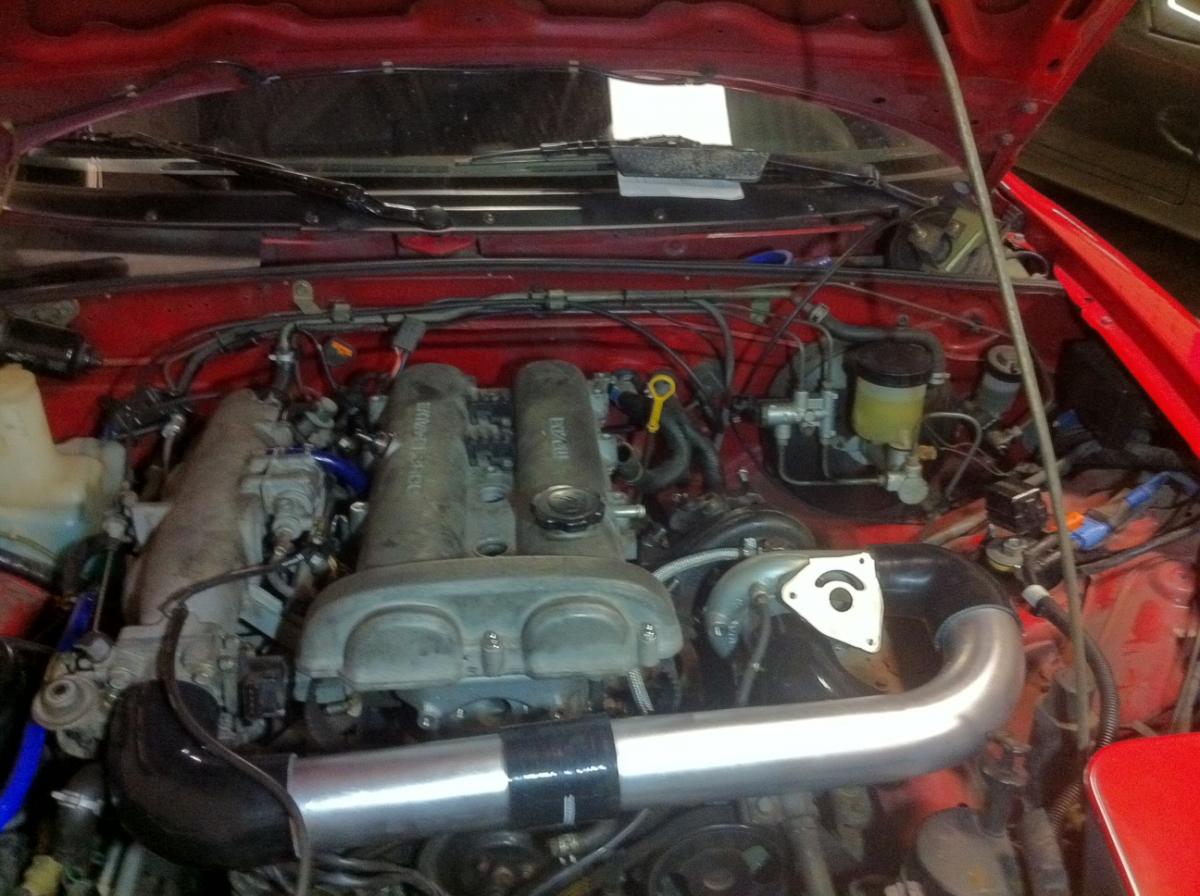
This is how the engine looks in stock form:
Just ordered some silicone hoses, took the manifold off and the turbo on.
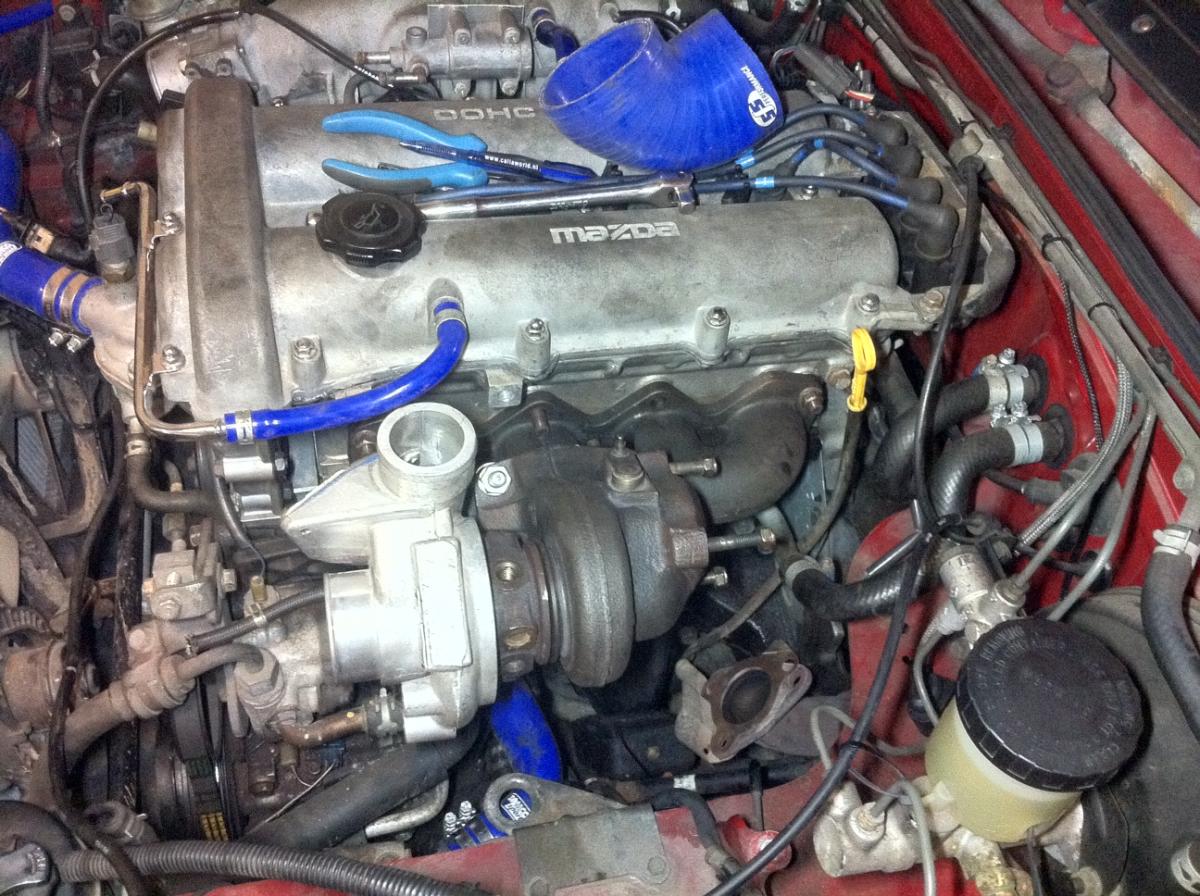
Let's put it all together.
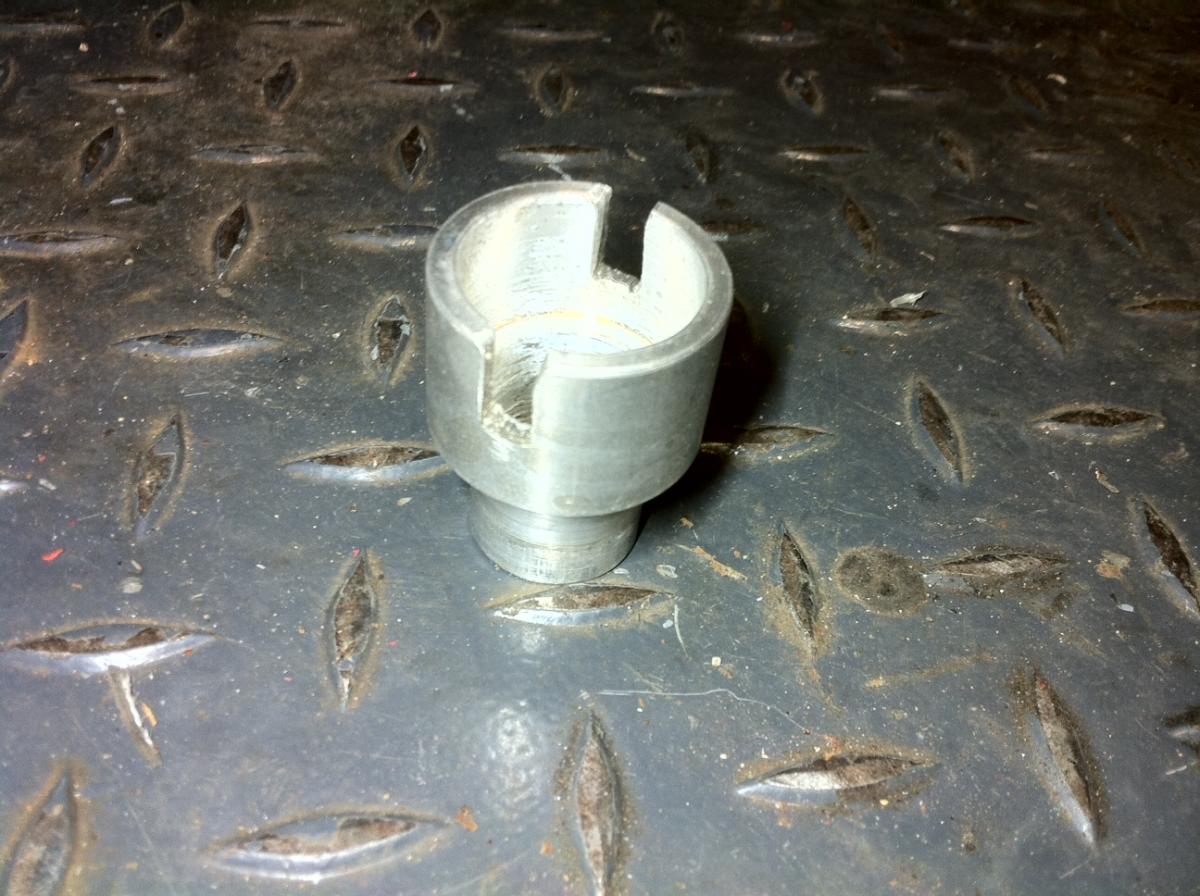
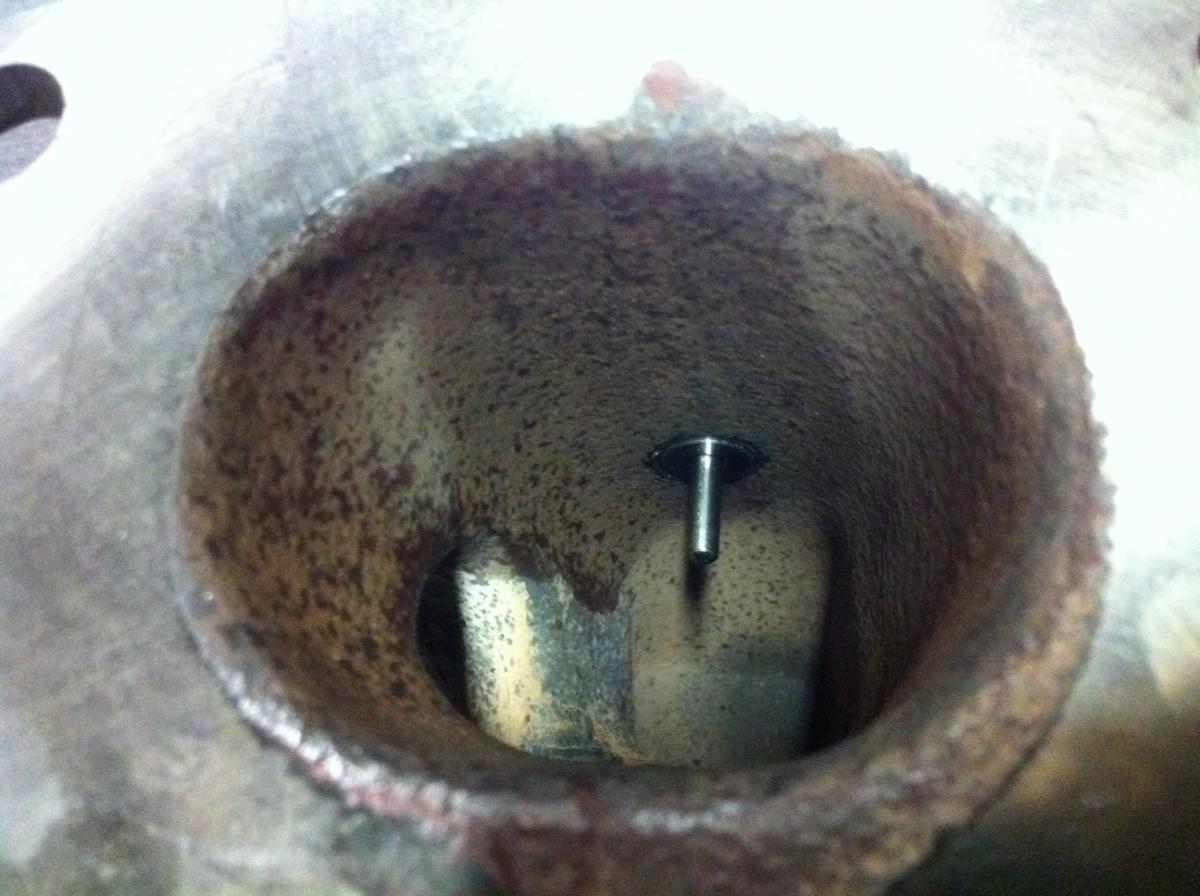
There is no banjo bolt available for the Mazda oil pickup-point.
So I had to fab one myself (needed more debur..)

Oil line installed. That was not that hard... (Why is this pic upside down ???)
This is not the oil-line I am planning to use for a long time. It is in fact petrol hose. It should hold the pressure and it is good for motor oil. But I am afraid it will age quick. It is just that the hydraulics shop did not have the nice PTFE steel braided hoses. So for the time being it is this hose.
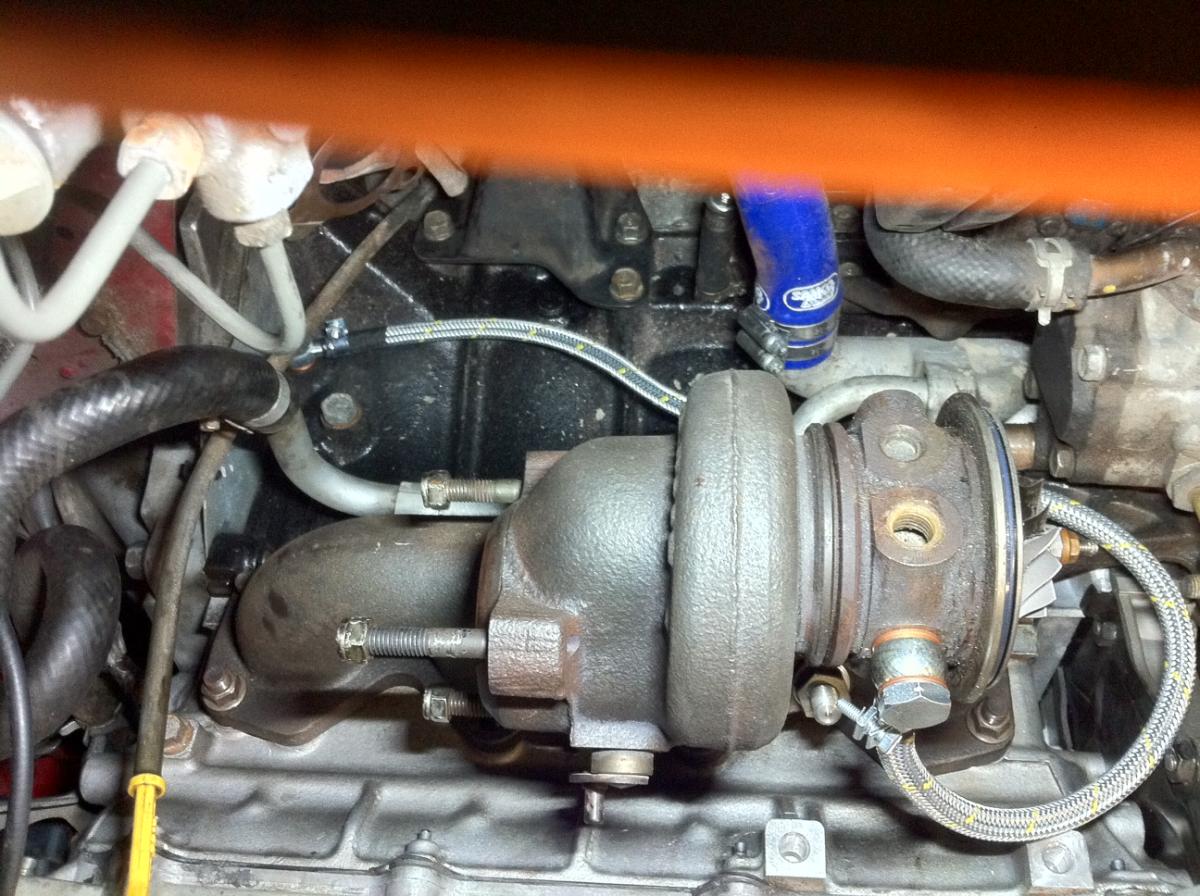
Damn ! I just dropped the turbo of the work shelf. It landed right on its compressor. Now it is stuck. Lucky me, a friend of mine has another one for $50. These turbo's are dead cheap. I ripped this one apart and tried to get it working again with the internals of a 13T but it is all different and not working out.
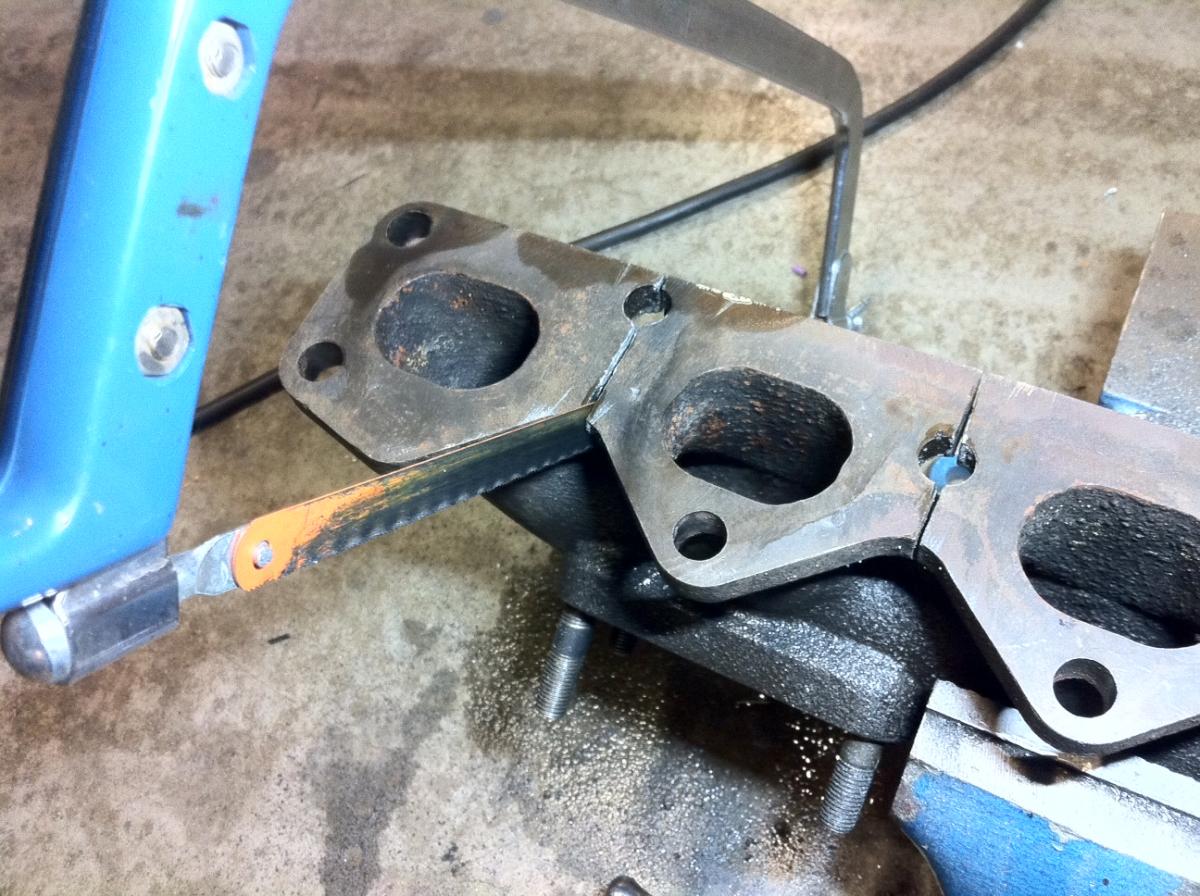
In the mean time I am pulling the manifold for the relieve cuts and I can show you the resurfaced Volvo turbine housing:
And.. While we are there:
Relief cuts:
Ok, IC piping and Silicone stuff came in.
Problems..
Do you think what I am thinking ?
The thermostat is in blocking the way of the intake charge pipes.
Coolant reroute was NOT on my planning board.... But it is tempting now.
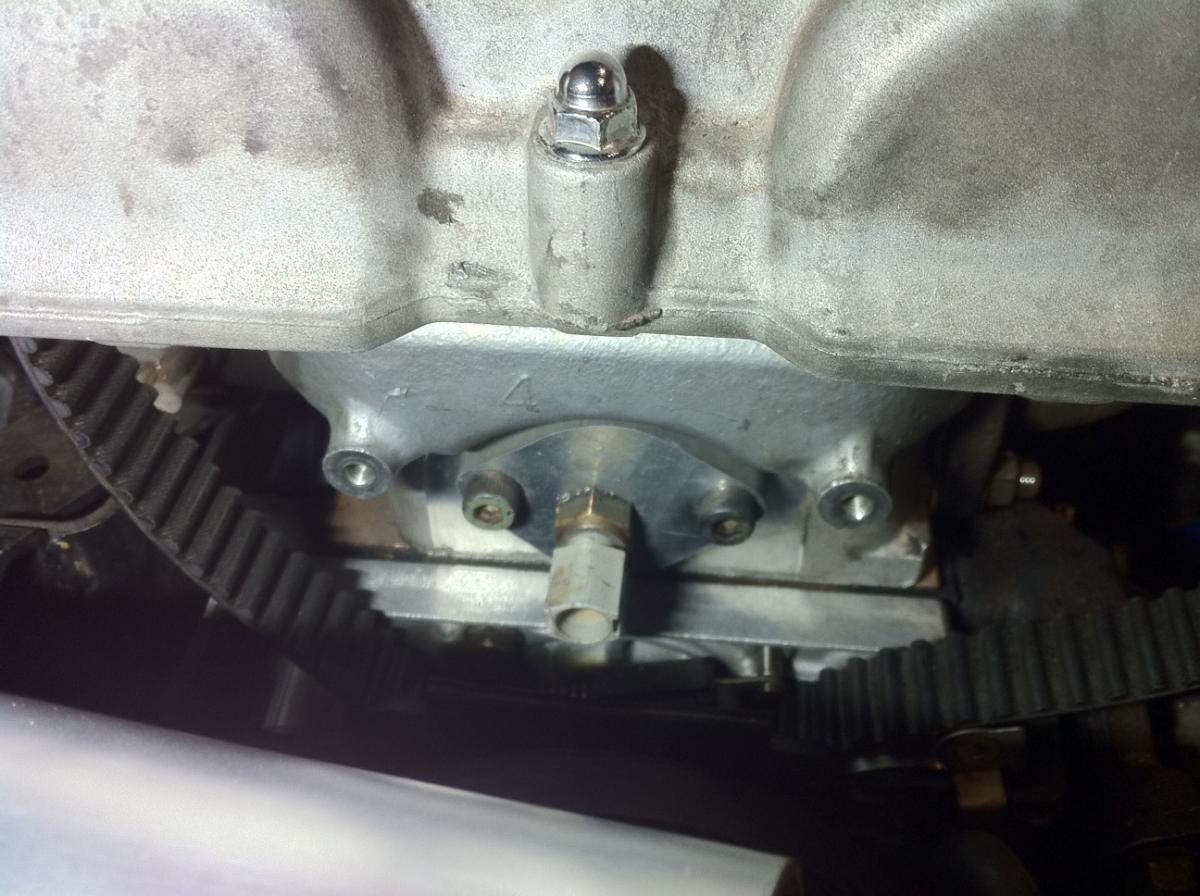
Yes... I am going to do it. Thermostat housing is out.
I also got the rear housing out. Including the stud. It took me less then 2 minutes to get that stud out. Used the 2 nuts method. Going to fab some parts later to make the reroute complete.
Better: more room. Need to get it a little more symmetrical. But good for now.
So got on fabbing:
Blocking plate for the thermostat. I made the sensor for the dash in it.
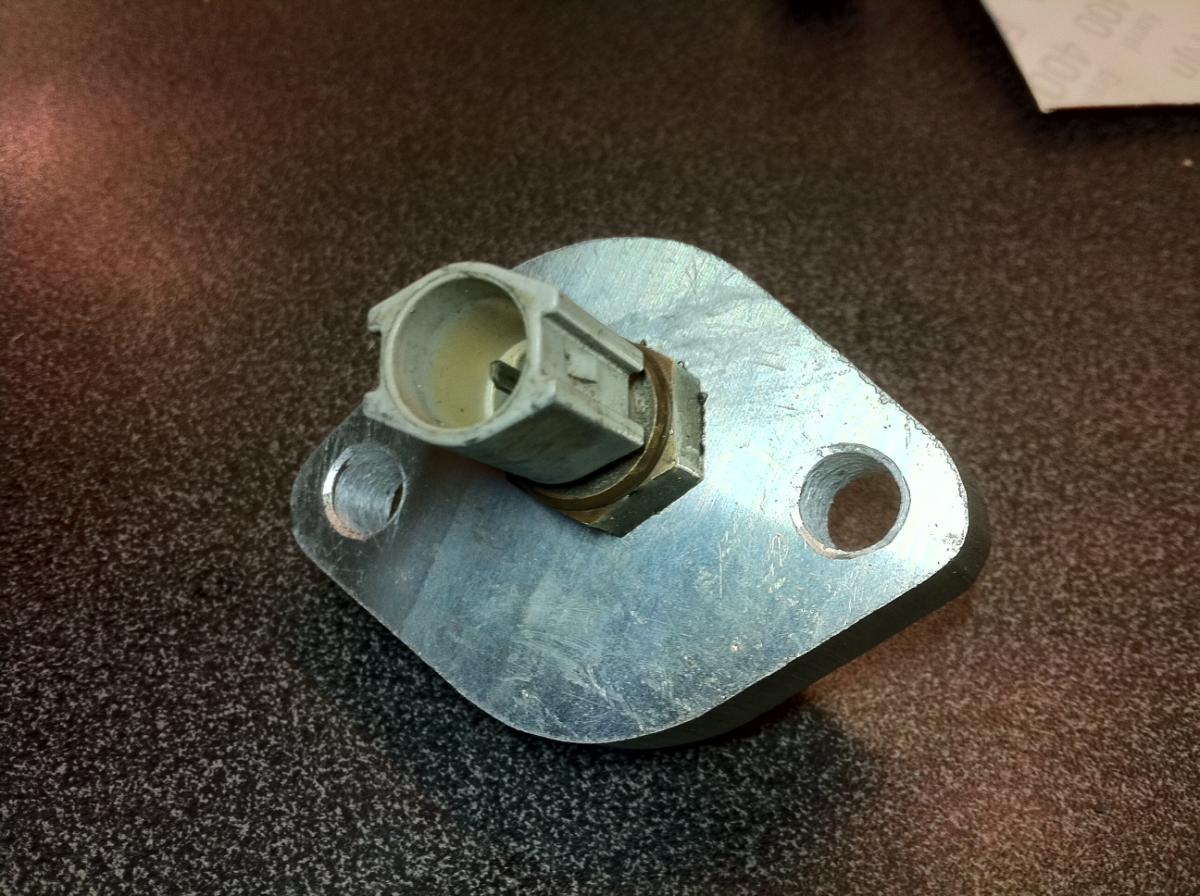
Blocking plate in position:
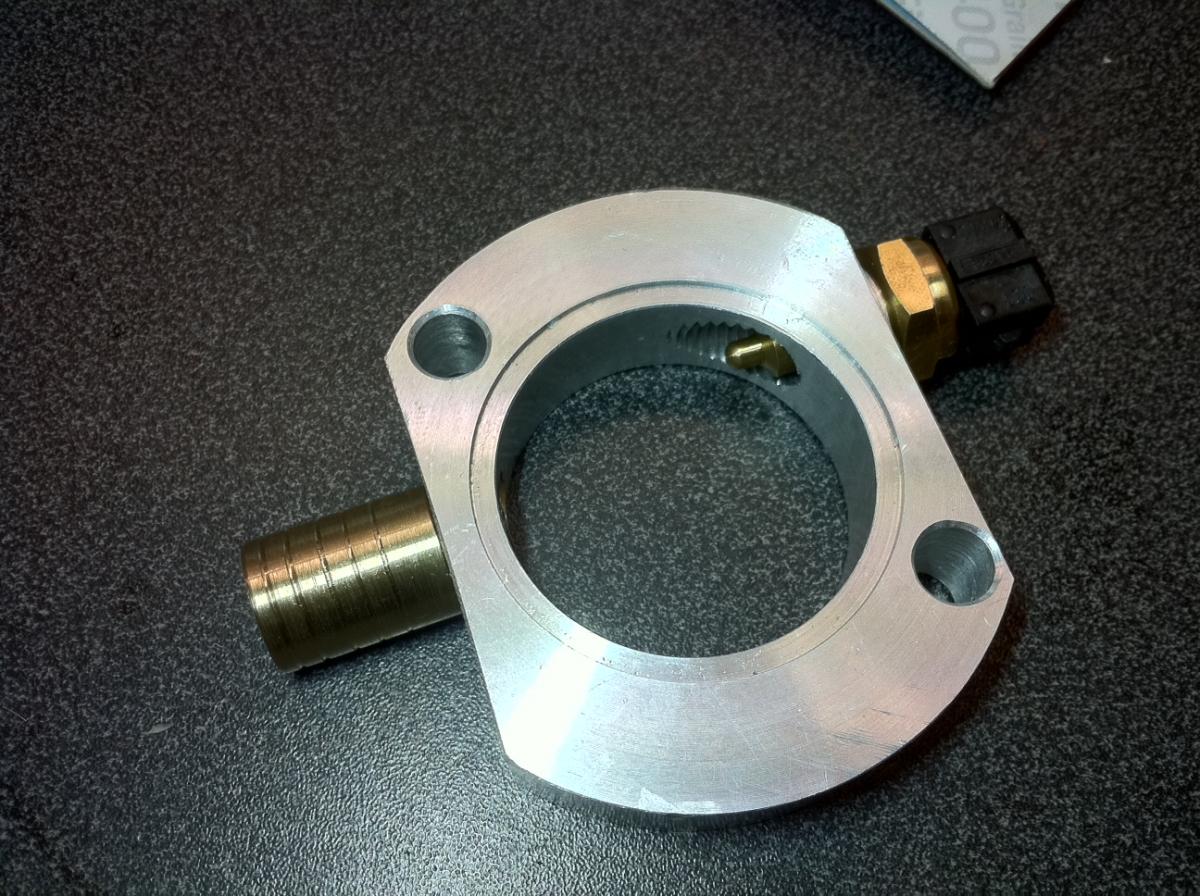
And the coolant reroute spacer. Very nice !
That really awkward long coolant hose is on its way. Also the Kia water neck is ordered and is in right now. I guess I am off the turbo-fab into the coolant reroute fab. Anyway, I also chopped the flange off the manifold (that was cracked anyway...). So all I need to do now is to fab a down pipe that connects to the front pipe of the exhaust.
To do:
Downpipe
Oil return line
Waterlines for the turbo
Finish the coolant reroute
Not to bad at all !
I have been here for about 1 year now, reading the stuff I need to know before getting my Miata turbo-ed. Now it is time. Here is the story of my car.
I have bought this Miata in 2010. It is made in 1989. One of the first editions. It has PS, AC, CC. Got it with a broken engine (No oil,big-end bearing died).
All and all it was in a sad, realy sad state. But.. No rust anywhere, leather seats, hardtop for only $1500.
The paint pas pale, took me a ages to polish it back to shiny red.
The soft top was worn and torn, renewed it with a pleasant to touch mahair one. I keep petting it.. The job itself was good fun and easy.
I replaced all bushings with the ES master kit. The rear shocks were almost empty, launching me on rebound. I mean realy launching me aut of the car if not secured by seatbelts. Scary as hell. I replaced those worn shocks with Koni sports and FCM mounts. I renewed the rear brake pads as they were metal to metal. The front was fine but I renewed the dust seals and placed new brakelines from one of the sponsors. Renewed the brakefluid on the fly.
All and all I brought it back to original specs, little modified though.
A little TLC and now it is getting a pretty NA to look at.
As for the engine:
I bought a second engine, used the best parts out both engines and did some resurfacing and had the cylinder bore resurfaced. Got new exhaust valves as they were sharp as a razor and allmost gone.
Got the engine back together with some modifications:
Lighter 1.8 flywheel (F1 11.7lbs) and Exedy stage 1 clutch. I love it.
H-beam con-rods.
Free programmable engine management system.
1.8 injectors (NBFL) 273cc/min
Samco hoses
All heating hoses unplugged from the manifold.
Air flow sensor blocked in open position (it does make a difference).
As I wanted to use it this summer I just putted it back together in stock form.
Getting a car in nice shape in stock form is an art to, you know !
We had lot's of fun and took the car out on a trip to France. It is even cheap to run. It did 2000 miles without any problem. Well... Sagging suspension...
Now summer get's to its end and the weather isn't great at all it is not much fun to drive the car in the rain anyway. So....
Time to do new things on the car:
Suspension:
1.8 diff (bought) + half- and drivshafts (these are from a NBFL, do I need the uprights too ?)
1.8 subframe + brace, sent it out for powdercoating in bright red. OMG... LOL.
OBX LSD + bolt and spacer kit, just got in.
Koni coilover sleeves + Eibach springs (375front 7", 250 rear 8") (waiting to arrive from Summit)
Engine (Turbo!):
I have a I'l TacoTaco manifold ready, bought from a MT member.
I also have a TD04H-13C from a Volvo 740/940. I had it resurfaced so it would fit the T3 mounting without leaking (this turbo has some awkward hole it the middle of the manifold mount).
This is how the engine looks in stock form:
Just ordered some silicone hoses, took the manifold off and the turbo on.
Let's put it all together.
There is no banjo bolt available for the Mazda oil pickup-point.
So I had to fab one myself (needed more debur..)
Oil line installed. That was not that hard... (Why is this pic upside down ???)
This is not the oil-line I am planning to use for a long time. It is in fact petrol hose. It should hold the pressure and it is good for motor oil. But I am afraid it will age quick. It is just that the hydraulics shop did not have the nice PTFE steel braided hoses. So for the time being it is this hose.
Damn ! I just dropped the turbo of the work shelf. It landed right on its compressor. Now it is stuck. Lucky me, a friend of mine has another one for $50. These turbo's are dead cheap. I ripped this one apart and tried to get it working again with the internals of a 13T but it is all different and not working out.
In the mean time I am pulling the manifold for the relieve cuts and I can show you the resurfaced Volvo turbine housing:
And.. While we are there:
Relief cuts:
Ok, IC piping and Silicone stuff came in.
Problems..
Do you think what I am thinking ?
The thermostat is in blocking the way of the intake charge pipes.
Coolant reroute was NOT on my planning board.... But it is tempting now.
Yes... I am going to do it. Thermostat housing is out.
I also got the rear housing out. Including the stud. It took me less then 2 minutes to get that stud out. Used the 2 nuts method. Going to fab some parts later to make the reroute complete.
Better: more room. Need to get it a little more symmetrical. But good for now.
So got on fabbing:
Blocking plate for the thermostat. I made the sensor for the dash in it.
Blocking plate in position:
And the coolant reroute spacer. Very nice !
That really awkward long coolant hose is on its way. Also the Kia water neck is ordered and is in right now. I guess I am off the turbo-fab into the coolant reroute fab. Anyway, I also chopped the flange off the manifold (that was cracked anyway...). So all I need to do now is to fab a down pipe that connects to the front pipe of the exhaust.
To do:
Downpipe
Oil return line
Waterlines for the turbo
Finish the coolant reroute
Not to bad at all !
Last edited by IHI; 09-19-2011 at 05:03 PM.

Reply
 0
0

0
09-13-2011, 08:29 AM
#2
Elite Member
iTrader: (14)

Join Date: Sep 2009
Location: Birmingham, AL
Posts: 2,101
Total Cats: 180
Good luck with the Taco - my 1st lasted 7 track days before it cracked, the 2nd made it one track day before it started cracking - one more day did this...
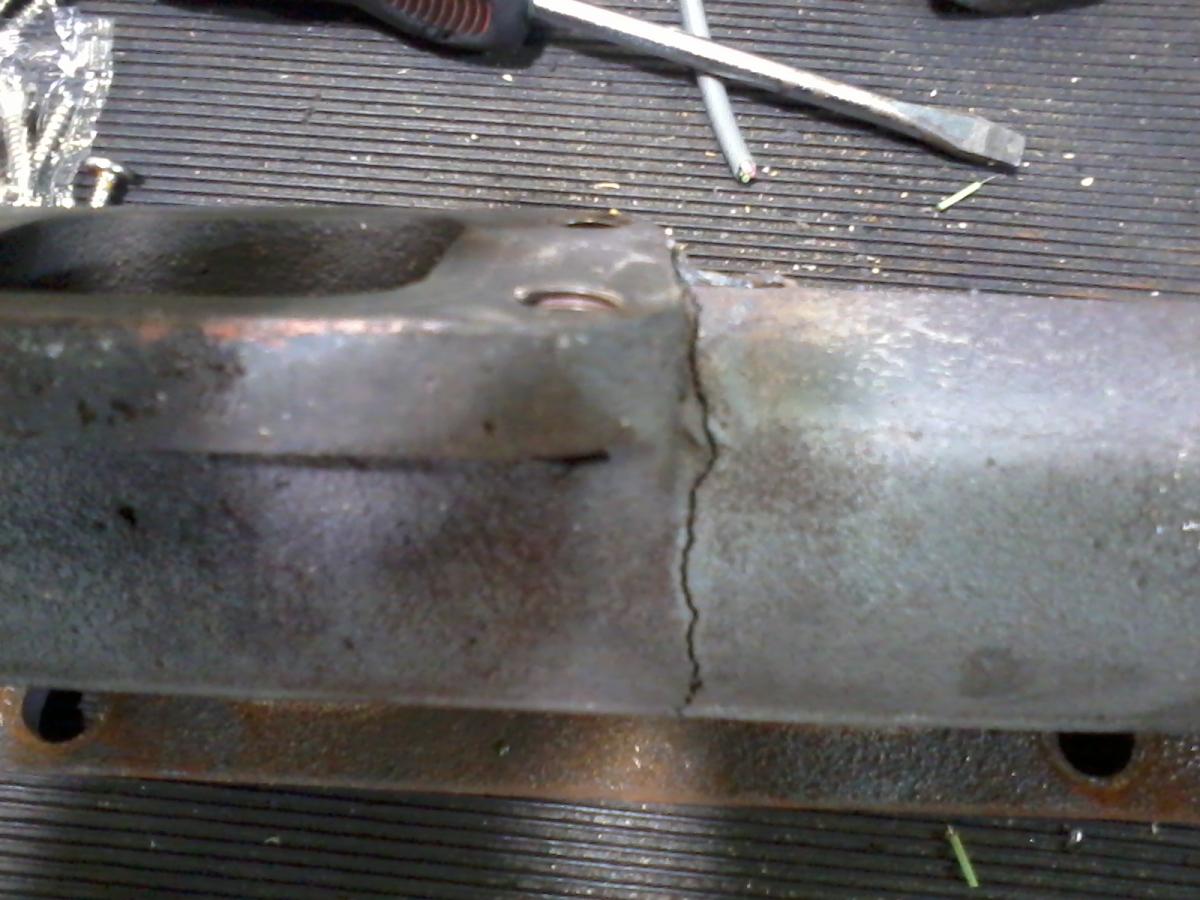
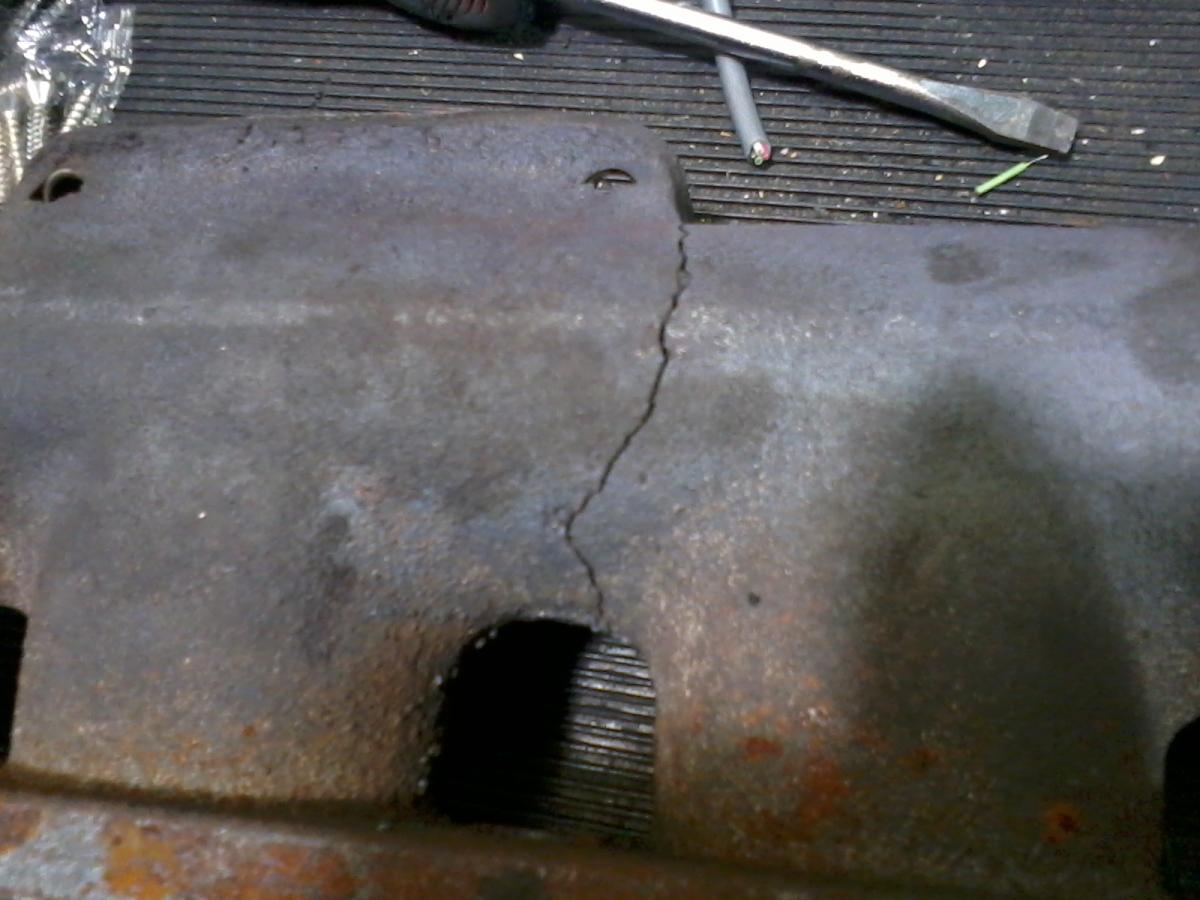
Now Abe is fabbing a superclone and will be able to make a replacement for when (not if) yours cracks in half
Now Abe is fabbing a superclone and will be able to make a replacement for when (not if) yours cracks in half
Reply
0
0
 09-13-2011, 09:34 AM
#6
Junior Member
Thread Starter
Join Date: Oct 2009
Location: The Netherlands
Posts: 200
Total Cats: 1
Thanks, I have seen your build and vids. I was amazed that it even held up that long. I am not going to track it. It is just for a little extra torque and fun. If I wan't more I'll switch to a GT series turbo and Artech / BeGi stuff. I wan't to do a cheap build now. Thanks for the warning and I will cut the manifold.
Reply
0
0
09-18-2011, 12:02 PM
#8
Junior Member

Join Date: Sep 2009
Posts: 101
Total Cats: 0
hey jeroen! finally a start on the project!! looking good!
I think i am going to come over soon, cause my setup is running way to lean at the moment. U can find my info here:
https://www.miataturbo.net/supercharger-discussion-38/supercharger-bov-55123/
When do you think you will have it running again?
I think i am going to come over soon, cause my setup is running way to lean at the moment. U can find my info here:
https://www.miataturbo.net/supercharger-discussion-38/supercharger-bov-55123/
When do you think you will have it running again?
Reply
0
0
09-19-2011, 04:40 PM
#9
Junior Member
Thread Starter
Join Date: Oct 2009
Location: The Netherlands
Posts: 200
Total Cats: 1
Thanks ! I hope to have it back on the road within 1-2 weeks. I have trouble getting the downpipe made. I guess it is going to be ok once I pick up the welder myself.
For now I need to get some parts.
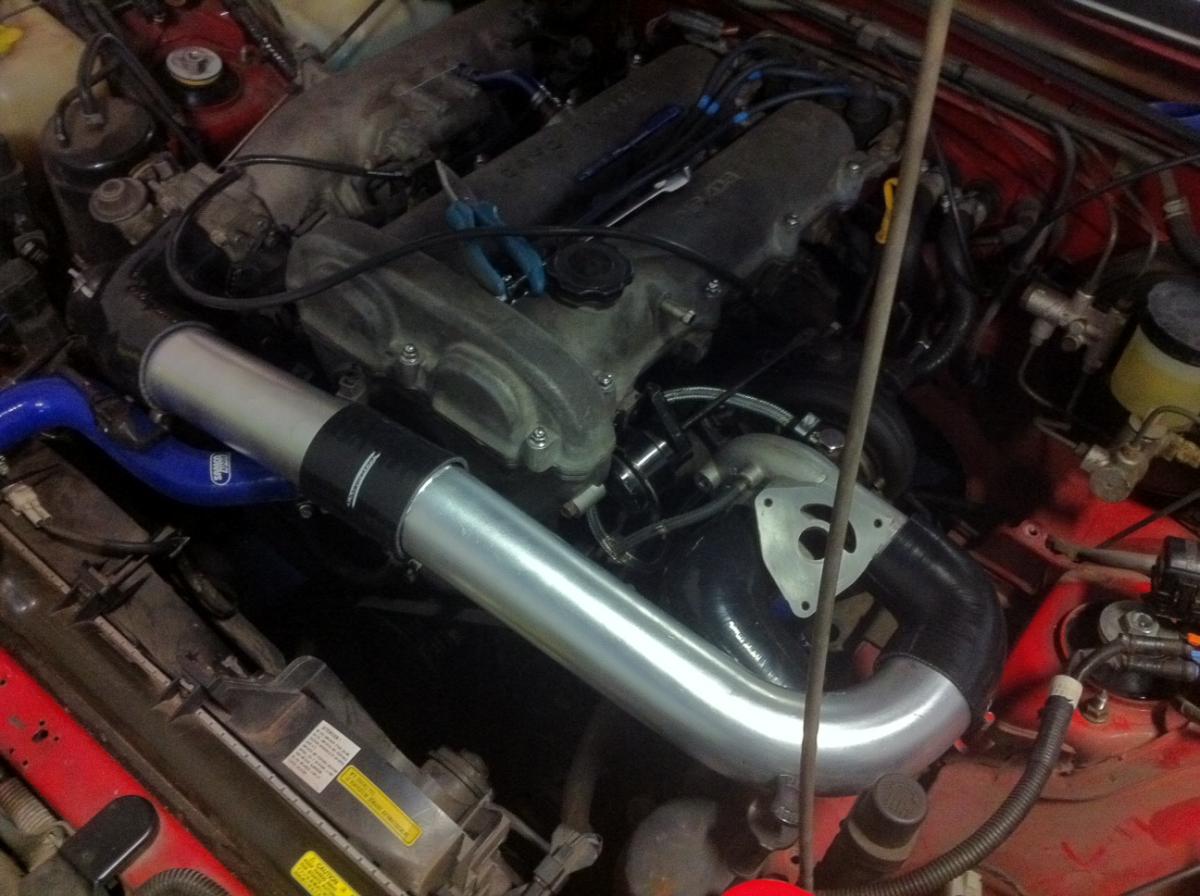
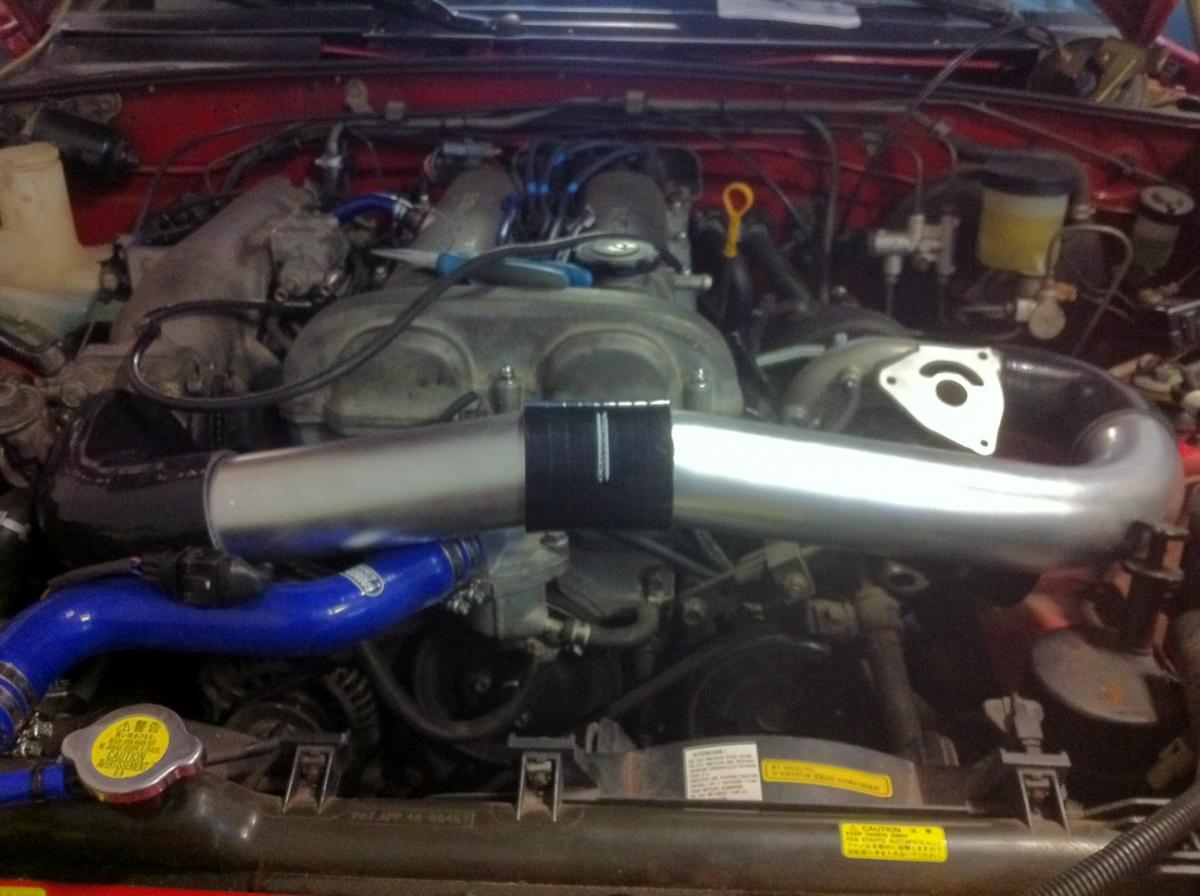
Have you seen the space I have for the intake charge pipe ? A water to air intercooler would fit right in, wouldn't it ? If it is all up and running I will order one of those frozen boost kits.
Anyway, these just came in:
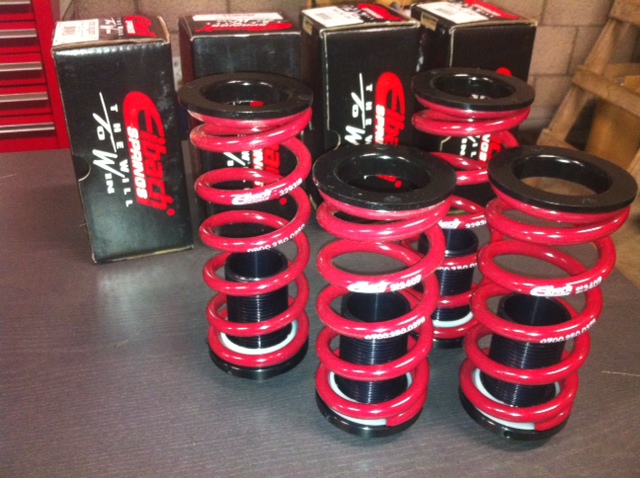
Koni sleeves, 2.25 to 2.5 spring adaptors, 2,5" ES spring isolators and 375/7" + 250/8" Eibach springs.
And I also got one of these:

I have a 1.8 rear diff with all the parts. Just needs to be taken apart an some paint.
I bought a new (used) rear subframe with brace and took it to the powdercoater. I had it coated bright red.
I might have all suspension parts powder coated. Just good fun to install nice and shiny parts.
For now I need to get some parts.
Have you seen the space I have for the intake charge pipe ? A water to air intercooler would fit right in, wouldn't it ? If it is all up and running I will order one of those frozen boost kits.
Anyway, these just came in:
Koni sleeves, 2.25 to 2.5 spring adaptors, 2,5" ES spring isolators and 375/7" + 250/8" Eibach springs.
And I also got one of these:
I have a 1.8 rear diff with all the parts. Just needs to be taken apart an some paint.
I bought a new (used) rear subframe with brace and took it to the powdercoater. I had it coated bright red.
I might have all suspension parts powder coated. Just good fun to install nice and shiny parts.
Last edited by IHI; 09-30-2011 at 04:24 AM.
Reply
0
0
 11-04-2011, 04:15 PM
#11
Junior Member
Thread Starter
Join Date: Oct 2009
Location: The Netherlands
Posts: 200
Total Cats: 1
Hi Frank, I made it myself with a little help of a friend that has the machinery.
I did had to modify it a little more as it did not clear the head/engineblock. But it looks great and it is really small. It was easy to get in position.
I did had to modify it a little more as it did not clear the head/engineblock. But it looks great and it is really small. It was easy to get in position.
Reply
0
0
12-06-2011, 01:23 PM
#12
Junior Member
Thread Starter
Join Date: Oct 2009
Location: The Netherlands
Posts: 200
Total Cats: 1
So I made a coolant re-route to have nice ducting to the throttle body...
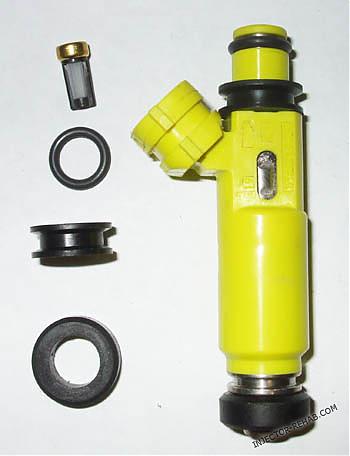
And now I have purchased bigger injectors. My initial goal was to run out the 1.8NBFL injectors (275cc/min ish). But I needed some parts and bought RX8 440cc/min injectors along with that order as they aren't that expensive.
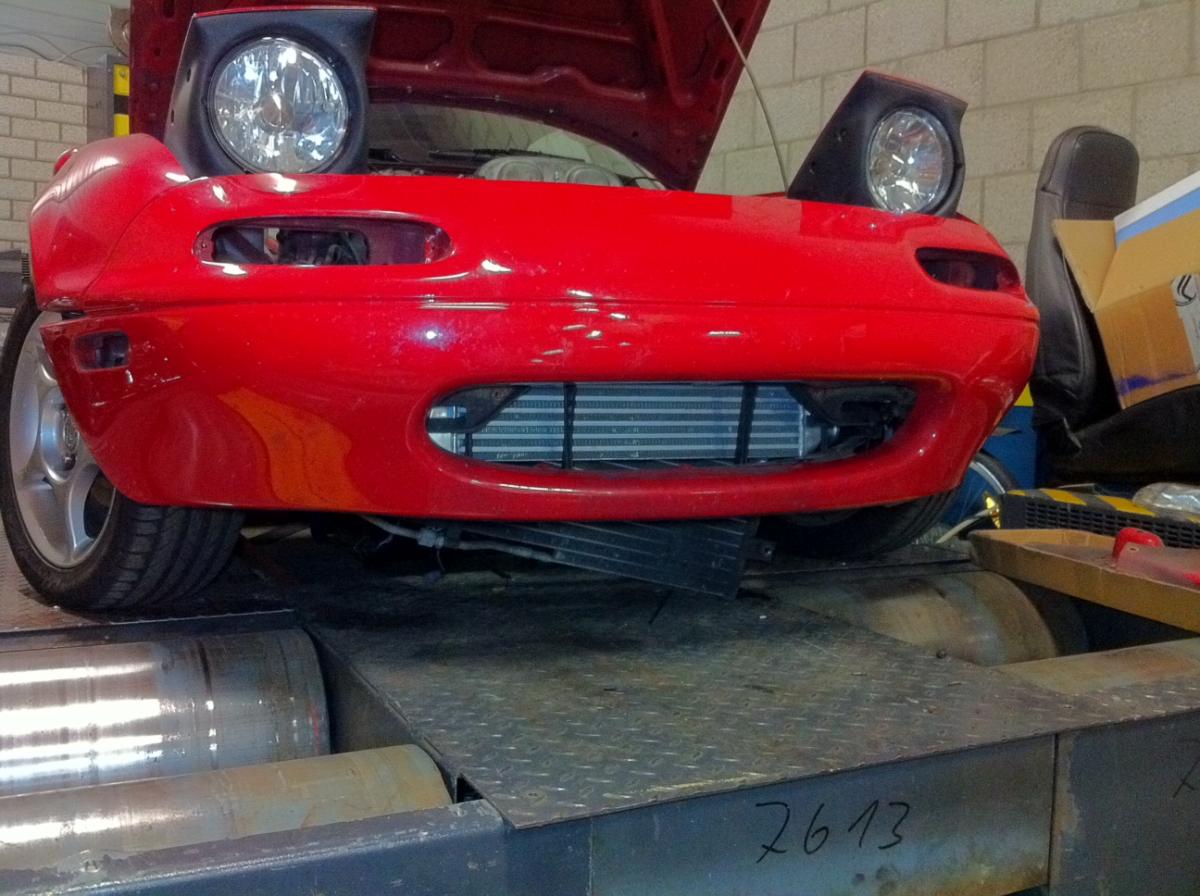
By doing that I can run more boost... And when running more boost I need cooler air. So... I bought an FMIC.
Coolant re-route for nothing ? Well... It doesn't harm, does it ?
Anyway, Pics !!!
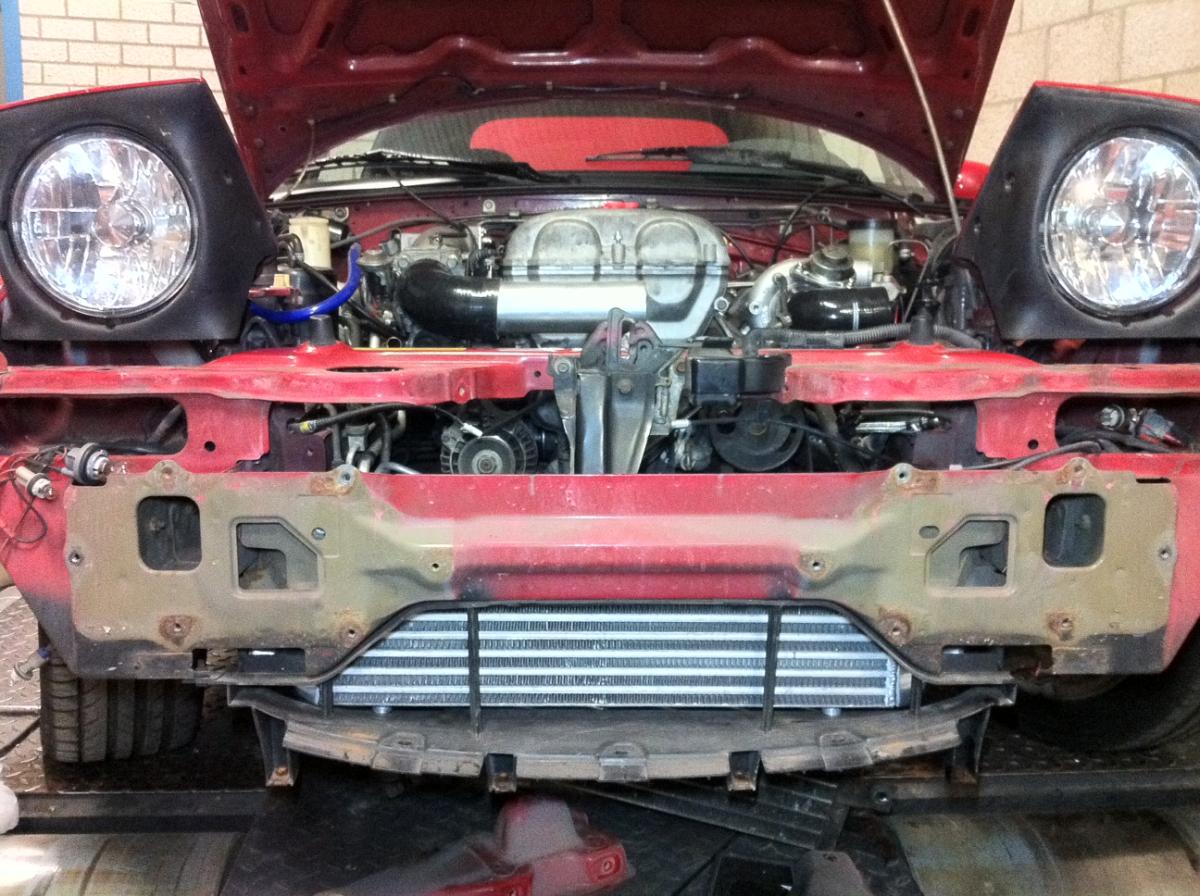
I can adjust the hight still a little. The intercooler is really steady on the simple mounts I made in very little time. And yes.. The car is parked on my dyno...
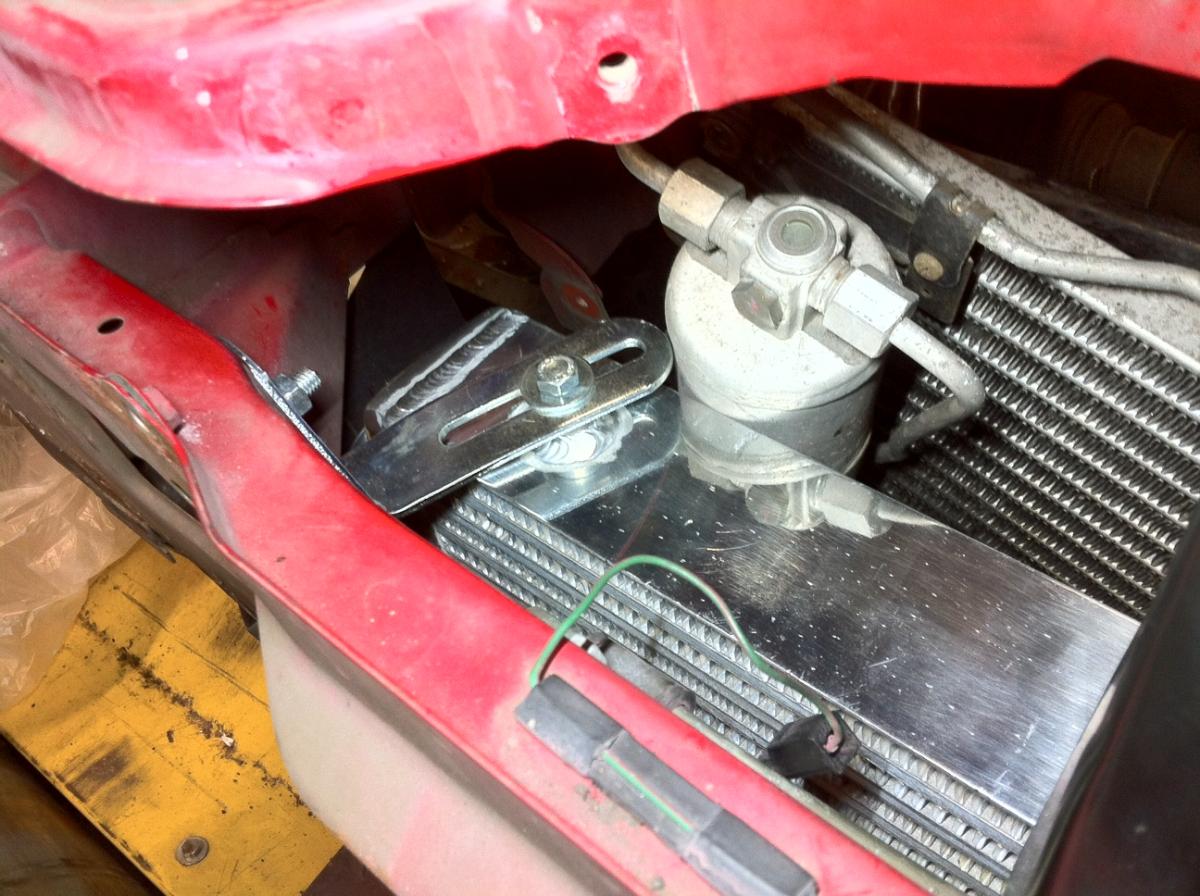
I have to sleep over it... I cannot make up my mind.. I used the AC about 3 times this summer and it was more to check if it still worked. Now it works fine but I hardly (never) use it. So should just remove it as it takes a lot of space and weight in the front. But I have a problem removing a perfectly working accessory....
I just cannot do it today. I will do it tomorrow I think...
Why ? Well, I cannot get the AC dryer/filter back in place. The FMIC is taking it's space. I heard people bending it out of the FMIC's way, but I just cannot see how to bend it to get it out of the way enough... Some hints please ?
I also made some bushings for the VAG coil on plugs. As I had those here in the shop, I figured I would use them... They go in a little deeper, but I had another valve cover "wrinkle painted". After that one is on, these are pressed in and all tight.
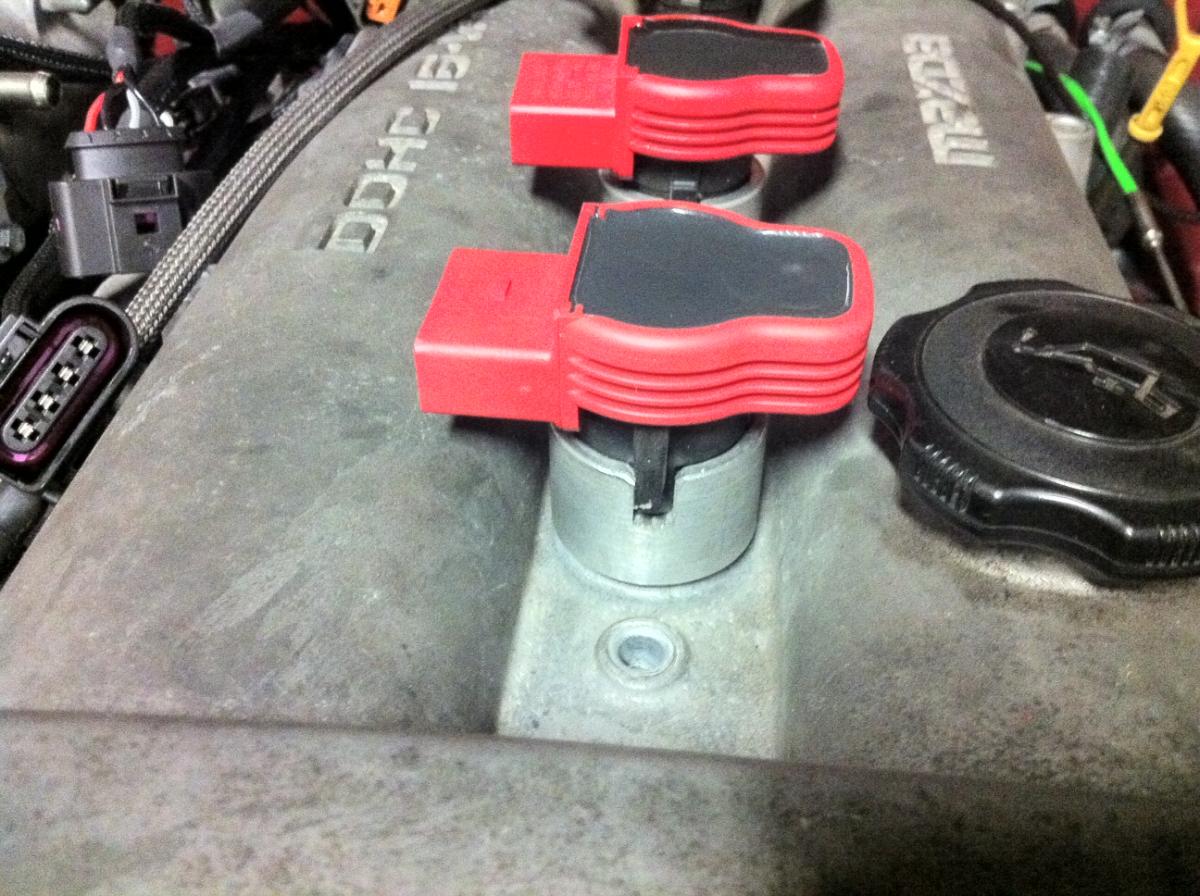
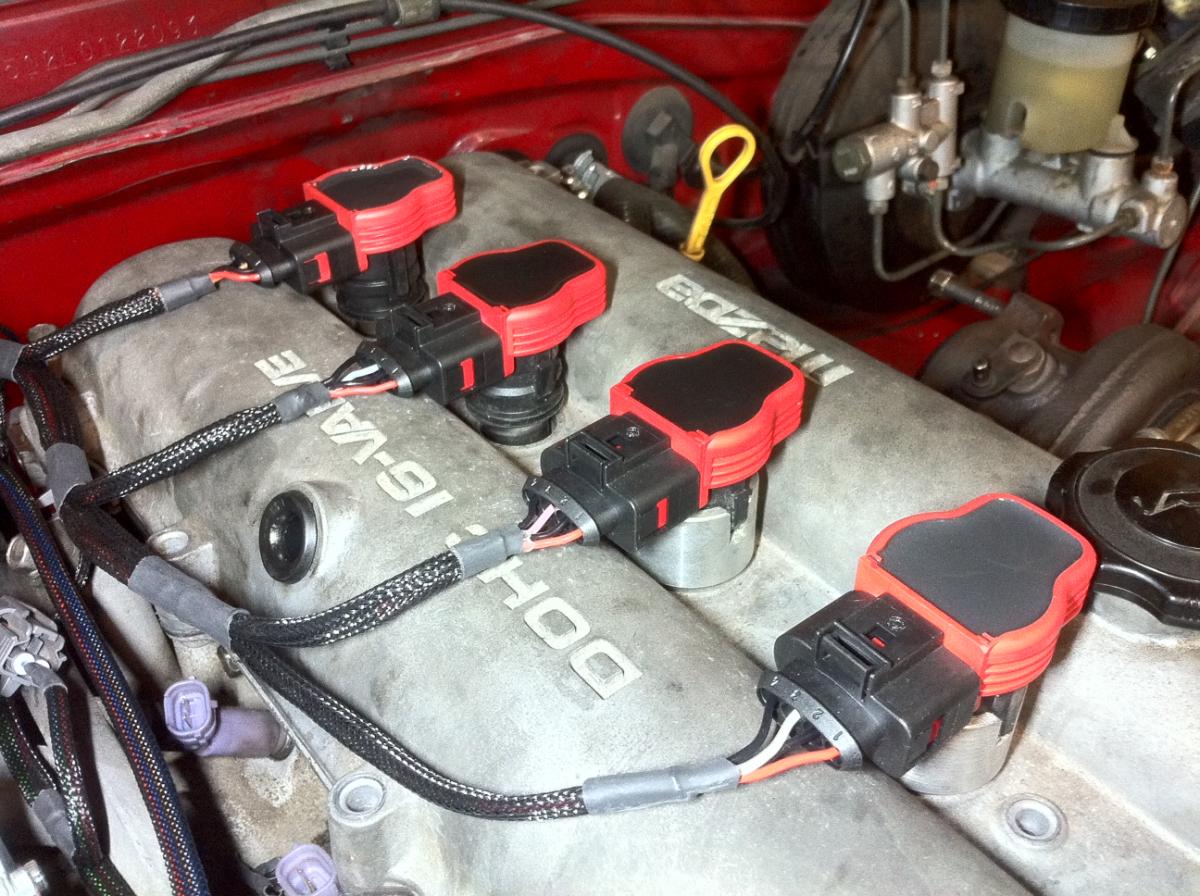
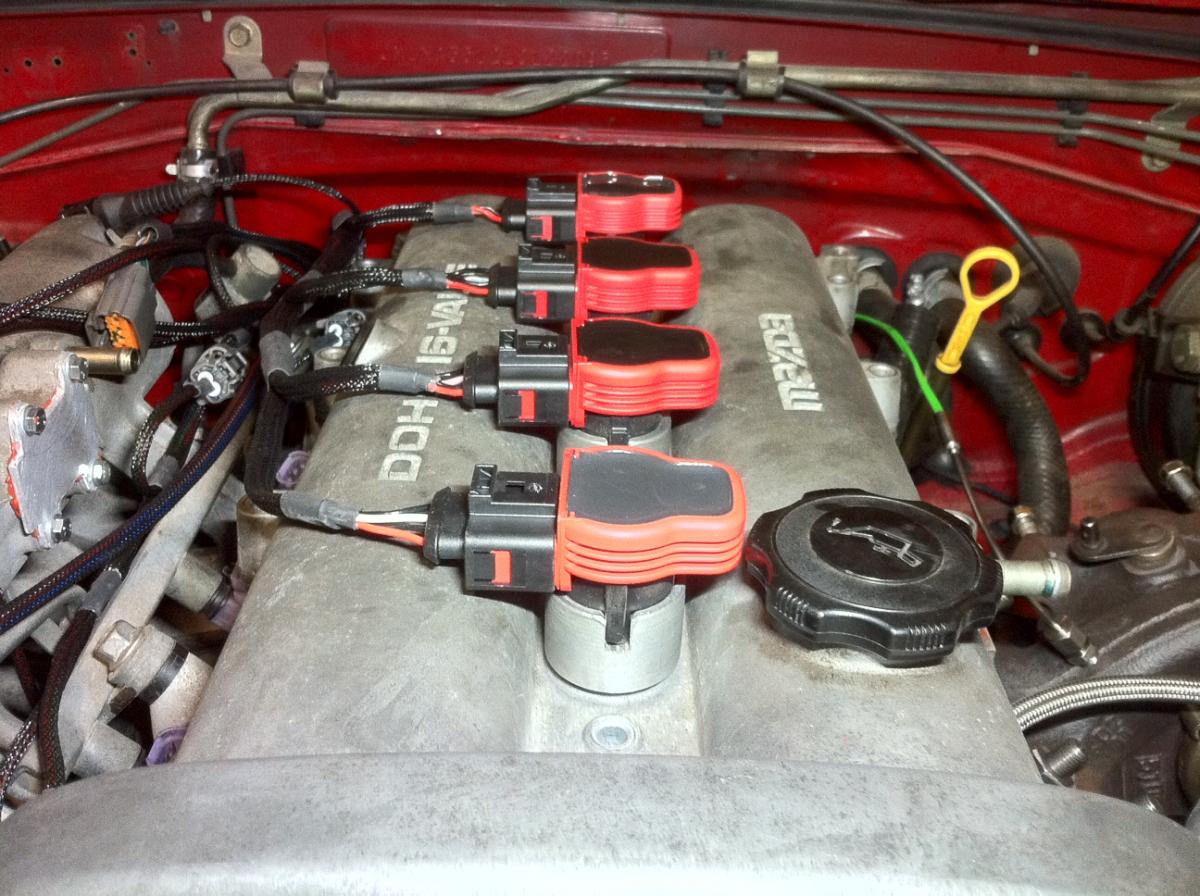
And now I have purchased bigger injectors. My initial goal was to run out the 1.8NBFL injectors (275cc/min ish). But I needed some parts and bought RX8 440cc/min injectors along with that order as they aren't that expensive.
By doing that I can run more boost... And when running more boost I need cooler air. So... I bought an FMIC.
Coolant re-route for nothing ? Well... It doesn't harm, does it ?
Anyway, Pics !!!
I can adjust the hight still a little. The intercooler is really steady on the simple mounts I made in very little time. And yes.. The car is parked on my dyno...
I have to sleep over it... I cannot make up my mind.. I used the AC about 3 times this summer and it was more to check if it still worked. Now it works fine but I hardly (never) use it. So should just remove it as it takes a lot of space and weight in the front. But I have a problem removing a perfectly working accessory....
I just cannot do it today. I will do it tomorrow I think...
Why ? Well, I cannot get the AC dryer/filter back in place. The FMIC is taking it's space. I heard people bending it out of the FMIC's way, but I just cannot see how to bend it to get it out of the way enough... Some hints please ?
I also made some bushings for the VAG coil on plugs. As I had those here in the shop, I figured I would use them... They go in a little deeper, but I had another valve cover "wrinkle painted". After that one is on, these are pressed in and all tight.
Last edited by IHI; 12-07-2011 at 08:08 AM.
Reply
0
0
 01-11-2012, 11:27 AM
#14
Junior Member
Thread Starter
Join Date: Oct 2009
Location: The Netherlands
Posts: 200
Total Cats: 1
Working my way trough.
Installing EGT sensor.
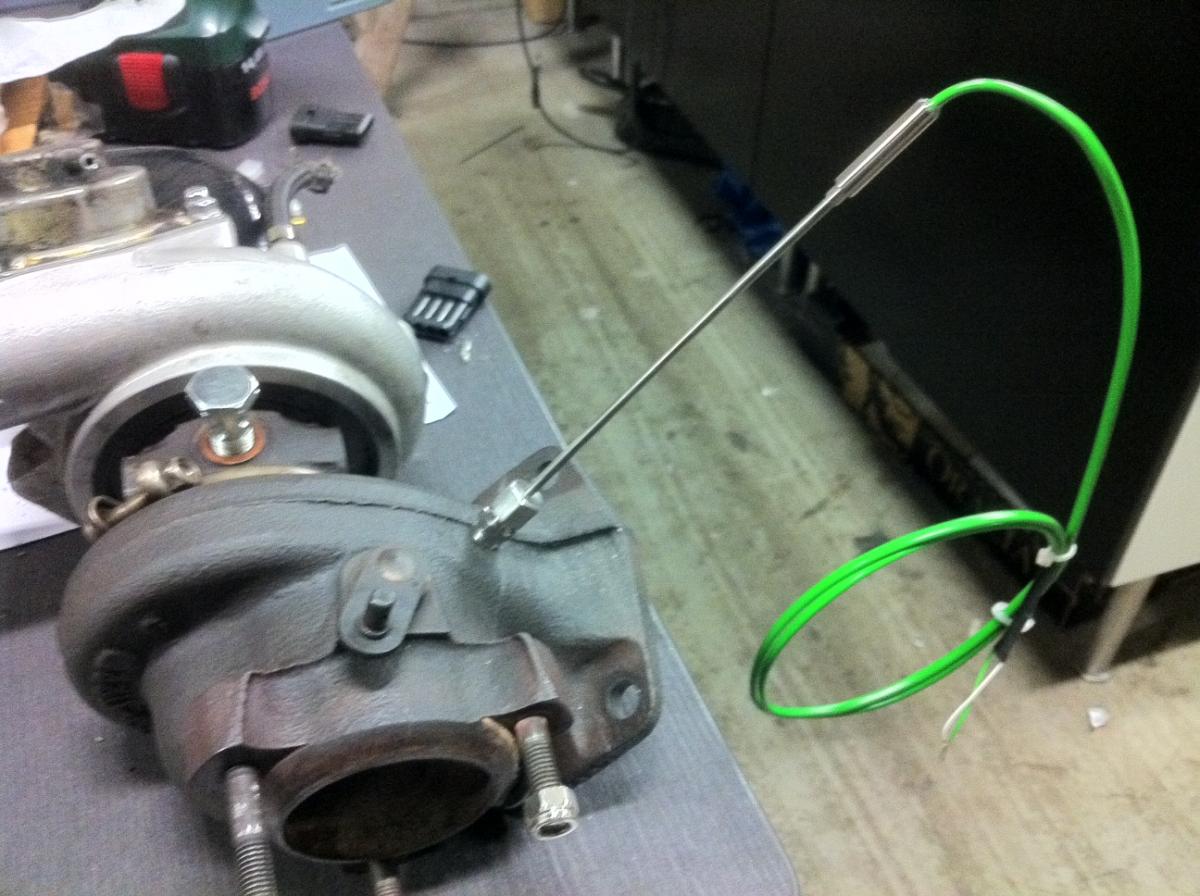
Made it smooth.
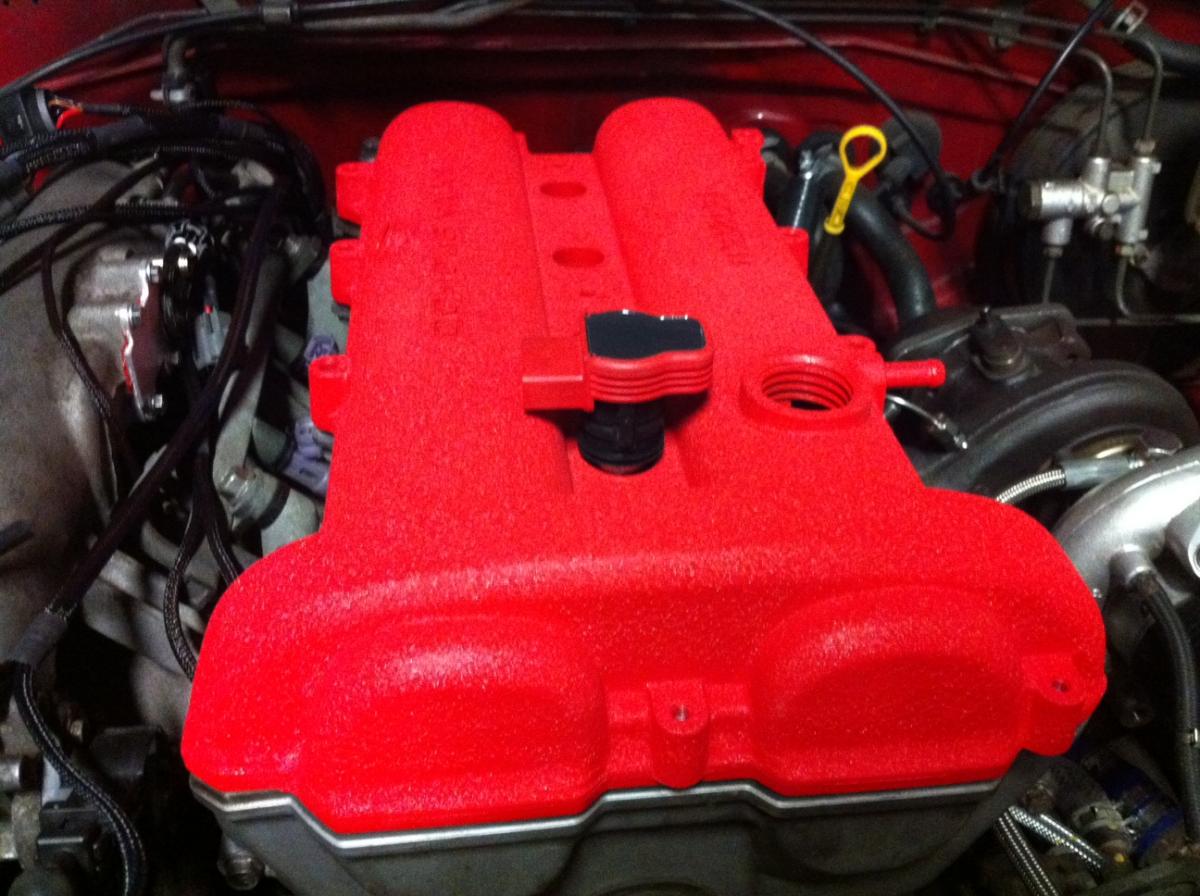
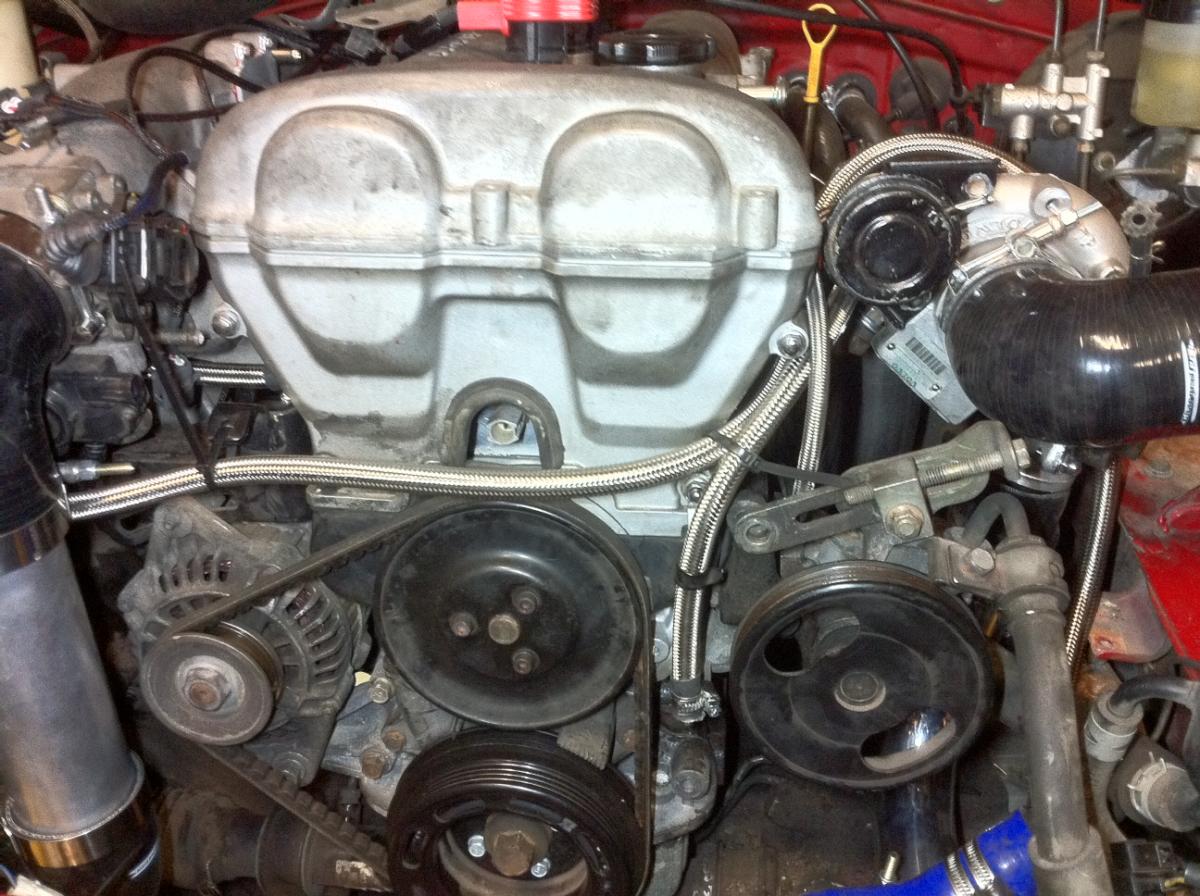
Wrinkle paint on the Valve cover.
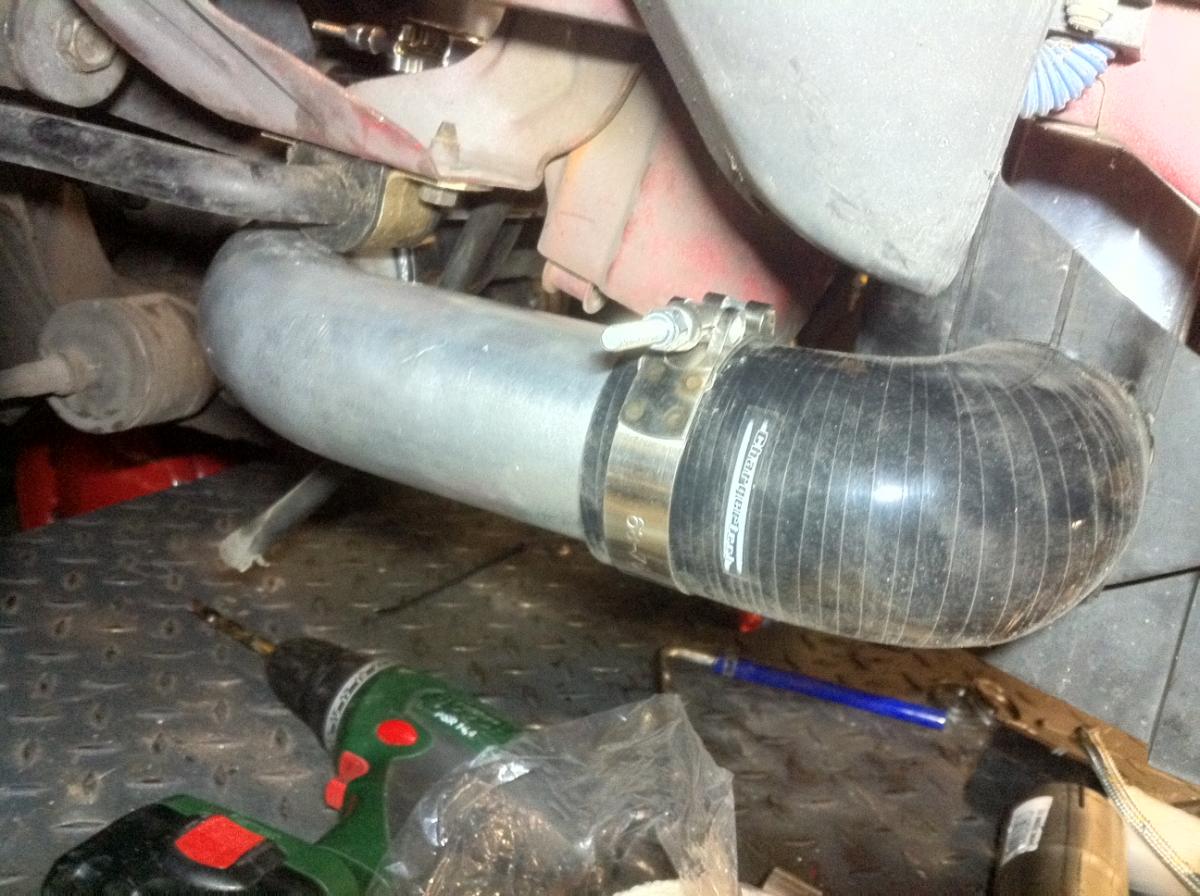
IC piping on the right is as I like it, I do need some bracing.:
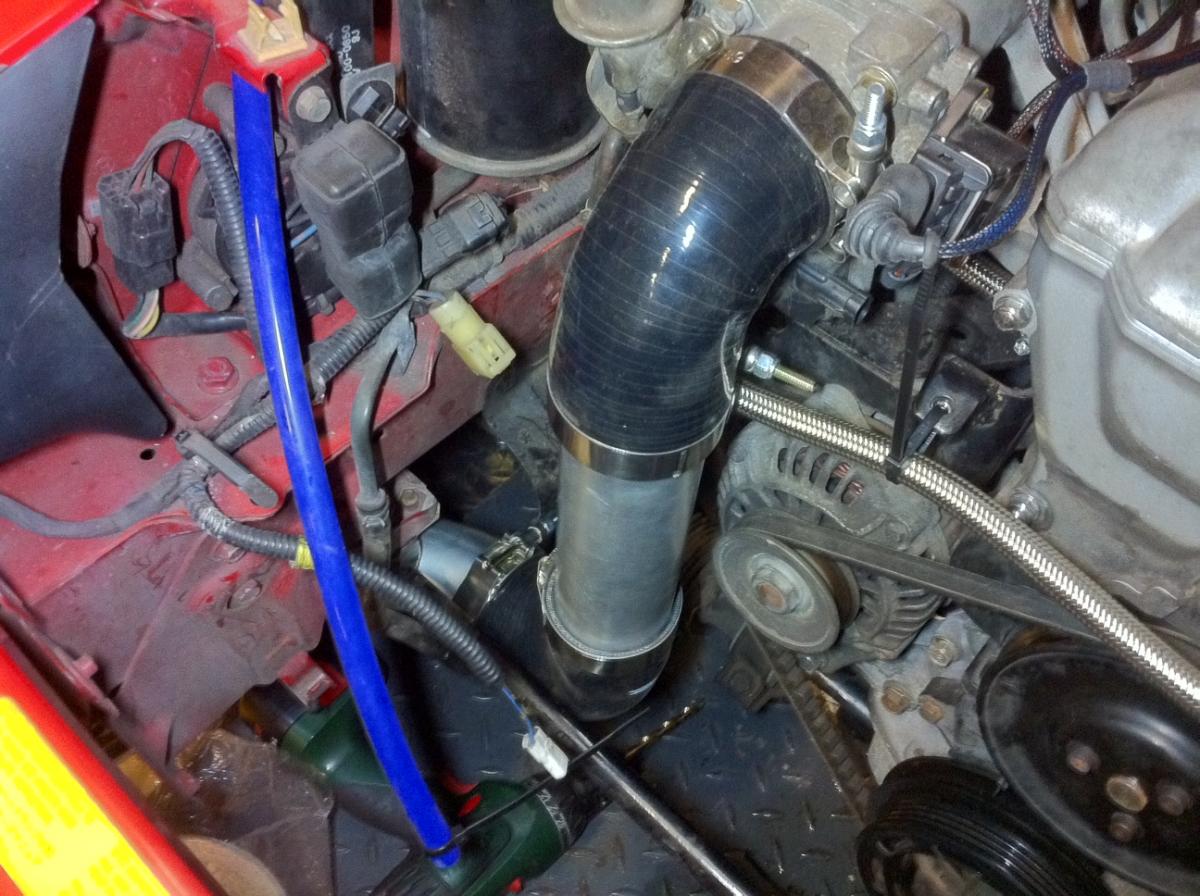
On the left needs a little work, but feels solid:
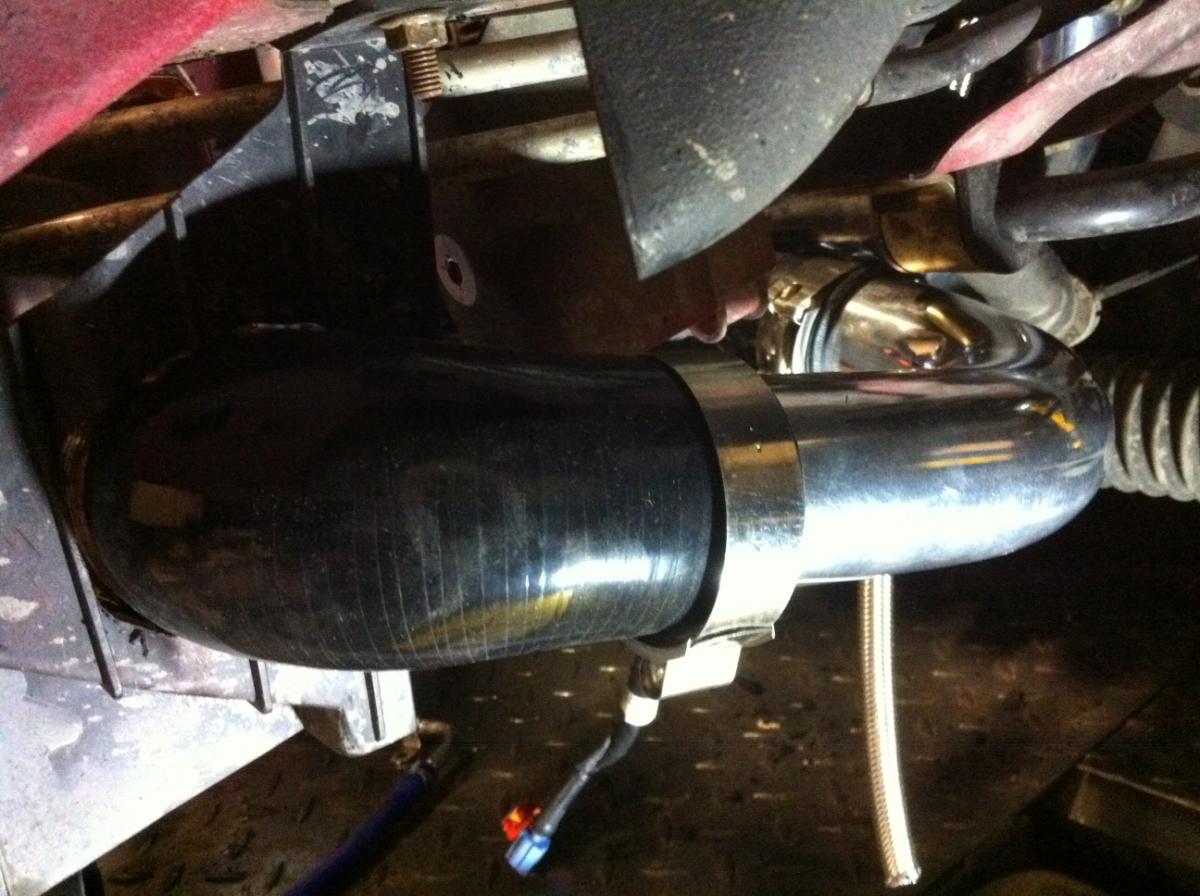
Right side:
Got those expensive AN lines for the turbo with all steel braided ----. Wow...
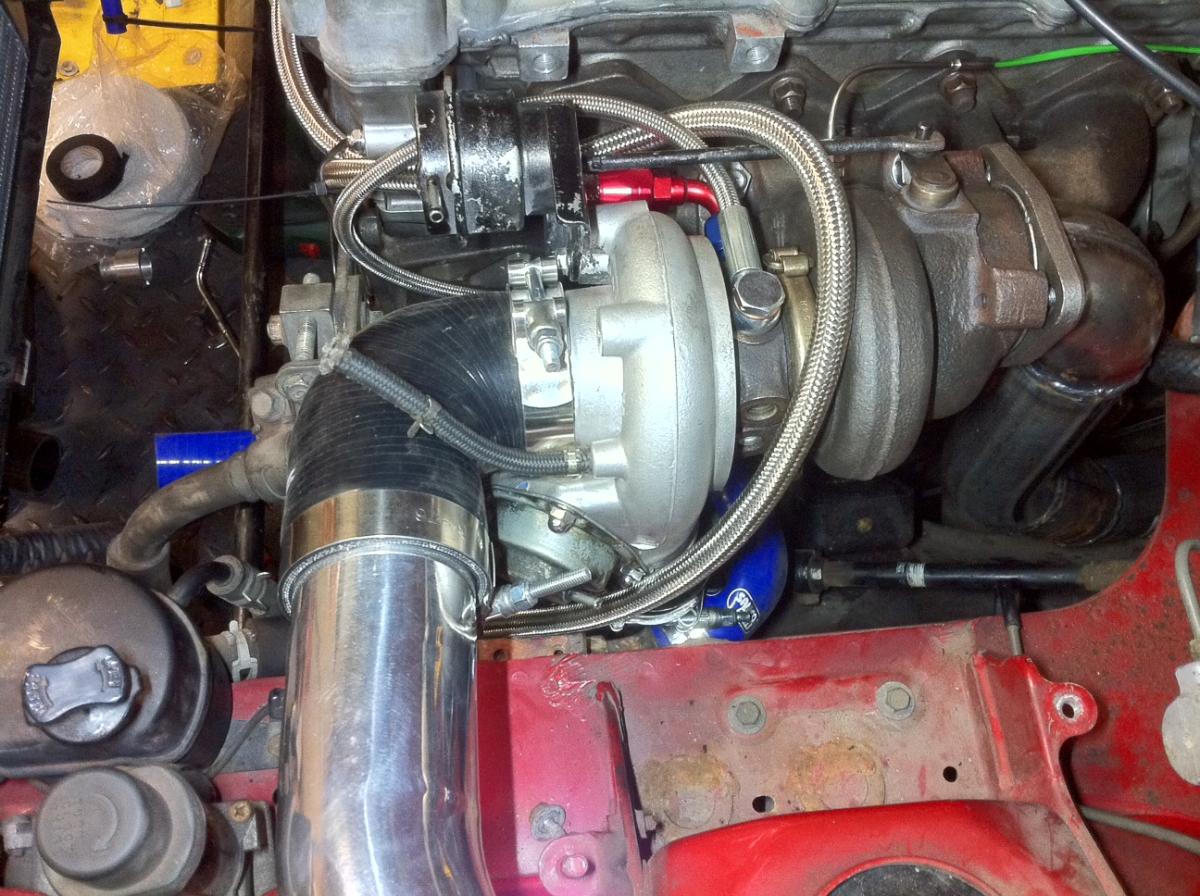
Expensive lines everywhere.
Made a down pipe of 2,5" sections. I like how it is routed.

Installing EGT sensor.
Made it smooth.
Wrinkle paint on the Valve cover.
IC piping on the right is as I like it, I do need some bracing.:
On the left needs a little work, but feels solid:
Right side:
Got those expensive AN lines for the turbo with all steel braided ----. Wow...
Expensive lines everywhere.
Made a down pipe of 2,5" sections. I like how it is routed.
Last edited by IHI; 01-11-2012 at 11:46 AM.
Reply
0
0
 01-13-2012, 06:42 AM
#16
Junior Member
Thread Starter
Join Date: Oct 2009
Location: The Netherlands
Posts: 200
Total Cats: 1
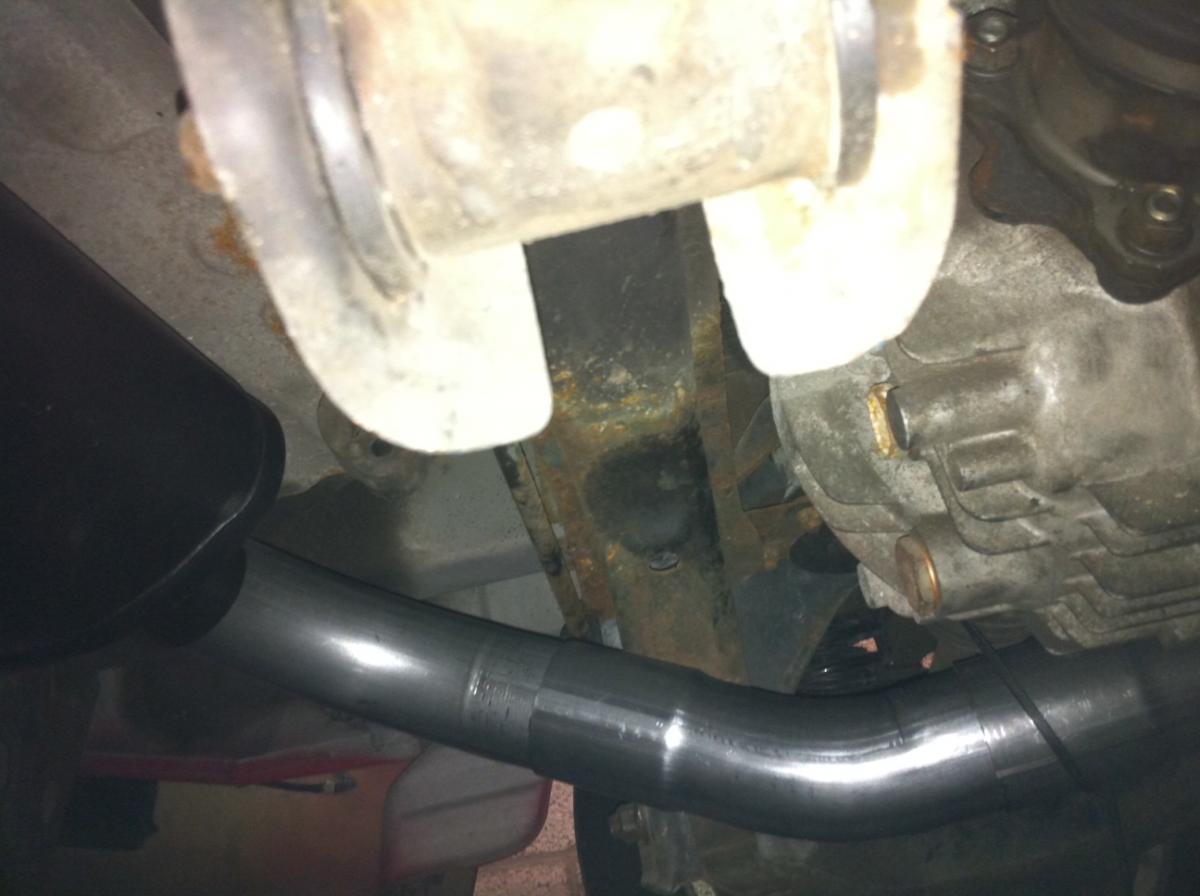
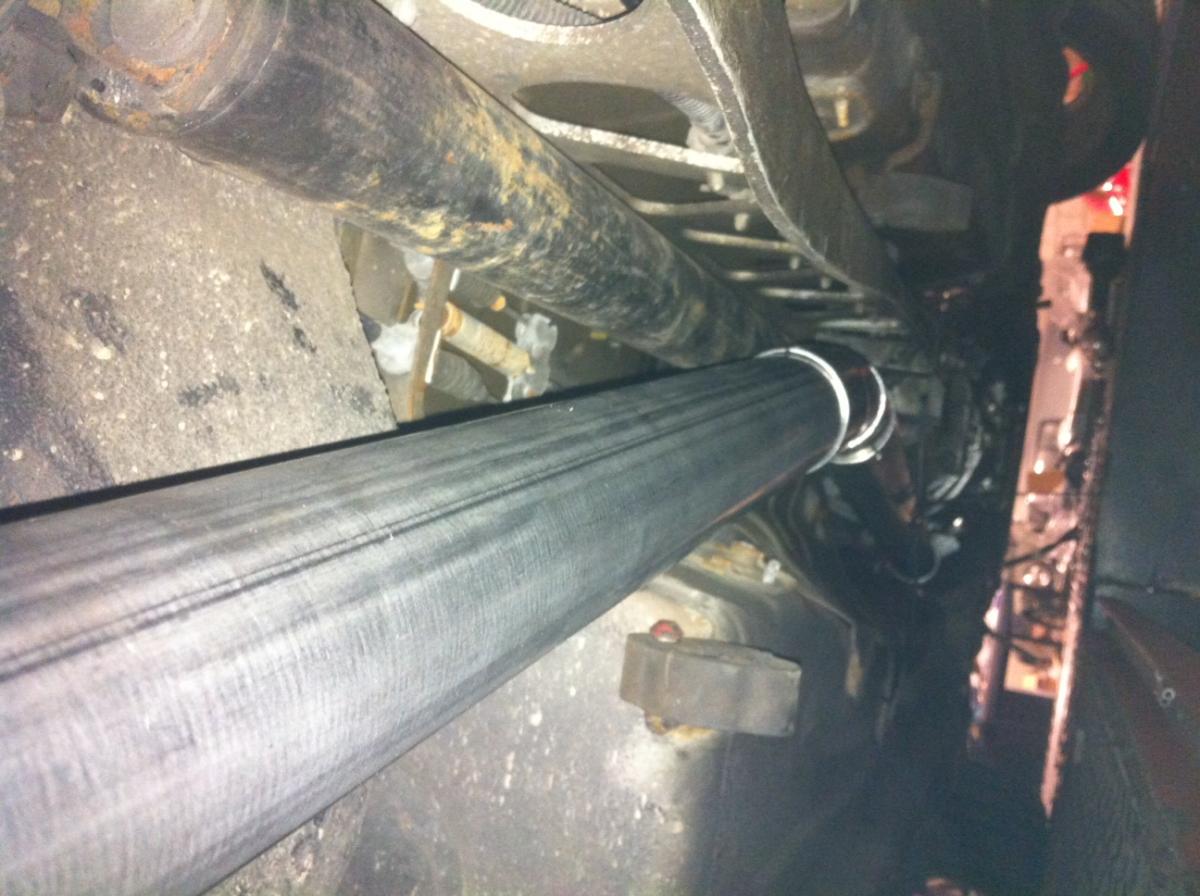
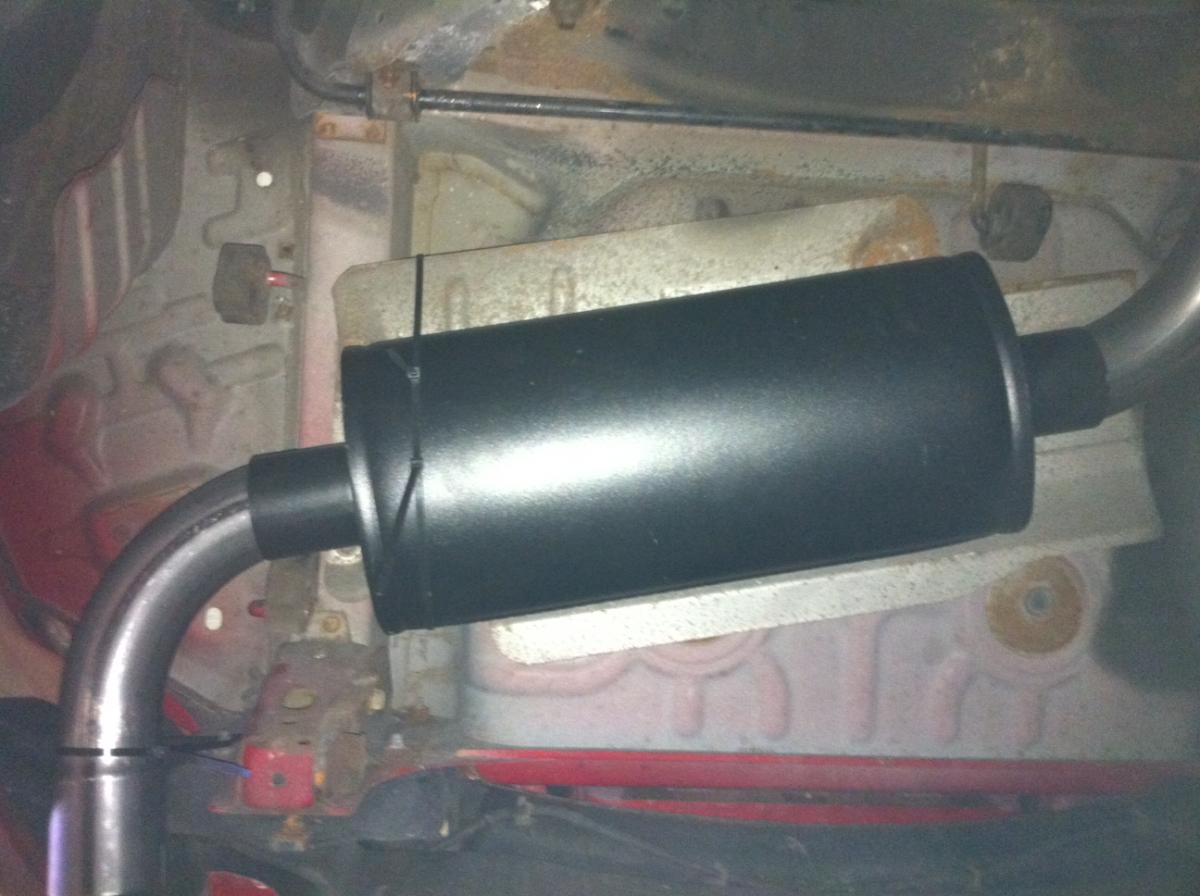
Getting there... Exhaust zip-tied into place.
My only concern is the muffler. It is a bit little. But so is the turbo. I hope it is not too loud. I like my car to be silent...
2,5" all the way down. I tried to get as much smooth bends as I could, ending up with just one sharp 90 degrees angle in the down pipe.
I think it will flow nicely.
I might add another muffler to "fake" a catalytic converter on the place where the catalytic converter was supposed to hang.
I'll finish other projects first so I can start it up and check the sound levels.
I am also thinking about putting a flex joint in it. As it all seems to hang rather rigid in there, even on zip-ties. It might tear and rip the pipe off at the turbo.
Or I can mount the exhaust pipe to the gearbox and connection bar between the diff and gearbox. That way it won't flex, but might give a lot of vibrations to the chassis.
Suggestions welcome.
Last edited by IHI; 01-13-2012 at 09:24 AM.
Reply
0
0
 01-24-2012, 07:54 AM
#18
Junior Member
Thread Starter
Join Date: Oct 2009
Location: The Netherlands
Posts: 200
Total Cats: 1
This just came in:
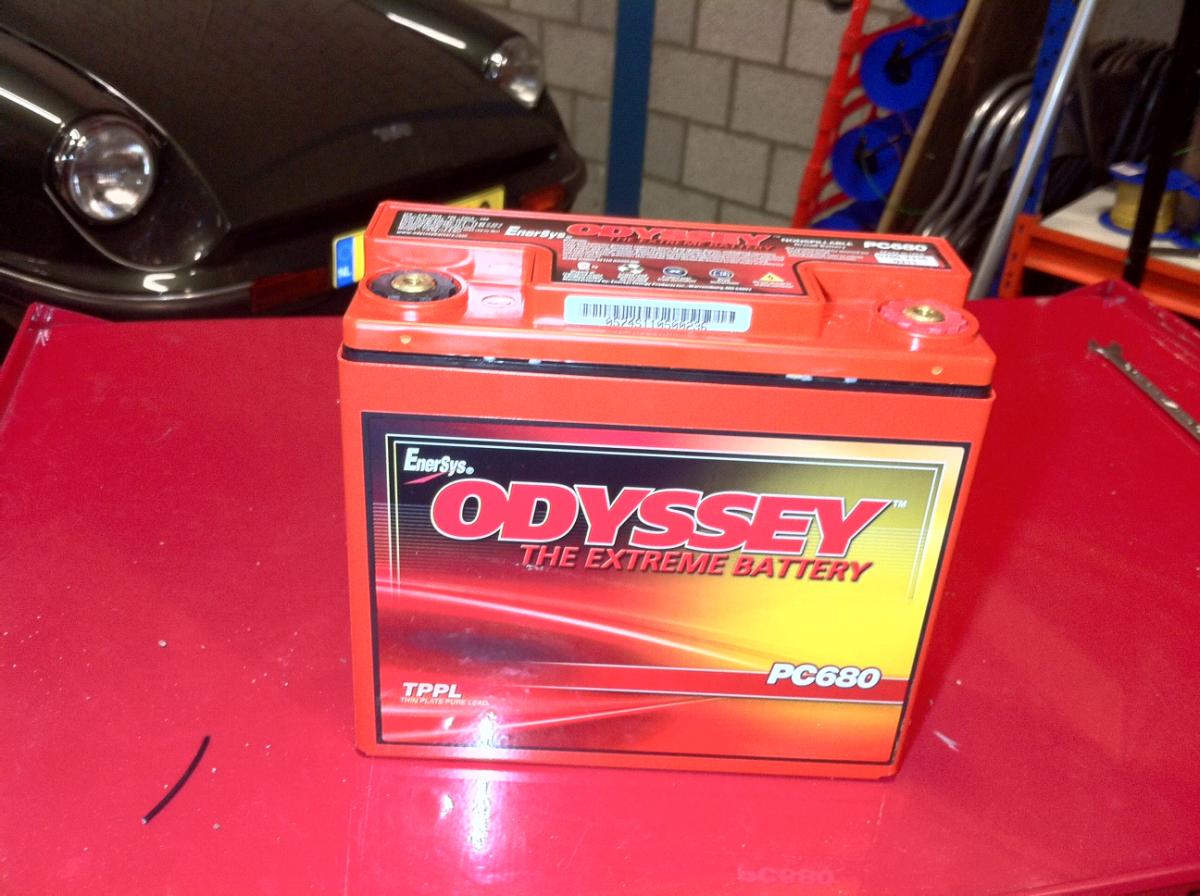
It fits better in the trunk and also saves (a lot) of weight compared to the Red-Top Optima I had in there before.
The optima was ok, but since I am taking stuff out to save weight, I thought this was a good idea to transfer some weight more to the middle of the car and couldn't get by the heavy Optima.
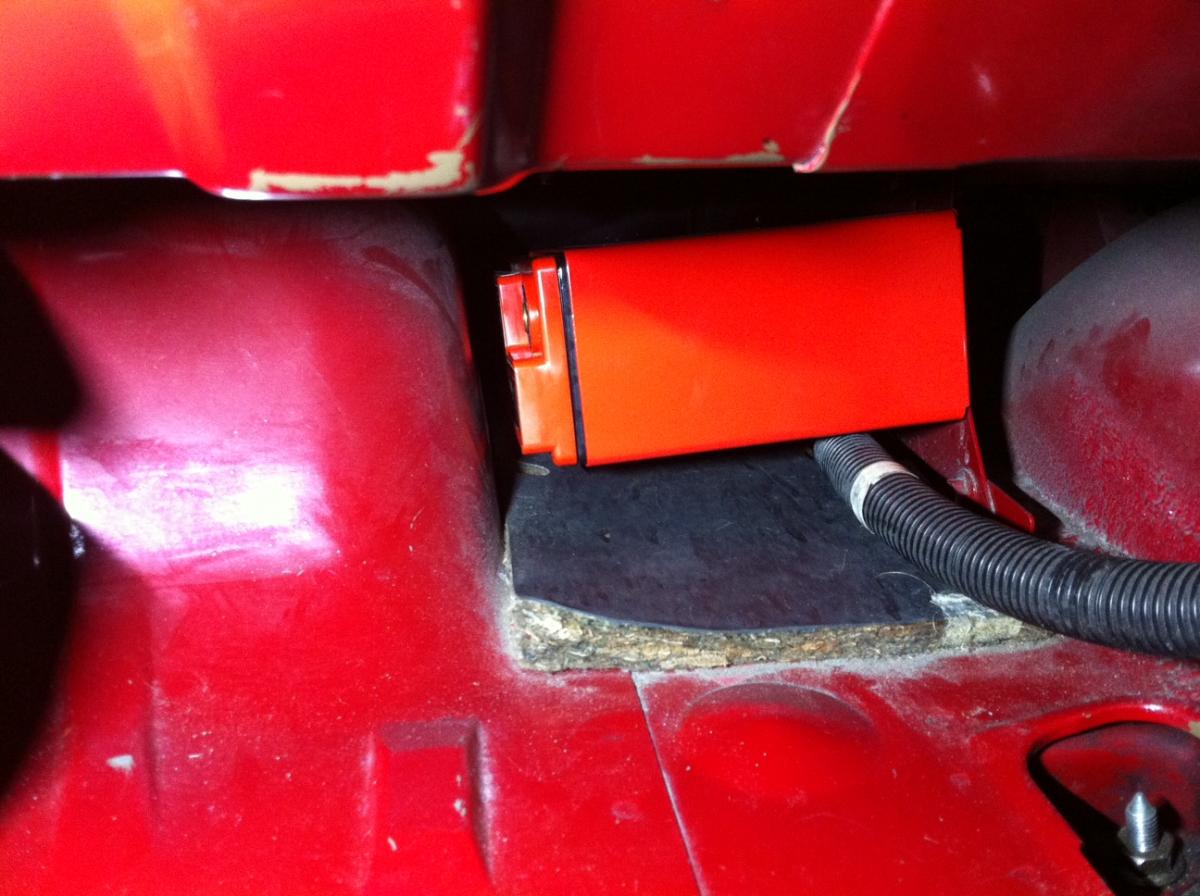
I do need to alter my wiring a little and make a nice bracket.
In my weight-saving quest this also helps:
It fits better in the trunk and also saves (a lot) of weight compared to the Red-Top Optima I had in there before.
The optima was ok, but since I am taking stuff out to save weight, I thought this was a good idea to transfer some weight more to the middle of the car and couldn't get by the heavy Optima.
I do need to alter my wiring a little and make a nice bracket.
In my weight-saving quest this also helps:
Last edited by IHI; 01-24-2012 at 08:05 AM.
Reply
0
0
01-24-2012, 08:06 AM
#20
Junior Member
Thread Starter
Join Date: Oct 2009
Location: The Netherlands
Posts: 200
Total Cats: 1
All I care about is cars... We got fed up with al that s--t you are talking about...
I do like a "broodje Haring" now and then.

Here a typical street in Amsterdam:

And....
Coffeeshops all over the place. But you cannot get good coffee inside....

Did you have fun ?
I do like a "broodje Haring" now and then.
Here a typical street in Amsterdam:
And....
Coffeeshops all over the place. But you cannot get good coffee inside....
Did you have fun ?
Last edited by IHI; 01-25-2012 at 06:26 PM.
Reply
0
0


