When you click on links to various merchants on this site and make a purchase, this can result in this site earning a commission. Affiliate programs and affiliations include, but are not limited to, the eBay Partner Network.
If the screw head snaps off it will be captured instead of getting into one of the cylinders and destroying your engine.
None of the four(?) that I lost damaged* my (atmo) engine, but a turbine wheel would be another matter entirely.
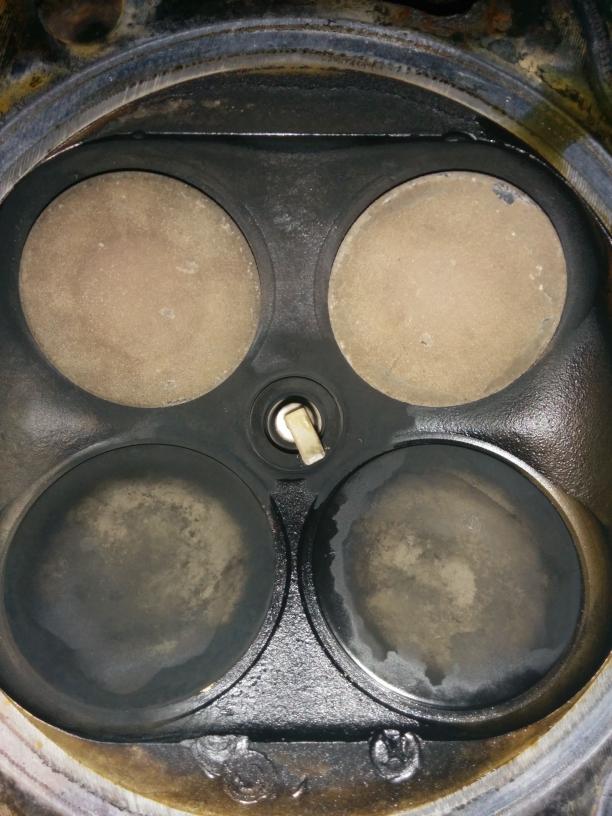
I was actually more interested in the material added, what it was and what if any steps were taken to ensure that none of that came off.
(* although the last time it happened, the screw got caught in between the closing valve and the seat, allowing the SUB to float sideways and jam the valve slightly open. Had to pull the head off, touch up the seat(s), and all good - not what I call destroying the engine. That was when the Skunk TB was installed. Another Skunk TB on my current car.)
Emilio, it may be a tired engine, but if you have another TB I'd suggest a TB swap and another dyno run, to ensure that the additional material on the TB butterfly is not disturbing the airflow. The top looks OK (as far as can be told with photos), the bottom doesn't look as smooth.
We did not use that throttle body. It was only used for mock up. We used the TB that came with the NB6 engine.
For the epoxy to work you have to get the butterfly and shaft clean... cleaner than is possible with ordinary methods. We were going to experiment with ultrasonic cleaning and various epoxies, and then curing them in an oven. That project got sidelined years ago. Too many projects and not enough time for me to do them.
Agree about the surface prep! I'd also be looking at anything mechanical that might help the epoxy adhere, maybe even a couple of extra holes in the plate to help keep the epoxy on board. Sounds like it's academic now anyway.
Skunk is an easy button fix, rules permitting, but may be too big for the 1.6?
They do a number on turbines, but pistons & heads aren't immune.
--Ian
Agree Ian. I was lucky - only one faint mark on my head when I pulled it off but I figured I had pushed my luck as far as I was prepared to go. I have tried several 'fixes', but none of them worked, and the only viable option left was a Skunk. With the SE/MSM turbo, I went straight to a Skunk as soon as the ECU went in.
Since it would cost more money to rebuild the B6, it's time to swap back Miller's original SuperMiata S2 motor (BP5A) for ease and convenience for achieving our power-to-weight goals. In theory, the B6 engine can make the power target requirements, but we need a fresher motor. Maybe one day a fully-optimized B6-equipped ST6 Miata will be verified on track.
Here's a comparison for Miller's current tune for ST6 on a BP5A motor vs. the best B6 configuration before the swap. Our target is 133whp average HP for 2474 lbs minimum competition weight, so Miller also had to gain weight to fit the adjusted power-to-weight (P:W) ratio. Also, we had to further optimize for less P:W penalties for swapping extended lower ball joints for front control arm offset bushings(from -0.2 to 0 P:W penalty) and gain a weight class from 2250 lbs to 2400 lbs (going from -0.4 to -0.3 P:W penalty). A bonus for being heavier (over 2400 lbs) is that now we get to upgrade to better contact patch by switching from 15x8 to 15x9 on 205 Hoosier R7s.
We had to take two days for dyno sessions to diagnose a fueling issue. A dying fuel pump was culprit. We replaced the fuel sock and the in-tank fuel pressure regulator as a precaution. Good to say, we have power for full ST6 optimization.
While I'm in there, changing out XIDA Race front springs from 800 lb/in. to 900 lb/in. for more handling balance fine tuning.
Eager to see what a fully optimized NA/NB can do in ST6. I think the 944's still look better on paper but hoping some Sonnymod and Supermiata tuning expertise will make up the difference.
 04-19-2019, 09:14 PM


 0
0