When you click on links to various merchants on this site and make a purchase, this can result in this site earning a commission. Affiliate programs and affiliations include, but are not limited to, the eBay Partner Network.
I sat down and had a bit of a think about it and I've decided to return the Hurricane Katrina spec 1,864 cfm SPAL 30102042 and replace it with the more reasonable 1,274 cfm SPAL 30101509. The main driver for this is the stock 30a fuse in the Miata, and the ECU logic that's already built into the stock ECU to deal with the additional demand of a fan in this size range. JRSC/M45 cars with stock ECUs have always had problems with idle and I'm not super hot on poking that bear with a stick if its not needed. Anecdotal evidence from another user here on the forum says a single 12" 1,227 cfm SPAL 30101504 is working just fine in his project with the stock wiring and fuse, which is exactly what I want. It's not that I'm scared of re-wiring the fan circuit, I just don't want to do it. I also ordered some of those little rubber flappy dudes as well, I figure they can't hurt. Summit seems to think they can get the box to me before the weekend and I hope they are willing to rise to the occasion. This is doubly convenient as it will provide me with an appropriately sized box in which to return the 30102042 and all the cripplingly expensive and unnecessary additional mounting hardware.
If it turns out I need even more airflow, I can get a pair of smaller 10" or 11" fans that move about ~1,000 cfm each and build another shroud out of another Nordic Wear 3/4 sheet pan.
If all goes according to plan I should be able to FINALLY FINISH THE COOLING SYSTEM this weekend! I might actually be able to drive the car again!
Well, after forgetting to order a fuel pump for the longest time, I finally remembered to order a fuel pump.
Now remember that the back half of this car is a NA6 glued to the front end of an NA8, so I'm blessed with the smaller 1.6 fuel tank and pump hangar and needed to order the correct pump for the TANK not the ENGINE. I selected the more than competent DeatschwerksDW100 Fuel Pump. The specific DW100 that includes the install kit for the NA6 is PN 9-101-0836 (9-101 is the pump, 9-0836 is the install kit. See what they did there?) You can of course buy the pump directly from DW, or you can do like I did and buy it for the same price from Summit with free shipping if you are already ordering other stuff. The pump drop-shipped from DW.
So that's my story and I'm sticking to it. On to the install!
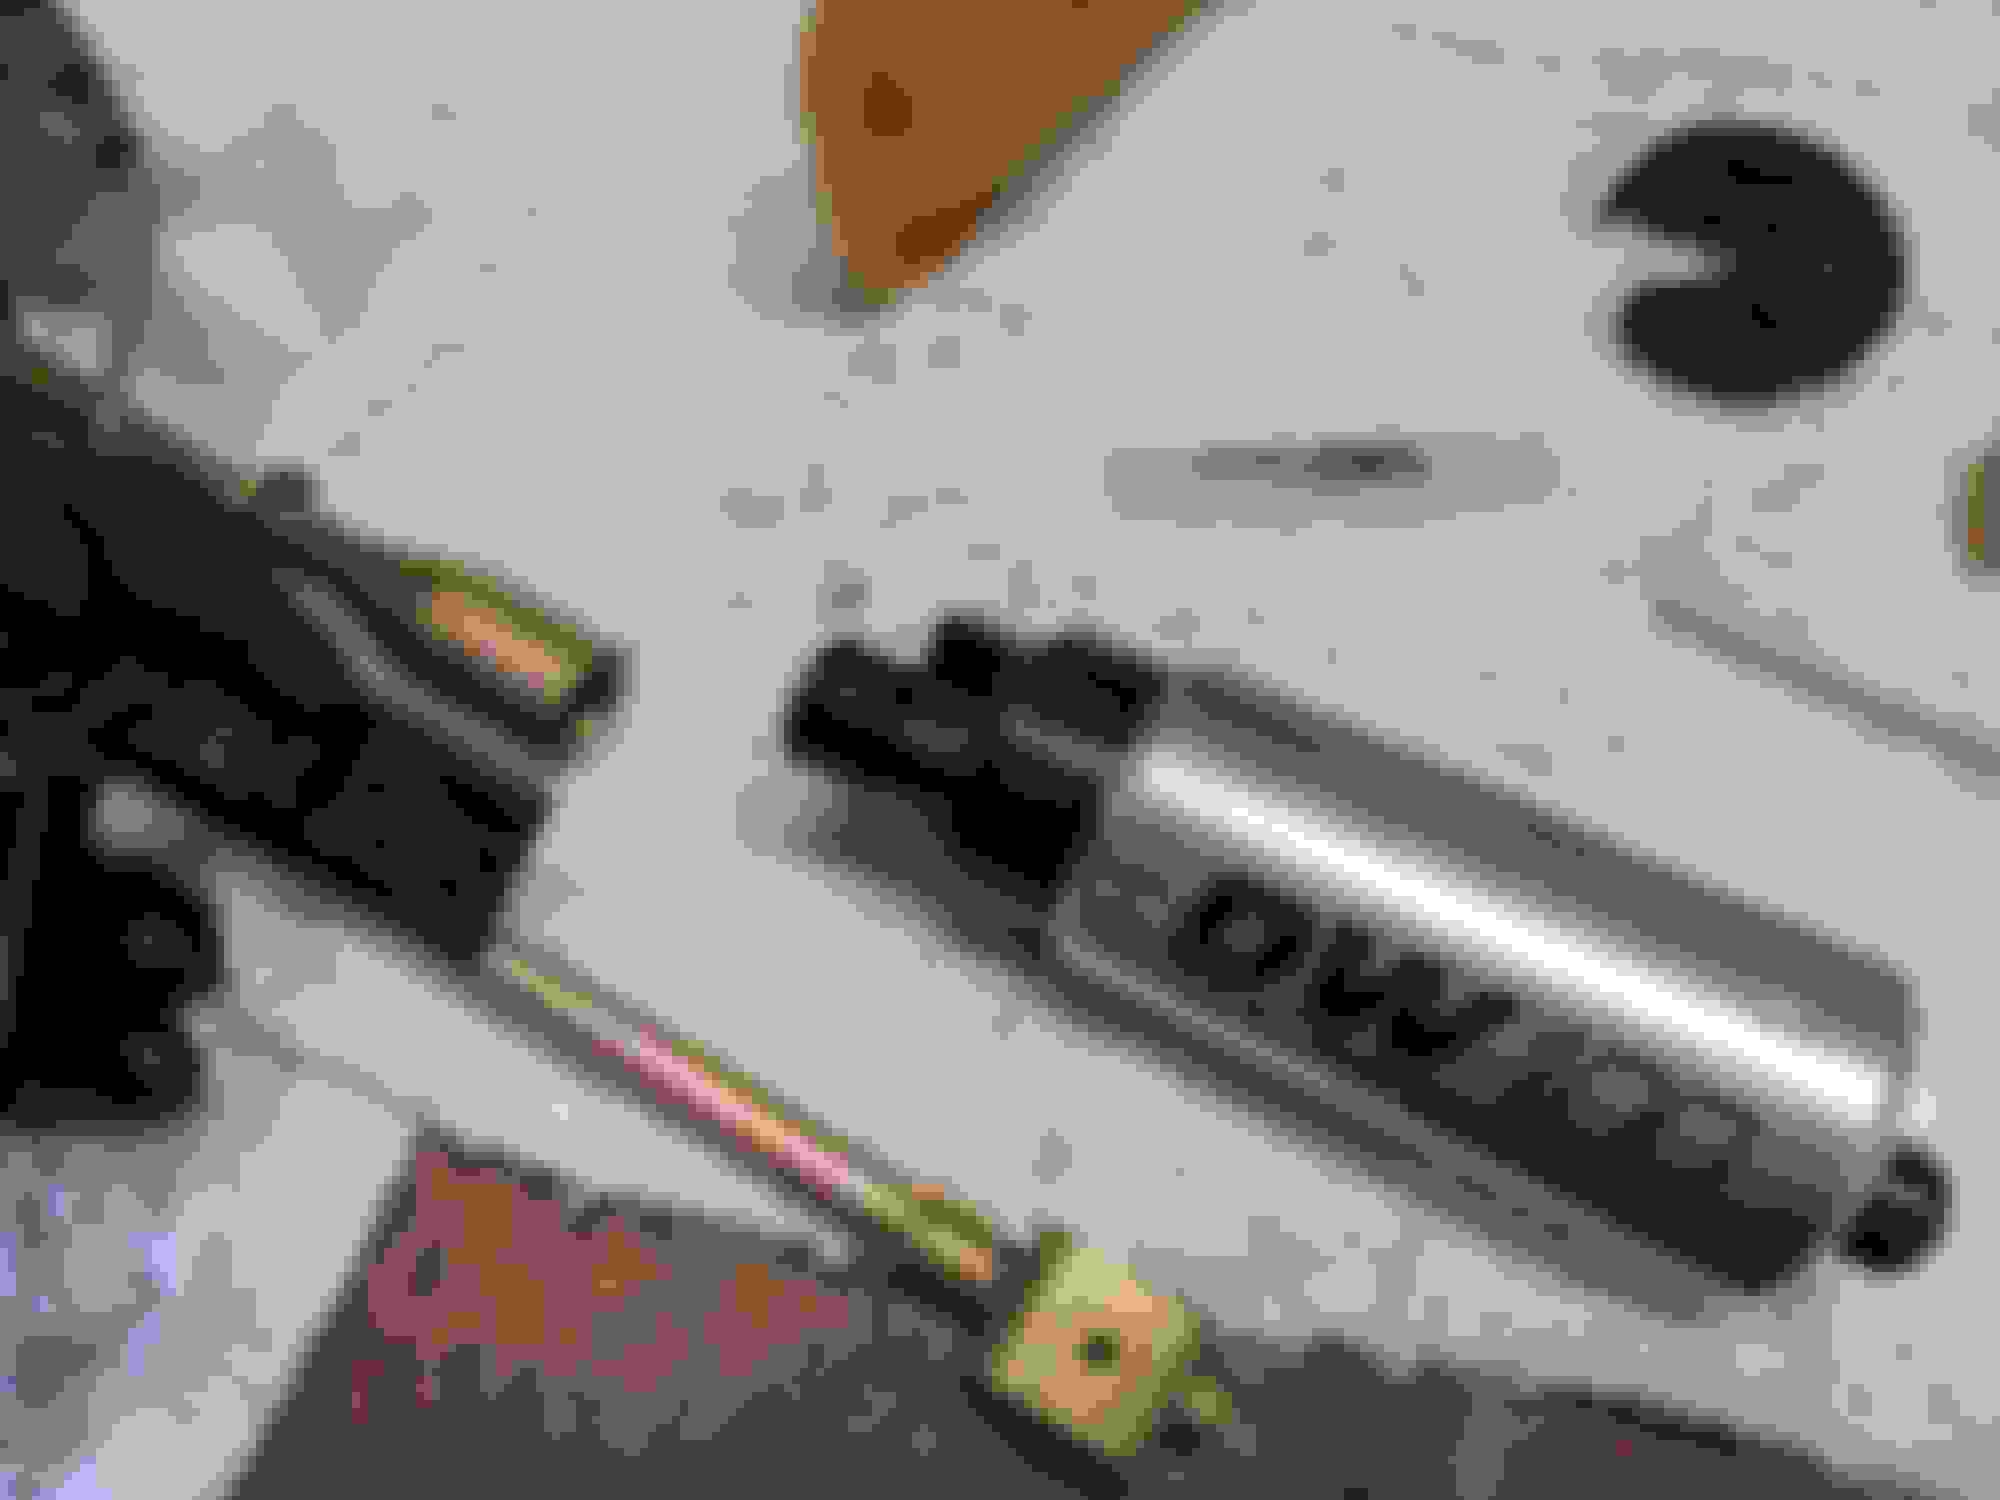
In the box I got an invoice, 9 air fresheners (?!) and what I assume is a fuel pump. As you can see, DW's marking department has been making themselves useful by redesigning their packaging. Older WRX DW200 pump box at top, newer NA6 DW100 pump box below.
I've got hair on my toes too.
Pump box contains pump, Miata specific install kit and spec sheet for DW100
The install kit includes 3 o-rings, some lube, pick up/filter sock, Miata specific instructions (kinda) and a new pump hangar base bracket. Oh, and the all important DW sticker.
After taking a look at the double sided word salad of an instruction sheet, I will say about 6 sentences are Miata specific and the rest is "don't kill yourself lol" but I'd encourage all you Darwin Awards Runners-Up to read through them carefully. Wear safety glasses, disconnect your battery, fire extinguisher handy, and mother on speed dial. Get a box of nitrile gloves and wear the damn things. Gasoline is incredibly toxic and it absorbs through the skin almost instantaneously, keep it off you as much as possible. Run your tank as dry as you dare or if you are like me, pump it out using the factory pump. THERE WILL BE FUEL SPILLAGE, BE PREPARED FOR IT.
We'll start our adventure over at the car.
Remove the carpet (if equipped) and the inspection cover from the rear parcel shelf. Did you know its called a parcel shelf? Its that whole British heritage thing, you'll need to just trust me on this. If you are lucky like me you can work around the harness bar on your roll bar (if equipped) otherwise, gl fam
We'll start by removing the 8 Philips head screws (pink) 2 OE spring hose clamps (blue) and the electrical connector (red.) The screws are tiny, DO NOT DROP THE SCREWS!!!
You can remove the electrical connector by pushing in the little lock tab at the back of the connector (red arrow in drawing) and pulling the connector towards the front of the car. PULL THE CONNECTOR NOT THE WIRES
Angle tip pliers and quality Philips screwdriver are a must here. Don't bugger up the screws because you are a cheapass and own garbage screwdrivers. My Hoosky (pictured here) is kinda honestly minimum viable. I chose to label the passenger side hose so I wouldn't screw it up. One hose is the high pressure feed to the engine, the other is the return. Trust me, you don't want to mix these up.
After that, break the seal and lift the assembly out of the tank. The thing that looks like a heavy gauge silver wire is in fact the lever arm that connects the fuel float (still in the tank) to the fuel level sender (under the lid.) The sender is fairly fragile so don't manhandle it like you do yourself on a lonely Thursday night. The pump will drip fuel as you lift it out so be prepared with some rags.
Once the lid and dangly bits clear of the top or the tank and the roll bar, place a rag over the gaping hole to keep unattended children from falling in. Trust me, they will ruin the new pump and clog the fuel filter.
From here, we move to the bench.
A clean, well organized workspace is always a good idea. Unfortunately I don't have that so I shoved some stuff on the floor to make room. Again, be prepared for spilled fuel while you work though this process.
The above upside down picture is some sort of odd rubber ring thing that Mazda put around the fuel pump and hangar when the car was new. Its now 31 years old and floppy but whatever.
Once that's out of the way we need to remove the #2 Phillips screw from the bottom of the hangar. On my car this was TIGHT. TOIGHT LIKE A TOIGER. Big Screwdriver Energy was required to remove it. Don't bugger it up as we'll need to reuse it.
After the screw is out, the retainer and bushing fall away. Remove the electrical connector from the pump and your old pump is out!
On the output side of the pump there is a little greyish-brown plastic hat guy, an o-ring and a spacer. We need that spacer.
With a little motivation the plastic hat guy is removed and we can retrieve the spacer. Nice.
Spacer goes on the new DW100 pump along with all 3 new o-rings. Lubricate liberally with the DW supplied super lube.
Then slide her in! This is the pump fully seated. It's NOT caught on the 2 round protrusions on the top of the pump. The lube is critical here to make sure you don't shred the o-rings. Never go in dry, nobody has a good time when you go in dry.
Next order or business is to add the sock. Some people like to reuse the OE sock (which will fit here) but I chose to use the one from DW. It only installs one way and is secured with the tiny, wafer thin star washer thing. Don't drop it. I dropped it. It can be fully seated with the end of a pair of needle nose if you are super careful.
I lost a pic here but at this point, you use the lower mount to hold the pump to the hangar and reinstall the screw. It pretty much only goes together one way so highly doubtful you need a pic to guide you. The black rubber vibration damper that was part of the OE assembly IS NOT REUSED.
I then noticed these strange runes. Lord only knows what they are trying to get across. The lower mount can be seen in situ in the above pic.
Plug in the electrical connector and you are good to go! Did I mention you don't have to change the connector? That's right, it literally just plugs in to the stock connector. Hells yessss.
DW100 baby! Hairy man arms are encouraged but not required.
For my next step I'll be replacing the fuel tank lid seal ring. This is not included with the DW kit but is instead a "while I'm in there" kind of thing. Again, 31 year old rubber exposed to fuel is only going to hold up for so long.
The old gasket comes right off and then I cleaned the surface with a non-scratching scotchbrite pad followed by acetone. You don't want to use anything abrasive enough to scratch through the gold cad plating on the lid.
New Spectra gasket is rubbed down with the Dow Corning #4. As I've said before, this stuff works great for rubber seals and o-rings and serves the same purpose as the Super Lube that DW supplies with the fuel pump kit.
Gasket only goes on only one way with the screw holes and alignment pins so its pretty hard to mess it up.
To borrow another phrase from our British friends 'Reassembly is a reversal of dismantling' or 'Refitting is a reversal of removal'
Alternately, werf that **** back in the tank and send it.
I've gone ahead and replaced the OE springy boi clips with the same Vibrant Stainless Steel Fuel Injection Clamps I used (and linked) previously in this project.
I'd recommend taking it slow when putting the screws back into the lid. The #4 lube allows the gasket to "slide" around the top of the tank so you can get optimal alignment of each of the screws. Start them off slow, just a turn at a time, using an alternating pattern to spread out the load.
Now that we've got the pump in, time to add fuel and do some testing!
You see this ****? This is what I'm forced to do thanks to the damn new gas cans. Ungh. My poor paint!
Once the battery and ECU are connected, plop the key into the ignition and turn it to ON. DO NOT CRANK/START
Next you'll want to locate the under-hood diagnostic connector, located above and to the right of the MAF (if equipped.) Use a short piece of wire to jump the "F/P" pin to the "GND" pin. If you did things correctly, you should (barely) hear the fuel pump running. Because its an awesome super quiet Deatschwerks fuel pump
There might be some squealing past the FPR as air is purged from the system but don't panic, this is normal.
Engine off, fuel pump running, pressure comes right up to 43.5psi as expected.
Using pliers I pinched off the return line to deadhead the pump and BAM! We got 102psi on the nose. YES!!!
I'm very happy with this outcome. The DW100 is only slightly louder than the stock (replacement?) Denso that came out of the tank but far, far more capable. The extra headroom makes me feel much more comfortable about my mess of a build. I'd highly recommend any of the DW pumps, and you'll definitely want the DW200 for a "real" boosted applicaiton. For "a little more than stock" pump or a stock replacement, the DW100 is a solid choice, unlike the entire Walbro product line that will cuck you every time you turn the key and make great efforts to impregnate your wife. With the flow rates involved she's sure to get pregnant and you'll end up raising a bunch of screaming, disgusting, half-human half Walbro fuel pump hybrid bastard children that you'll never love. Your marriage will collapse due to your verbal abuse and alcoholism and she'll leave you for the Walbro. Of course, it'll die because its a goddamn Walbro and your once beautiful wife, now a bitter hollow shell of a human will commit suicide after the noise from the screaming bastard human/pump children pushes her over the edge. The court will appoint them to your care because life is unfair and family court is massively biased against the male in the situation. Every day you'll want to kill yourself, or them, as the unrelenting screaming slowly grinds down your mental state. If you manage to hold out long enough, the Walbro hybrid bastards will all fail within a couple years and you'll be free of their eternal torture, but your mental scars will be for life. Walbro won't even give you a damn sticker.
Buy a quality fuel pump, choose Deatschwerks. A perfect 5/7 drop-in fuel pump solution!
The 15,000 character limit really screwed me on that last one, yikes.
Ok but back up a sec, I thought the car was running and the pump was fine, what gives?
The car is a 1995 which makes the majority of it 26 years old, but the back half being NA6 I could quite literally be dealing with a 31 year old fuel pump here. The OE pump has "always" been borderline for RRFPR applications and I'm going to be rocking the stock JR FPR with the M45. I'm not sure if I documented this previously, but deadhead pressure on the pump that came with the car is ~70psi. The RRFPR operates somewhere in the neighborhood of 5:1 or 7:1 depending on the documentation and forum posts you read, so with the expected 5psi of boost with base 43psi of fuel pressure and 5:1 RRFPR we rapidly reach 68psi of pressure. If its MORE than 5:1 or I end up with MORE than 5psi of boost, I'm out of pressure and out of fuel. This is bad. This is too close for comfort for me so slightly more pump is totally justified. This is how I'll sleep at night anyway.
Why not use a DW200?
That's a good question. The DW200 is the pump I should be using. It's the pump you should be using too. I used a DW200 in my 300+HP EFR'd NB and a DW200 in my stunningly stock 04 WRX and both performed as expected, and have been for years. They are very good pumps, I like them a lot. In the NA however, there is the very real possibility that the DW200 (or Walbro 255) will overpower the stock FPR and cause the engine to run rich at idle. For most of you reading along, this is probably fine. For me, in California, in a street car that needs to pass idle emissions, this is unacceptable. I need something with more headroom than the stock pump but without the risk of screwing up my idle ARRs. Bonus nachos: the DW100 also puts much less electrical load on the relays and electronics in my 26-31 year old car when compared to the DW200 so its "easier" on the electrical system as well.
Why not use a Walbro?
I had 2 Walbro pumps in my NB. First one was a 255 that complained about life the whole time it was working, then ~3 months later it sized. The second was a Walbro 190HP that quite literally SCREAMED in my fuel tank while it was running. Every time I started the car it was an assault on my senses. I could hear it echo off concrete dividers on the highway as I drove past and I hated every minute of it. It was so noisy I gave it away with my KW Rotrex when I sold it and put the stock pump back in the car. So IME, Walbros suck. DW all the way.
YMMV. I have had consistent bad results from DW200. The Walbro 190HP has worked well. Both let the fuel pressure bleed down in short order, requiring long purge before the Priming Pulse. Because of that, I run the pump for about 5 seconds at KO, instead of the the normal 2 seconds. Most of the time I can hear when the Walbro stops, so that is a bonus for me.
The electrical plug and play would be a huge +++++ in my opinion. I think you worded it this way: "hell yessss".
Oh, absolutely. Lots of fuel pumps on the market that'll meet my needs, this is the one I happened to pick for this project.
The 2 Walbros I've owned either screamed uncontrollably, failed, or both. The two DW200s I've had have done neither of these things. Simply put, my personal opinion based on my experience is better than your personal opinion based on your experience, but only because its mine. I know that sounds super snarky but its not intended that way
If this DW100 fails, trust me you'll hear it here first.
Originally Posted by sonofthehill
Oh yeah, like that rag is gonna stop any unattended children. You better check in there again, make sure to use a flashlight and not a lighter tho
Too late! Much like their fate, the tank is sealed. No going back now!
Valve cover gasket finally arrived so I got the motor all buttoned back up.
Things have been reassembled, but with one critical substitution:
While working on the cooling system I've decided to remove the JRSC and install the Racing Beat High Flow Intake kit I picked up some time ago. Beyond its obvious simplicity, the RB intake has one very obvious benefit over the JRSC:
It has a CARB EO sticker.
I need to actually drive the car to debug the cooling system mods and because the guys at Moss are being real hardasses about issuing me a new sticker, I felt it was a better idea to remove the blower for now. Debugging cooling system and janky supercharger felt like a lot of mental load that I didn't need right now. The JR FPR will also come out at some point, although for right now its not really doing anything so it shouldn't have any effect on the car. Unless the diaphragm ruptures, of course. Yes pedants, I know it needs hose clamps and the element needs to be oiled. This is not my first rodeo nor my first K&N filter.
If anyone has a driver side NACA duct NA headlight lid lying around collecting dust, please let me know as I'd love to add it to my stable of misfit Miata stuff
And while speaking of cooling system things, my sheet pan has arrived!
This is the Nordic Ware one I linked from Amazon previously in the thread. It's VERY shiny!
And it fits PERFECTLY on this radiator.
Almost too perfectly, if I'm honest.
I went ahead and returned both the 1,864 cfm 14" SPAL 30102042 and 1,274 cfm 14" SPAL 30101509 that I bought to replace it because I can't fit a 14" fan on the backside of this pan. A 13" SPAL is a better fit here as it has a 13.56" mounting diameter, and I've got 13.625" to work with.
So what do I already have that might work here? A stock fan, duh.
It fits pretty much perfectly. HAH!
I know from experience with my enormous TSE crossflow in the NB, the single, stock main fan can be sufficient. That car has no shroud and it does just fine with the reroute and the enormous radiator, so why can't this work? I'm going to go ahead and cut up this stock fan so that it mounts flat, then stick it to the pan with about a million rivets and give it a try. With the extra thiccccness of this radiator and the extra tall nature of the stock fan, center mounting isn't an option as the backside of the fan hits the coolant neck on the front of the block. Instead, I'll mount it offset and employ some of those little rubber flapper dudes to try to keep air flow paths open while at speed with the fan off. If this turns out to be insufficient or stupid, I should be able to center mount a higher flowing 12" or 13" SPAL without issue. Or suck it up buttercup and rewire with an enormous fan and big boi relay. Even though I don't wanna.
Next order of business is to get the pan mounted TO the radiator. I have an idea for how I want to do this but I'll need to bend up some simple aluminum sheet metal brackets and see what works. A sheet metal brake would be helpful here but as I don't have one, I might have to try a hammer and vice. Failing that, I might be meeting up with a friend this weekend who thinks he might have one, in which case I might be able to use it. Either way, things are moving forward.
If anyone has a driver side NACA duct NA headlight lid lying around collecting dust, please let me know as I'd love to add it to my stable of misfit Miata stuff.
Why don't you turn it 90 degrees so the mounts fit over the pan, then move your through-ducts around in the gaps?
I might do that, it all depends on what the fan motor hits on the front of the engine. OE fan is ridiculous tall compared to the SPAL or other aftermarket options but I decided to cheap out
@rleete Yeah, sure! As long as it doesn't come with JDM y0 swaggu price tag I'm probably down This car needs more ridiculous looking yet vaguely functional elements. I could probably build an airbox to go with that. Maybe.
I'm still on the lookout for some hood vents. I'd love to find a set of used/scratch-n-dent Left Lane or LRB vents that are actually proven to be functional, but I might end up cheaping out and buying some "universal" ones off ebay. We'll see.
Took a little bit of time at lunch and added a bit of additional fan clearance:
I went and got the saw and de-helmholtz'd my super jacked up crossover pipe. I cut a section out of the bottom of the chamber and JB Welded it to the opening. This should add a whole bunch of extra room for fan shenanigans, and make m.net patrons bigly mad. Also, it kinda looks like a dick.
As you can clearly see from the pics, the crossover tube I cut up was already fuckered. At some point it met with the accessory drive on the front of the engine and it was full of holes and gouges. Some of the holes were sealed up with what appears to be ancient epoxy or JB Weld and others were not. Clearly its been leaking unfiltered, unmetered air between the MAF and the throttle body for YEARS. Based on the crud built up inside the chamber around the holes I'm actually solving a problem here, so I don't feel bad cutting it up. The plastic cap I cut up to close the hole is very tight fitting, this means that there isn't a bunch of JB Weld packed into the tube waiting to break off and frag the motor so I feel pretty good about this ghetto repair.
 04-07-2021, 02:55 PM


 1
1