When you click on links to various merchants on this site and make a purchase, this can result in this site earning a commission. Affiliate programs and affiliations include, but are not limited to, the eBay Partner Network.
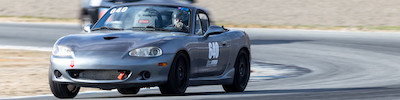
It is Boss Frog Double Hoop. I think same one that @nigelt is selling. In his build he discusses that many think this style is OK, but he is upgrading to a more standard style. It is much more that a style bar, but it is not continuous tubing.
I bought it believing it is acceptable, but I am far from knowledgable.
I had the hard dog Deuce, which is basically the same. For HPDE I haven't seen requirement for a continuous main hoop with any run group. For example, NASA simply says "a protection hoop with 4 mounting points". Things get stricter when you move in to TT, but for HPDE it just comes down to what you are comfortable with. I was comfortable with the double hoop until I started to turn slightly quicker times and adding more power.
I had the hard dog Deuce, which is basically the same. For HPDE I haven't seen requirement for a continuous main hoop with any run group. For example, NASA simply says "a protection hoop with 4 mounting points". Things get stricter when you move in to TT, but for HPDE it just comes down to what you are comfortable with. I was comfortable with the double hoop until I started to turn slightly quicker times and adding more power.
Really wish Ric hadn't shut down Boss Frog, as I really like that bar. Nigel, will see where you're at, although at 6' I think I'm already hosed on successfully using anything but an M2 Sport and probably with a track seat. I previously cleared the broomstick rule with a HDHCDD in my prior 91 but I had bolted in a Sparco seat as well.
RE: Rules - seems to be up to each track and/or their interpretation, but per NASA:
11.4.7 Roll Bars
All open cars should have a roll bar installed to help protect the occupant(s) from injury during a roll-over. The main hoop shall be one continuous piece with smooth Mandrel bends with no evidence of crimping or wall failure.
Sorry for the minor derail, OP - really like your build, and thanks for confirmation on which bar it is!
RE: Rules - seems to be up to each track and/or their interpretation, but per NASA:
11.4.7 Roll Bars All open cars should have a roll bar installed to help protect the occupant(s) from injury during a roll-over. The main hoop shall be one continuous piece with smooth Mandrel bends with no evidence of crimping or wall failure. All welds should be of the highest possible quality, with full penetration [Ref:(15.6.15)]. All cars with roll bars are required to have adequate roll bar padding per CCR section #15.6.4. In cases where the driver�s head may come in contact with the roll bar should the seatback fail, a seatback brace is required in conformance with section #15.6.21. Acceptable roll bars include, but are not limited to, the following:
Hard Dog
AC - Ace
*D - Deuce (center-braced model only) *
AB - M1 Hard Core
TB � M1 Hard Core Hardtop
9B � M2 Hard Core
NB � M2 Hard Core
...
The above roll bars are examples only.
Added Allstar catch can just before MATG. Running up to 16 psi with mini-turbo. Not a drop of oil from it yet. Still, it eliminated oil drops onto the exhaust manifold from the little filter.
No changes to the valve cover. Cold side is connected via a gutted PVC valve.
Last edited by DNMakinson; 04-19-2022 at 12:11 PM.
Cold Air Box. I have not taken it out to see if it attenuates some of the fun sounds. I used the ABS plastic. Used a board screwed to saw-horse as a giant vice pinching the material between. Then, with a MAP gas torch, softened the material for the bends. When done correctly, I got a good tight 90. Finally found the bulb-edging on Amazon that fit.... 5 feet for $10.
Then I took the Duct Tape off the Roll Bar padding and replaced it with the self-adhering Silicone wrap. I need another pack for the other side... Before:
Peeling off, exposing adhesive, non-conforming.
After:
Much better. Sealed, no adhesive, form-fitting.
A better comparison. Driver’s side new, Pass side old:
Last edited by DNMakinson; 04-11-2020 at 07:49 PM.
Here are a couple of shots. First is the addition of the Kinugawa WGA..
From that post:
I’m quoting my own thread from 5 years ago. I have now gone through (2) diaphragms on the wastegate actuator. This design has no guide bushing, and the off-center push causes the piston to pinch the diaphragm fold, rubbing a hole in it. Another reason to have overboost cut set.
So I put on a OEM style knockoff from EBay. They are available from Amazon as well. No-name products, but cheap, and I think will be more robust. I did not have to touch EBC settings.
With EBC off, boost goes from 145 to about 148kPa with RPM, so close to the Kinugawa.
Started, finally, install of Corbeau LE seats. Decided that to get the full benefit, I had to remove the rear humps. I cannot say I am any close to expert in using a spot weld mill:
Instead of a through bolt to large washer underneath, I am going to weld 1/8" plate(s) to floor. It should spread the load from the rails to the floor sheet metal in the same way the humps do now, and thus keep things stiff. More pics to come.
So, after removing the humps, we added 1/8" plates to reinforce the floor pan to be roughly equivalent in stiffness, and to give good strength as well. Then only standard washers needed underneath.
We used this to cut the plates:
Then we been the front of the rails, and took a wedge out of the back of the rails (the inner ones for seat belts), to fit the new angles. We also ground off the spacers on the back of the rails for max fit. The reason we welded back the rails after removing the wedge it to retain all of the stock seatbelt strength.
Ground off the "spacer" Cut the wedge out of the inner sliders. I'll have to add the photos of the bend and weld later, as I suppose I forgot to take them at this time. This is as low as possible (test before the plates were welded in. I had to grind a little off to not interfere with the roll bar plate.
Stock seats are now about 1" lower, when fully back. I can now wear helmet with top up.
And this is how I will mount the Corbeau’s to the stock rails: @HarryB@andym
For the front, a channel with small ends welded to it. Rear are plates (it looks like it disappears into the seat, but the real seats taper back in that area. Little ends and rear plates will be welded directly to the sliders. This should allow the seat back to lay directly against the bulkhead, at the 20* angle, with the sliders all the way back. The bottom of the pieces are at 7* angle to match the rails now that the rear humps are out.
Won’t have real pics for a while as I’m having my other hip replaced. But the metal bits have been machined and bent.
I did finally get the Garrett Intercooler Core. I have no idea when we will make the tanks and install it. I do have the 3003 aluminum for the tanks, and models made.
I purchased the core from Autoplicity for $169 delivered. They had it in stock and packaged it well:
This Garrett Box would likely have been enough, save the one face against the side wall. But Autoplicity over-packed it in this larger box.
End Tank: General View. Inside view of the inlet Flat blank for 3 sides. Not symmetrical because I may with to move the intercooler towards front or towards radiator, with same inlet / outlet locations.
Plan is to remove old one, then decide final locations of Core, and the inlet and outlet. The model is parametric and will allow some movement.
Staying with 2" inlet and outlet because it is enough.
DNM
Back to the seat install.... Finally got the UK Corbeaus installed:
Removed bosses where bolts go into side of OEM seat
Finished sliders with side brackets and front rail. Kept all the OEM belt safety features. As set up a couple of posts up, for no rear hump mount.
Finished installation
Side view
Looking down. Swing arm that pulls the cable is just in front of the seat.
Seat belt guide on roll bar is a little low and outboard. I will likely move it with a bracket to line up better. This is with seatback at same 20* angle as the back wall.
This does not really show that guide is too low, but it is. Seat cannot go all the way back to the wall. I don't need it to, as back is so thin, but a 6' + guy might want it back more.
Side brackets are welded right against the inside verticals that hold the seatbelt receptacle. Moves the seat centerlines in. I have the lumbar support bulbs to the outside and they lie between the seat and the door threshold.
I took it to AMP Sunday. With a helmet on, there is plenty of room beneath the top. Would pass broomstick. Back of seat presses against helmet. I may change the angle a little. However, I did not notice the push when driving.
I have harnesses. Need to make the harness bar, and figure how I will place the inboard clip bolts, as there is very little room. @HarryB@andym
DNM
Last edited by DNMakinson; 05-18-2021 at 07:42 PM.
Reason: Larger main picture
In other news. Final session at AMP, cool-down lap; the 5-speed ate itself. Nothing came out of the case, including fluid; but there are lots of things flying around inside making banging noises.
DNM
 10-21-2018, 09:30 AM


 0
0