
LeBoeuf's build...
 12-17-2015, 11:42 AM
#62
Junior Member
Thread Starter
iTrader: (1)

Join Date: May 2013
Location: Sandia Park, NM
Posts: 455
Total Cats: 54
Yes, the downpipe to the tail pipe will all be stainless.
I'm also giving solar flux a shot for the first time and will get some pics of what it does for backside sugaring. I don't have the provisions to back purge so hopefully it lives up to the hype.
I'm also giving solar flux a shot for the first time and will get some pics of what it does for backside sugaring. I don't have the provisions to back purge so hopefully it lives up to the hype.

Reply
 0
0

0
12-17-2015, 11:44 AM
#63
SADFab Destructive Testing Engineer


iTrader: (5)
Join Date: Apr 2014
Location: Beaverton, USA
Posts: 18,642
Total Cats: 1,866
Interested. I specifically picked up a little 3 foot bottle and an ebay reg so I could backpurge. It ended up being cheap. You can also just split a hose.
Reply
0
0
12-21-2015, 10:52 AM
#64
Junior Member
Thread Starter
iTrader: (1)
Join Date: May 2013
Location: Sandia Park, NM
Posts: 455
Total Cats: 54
Downpipe is tacked!
I spent the last 2 months reflooring my house... this metal fab is way more fun.
Those baller technicolor rainbow welds have eluded me


I plan on using the stock bracing location


Lots of room

A buddy donated a vibrant catalytic converter to the cause (which had some sawzall contact haha )
)

Now I just need to get that giant magnaflow figured out hah.
I spent the last 2 months reflooring my house... this metal fab is way more fun.
Those baller technicolor rainbow welds have eluded me
I plan on using the stock bracing location
Lots of room
A buddy donated a vibrant catalytic converter to the cause (which had some sawzall contact haha
)Now I just need to get that giant magnaflow figured out hah.
Last edited by leboeuf; 12-21-2015 at 11:49 AM. Reason: google = :eggplant
Reply
0
0
12-21-2015, 11:14 AM
#66
Junior Member
Thread Starter
iTrader: (1)
Join Date: May 2013
Location: Sandia Park, NM
Posts: 455
Total Cats: 54
Ehh yeah I'm not too concerned.
I think a lot of it has to do with the flux stuff. It does seem to prevent the backside sugaring but it also makes the puddle harder to read. It makes a hard film over the (backside of the) weld a lot like flux core wire.
I was talking to a buddy who welds sanitary equipment and he was saying the only practical way is to back purge the entire tank. That way the argon is leaking everywhere and shielding constantly. He said they do 15 seconds of post flow and tape all joints to save on argon. He mentioned lenses and yada yada, its an exhaust pipe not a fermenting tank haha
Reply
0
0
12-21-2015, 01:51 PM
#68
SADFab Destructive Testing Engineer
iTrader: (5)
Join Date: Apr 2014
Location: Beaverton, USA
Posts: 18,642
Total Cats: 1,866
Try doing a short weld with like 5+ seconds of post flow, and keep the puddle in the weld until you see it snap off (it will suddenly darken when the argon turns off). If that doesn't get you a rainbow then blame it on the flux.
Reply
0
0
12-22-2015, 10:40 AM
#69
Junior Member
Thread Starter
iTrader: (1)
Join Date: May 2013
Location: Sandia Park, NM
Posts: 455
Total Cats: 54
I tinkered around with the stainless some more. My issues were all technique...
Apparently you can't weld 16g stainless like schedule 40 mild steel? Hah way too much heat and way too much filler.
I need to get a shot of the backside but it looks like the solar flux works pretty good. It does burn red while you're welding though and can make it hard to see the puddle.

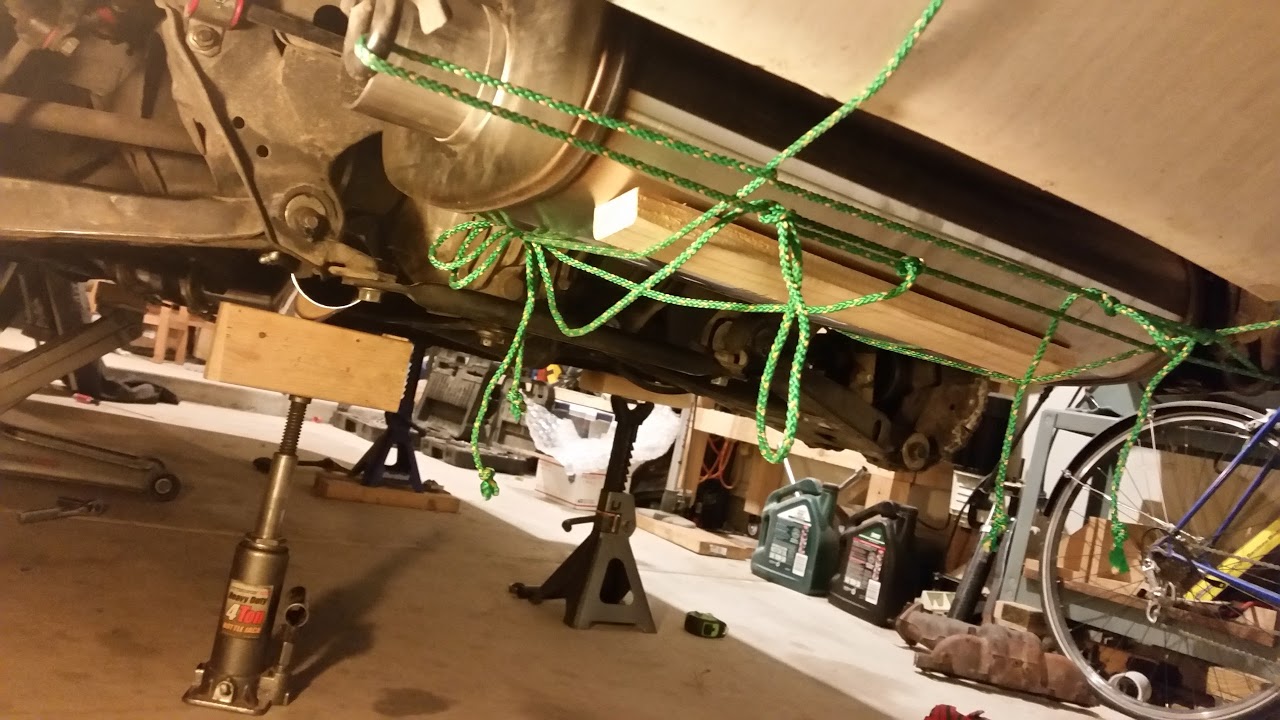
I rigged up some lines and got that mammoth muffler placed. I'll be using the standard mt.net routes to the muffler. Old fisherman skills ftw.
Apparently you can't weld 16g stainless like schedule 40 mild steel? Hah way too much heat and way too much filler.
I need to get a shot of the backside but it looks like the solar flux works pretty good. It does burn red while you're welding though and can make it hard to see the puddle.
I rigged up some lines and got that mammoth muffler placed. I'll be using the standard mt.net routes to the muffler. Old fisherman skills ftw.
Last edited by leboeuf; 12-22-2015 at 10:51 AM.
Reply
2
2
12-30-2015, 12:48 PM
#70
Junior Member
Thread Starter
iTrader: (1)
Join Date: May 2013
Location: Sandia Park, NM
Posts: 455
Total Cats: 54
The rear section of the exhaust is done. Really happy with how this turned out.
More pics to follow with the downpipe and other bracing up front.


Inside shot with the solar flux working great.

More pics to follow with the downpipe and other bracing up front.
Inside shot with the solar flux working great.
Last edited by leboeuf; 12-30-2015 at 01:00 PM.
Reply
2
2
12-30-2015, 01:35 PM
#72
Junior Member
Thread Starter
iTrader: (1)
Join Date: May 2013
Location: Sandia Park, NM
Posts: 455
Total Cats: 54
Haha maybe? The fusion/minimal filler welds actually lay down pretty quick. Most of my time was spent laying under the car and test fitting.
I did say I was planning on using this exhaust to practice welding.
I did say I was planning on using this exhaust to practice welding.
Reply
0
0
12-30-2015, 01:42 PM
#73
Junior Member
Join Date: Aug 2005
Location: Cayman Islands
Posts: 440
Total Cats: 17
great work so far man
I'll have to give that solar flux a try. Even with all the post flow in the world I can't get rainbows. I think its because I'm using shitty chinese diffusers. Everyone knows you need toxicup's for rainbows
I'll have to give that solar flux a try. Even with all the post flow in the world I can't get rainbows. I think its because I'm using shitty chinese diffusers. Everyone knows you need toxicup's for rainbows
Reply
0
0
12-30-2015, 03:08 PM
#74

Whenever you build tight radius turns like that do you come at it from both sides or do you work from one end only? I found with my intercooler piping that I had to go from both ends to get the radius right, but that could be bad technique.
I think your exhaust looks great. It would be awesome to see something like that in the engine bay. I feel like much of your hard work is going to go unnoticed. :(
I think your exhaust looks great. It would be awesome to see something like that in the engine bay. I feel like much of your hard work is going to go unnoticed. :(
Reply
0
0
01-11-2016, 11:45 AM
#75
Junior Member
Thread Starter
iTrader: (1)
Join Date: May 2013
Location: Sandia Park, NM
Posts: 455
Total Cats: 54
Whenever you build tight radius turns like that do you come at it from both sides or do you work from one end only?
I've been mostly skiing every day away from work but I've made some progress getting the intercooler mounted. I decided to build a shelf using the existing tow hook assemblies. The plan is to add a gazillion mounting points and subframe under the bumper to make ducting and maybe a future splitter an easier task.


Also picked up one of these ra(i)cy things to serve as a danger to intercooler warning.

My driveway still looks like this so no miata driving for a month or so....

Reply
1
1
01-17-2016, 01:09 AM
#76
Junior Member
Thread Starter
iTrader: (1)
Join Date: May 2013
Location: Sandia Park, NM
Posts: 455
Total Cats: 54
I fell to a little "while I was in there" action. My car was crunched on the driver side corner some time before my ownership and things never quite lined up. My upper radiator mount was never connected and my hood never lined up because the bumper mount point was pushed down an inch or so.
I decided to cut some wood blocks to serve as a brace for my crow bar and got things back into place. After lining things up I shot some paint on my crunched up radiator support; now I'm ready for the car shows

I also got the cold side piping fabbed up. The upper section does a little jog to clear the radiator hose and the alternator. The 1" tube is for my baller oem bosch (kayser) bpv. The bottom section is a Flyin Miata hose.


This thing gave me trouble. It seemed simple enough to cut the flange, rotate the bend and add some tube, but man did that flange give me trouble. There was something in the casting that would explode and catch fire at random while welding it.

This looked cooler than I thought it would without the bumper. I think one of my tow hooks got abused once or twice.

I decided to cut some wood blocks to serve as a brace for my crow bar and got things back into place. After lining things up I shot some paint on my crunched up radiator support; now I'm ready for the car shows
I also got the cold side piping fabbed up. The upper section does a little jog to clear the radiator hose and the alternator. The 1" tube is for my baller oem bosch (kayser) bpv. The bottom section is a Flyin Miata hose.
This thing gave me trouble. It seemed simple enough to cut the flange, rotate the bend and add some tube, but man did that flange give me trouble. There was something in the casting that would explode and catch fire at random while welding it.
This looked cooler than I thought it would without the bumper. I think one of my tow hooks got abused once or twice.
Reply
0
0
01-18-2016, 12:42 AM
#77
Junior Member
Thread Starter
iTrader: (1)
Join Date: May 2013
Location: Sandia Park, NM
Posts: 455
Total Cats: 54
Hot side piping is done!
Now just some tube beading, bungs to weld, ducting, and a minor tubular front bumper mount.
Maybe I'll be ready to drive once the snow melts!
I modified an sr20 outlet to be more of a 45 degree bend. Note the comical spluge of aluminum to build the bolt hole spot back up.


I had to trim the Flyin Miata hose by cutting it in half and shortening the 45 degree (from horizontal) section... Bummer... but it fits great.
Now just some tube beading, bungs to weld, ducting, and a minor tubular front bumper mount.
Maybe I'll be ready to drive once the snow melts!
I modified an sr20 outlet to be more of a 45 degree bend. Note the comical spluge of aluminum to build the bolt hole spot back up.
I had to trim the Flyin Miata hose by cutting it in half and shortening the 45 degree (from horizontal) section... Bummer... but it fits great.
Reply
0
0
 01-28-2016, 10:25 AM
#79
Junior Member
Thread Starter
iTrader: (1)
Join Date: May 2013
Location: Sandia Park, NM
Posts: 455
Total Cats: 54
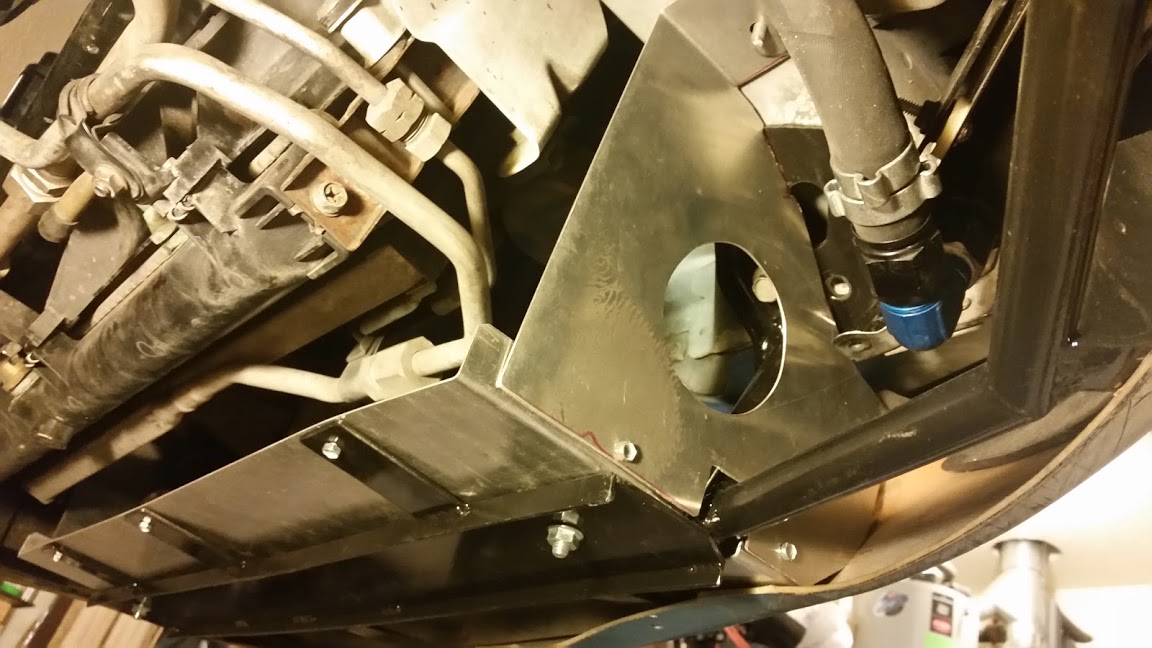
This bumper subframe thing is almost done. I'm not ecstatic about how all of the mounts worked out but everything is pretty functional and it will serve as a solid mount for whatever ends up on the nose. I still need to mount the lip and drill everything in place.
Everything on this was tacked in place under the car...
Looks like something from star trek or teenage mutant ninja turtles:

This corner is getting busy; the bars will also serve to hold a splash guard.


The other side is much easier to get a tig torch into.

Everything on this was tacked in place under the car...
Looks like something from star trek or teenage mutant ninja turtles:
This corner is getting busy; the bars will also serve to hold a splash guard.
The other side is much easier to get a tig torch into.
Reply
0
0
02-15-2016, 10:45 AM
#80
Junior Member
Thread Starter
iTrader: (1)
Join Date: May 2013
Location: Sandia Park, NM
Posts: 455
Total Cats: 54
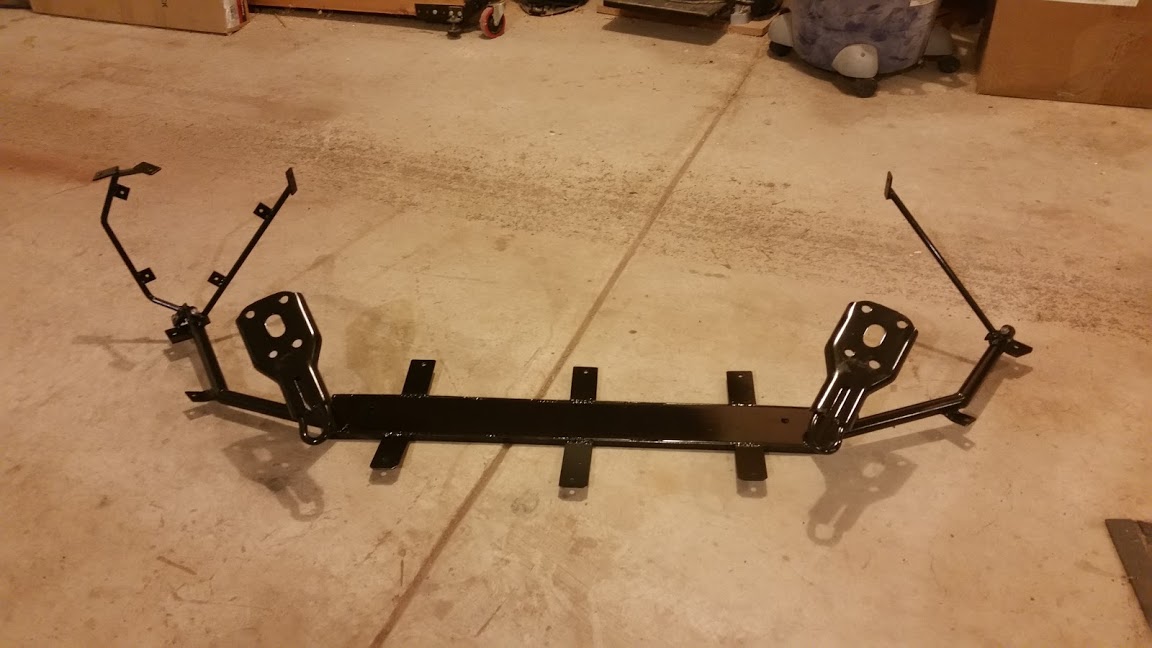
I think I'm actually done fabricating stuff.
I may actually be driving this thing next weekend.
Here's the front subframe thing off the car:
And here's the intercooler on it. It is kind of a pita but the whole unit does drop in without too much fuss:
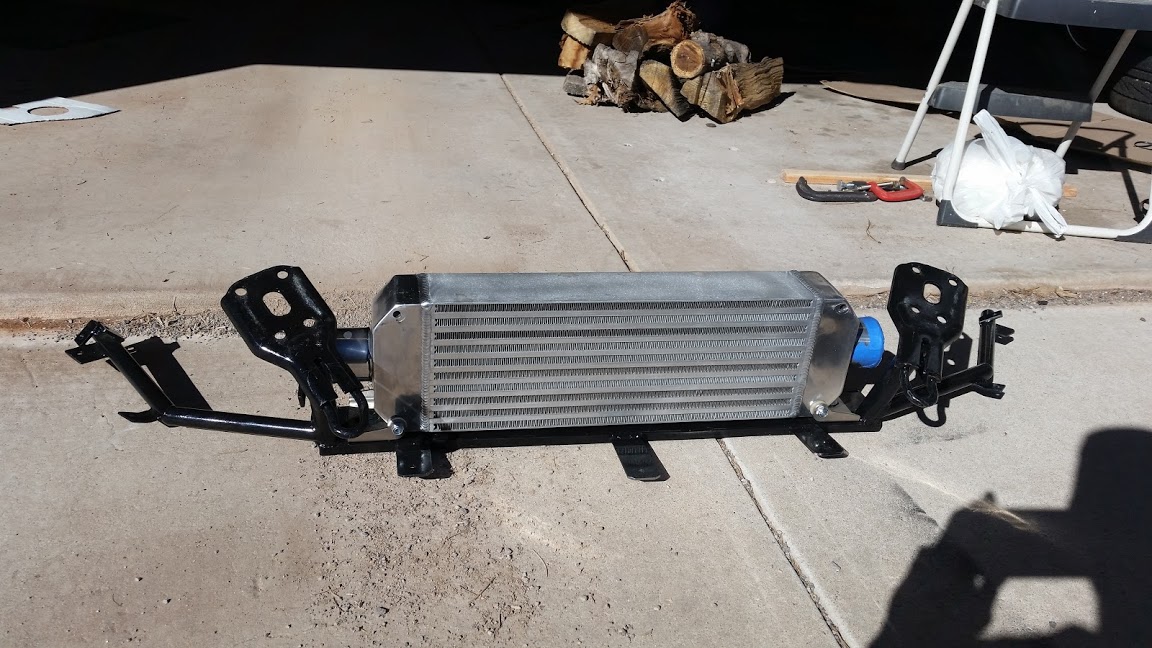
I also finished the front ducting stuff. It's a pretty simple thing held together with rivet nuts. The oem plastic undertray integrates into everything pretty well.
I may actually be driving this thing next weekend.
Here's the front subframe thing off the car:
And here's the intercooler on it. It is kind of a pita but the whole unit does drop in without too much fuss:
I also finished the front ducting stuff. It's a pretty simple thing held together with rivet nuts. The oem plastic undertray integrates into everything pretty well.
Reply
0
0


