Knock-Off Eliminator Build
 07-08-2019, 03:18 PM
#81
Junior Member
Thread Starter
iTrader: (3)

Join Date: Oct 2015
Location: Steamboat Springs, CO
Posts: 329
Total Cats: 22
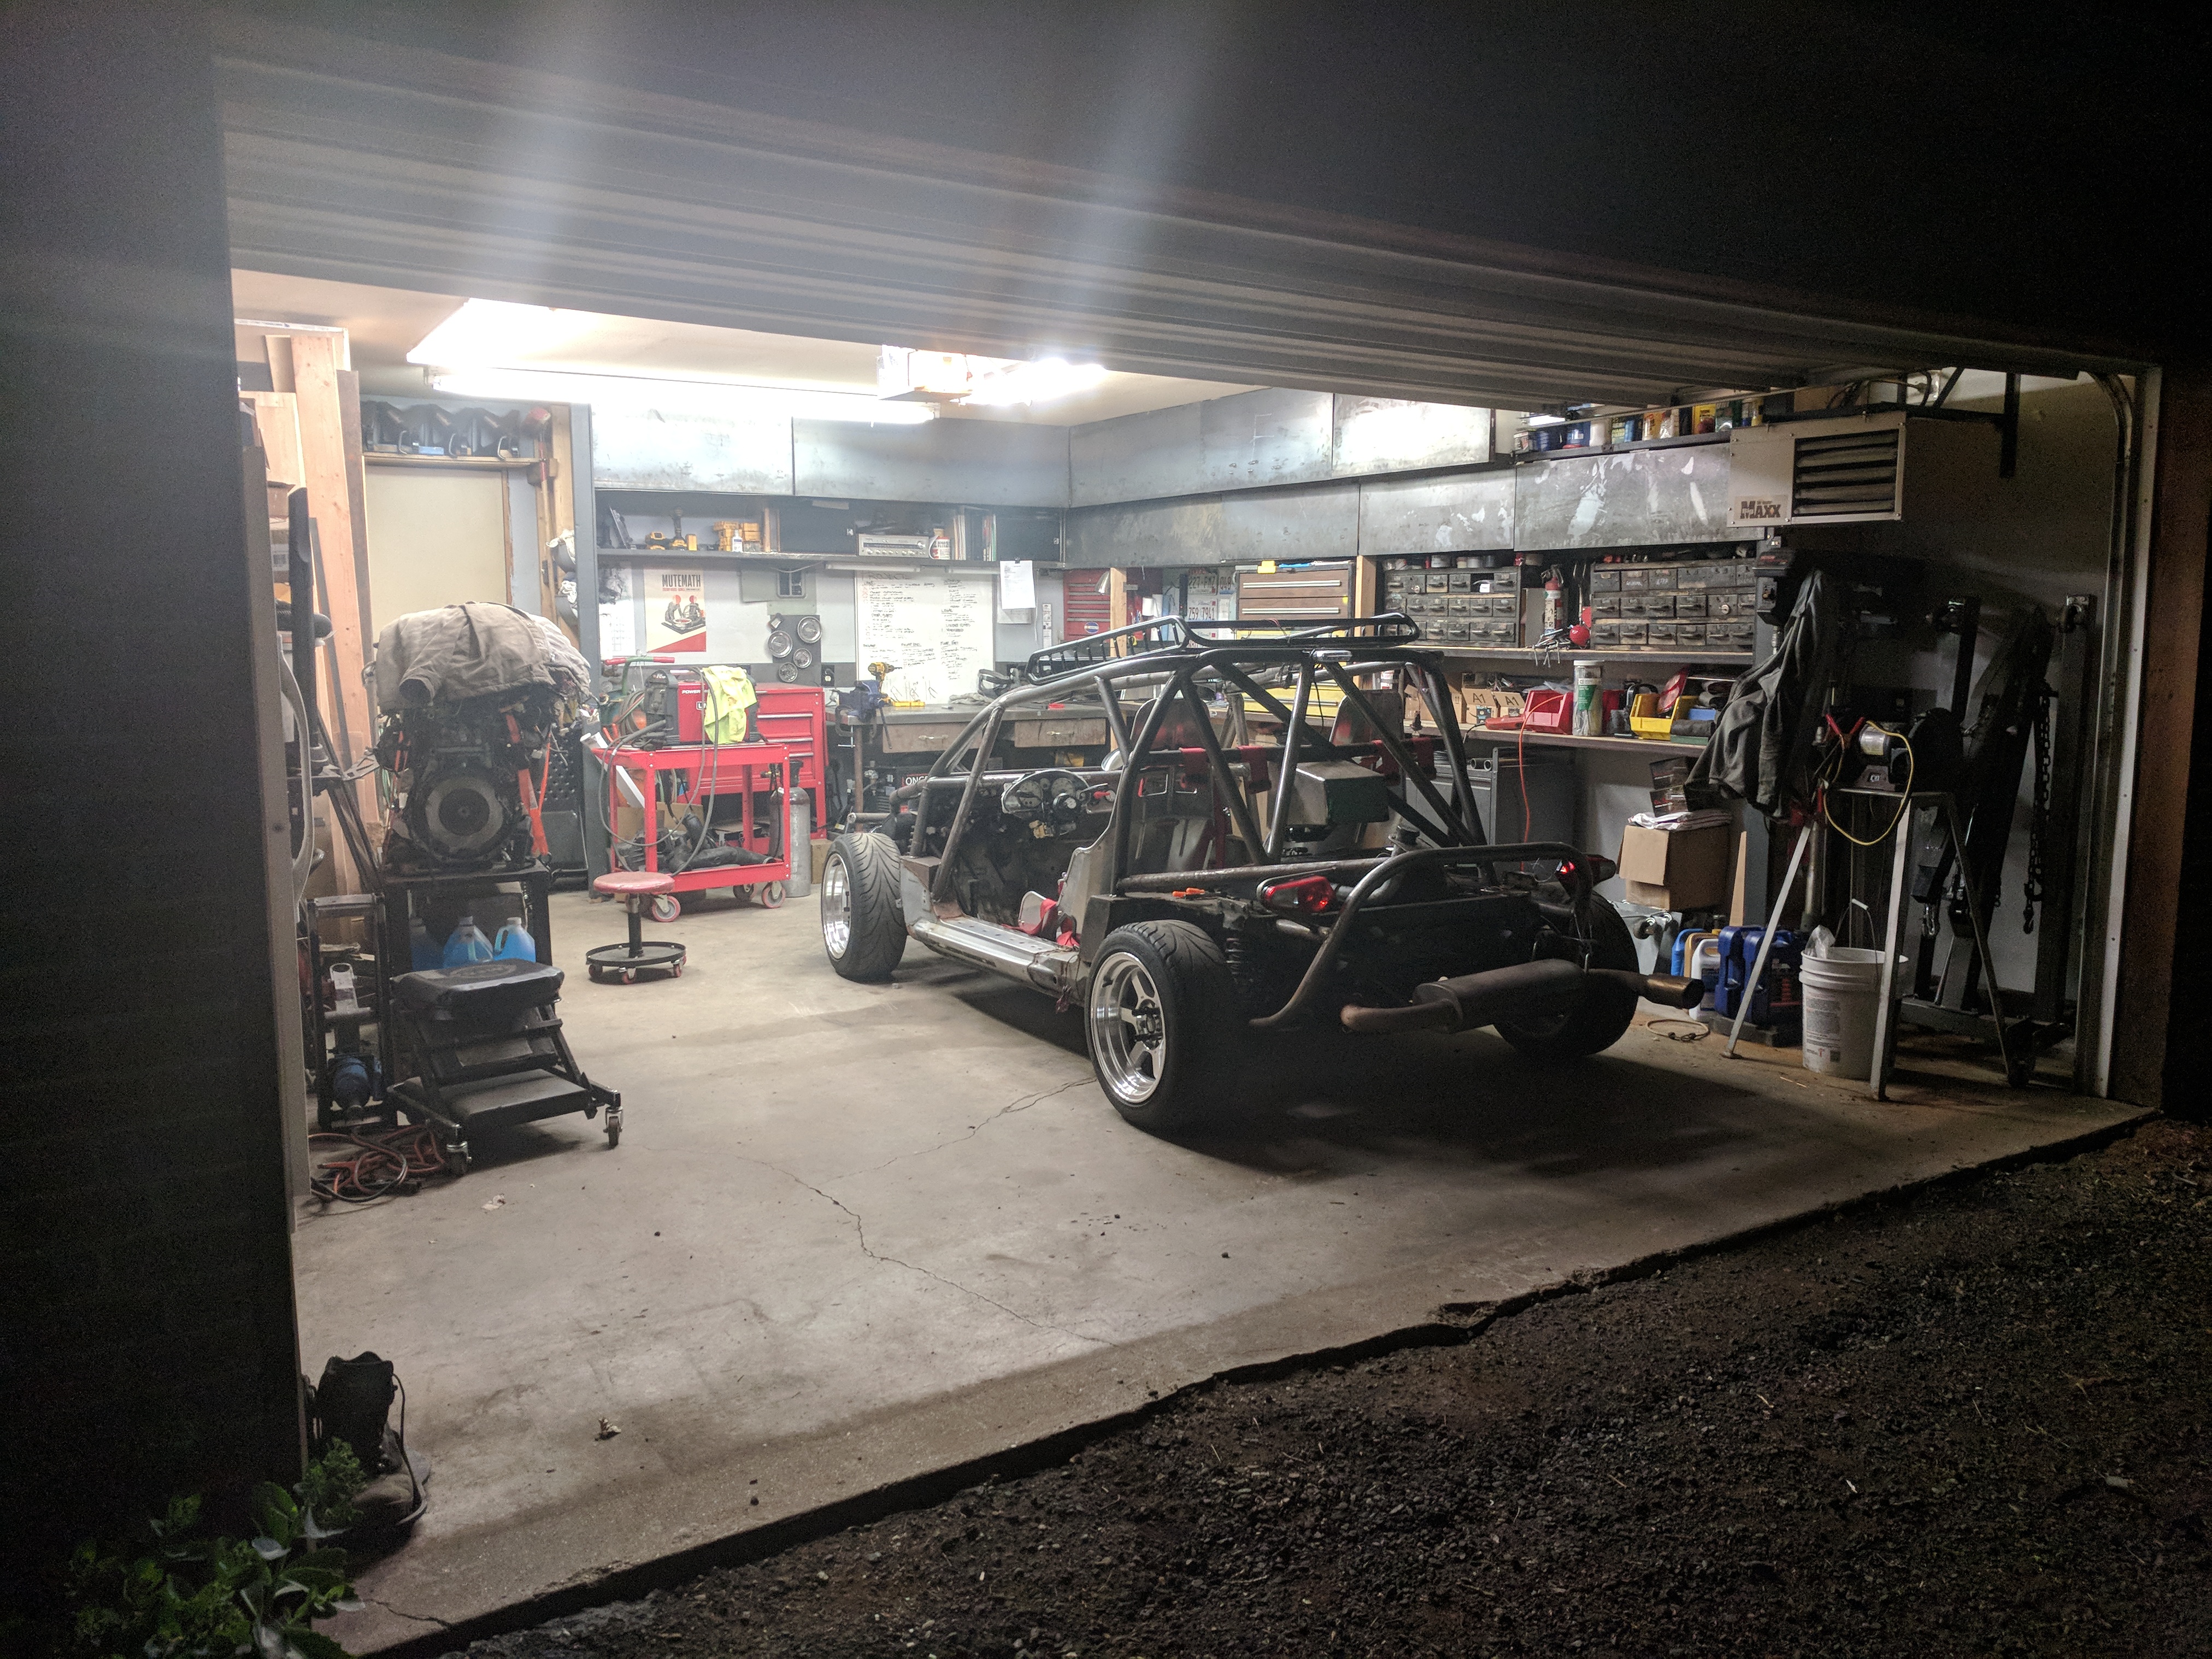
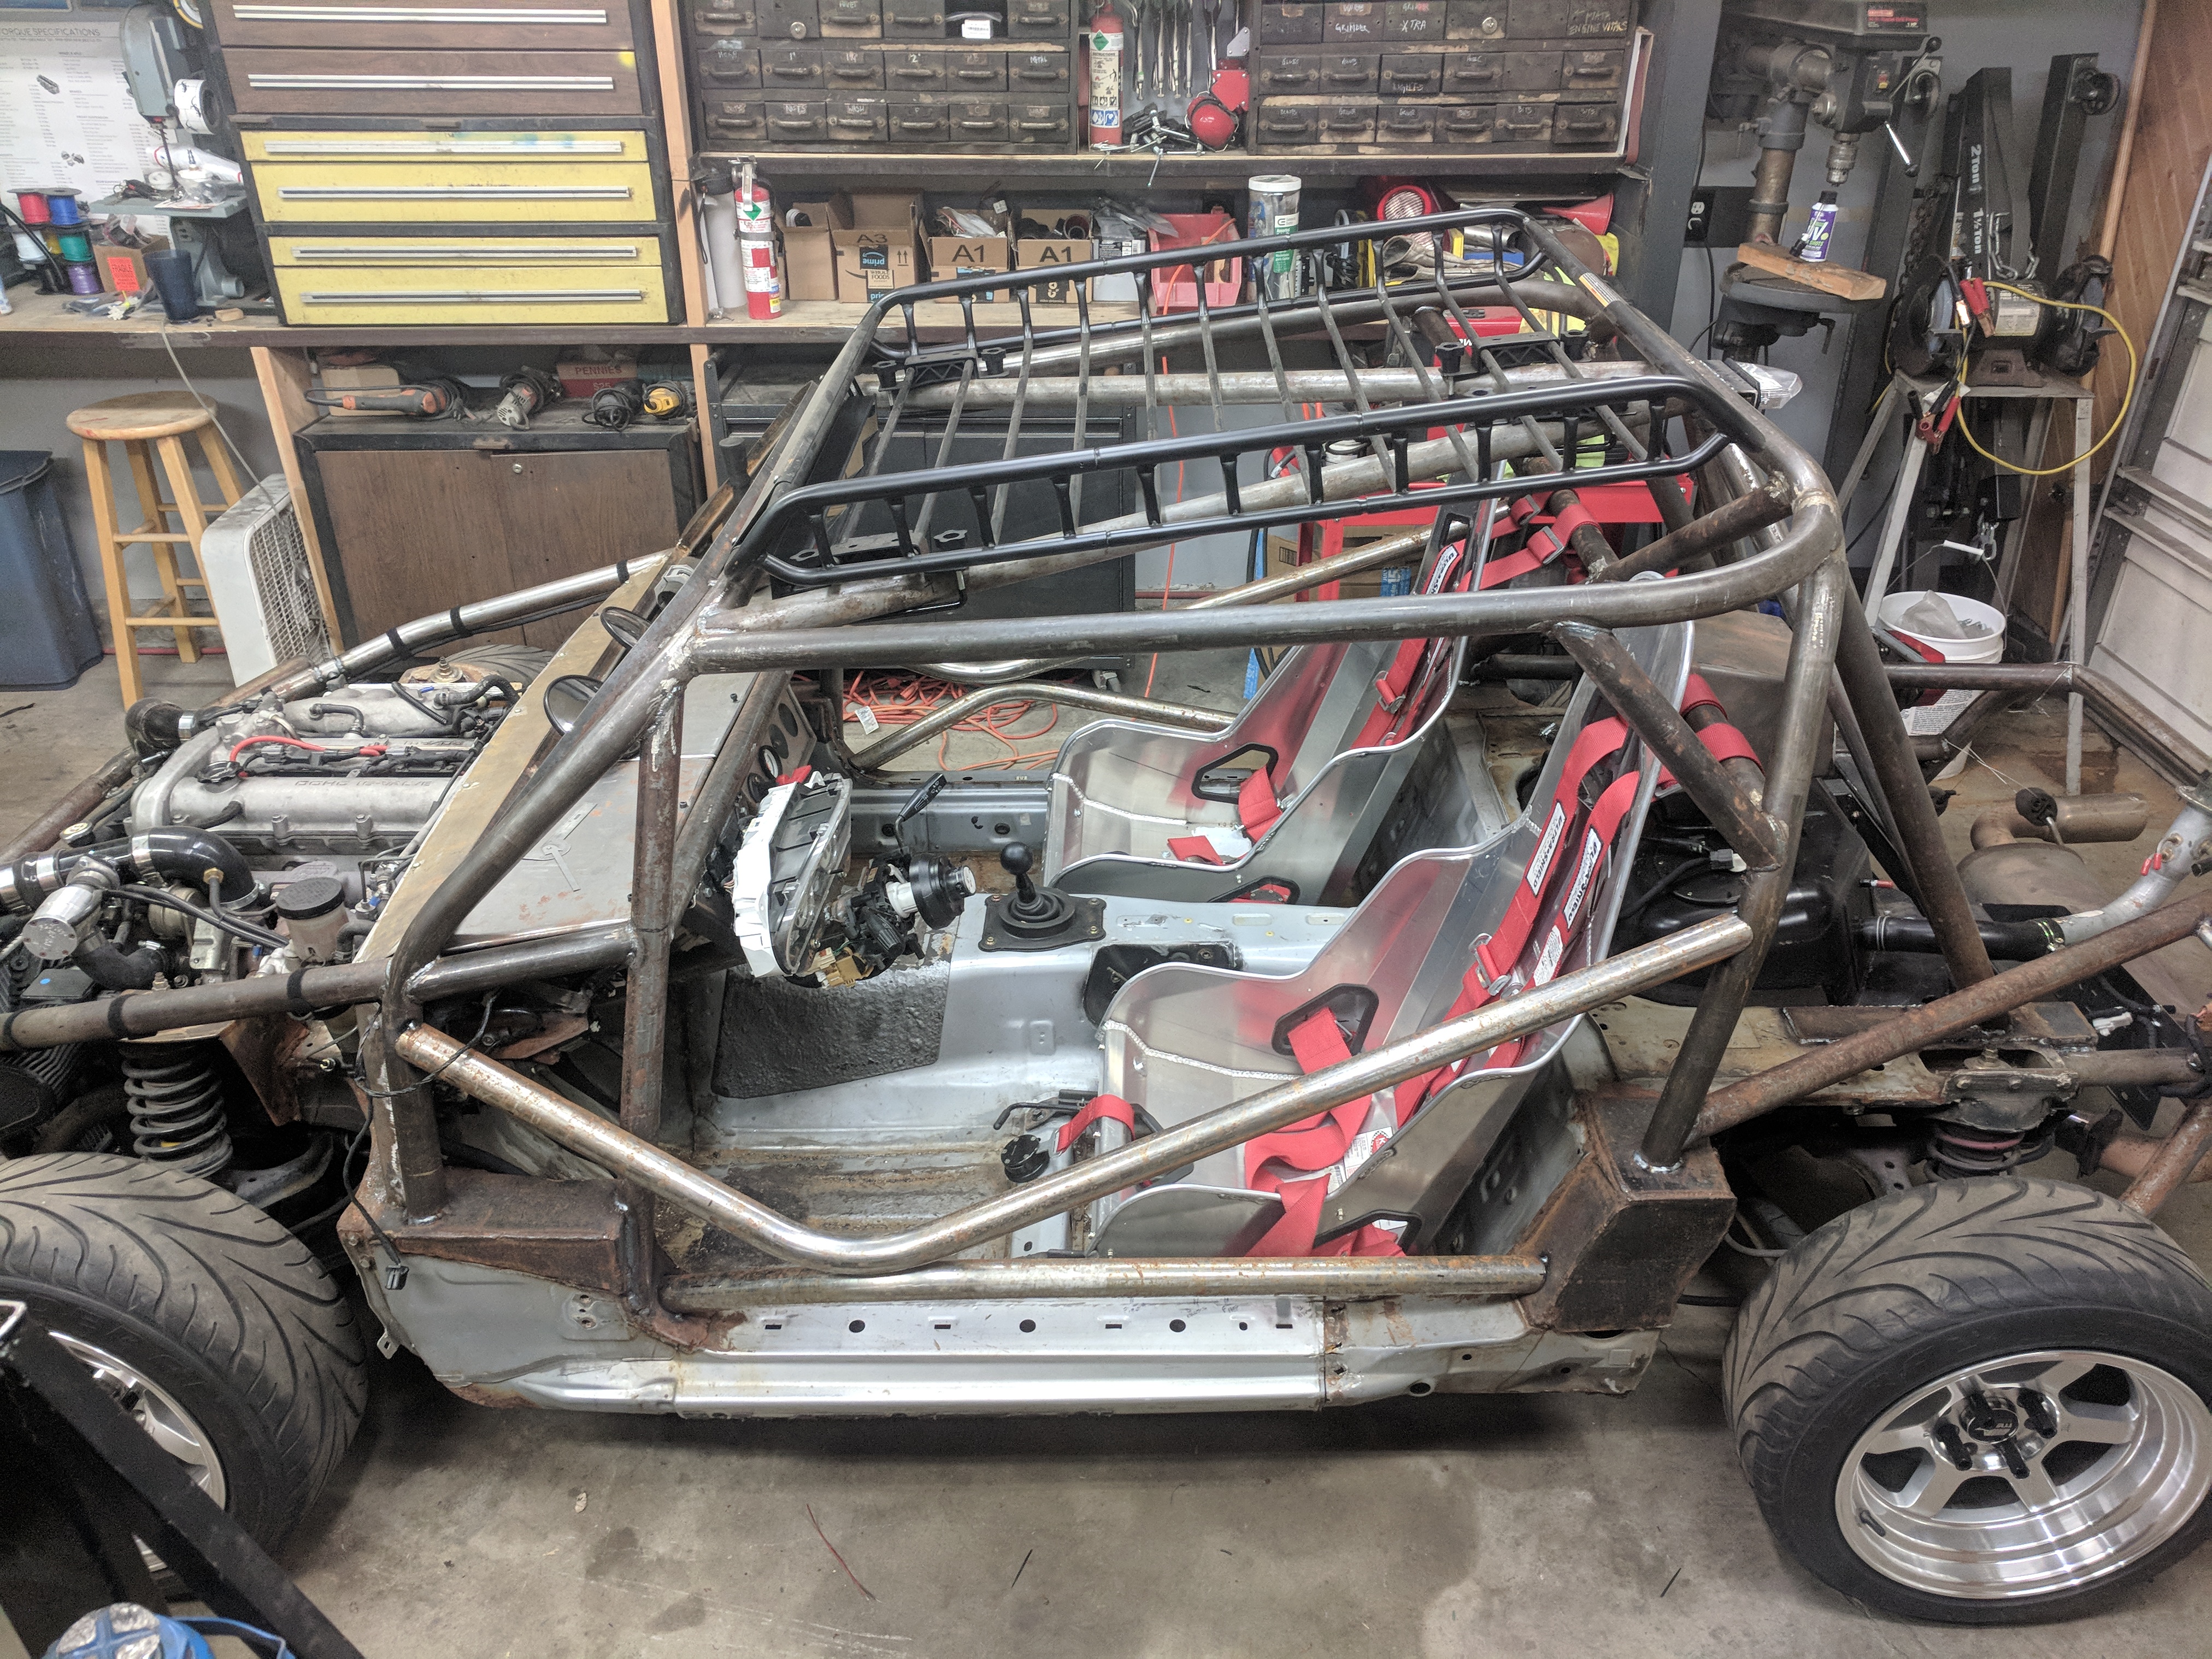
Got the kart out for another shake-down test.
I have a boost leak, only making 10lbs of boost (was making 13/14 prior to swapping the roller-skate) - SO, I have to hunt that down - but altogether, pretty happy!
Current goals - get the thing 'street legal' (so I don't feel like a bandit during my test-runs), then make it safe (these might seem out of order... and you might be right - but wiring is WAY easier without door bars in the way!)
[img]https://i.imgur.com/6QJ8xSu.jpg[/img]
[img]https://i.imgur.com/BdxTlYg.jpg[/img]
[img]https://i.imgur.com/0I2WRUk.jpg[/img]
Last edited by bawward; 09-16-2019 at 01:47 PM. Reason: Photos Missing (TinyPic)

Reply
 0
0

0
07-16-2019, 01:16 PM
#82
Junior Member
Thread Starter
iTrader: (3)
Join Date: Oct 2015
Location: Steamboat Springs, CO
Posts: 329
Total Cats: 22
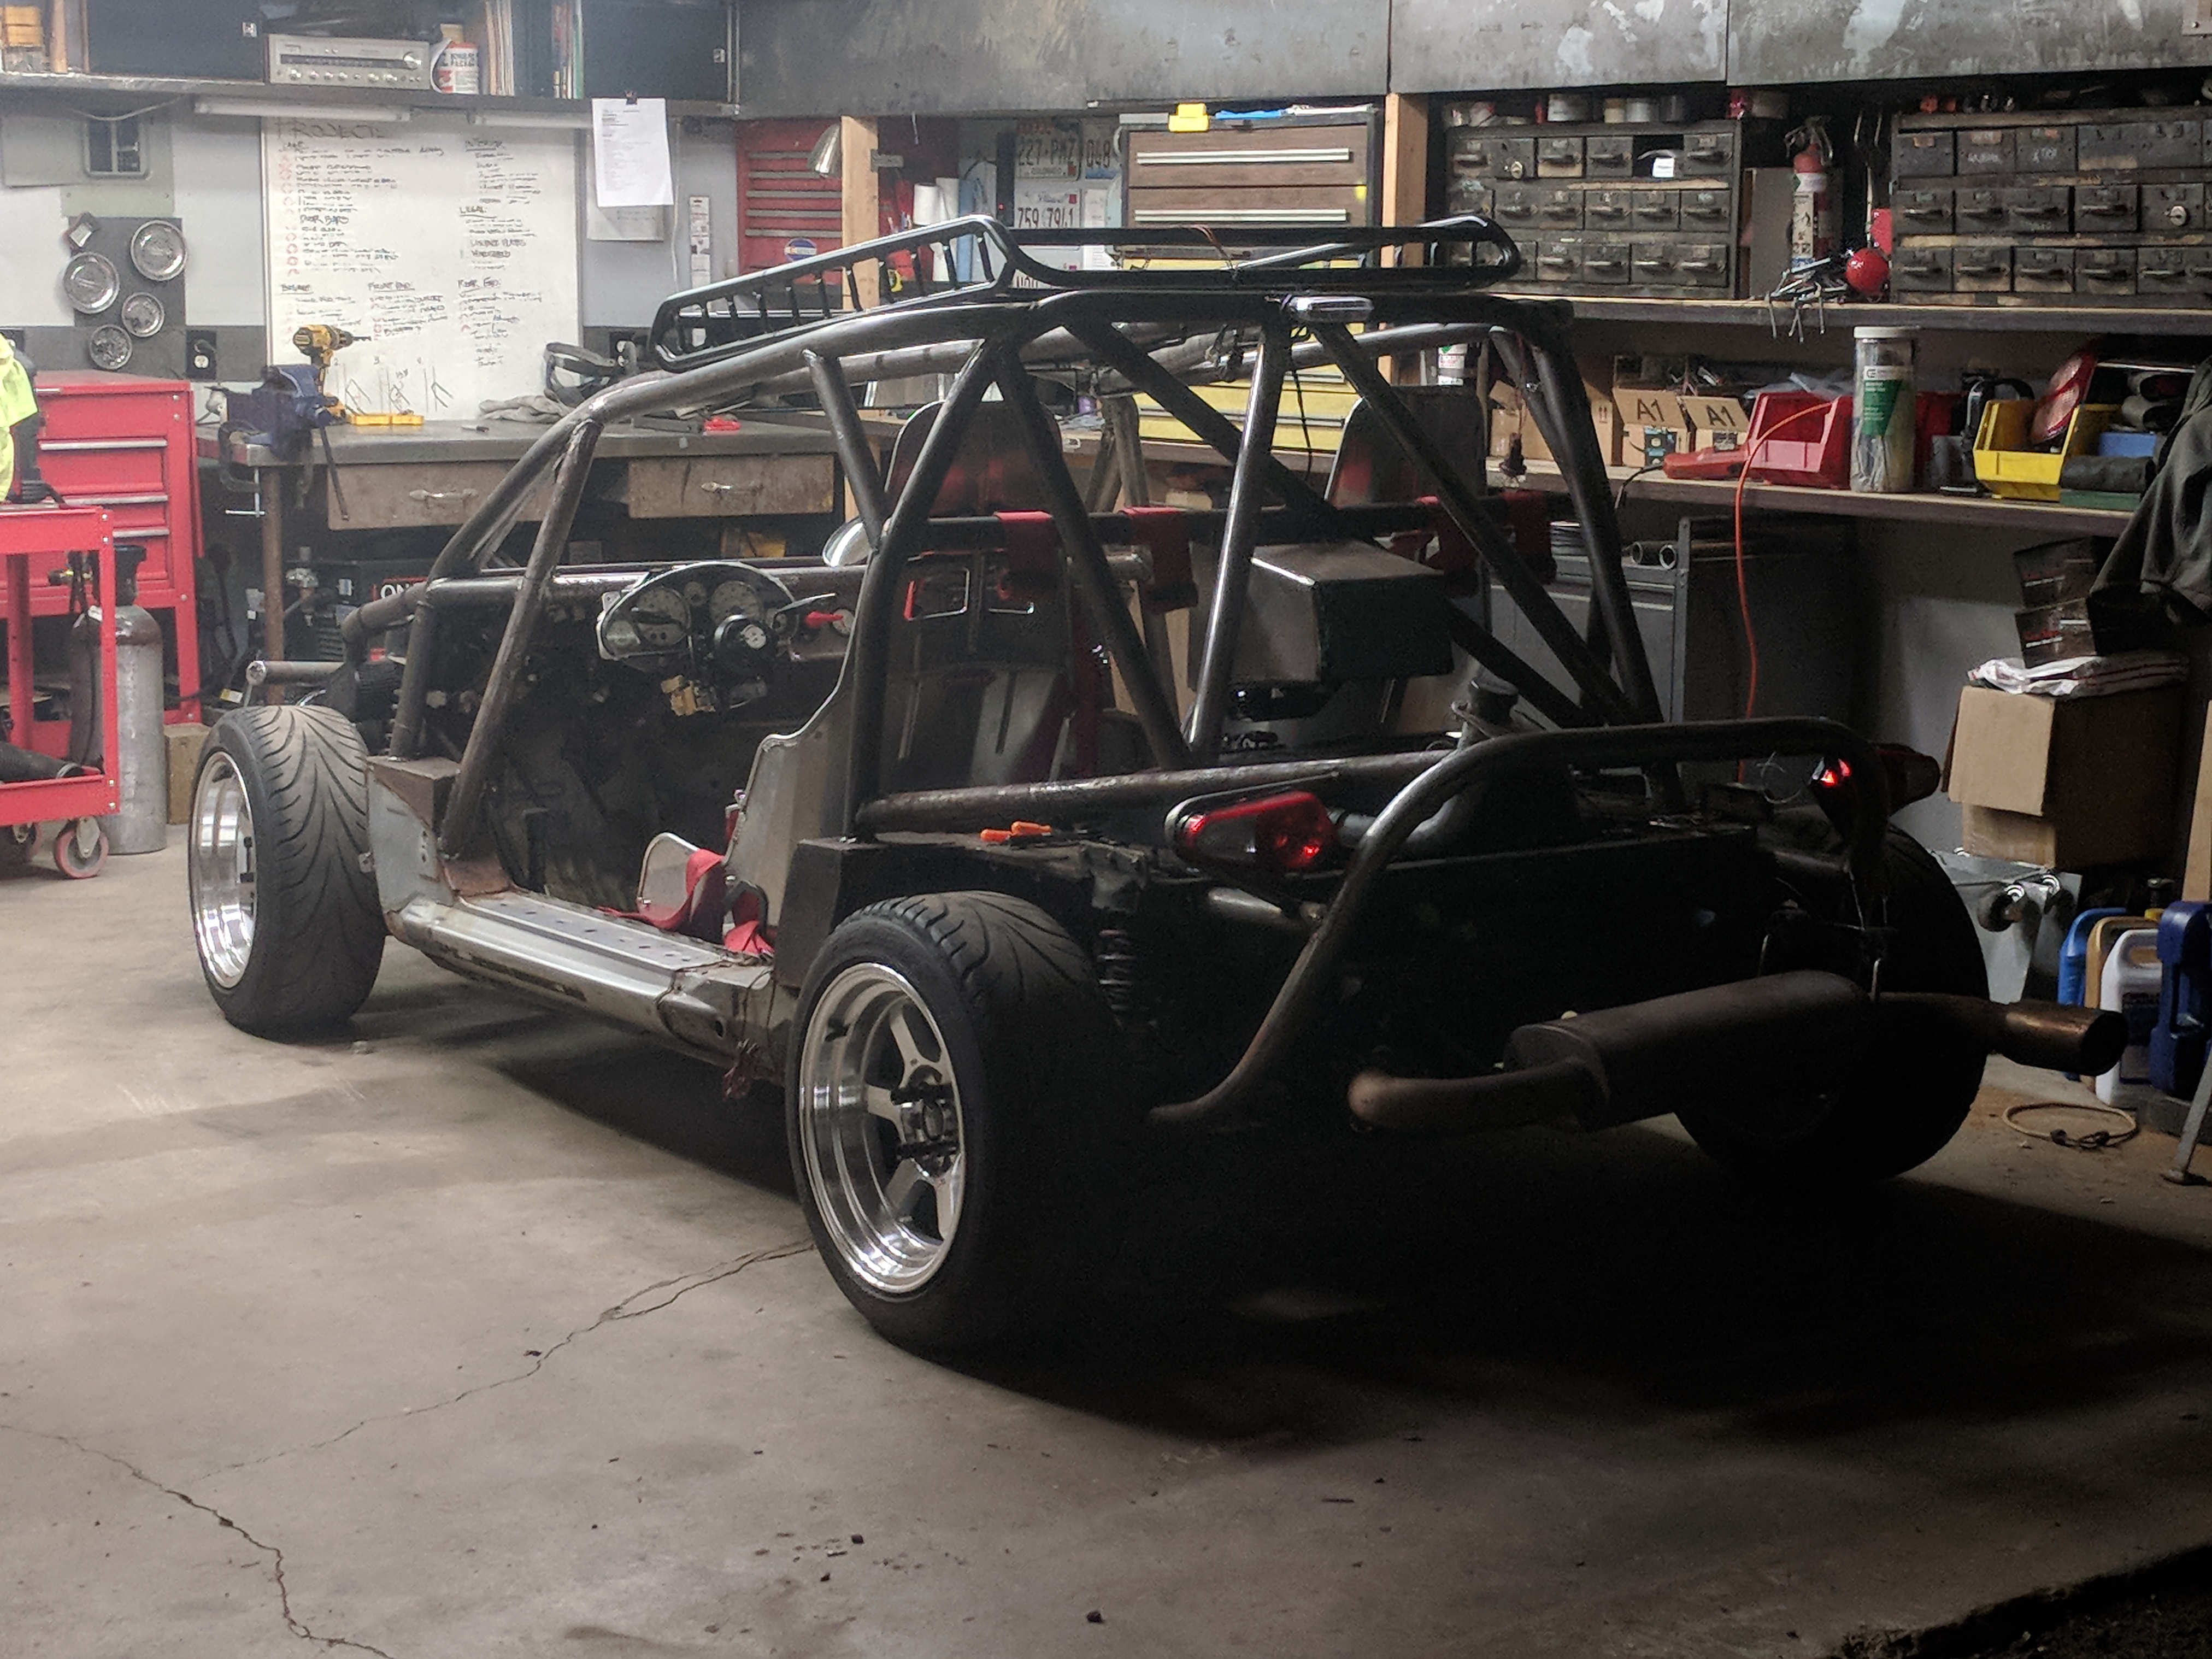
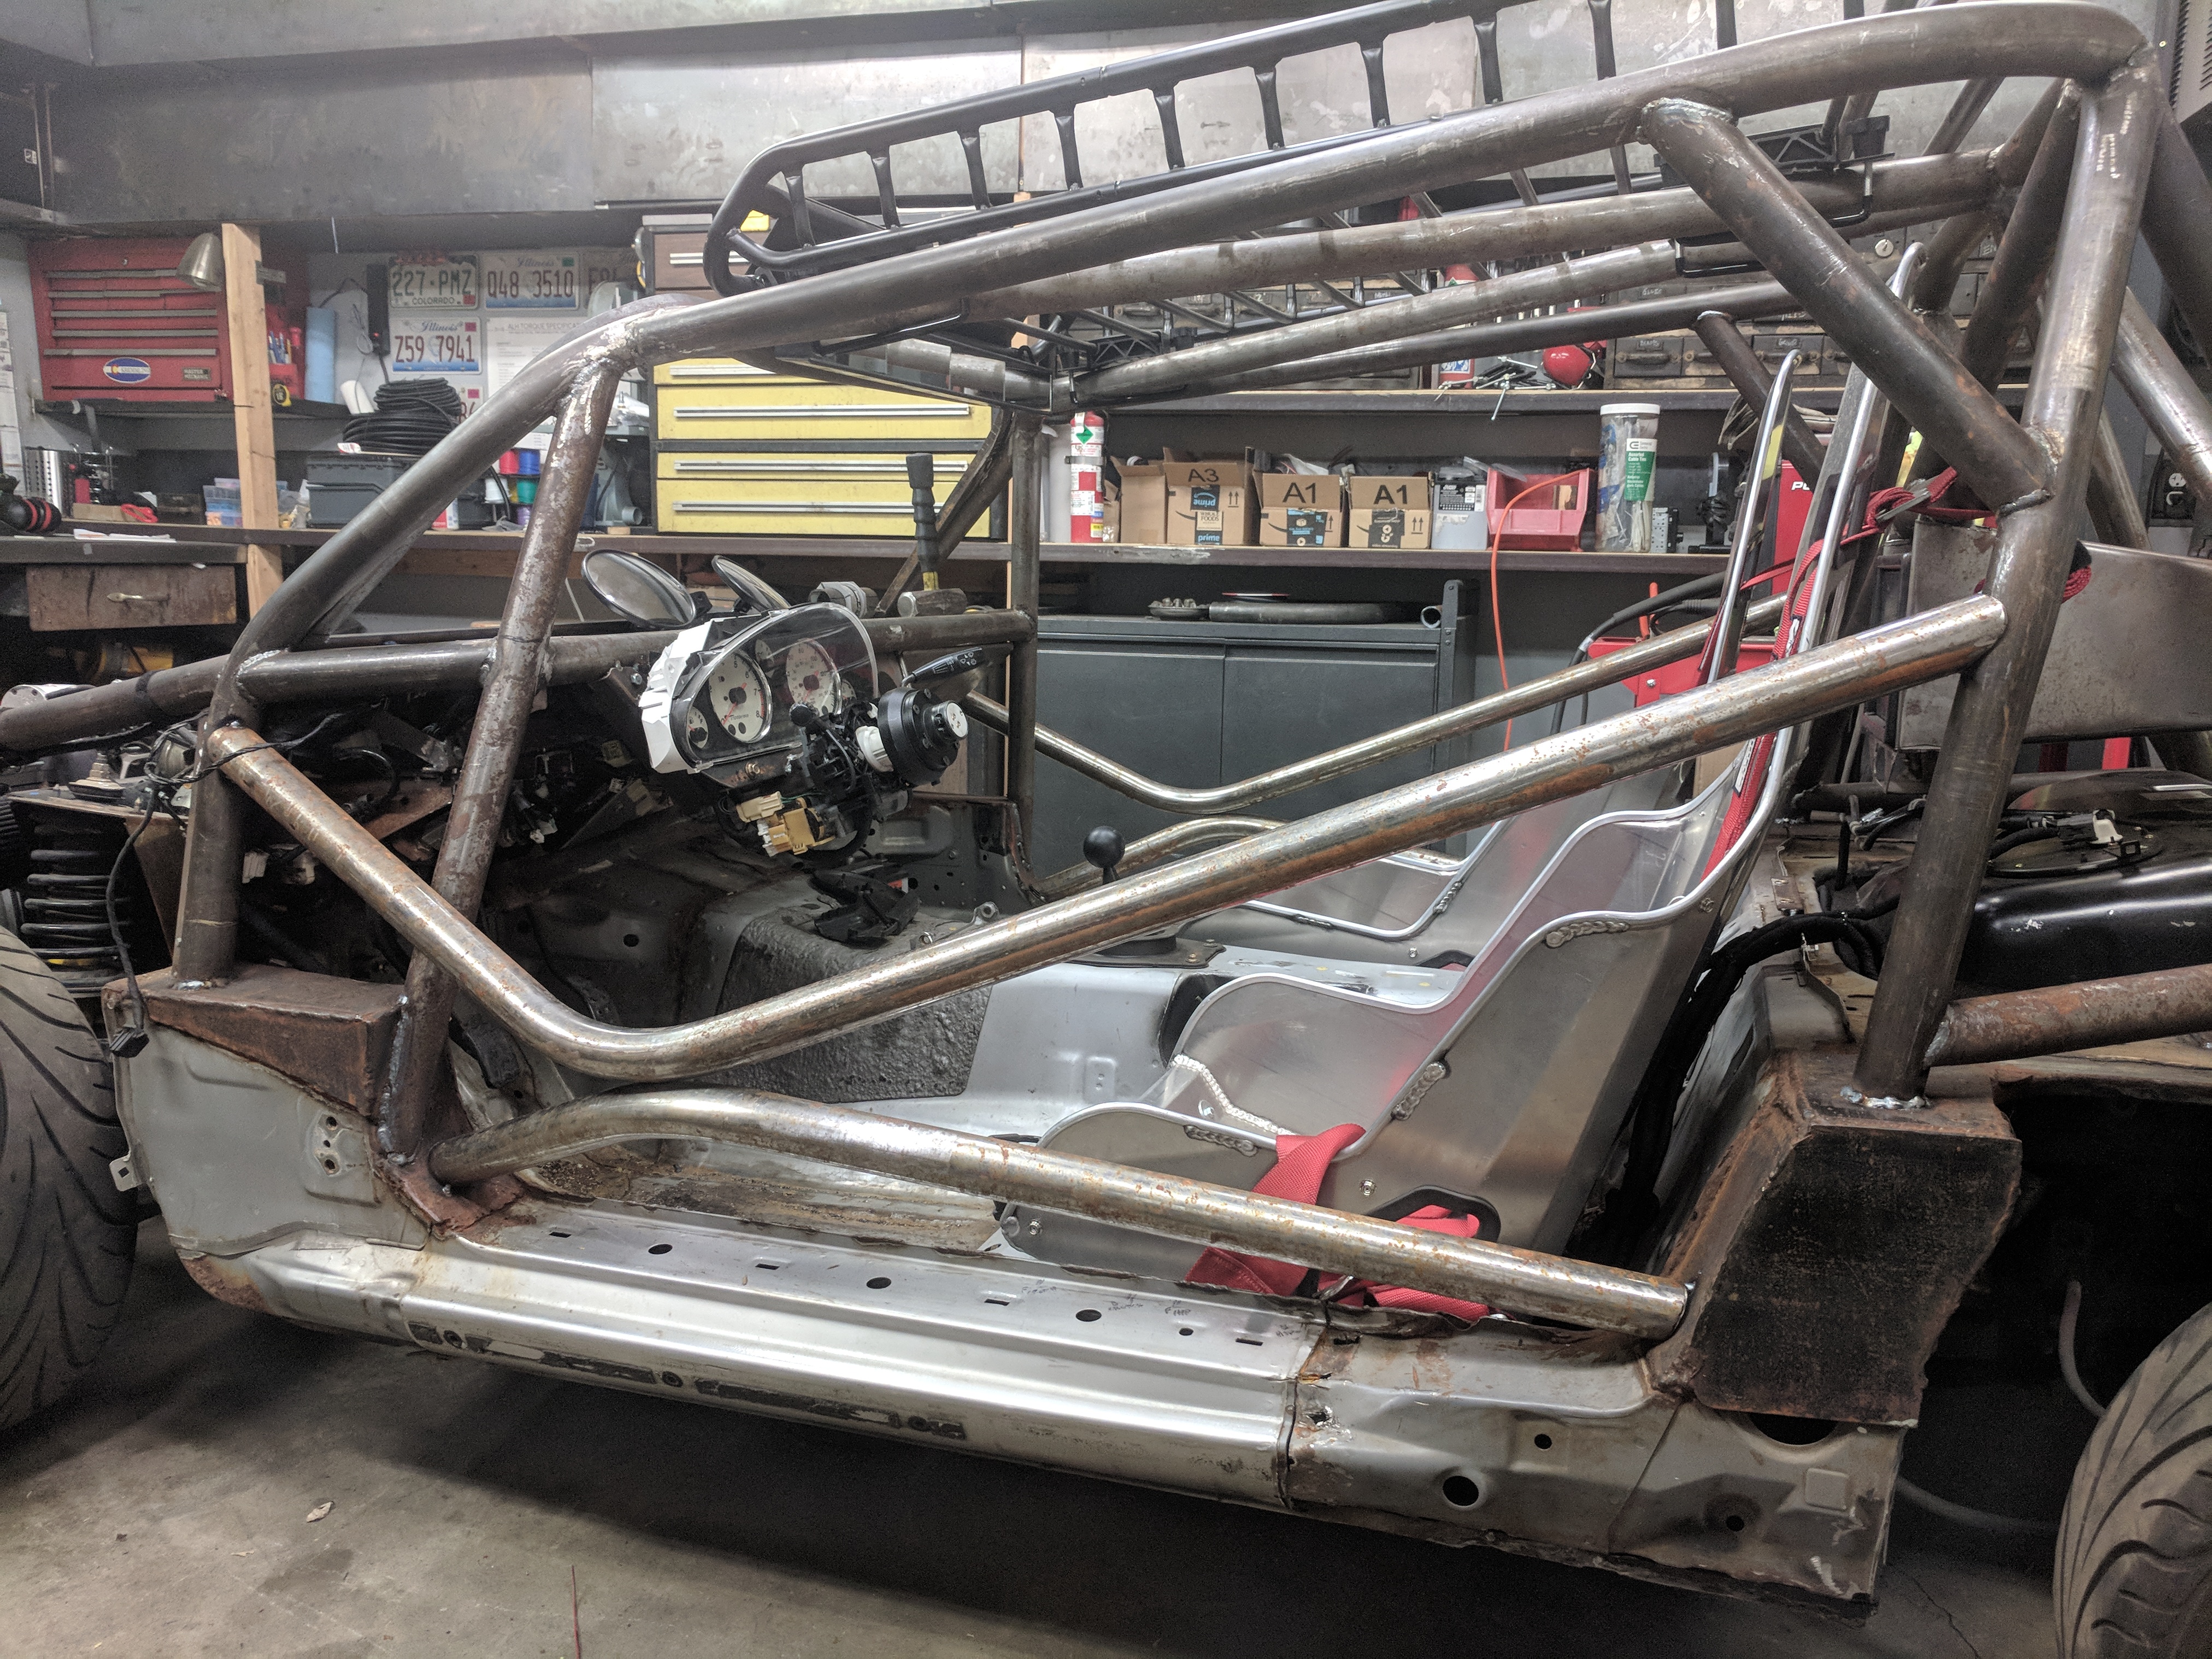
LOTS of recent progress.
Tasks completed:
-Wired in headlights - PAIN IN THE BUTT - (went from the NB2 2-bulb headlights to these single bulb / dual filament headlights) - Used a relay to switch high / lows, got them working.
-Wire in taillights
-Wire in third brake light
-Wrapped a bunch of loom back up and organized the 'wire snake' under the dash
-Final welded all the new bars
-Final welded all base plates
-Installed third brake light bracket
-Installed engine fuse-box bracket
-Installed end caps on the front bumper
This is how she was looking last night:
Reply
0
0
07-23-2019, 11:16 AM
#83
Junior Member
Thread Starter
iTrader: (3)
Join Date: Oct 2015
Location: Steamboat Springs, CO
Posts: 329
Total Cats: 22
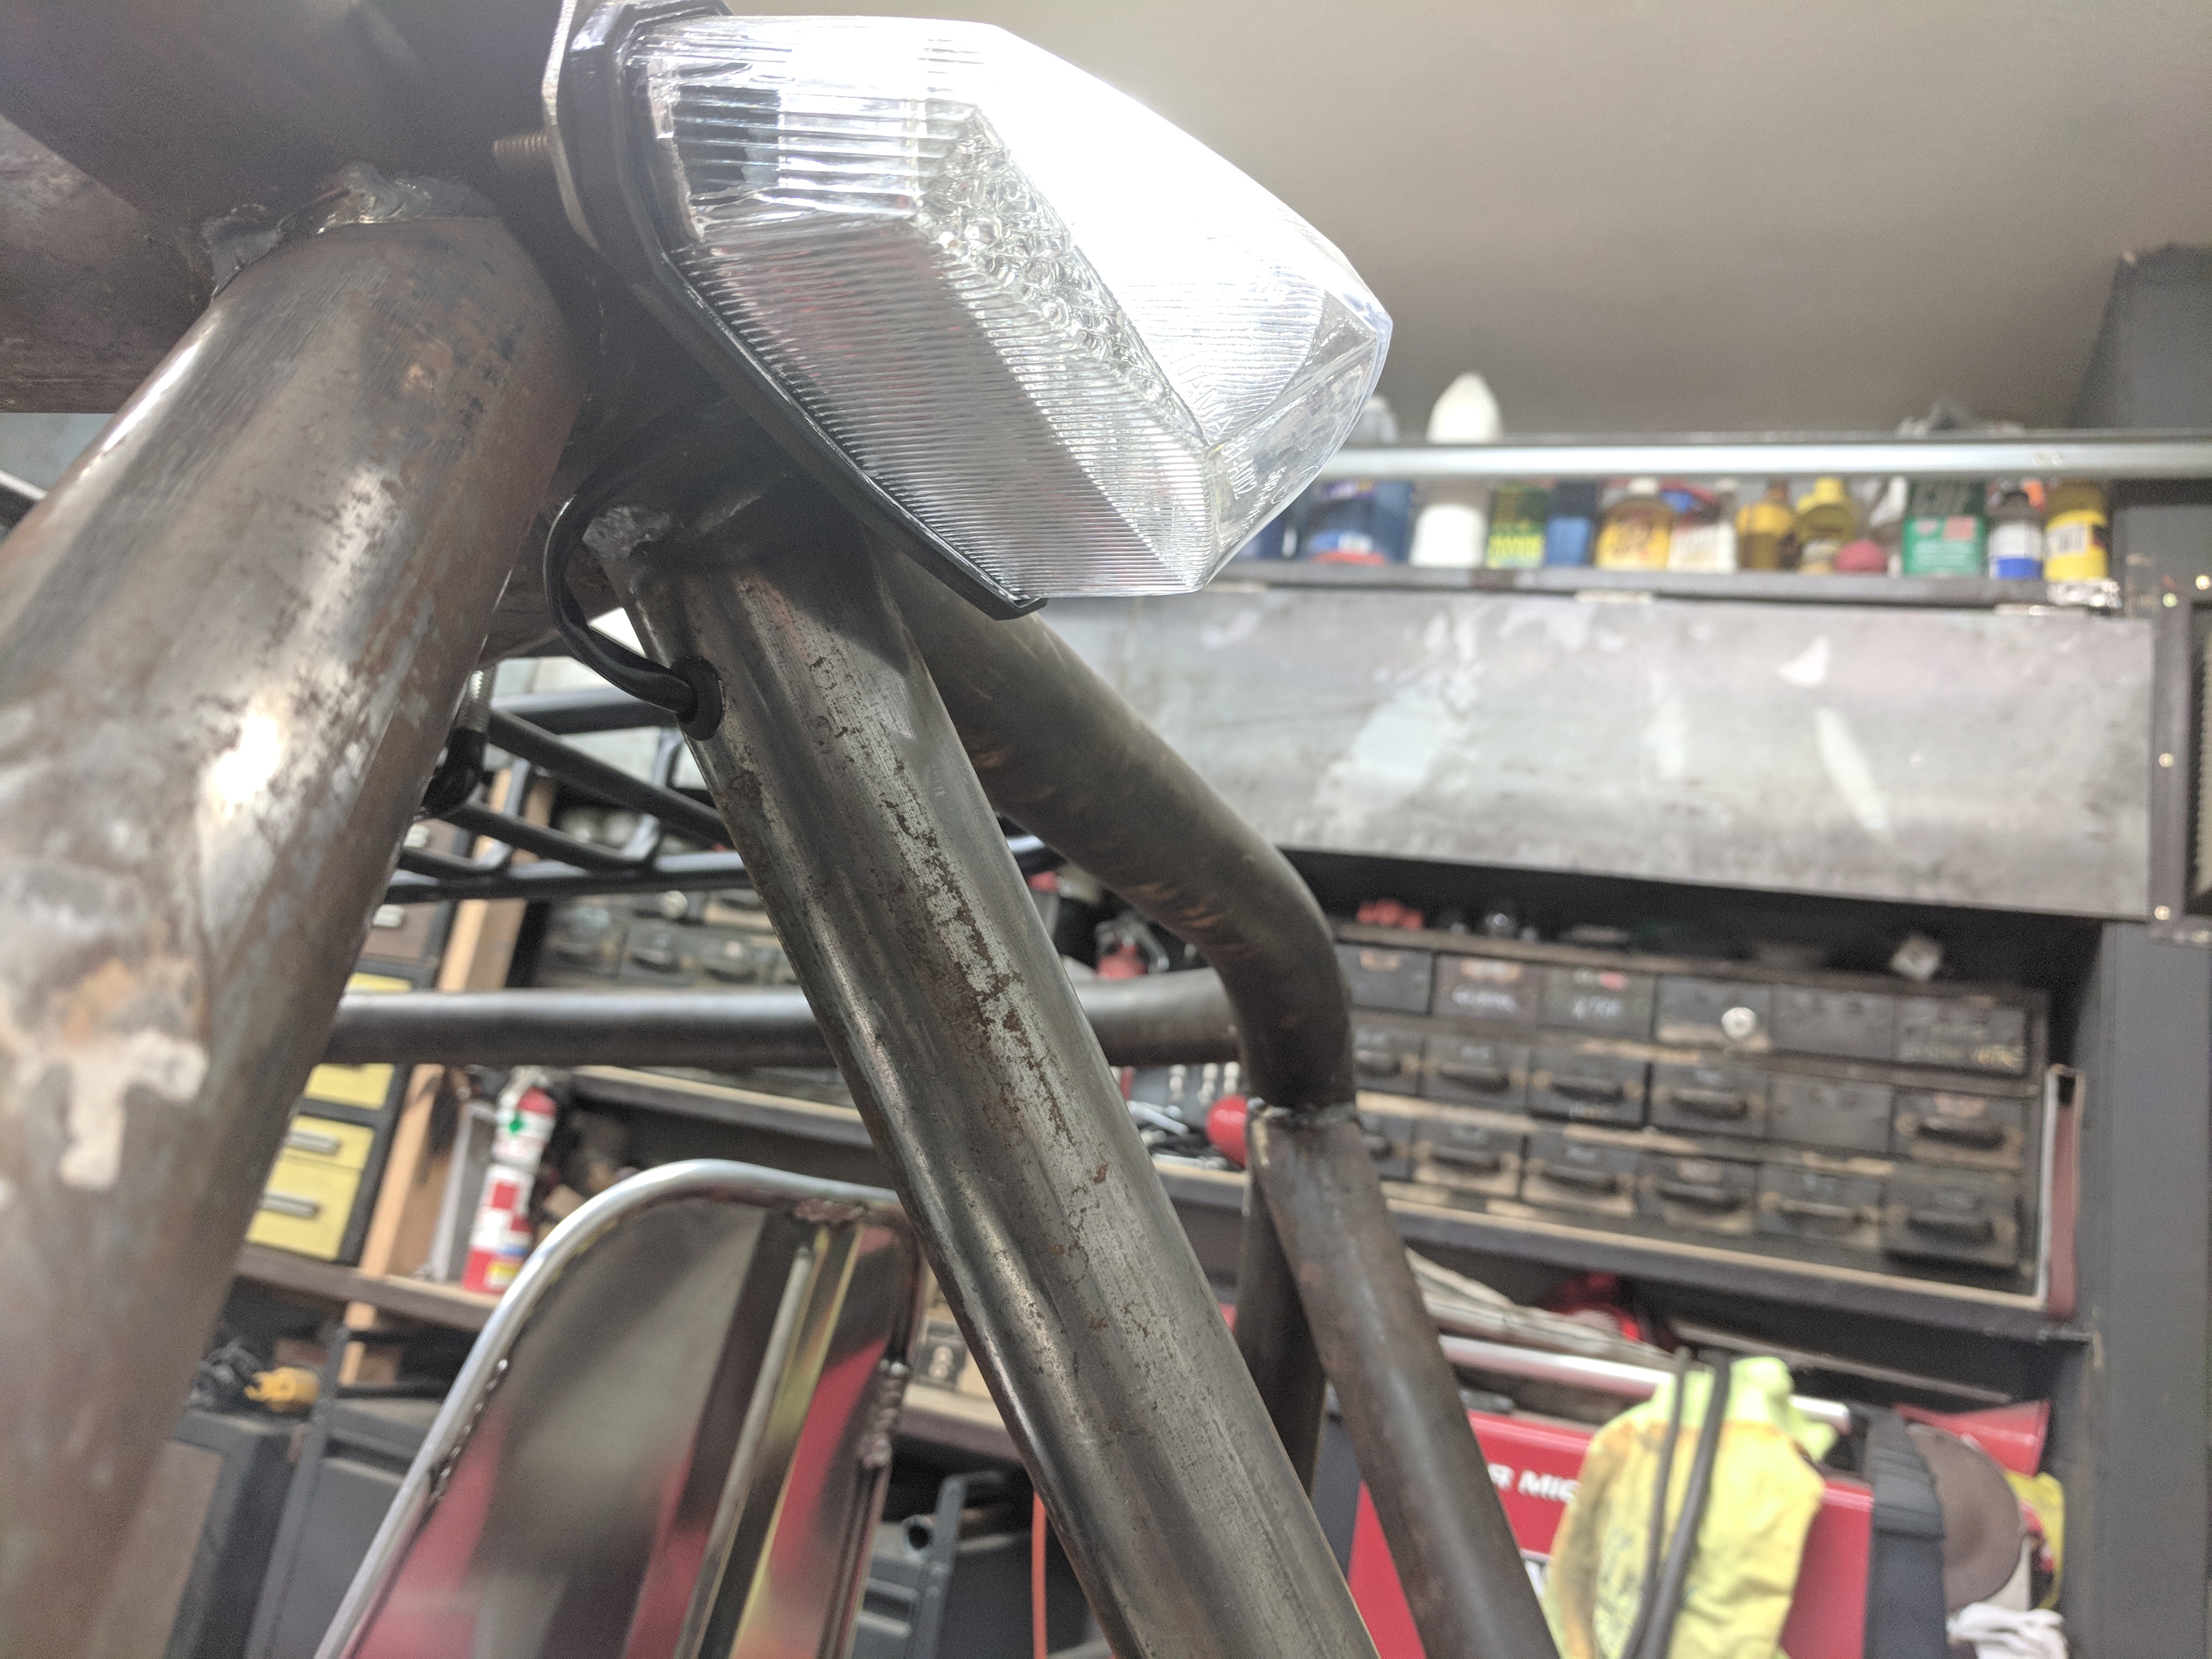
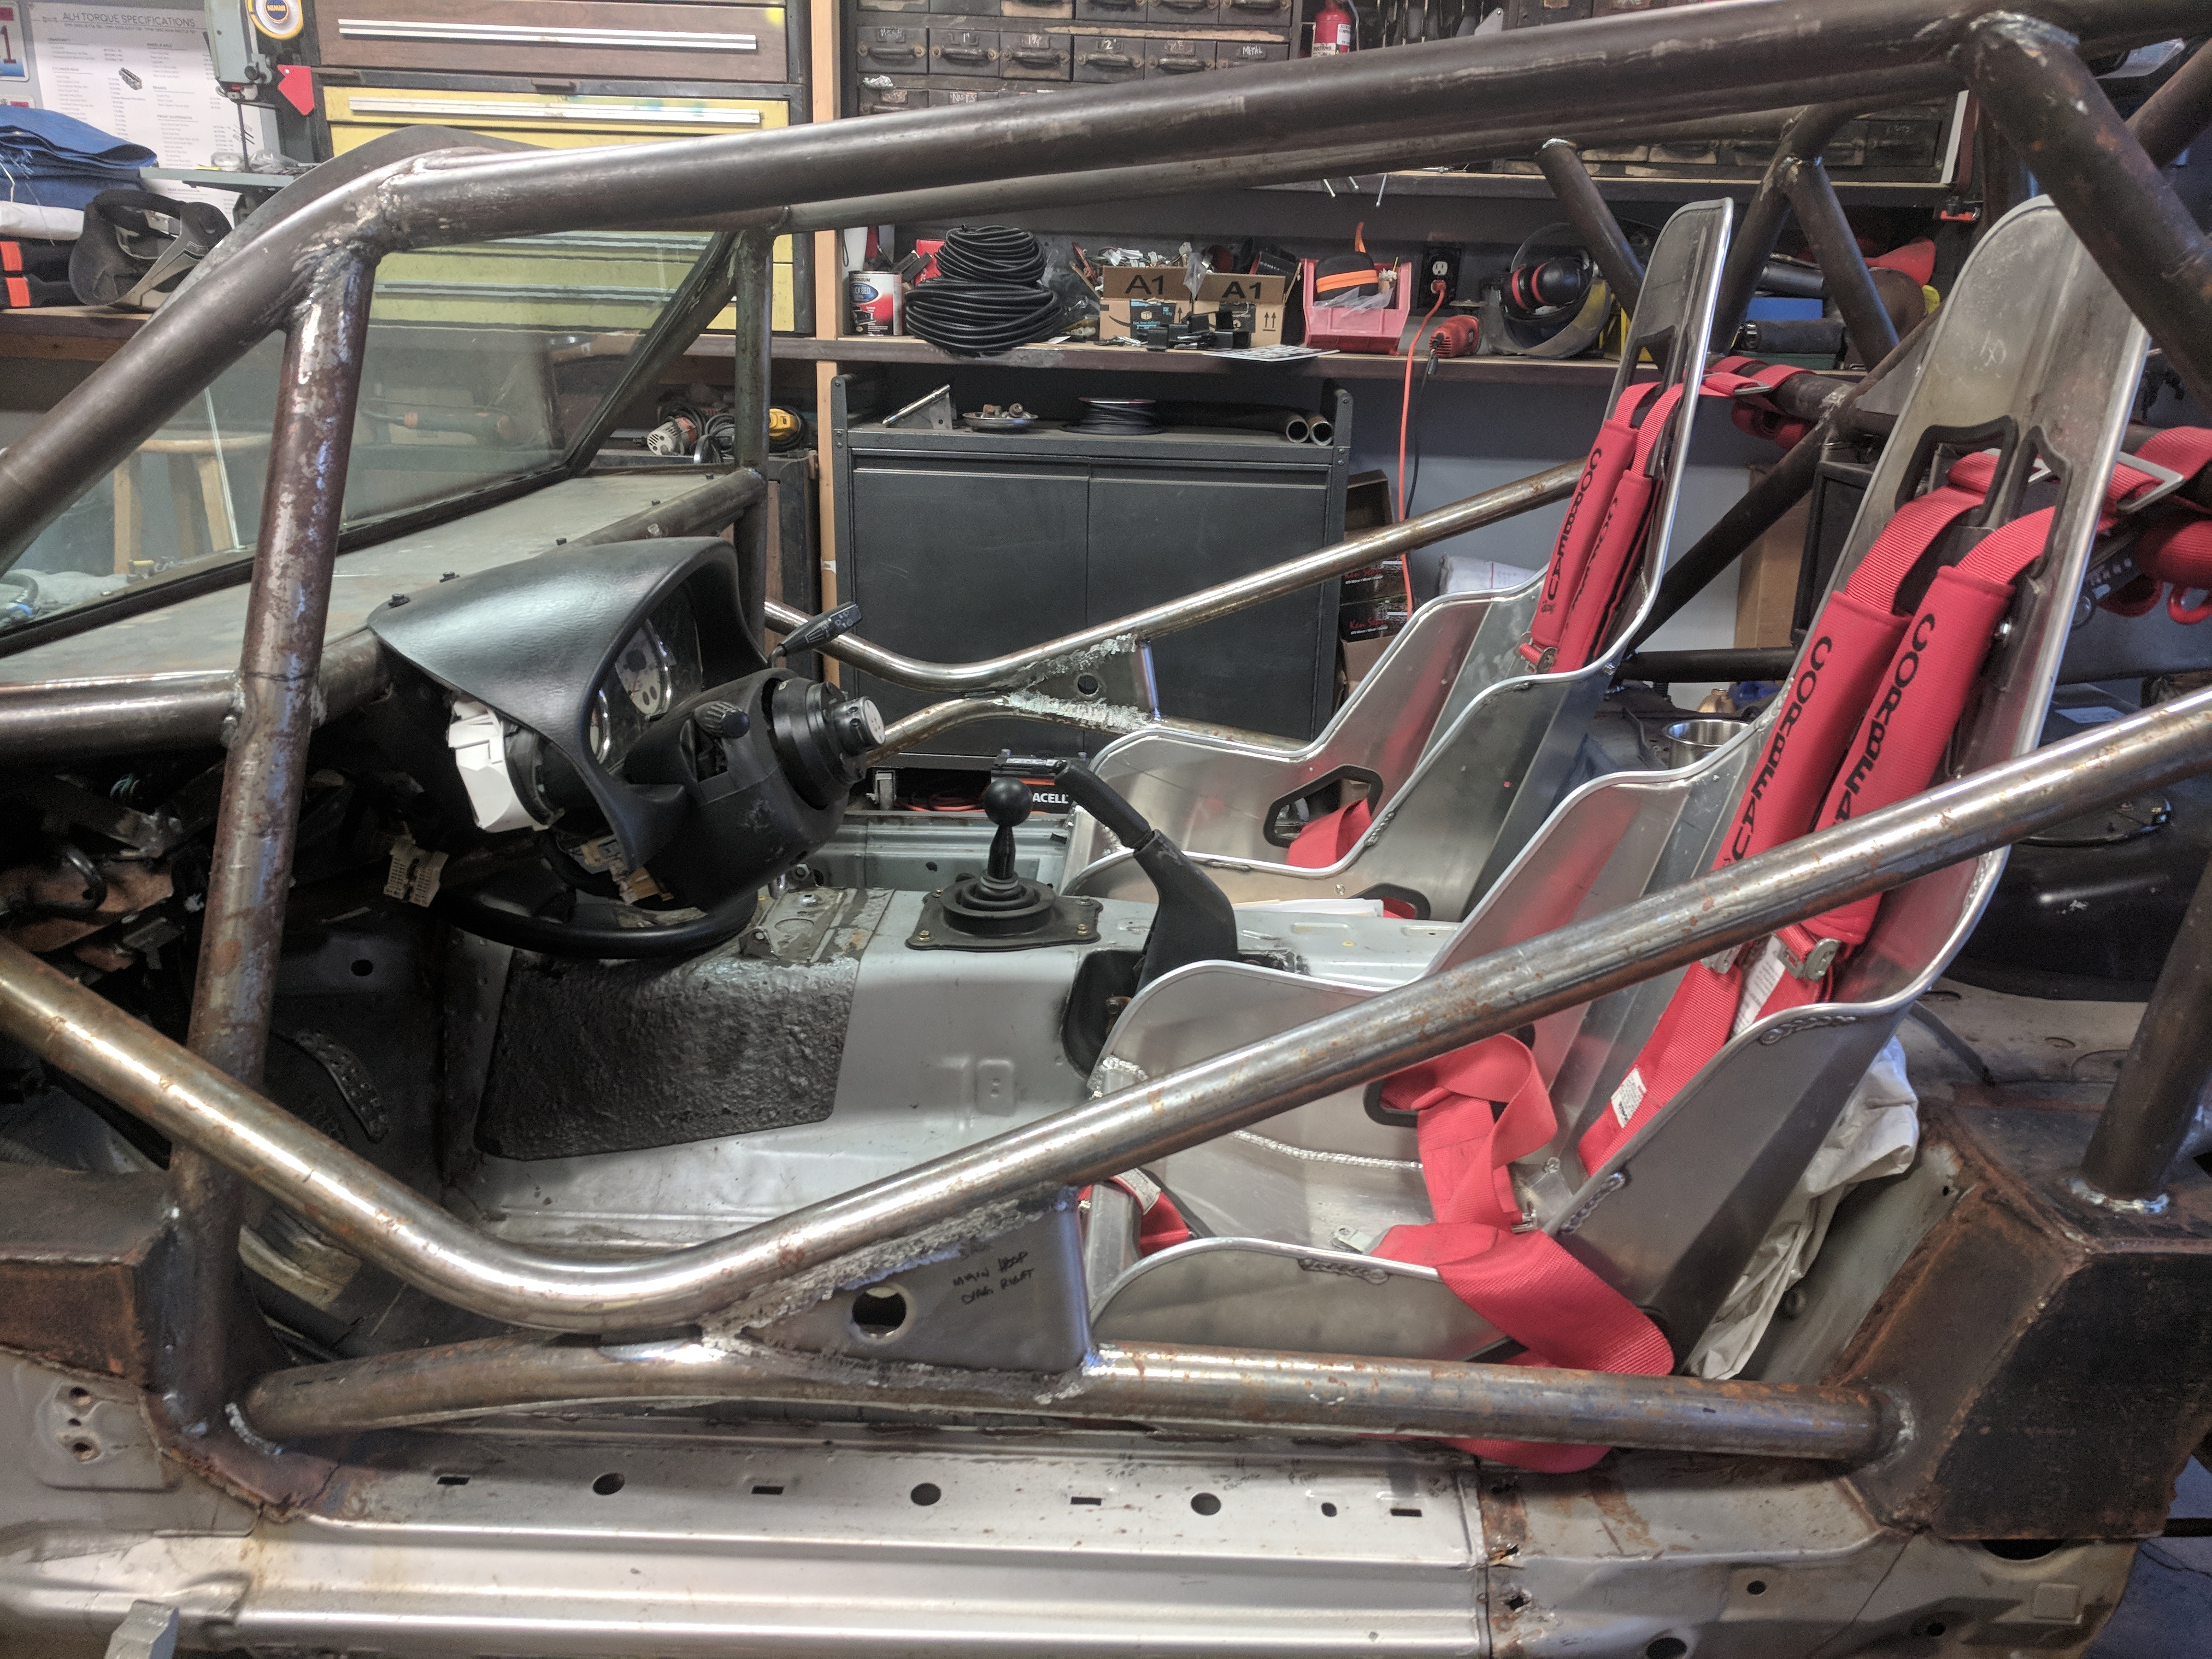
Lots of good progress recently. Wiring is all routed, wrapped in Tesa harness tape - bulbs and relays in, everything looking good!
Speaking of wiring - Where I could, I routed the wiring through the roll cage bars themselves (to avoid zip ties wherever possible) - so, drill a hole, plug it with a gusset, route the wire, profit!
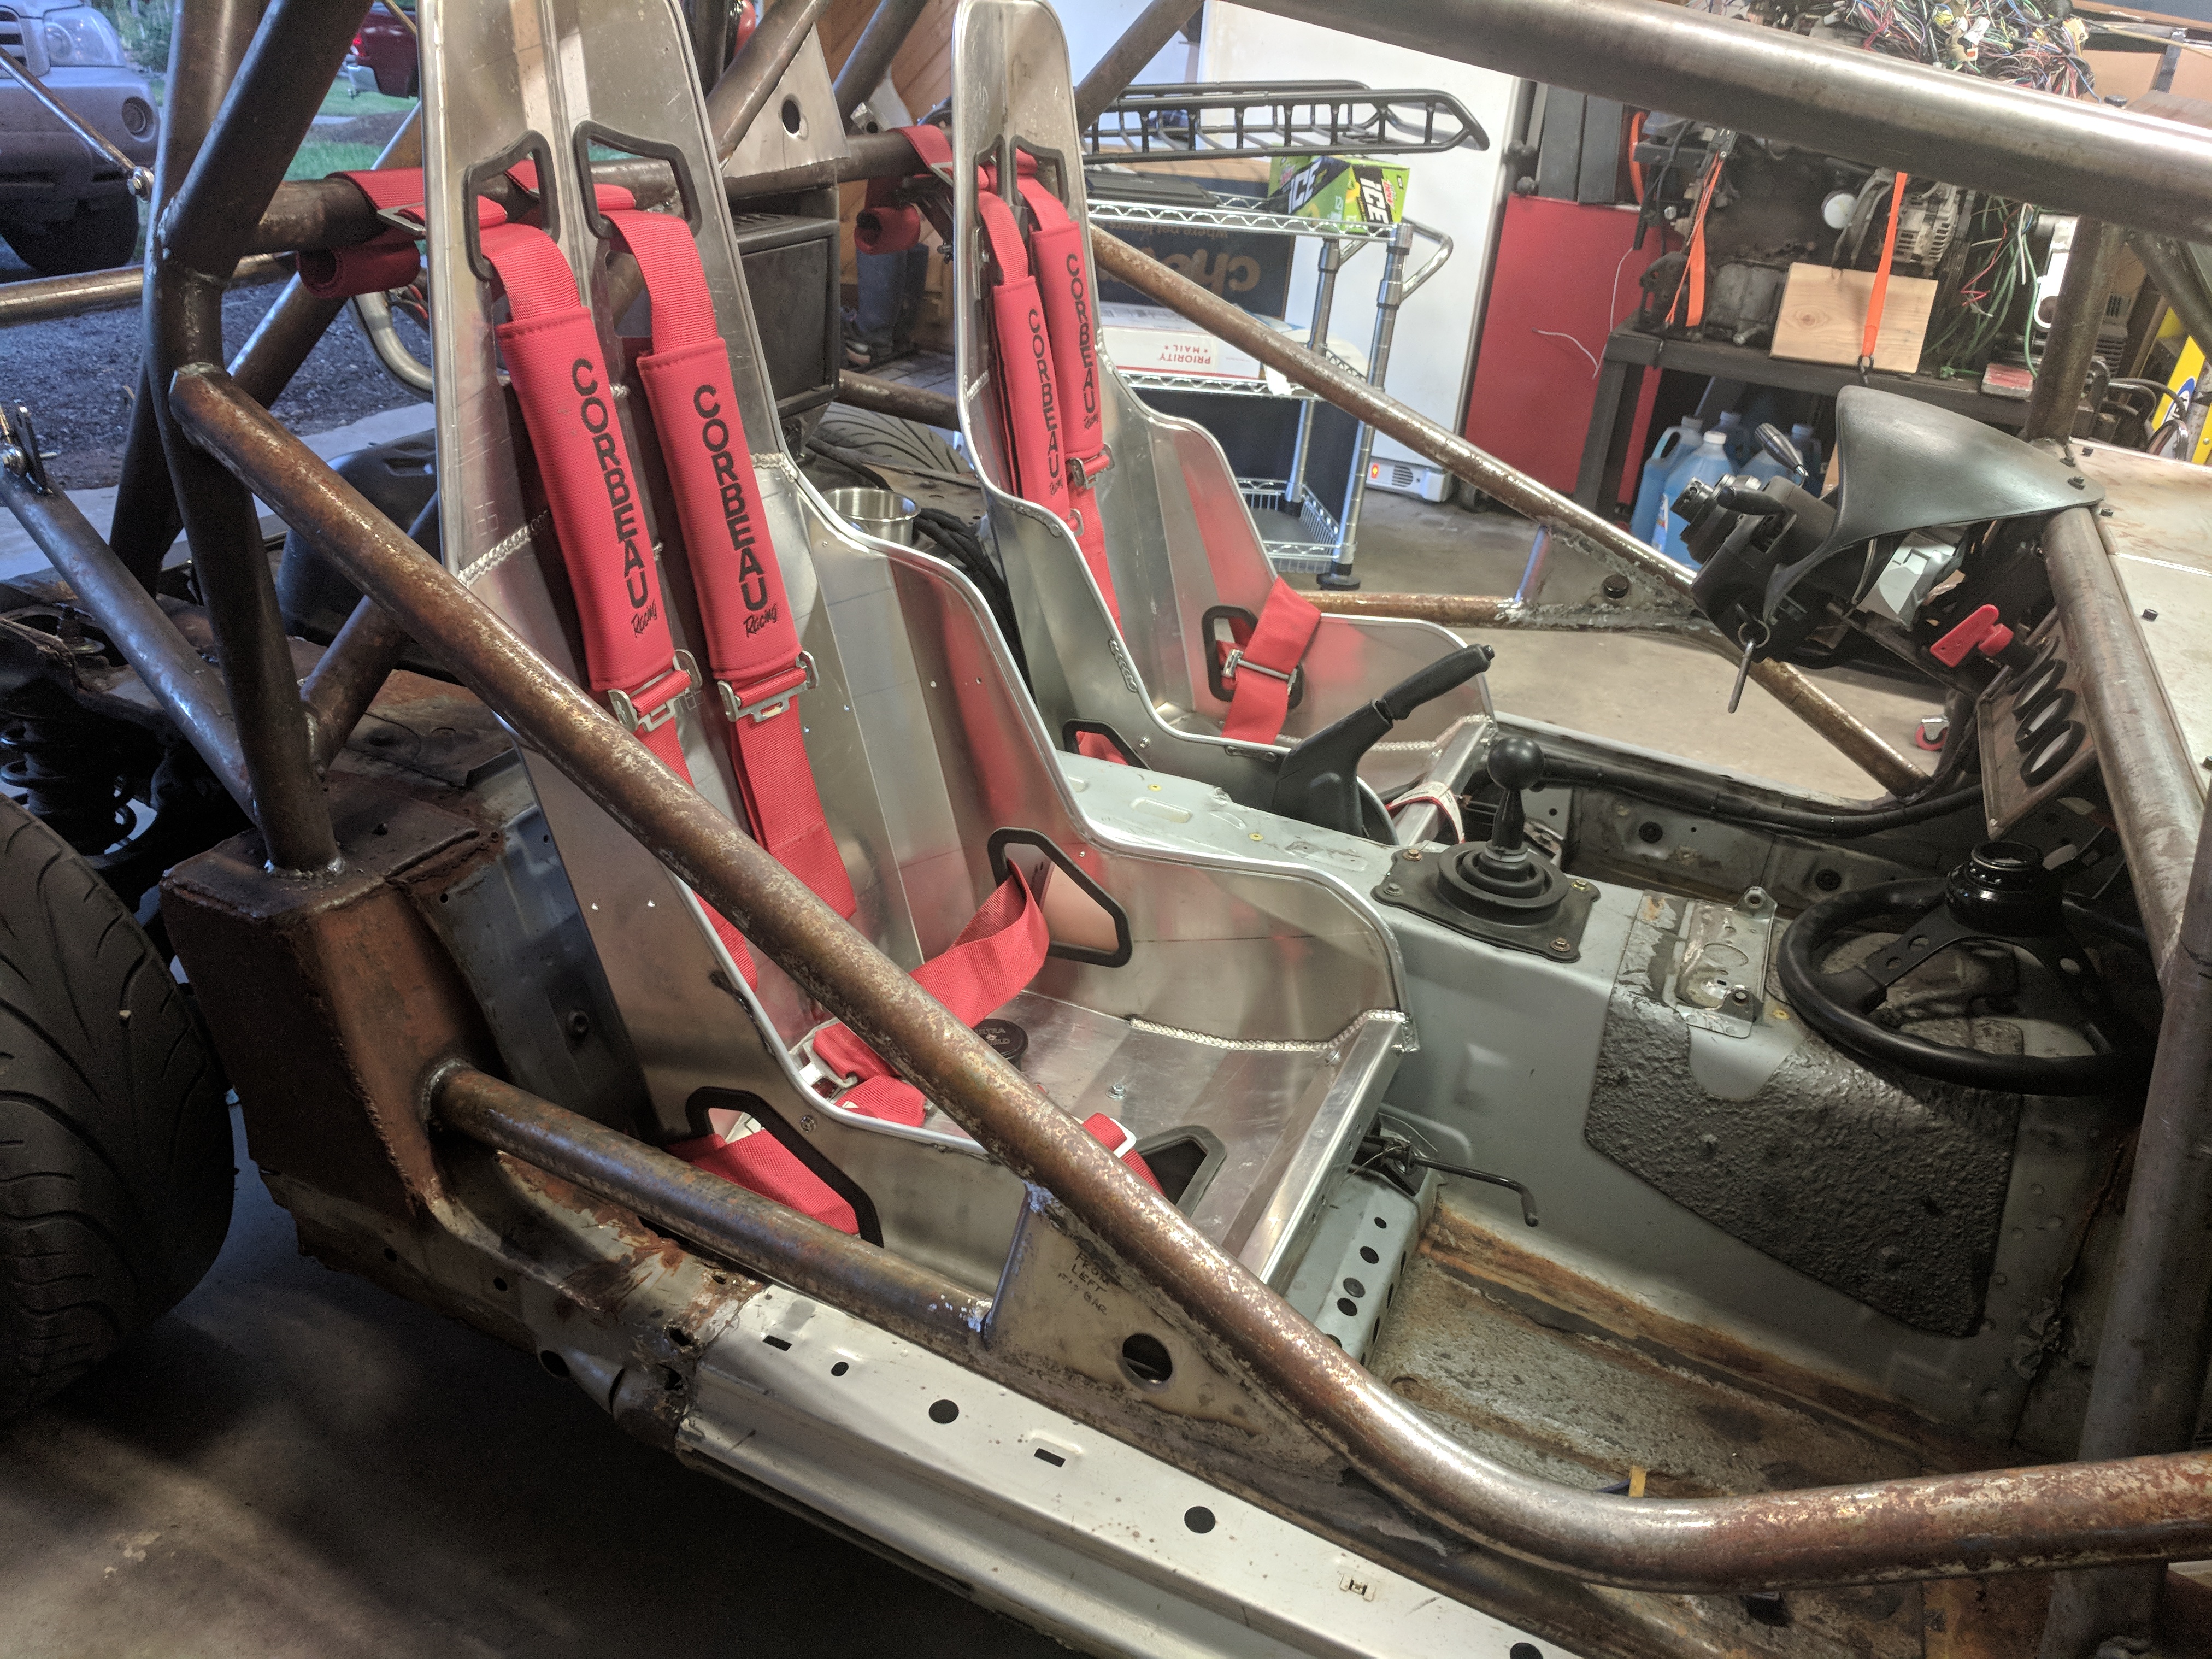
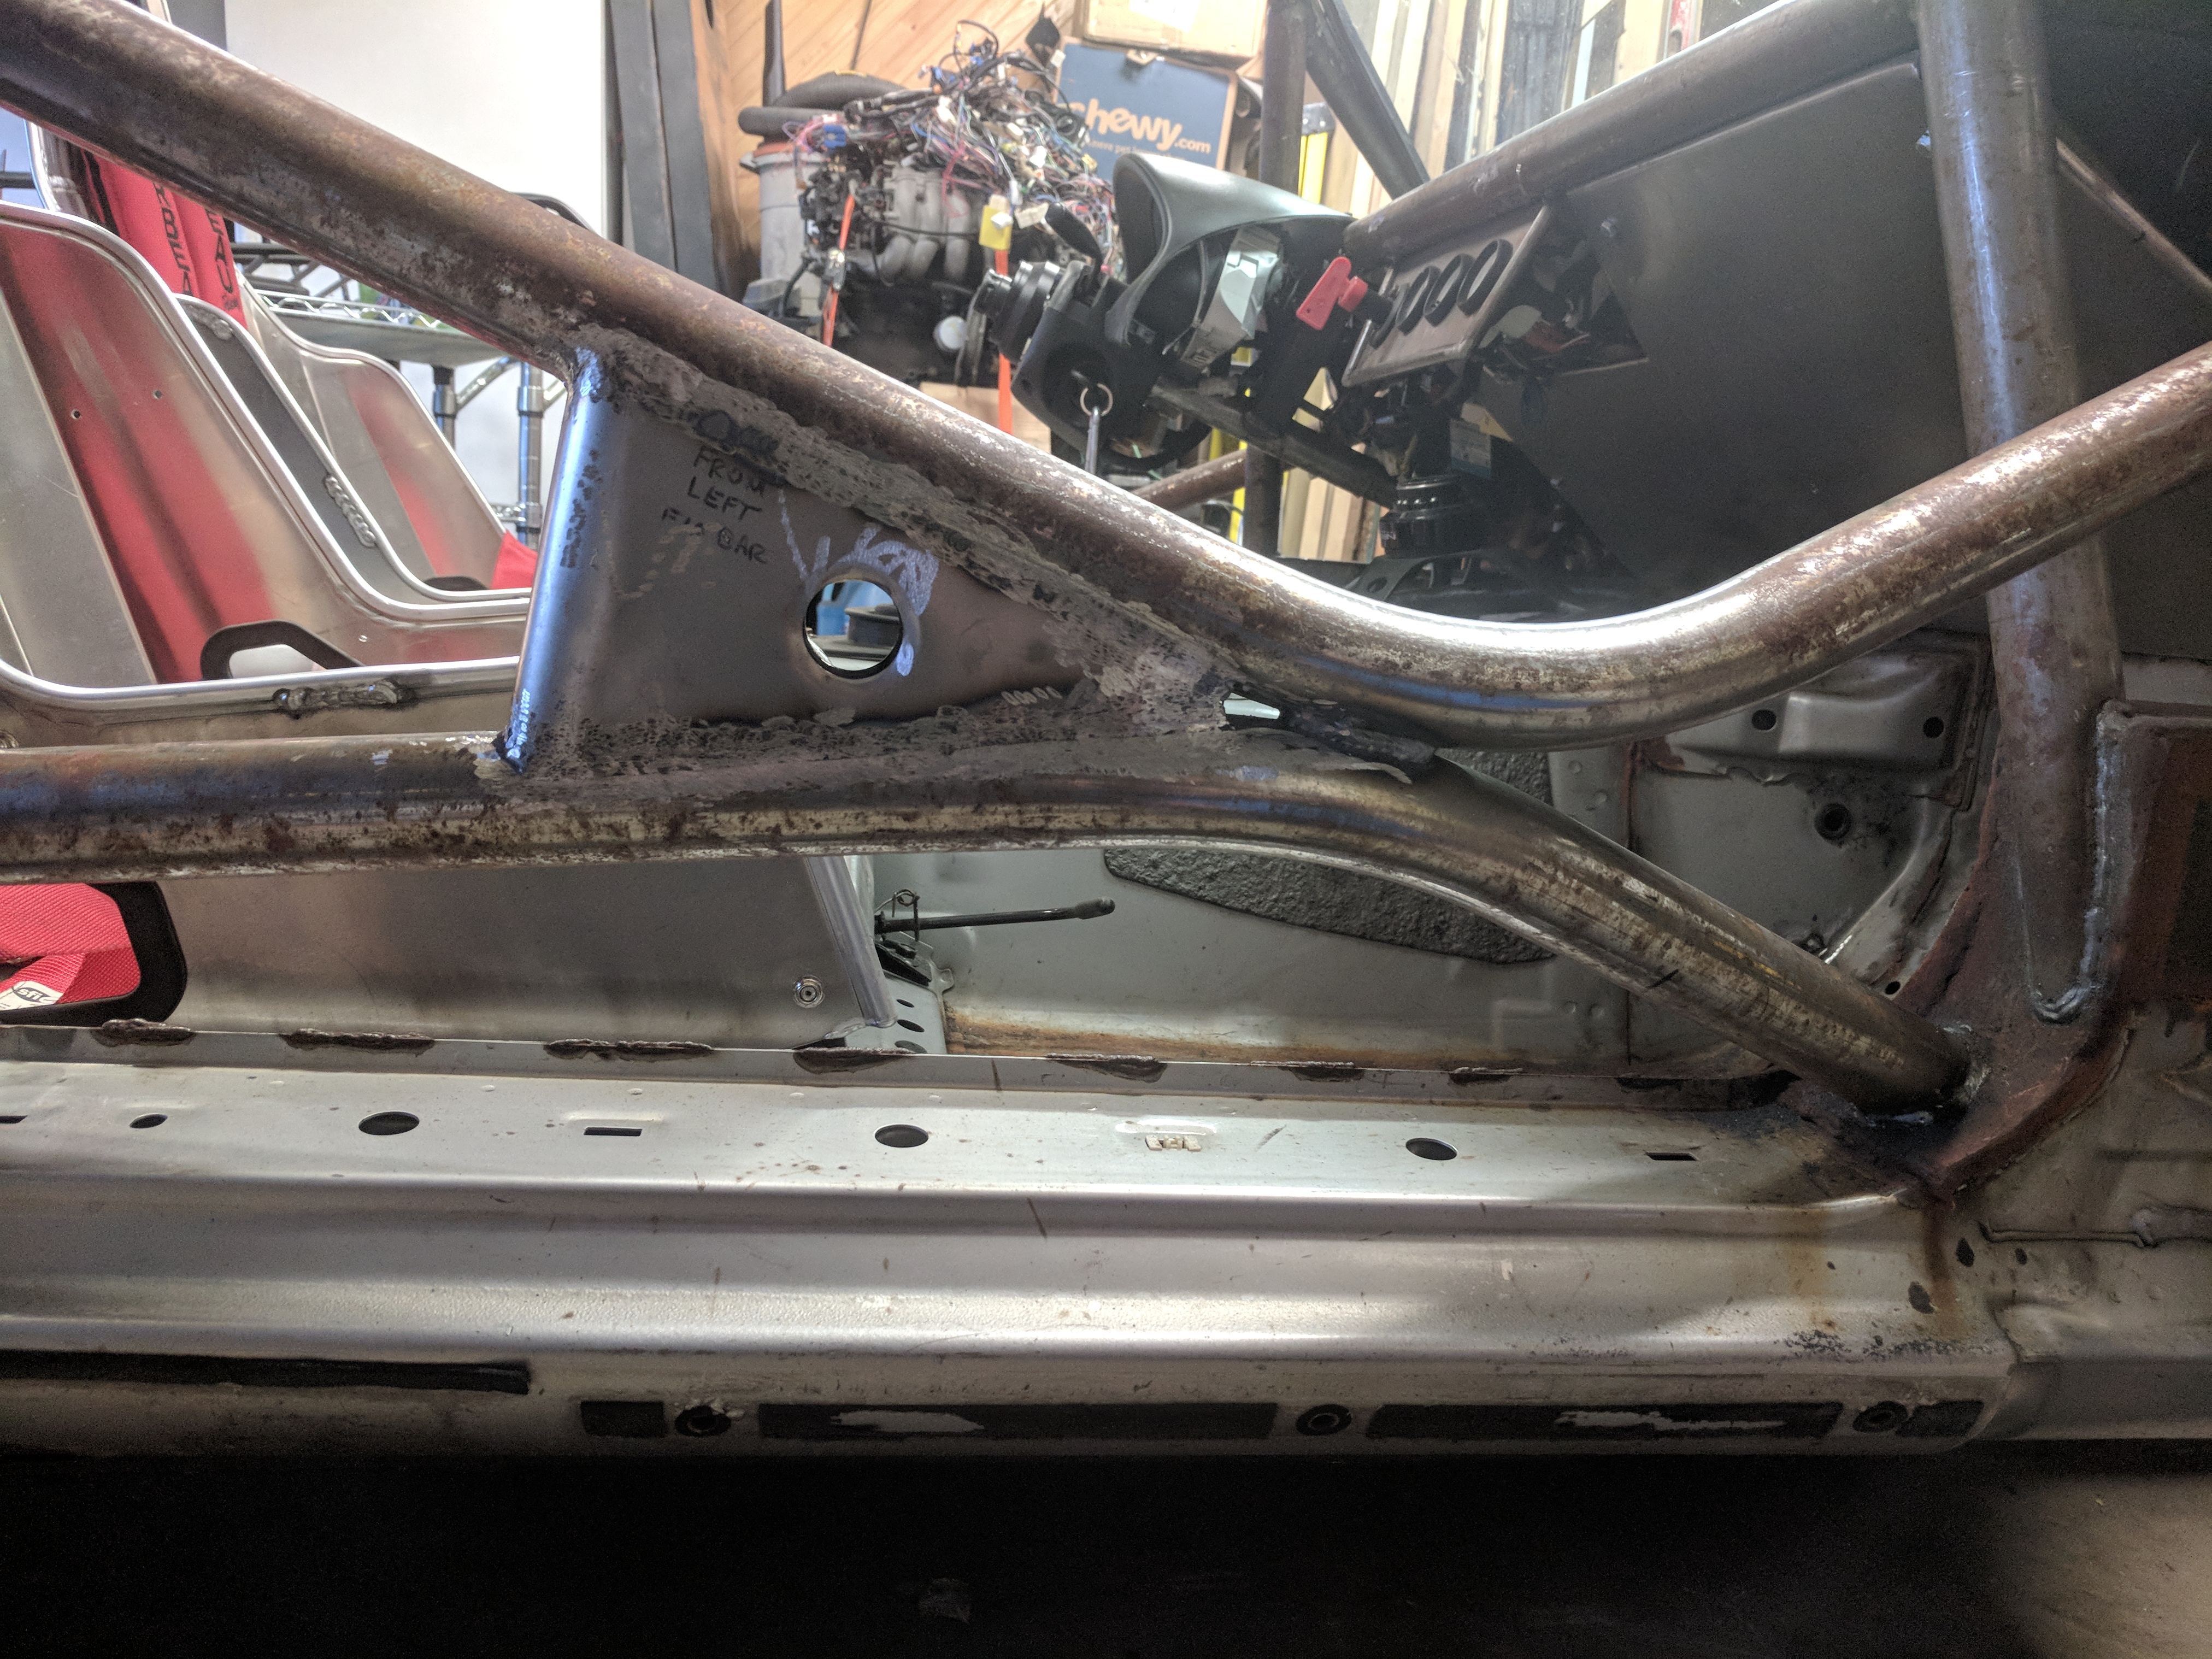
Door Bars:
Made good progress last night - whipped up the door bars - very pleased with the outcome.
They kick out about 4"-5", all four points landing on a reinforced plate or the cage itself. Ended up using EXACTLY 20' on these door bars, using up my last stick! VERY glad I don't have to buy another 20' @ $8.75/ft.
I have yet to make a little vertical 'leg', that will intersection the door bar 'X', then run down to the running board / sill, landing on a reinforcing plate.

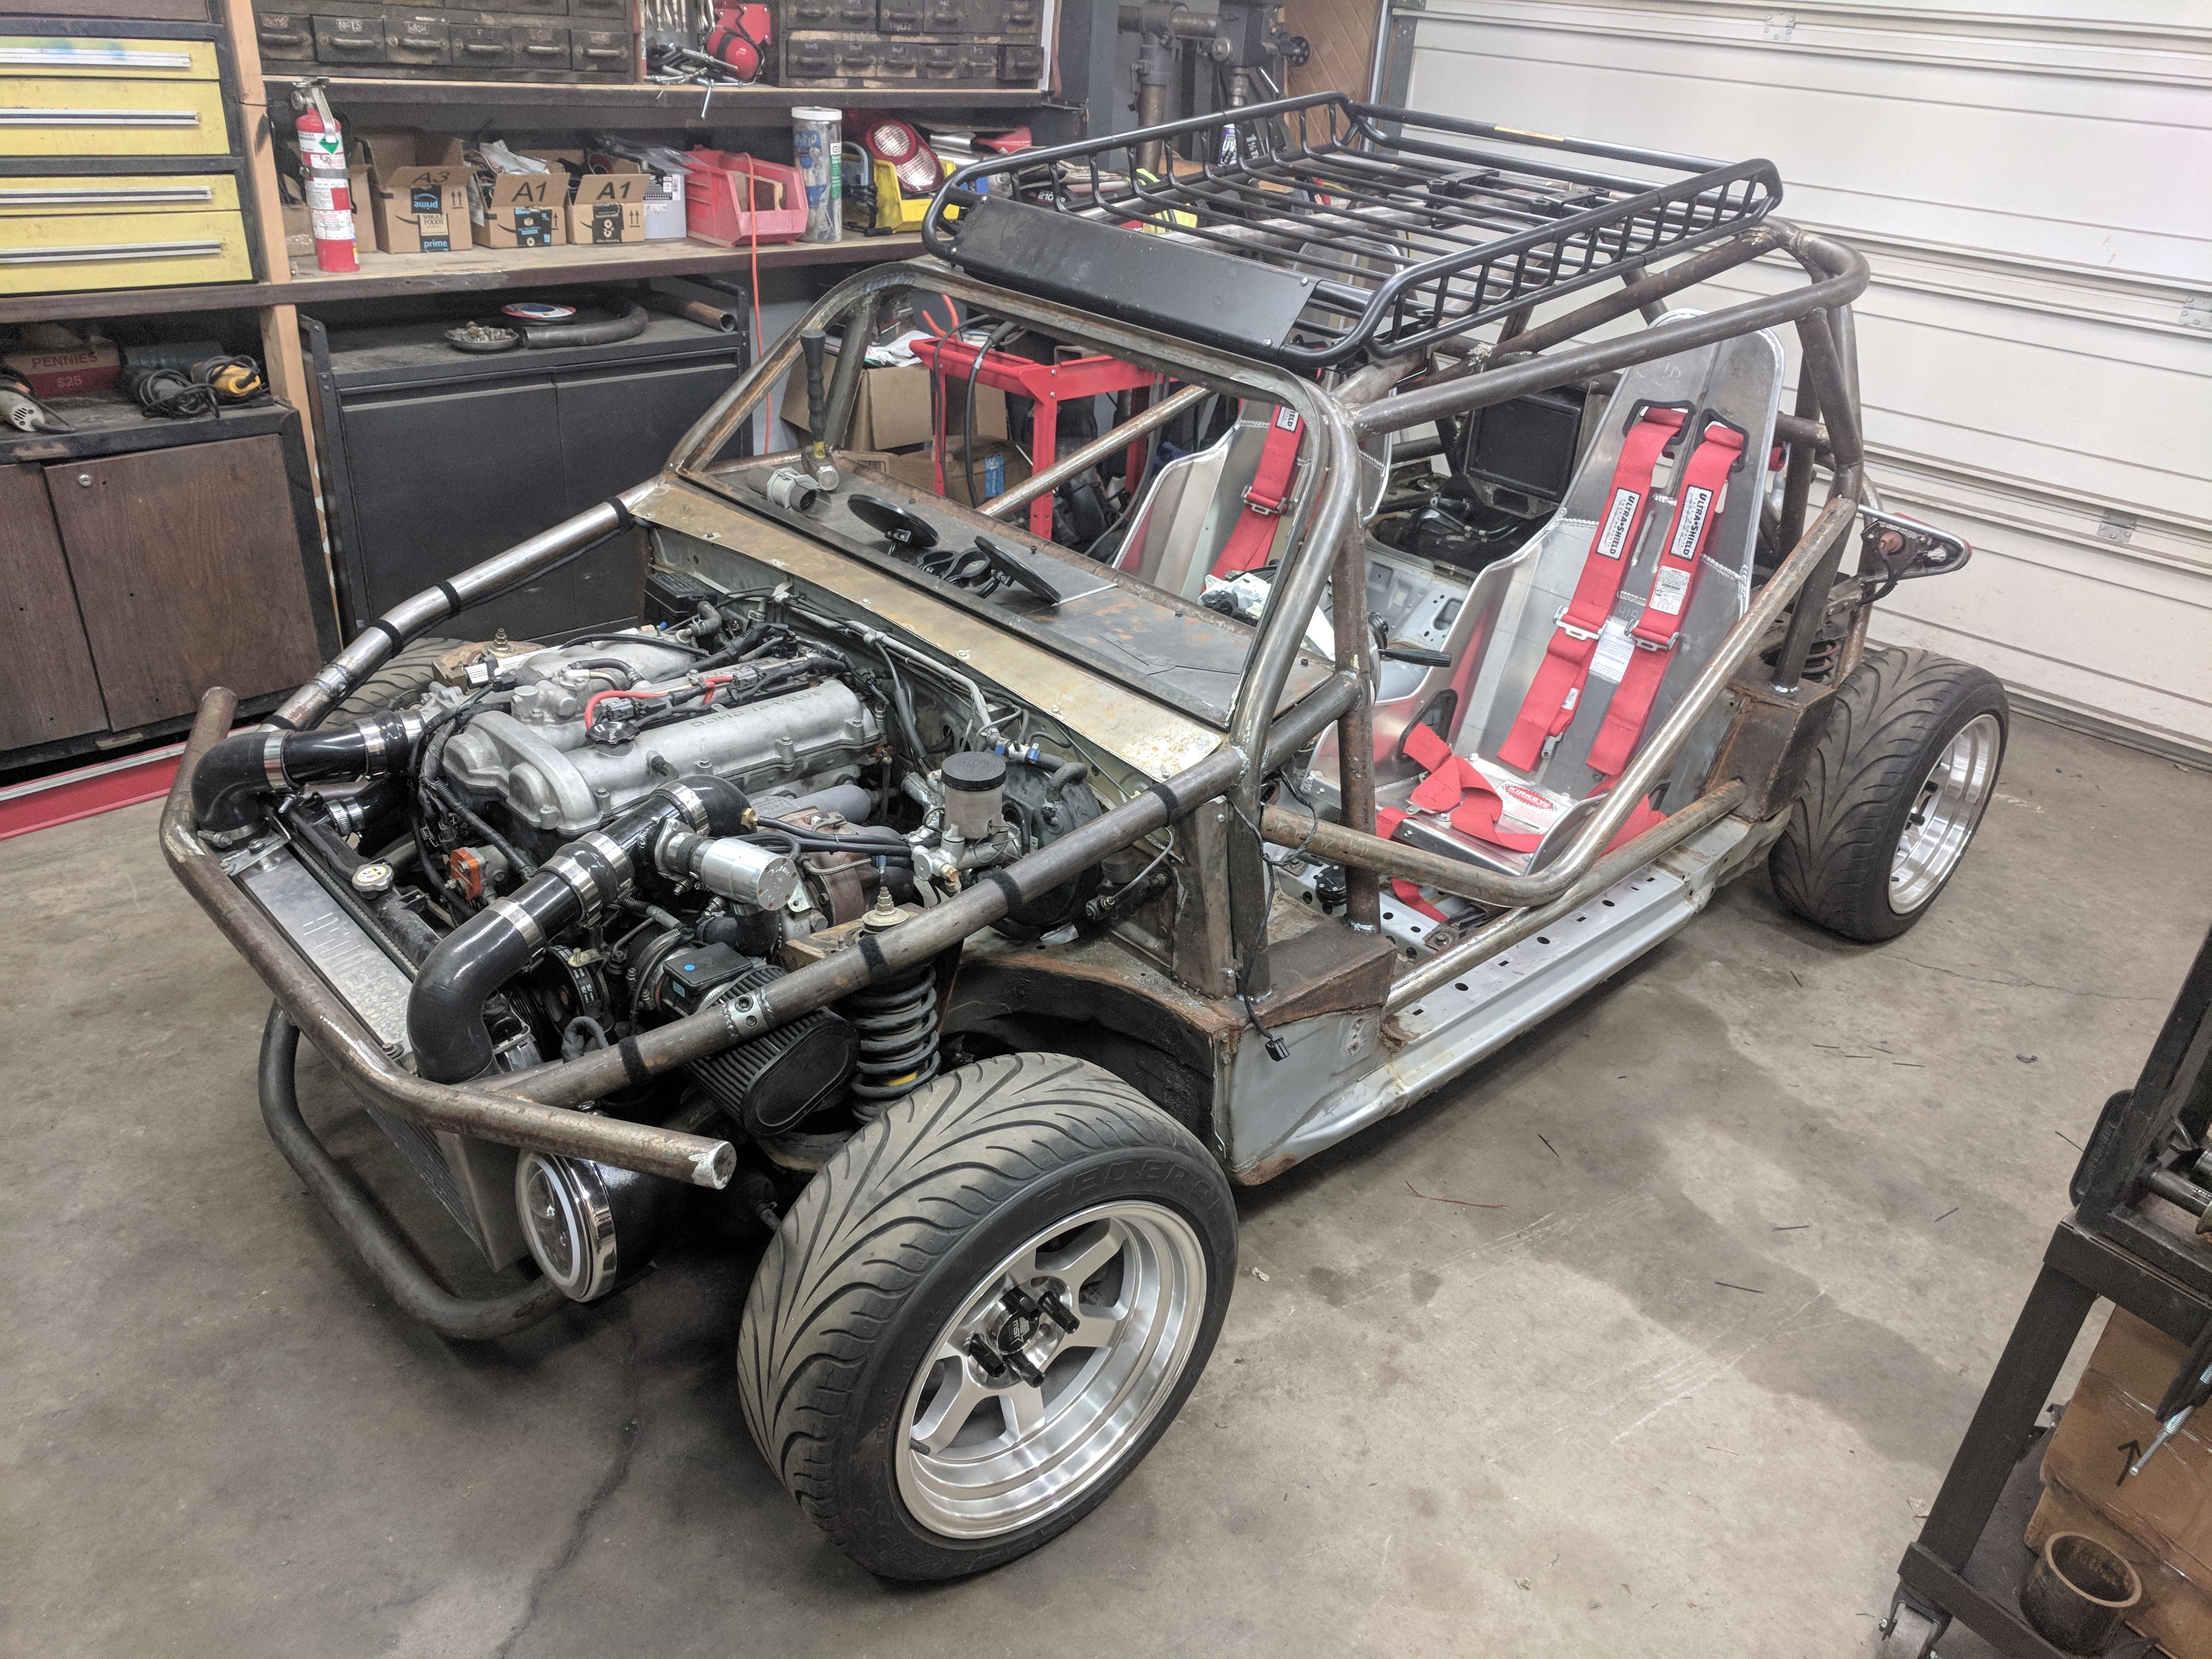
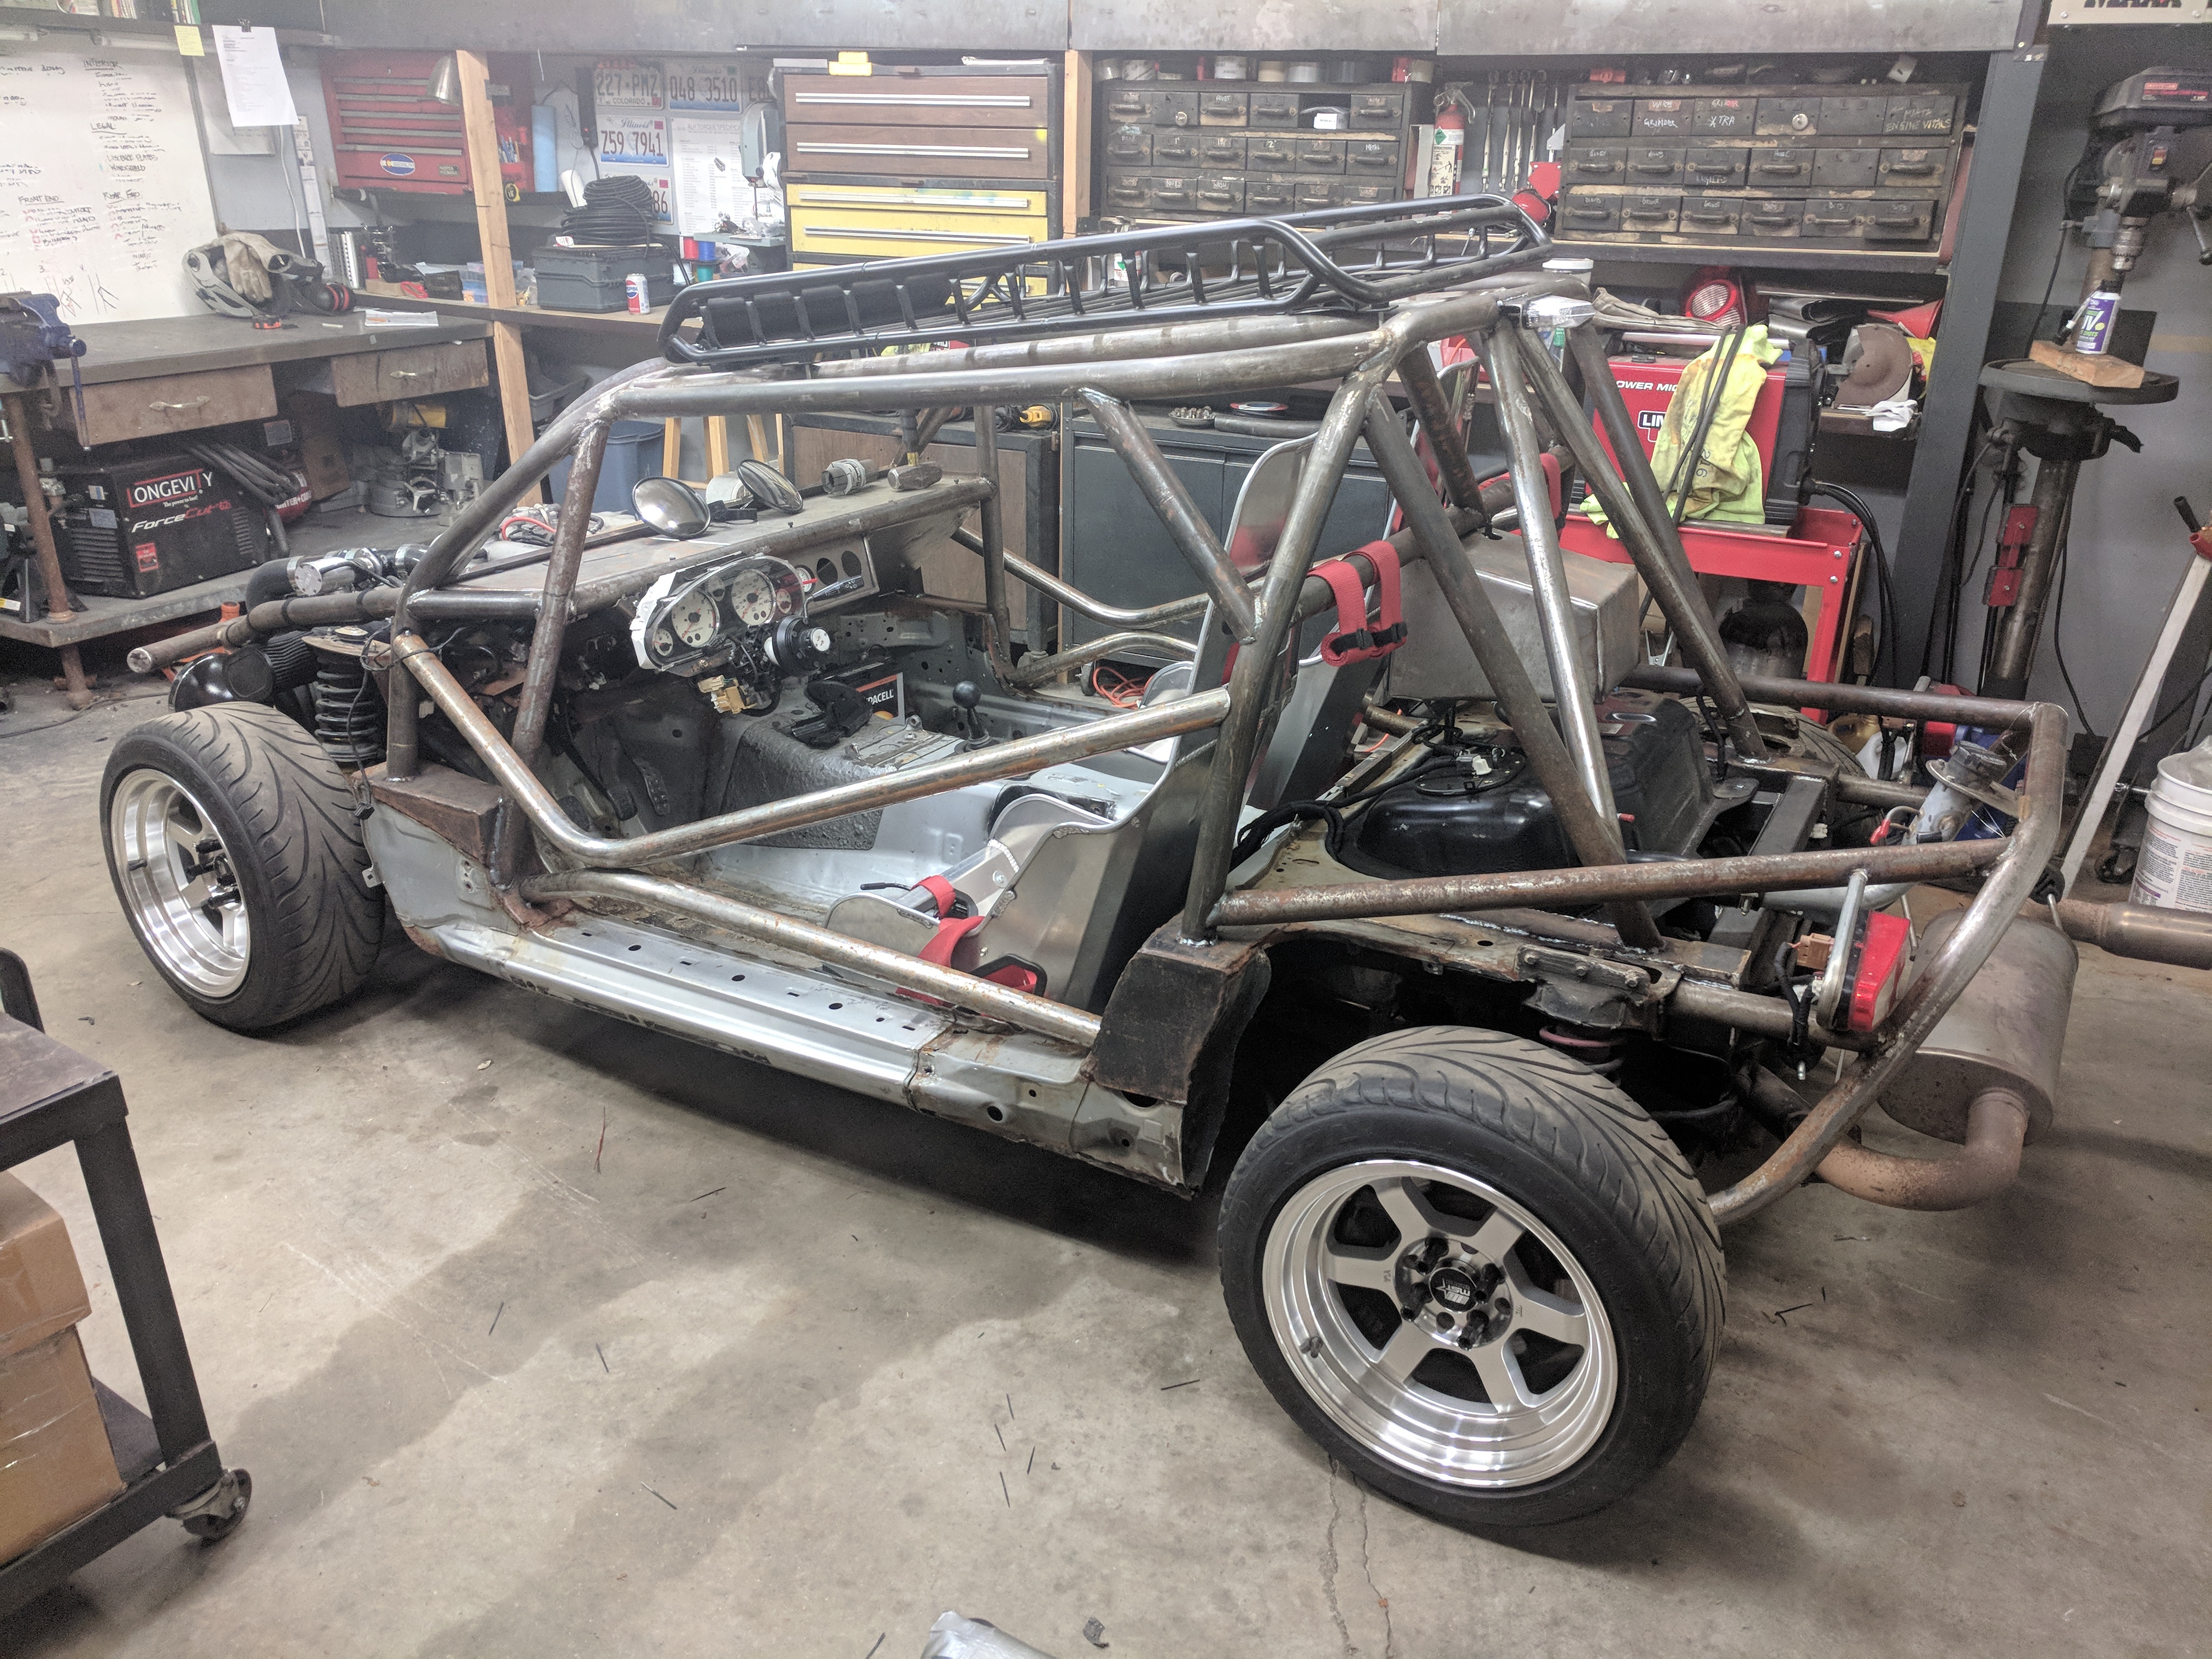
SO! At this point the car is Street Legal AND Safe - I'm going to create seat-back brackets, wire in my AFR, along with tidy up a couple random bits before hitting the road. A windshield will be installed (fingers crossed) this weekend or next.
Speaking of wiring - Where I could, I routed the wiring through the roll cage bars themselves (to avoid zip ties wherever possible) - so, drill a hole, plug it with a gusset, route the wire, profit!
Door Bars:
Made good progress last night - whipped up the door bars - very pleased with the outcome.
They kick out about 4"-5", all four points landing on a reinforced plate or the cage itself. Ended up using EXACTLY 20' on these door bars, using up my last stick! VERY glad I don't have to buy another 20' @ $8.75/ft.
I have yet to make a little vertical 'leg', that will intersection the door bar 'X', then run down to the running board / sill, landing on a reinforcing plate.
SO! At this point the car is Street Legal AND Safe - I'm going to create seat-back brackets, wire in my AFR, along with tidy up a couple random bits before hitting the road. A windshield will be installed (fingers crossed) this weekend or next.
Reply
1
1
07-23-2019, 01:49 PM
#85
Junior Member
Thread Starter
iTrader: (3)
Join Date: Oct 2015
Location: Steamboat Springs, CO
Posts: 329
Total Cats: 22
The headlights seem fine - I put them inside 7" cases. The lights themselves are SUPER bright, but do have decent cut-offs. I have yet to aim them. All these 7" Jeep headlights are plug and play for NA/NB1 (not NB2 like my car), and therefore required some wiring trickery. I do like the amber 'halo' ring turn signal - simplified the front of the car a LOT.
One thing unique about these (as opposed to most other 7" LED headlights on Amazon) is the DOT certified paperwork that came with the headlights - MASSIVE deal when/if I get pulled over in this ridiculous car - best to have paperwork in order.
I'll update with photos / thoughts after some use.
Reply
0
0
07-23-2019, 01:59 PM
#86
Junior Member

Join Date: Jan 2016
Location: Wadsworth, Ohio
Posts: 417
Total Cats: 67
Thanks for the detailed description. I have been thinking about replacing my stock 1991 headlights with ones that look identical to yours. I don't drive at night much so its been a low priority.
What color do you plan on painting it?
What color do you plan on painting it?
Reply
0
0
07-23-2019, 02:09 PM
#87
Junior Member
Thread Starter
iTrader: (3)
Join Date: Oct 2015
Location: Steamboat Springs, CO
Posts: 329
Total Cats: 22
Color is tricky.
Going to DD the car from now-ish to mid-fall - trying to give it a good shake-down and making sure I don't want to add / move any kind of brackets, tubes, etc.
Once all the metal work / welding is locked in, I'll start on paint.
Paint - lots of options... roll cage will either be black or clear-coated. Tub probably a deep metallic gray. Then not sure if I'll leave it there or add an accent color - possibly some details in either blue, orange, or purple.
I'm in process of collecting parts to build a powder-coating oven - have the shell (6'x3'x3' dough proofing oven) and other bits. Planning on doing lots of powder work this winter. I had considered powder coating the entire car - but too expensive, too annoying to prep - I'd rather do the finish work myself.
Reply
0
0

 08-05-2019, 11:54 AM
#89
Junior Member
Thread Starter
iTrader: (3)
Join Date: Oct 2015
Location: Steamboat Springs, CO
Posts: 329
Total Cats: 22
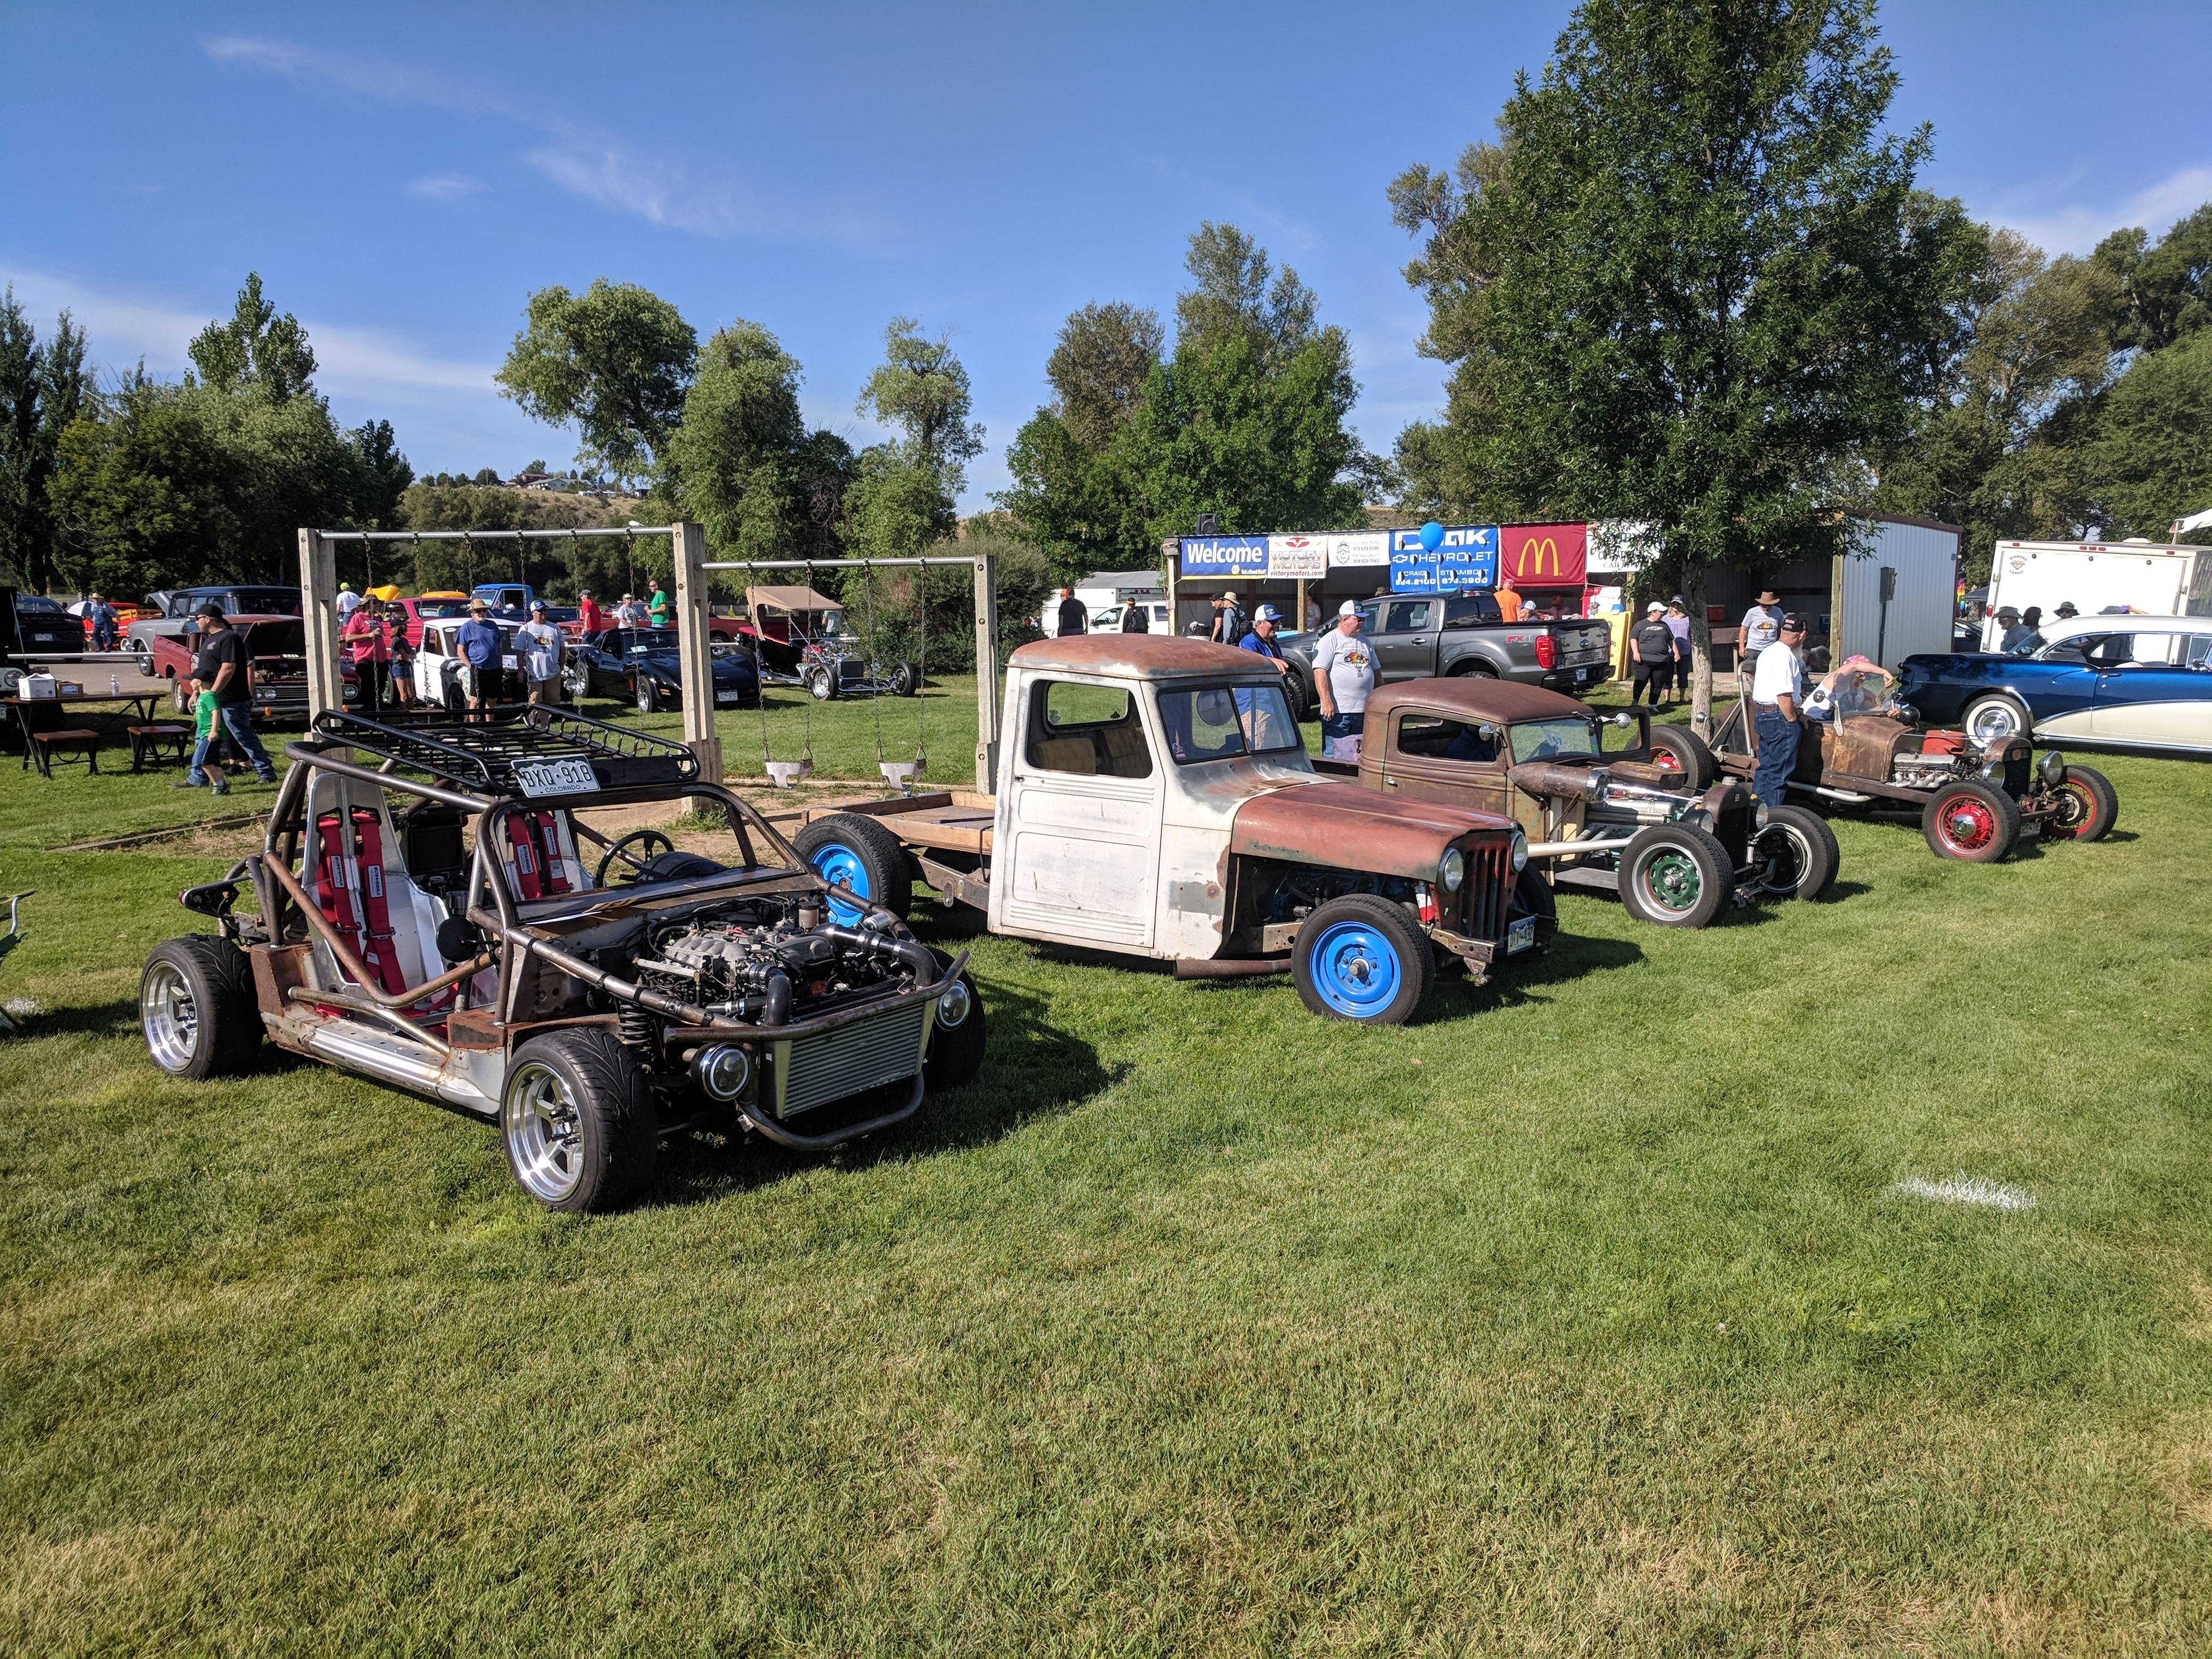
First car show for the Miata - absolute BLAST - ended up being parked next to some REAL Rat-Rods.
What category do I even enter my car in?? Modern? Import? Rat-Rod? Special Interest would be my guess....
What category do I even enter my car in?? Modern? Import? Rat-Rod? Special Interest would be my guess....
Reply
0
0
08-06-2019, 11:44 AM
#90
Junior Member
Thread Starter
iTrader: (3)
Join Date: Oct 2015
Location: Steamboat Springs, CO
Posts: 329
Total Cats: 22
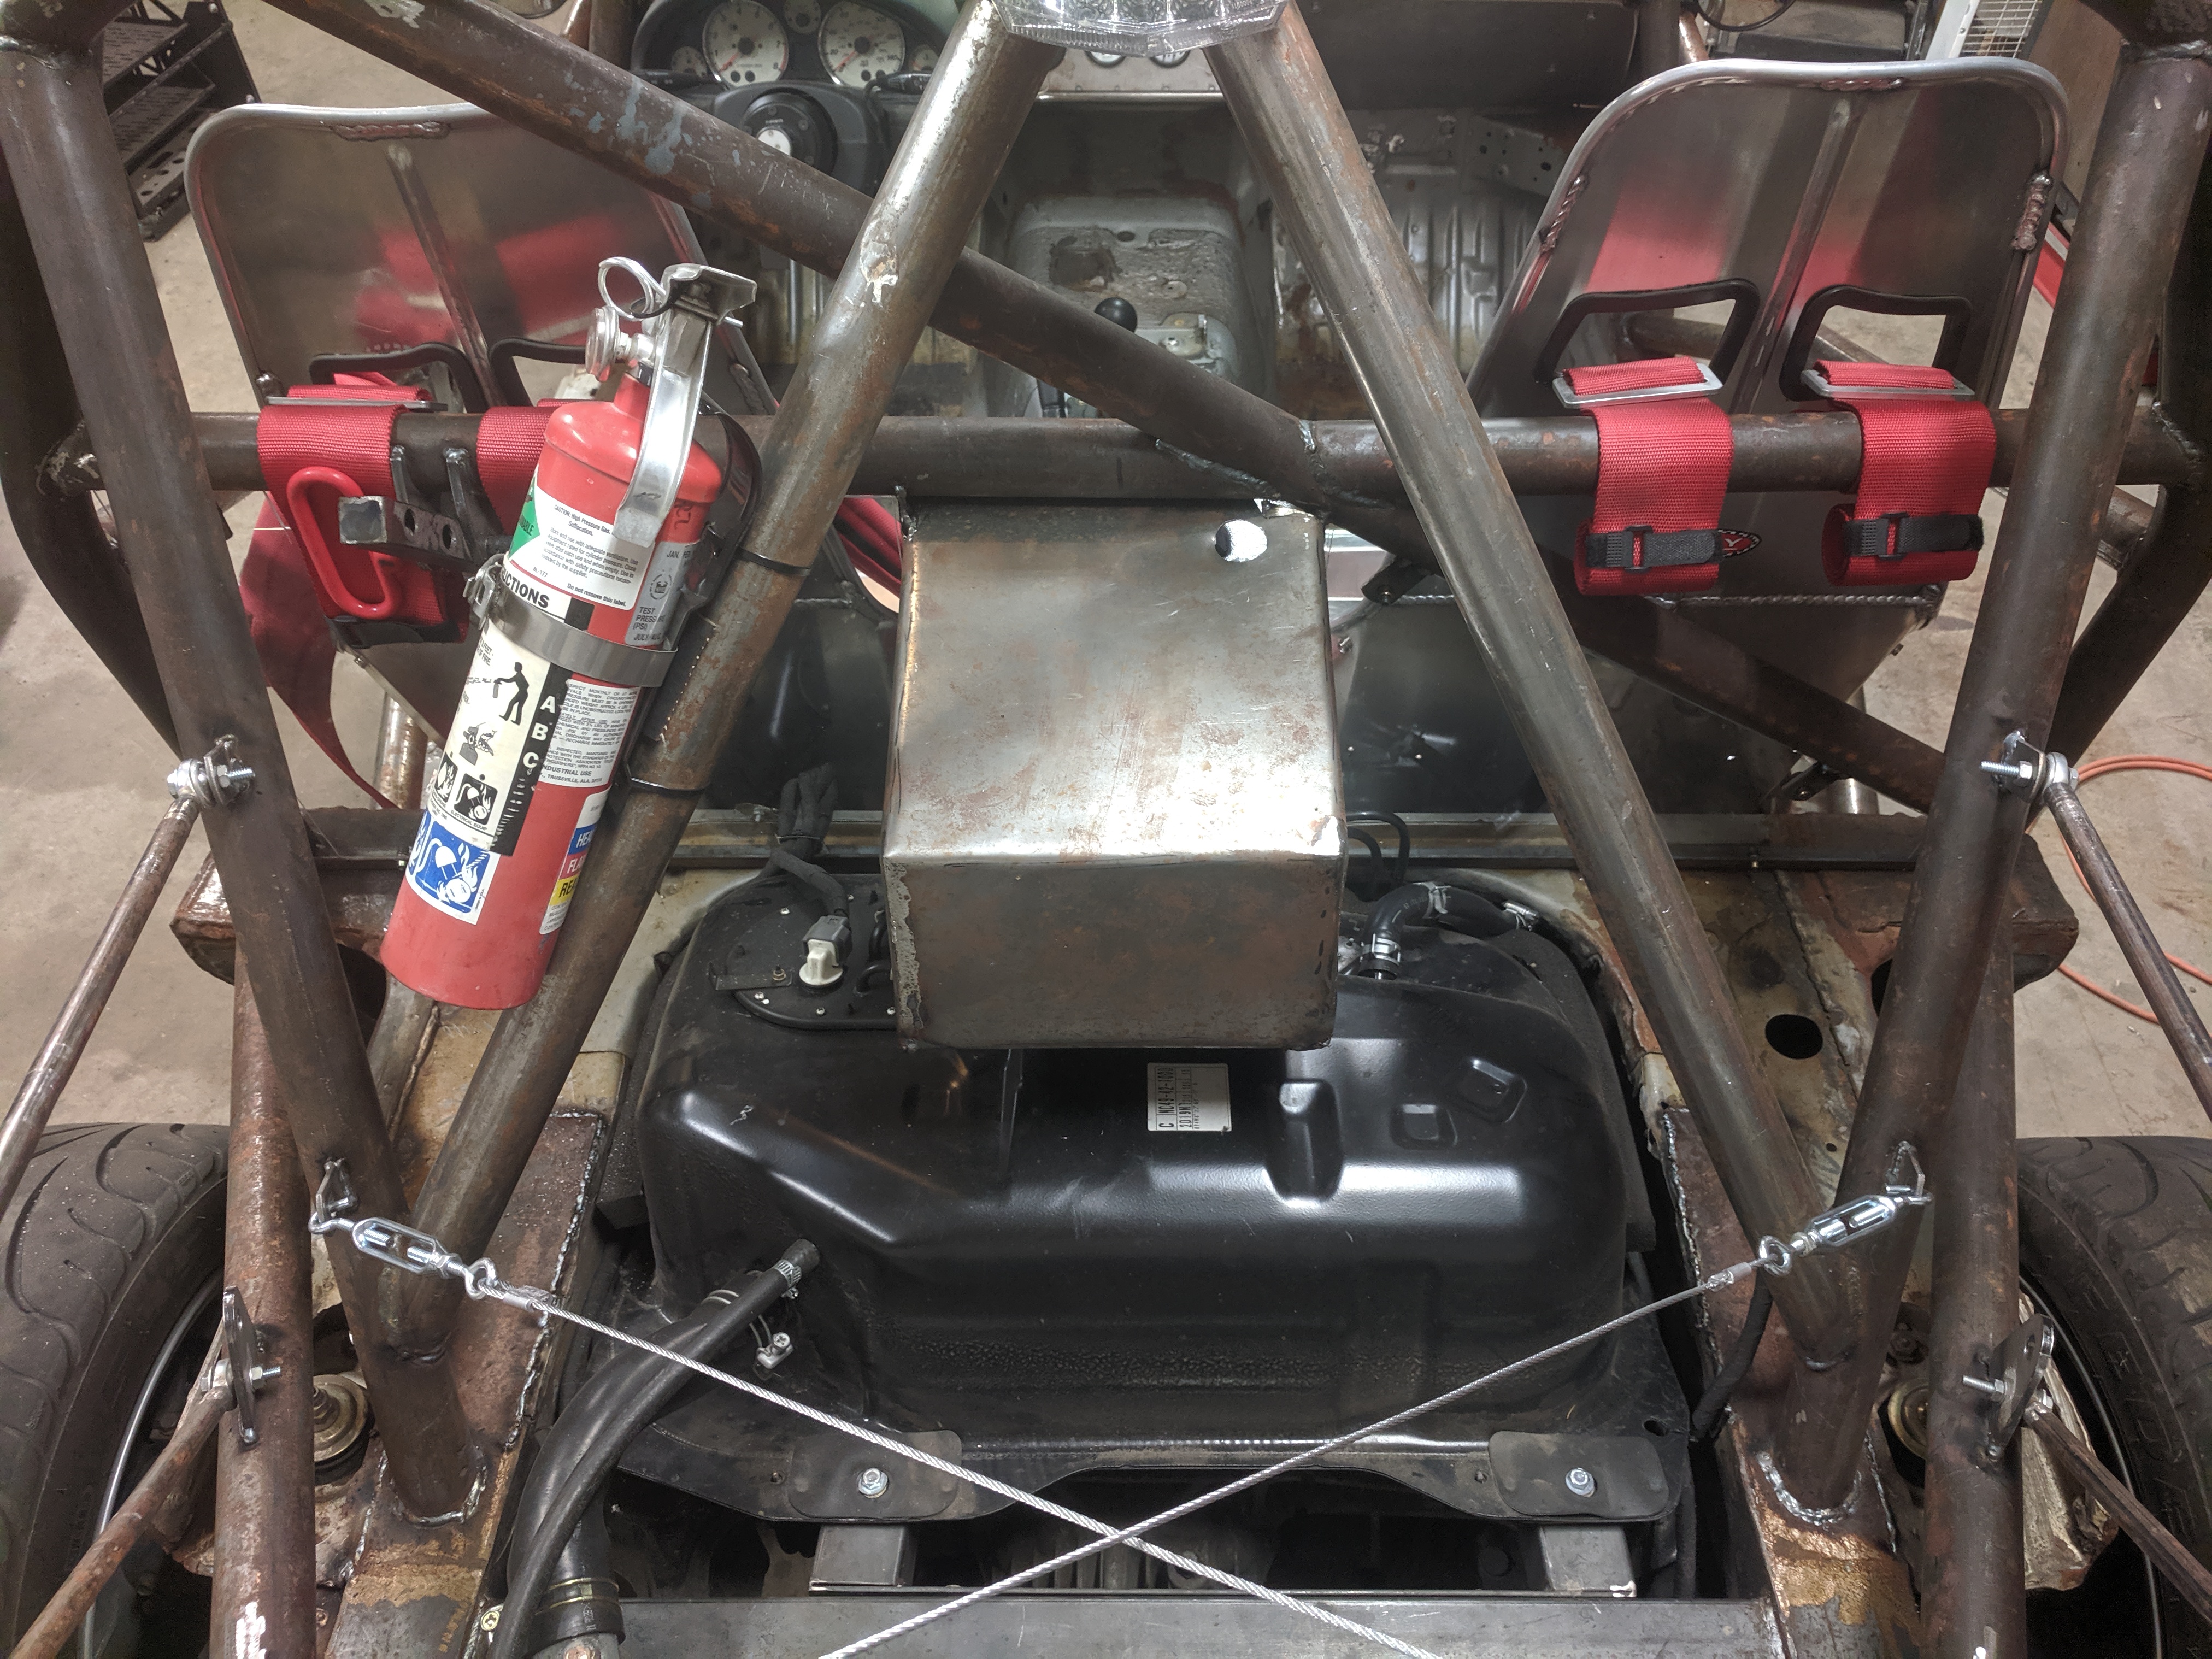
(Tiny) update -
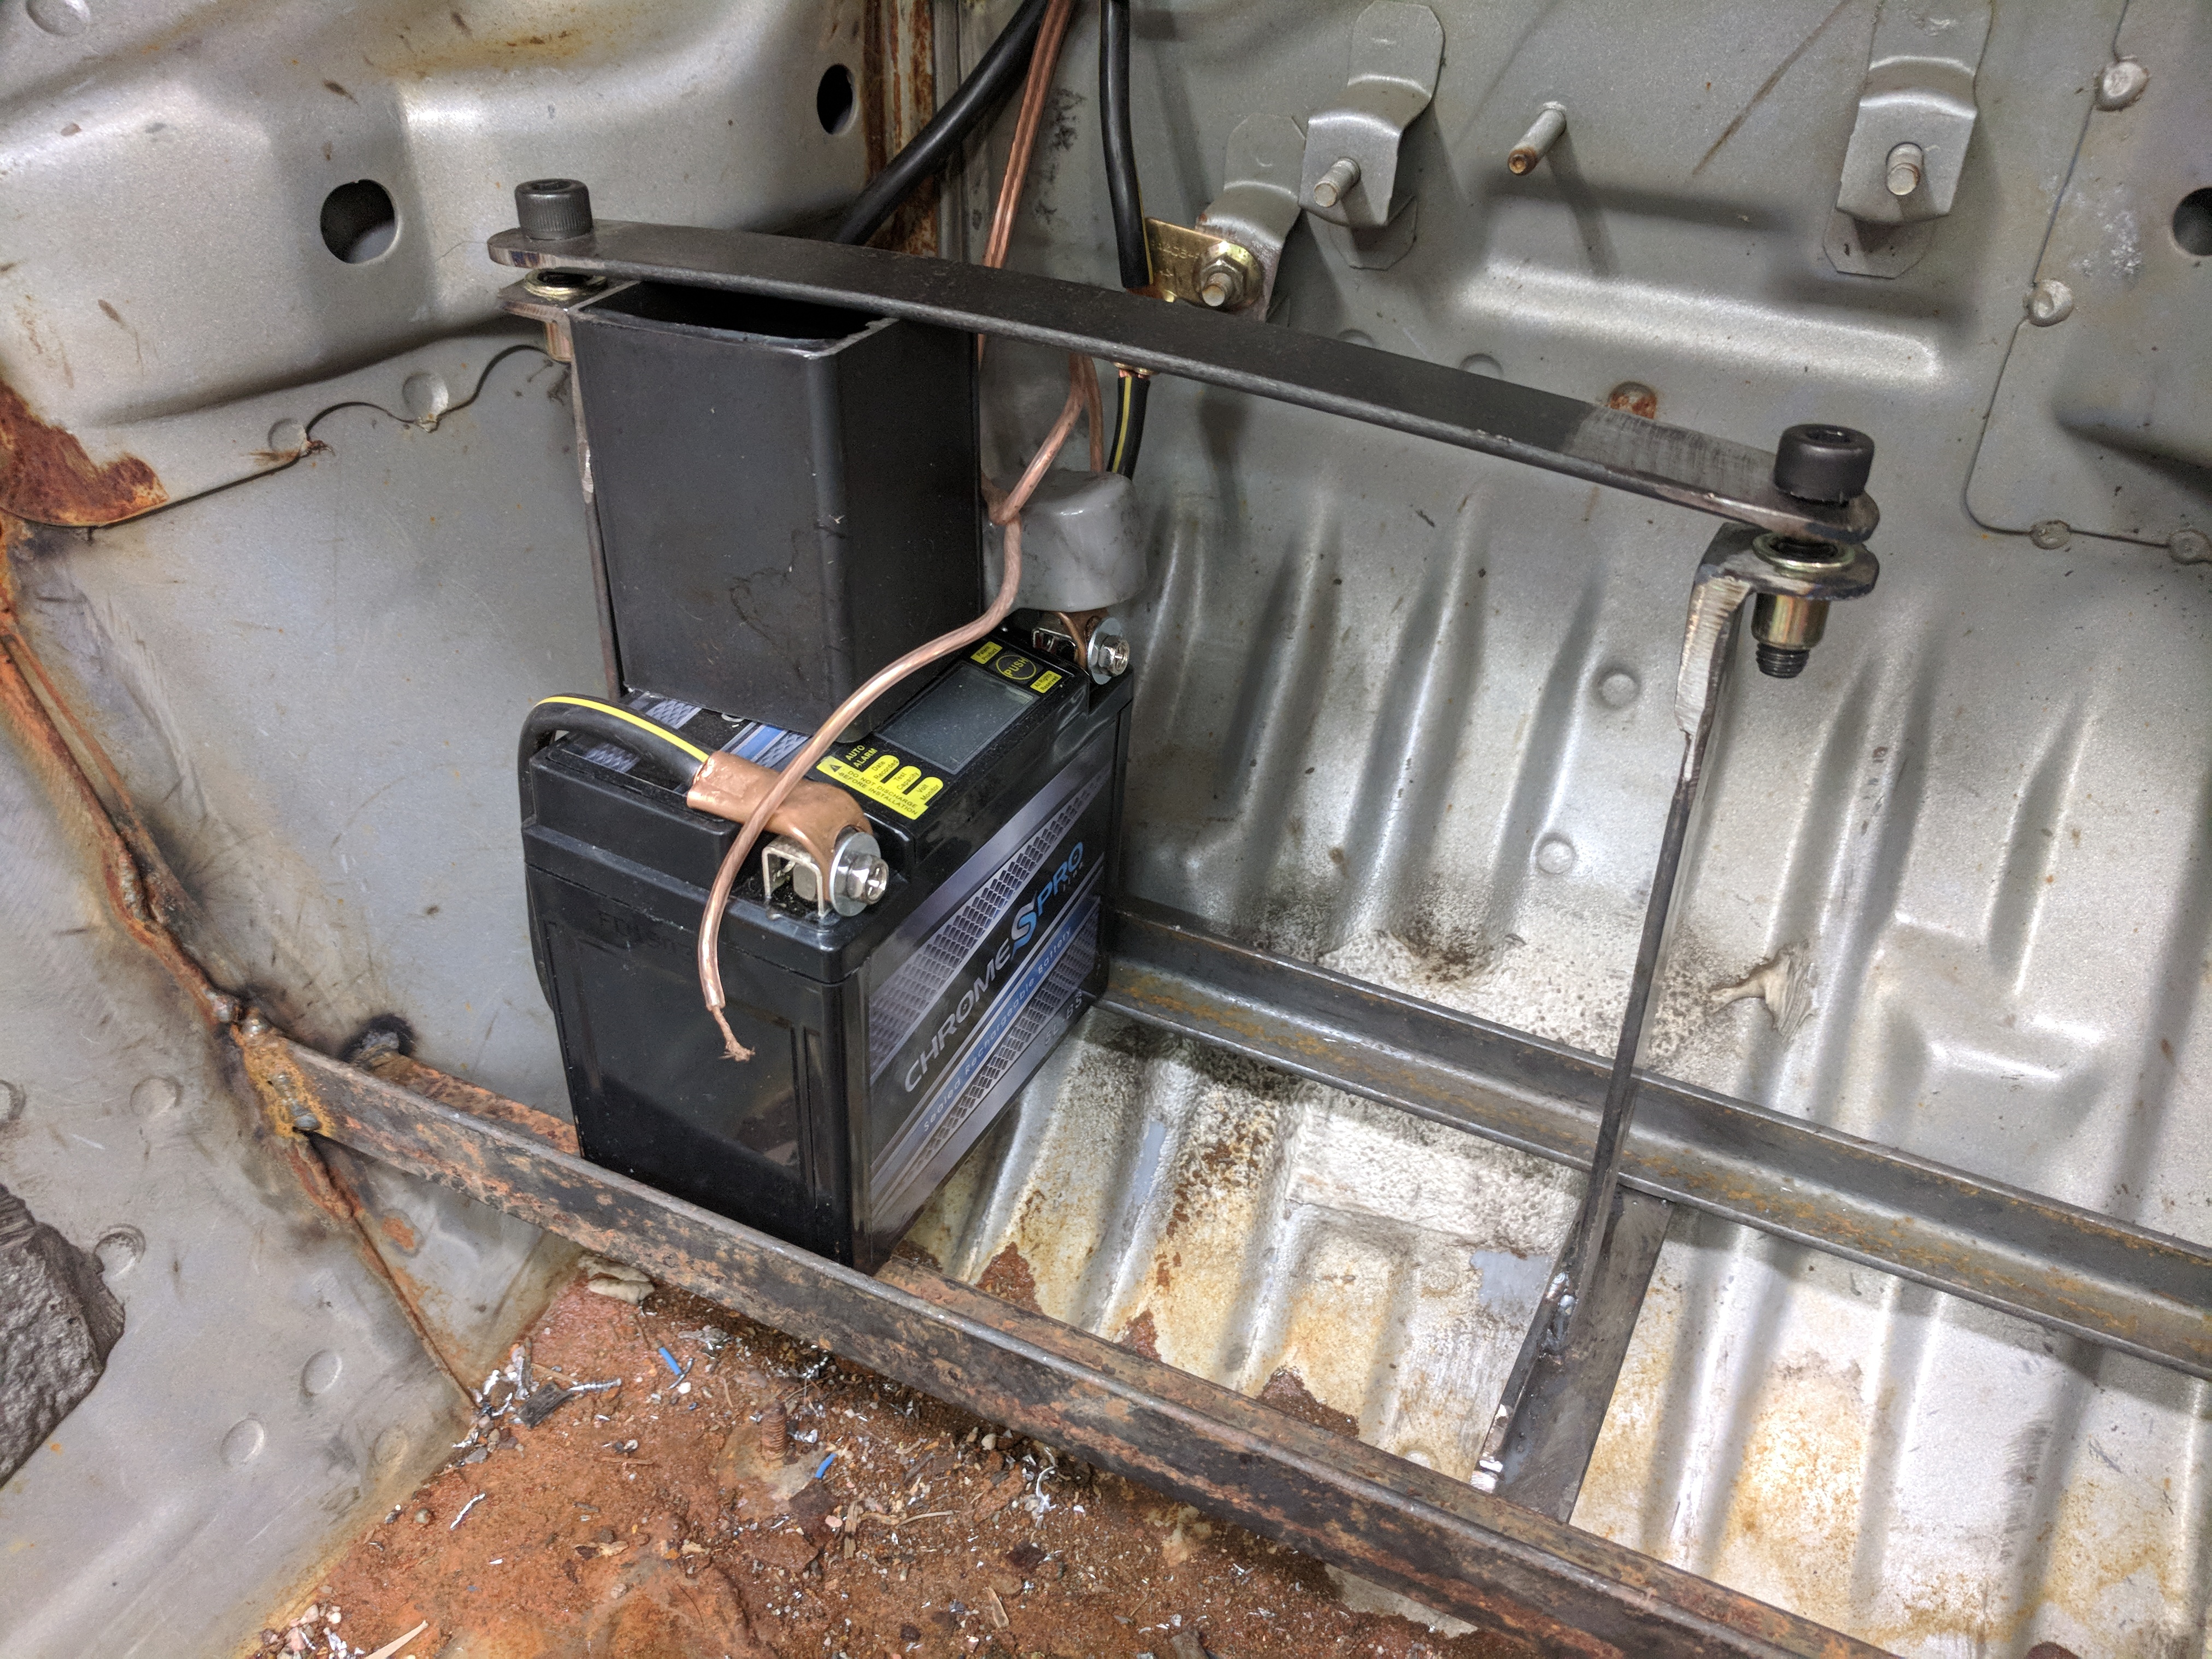
The battery on the car has been dead throughout this entire build process, sitting uncharged for almost 2yrs - time to replace!
After some light research, I came across the option of running a riding lawn mower battery instead of the typical "full size" (?) Miata battery. Well, $27 later, the little guy showed up. Has an LED voltmeter, charge / health status, etc. VERY cool.
ALSO... it's tiny - 1/6th the size of a typical Miata battery.
Here's a photo of it sitting in the frame built originally for the "full-size" Miata battery:
Reply
0
0
08-06-2019, 11:51 AM
#91
Junior Member
Thread Starter
iTrader: (3)
Join Date: Oct 2015
Location: Steamboat Springs, CO
Posts: 329
Total Cats: 22
Update:
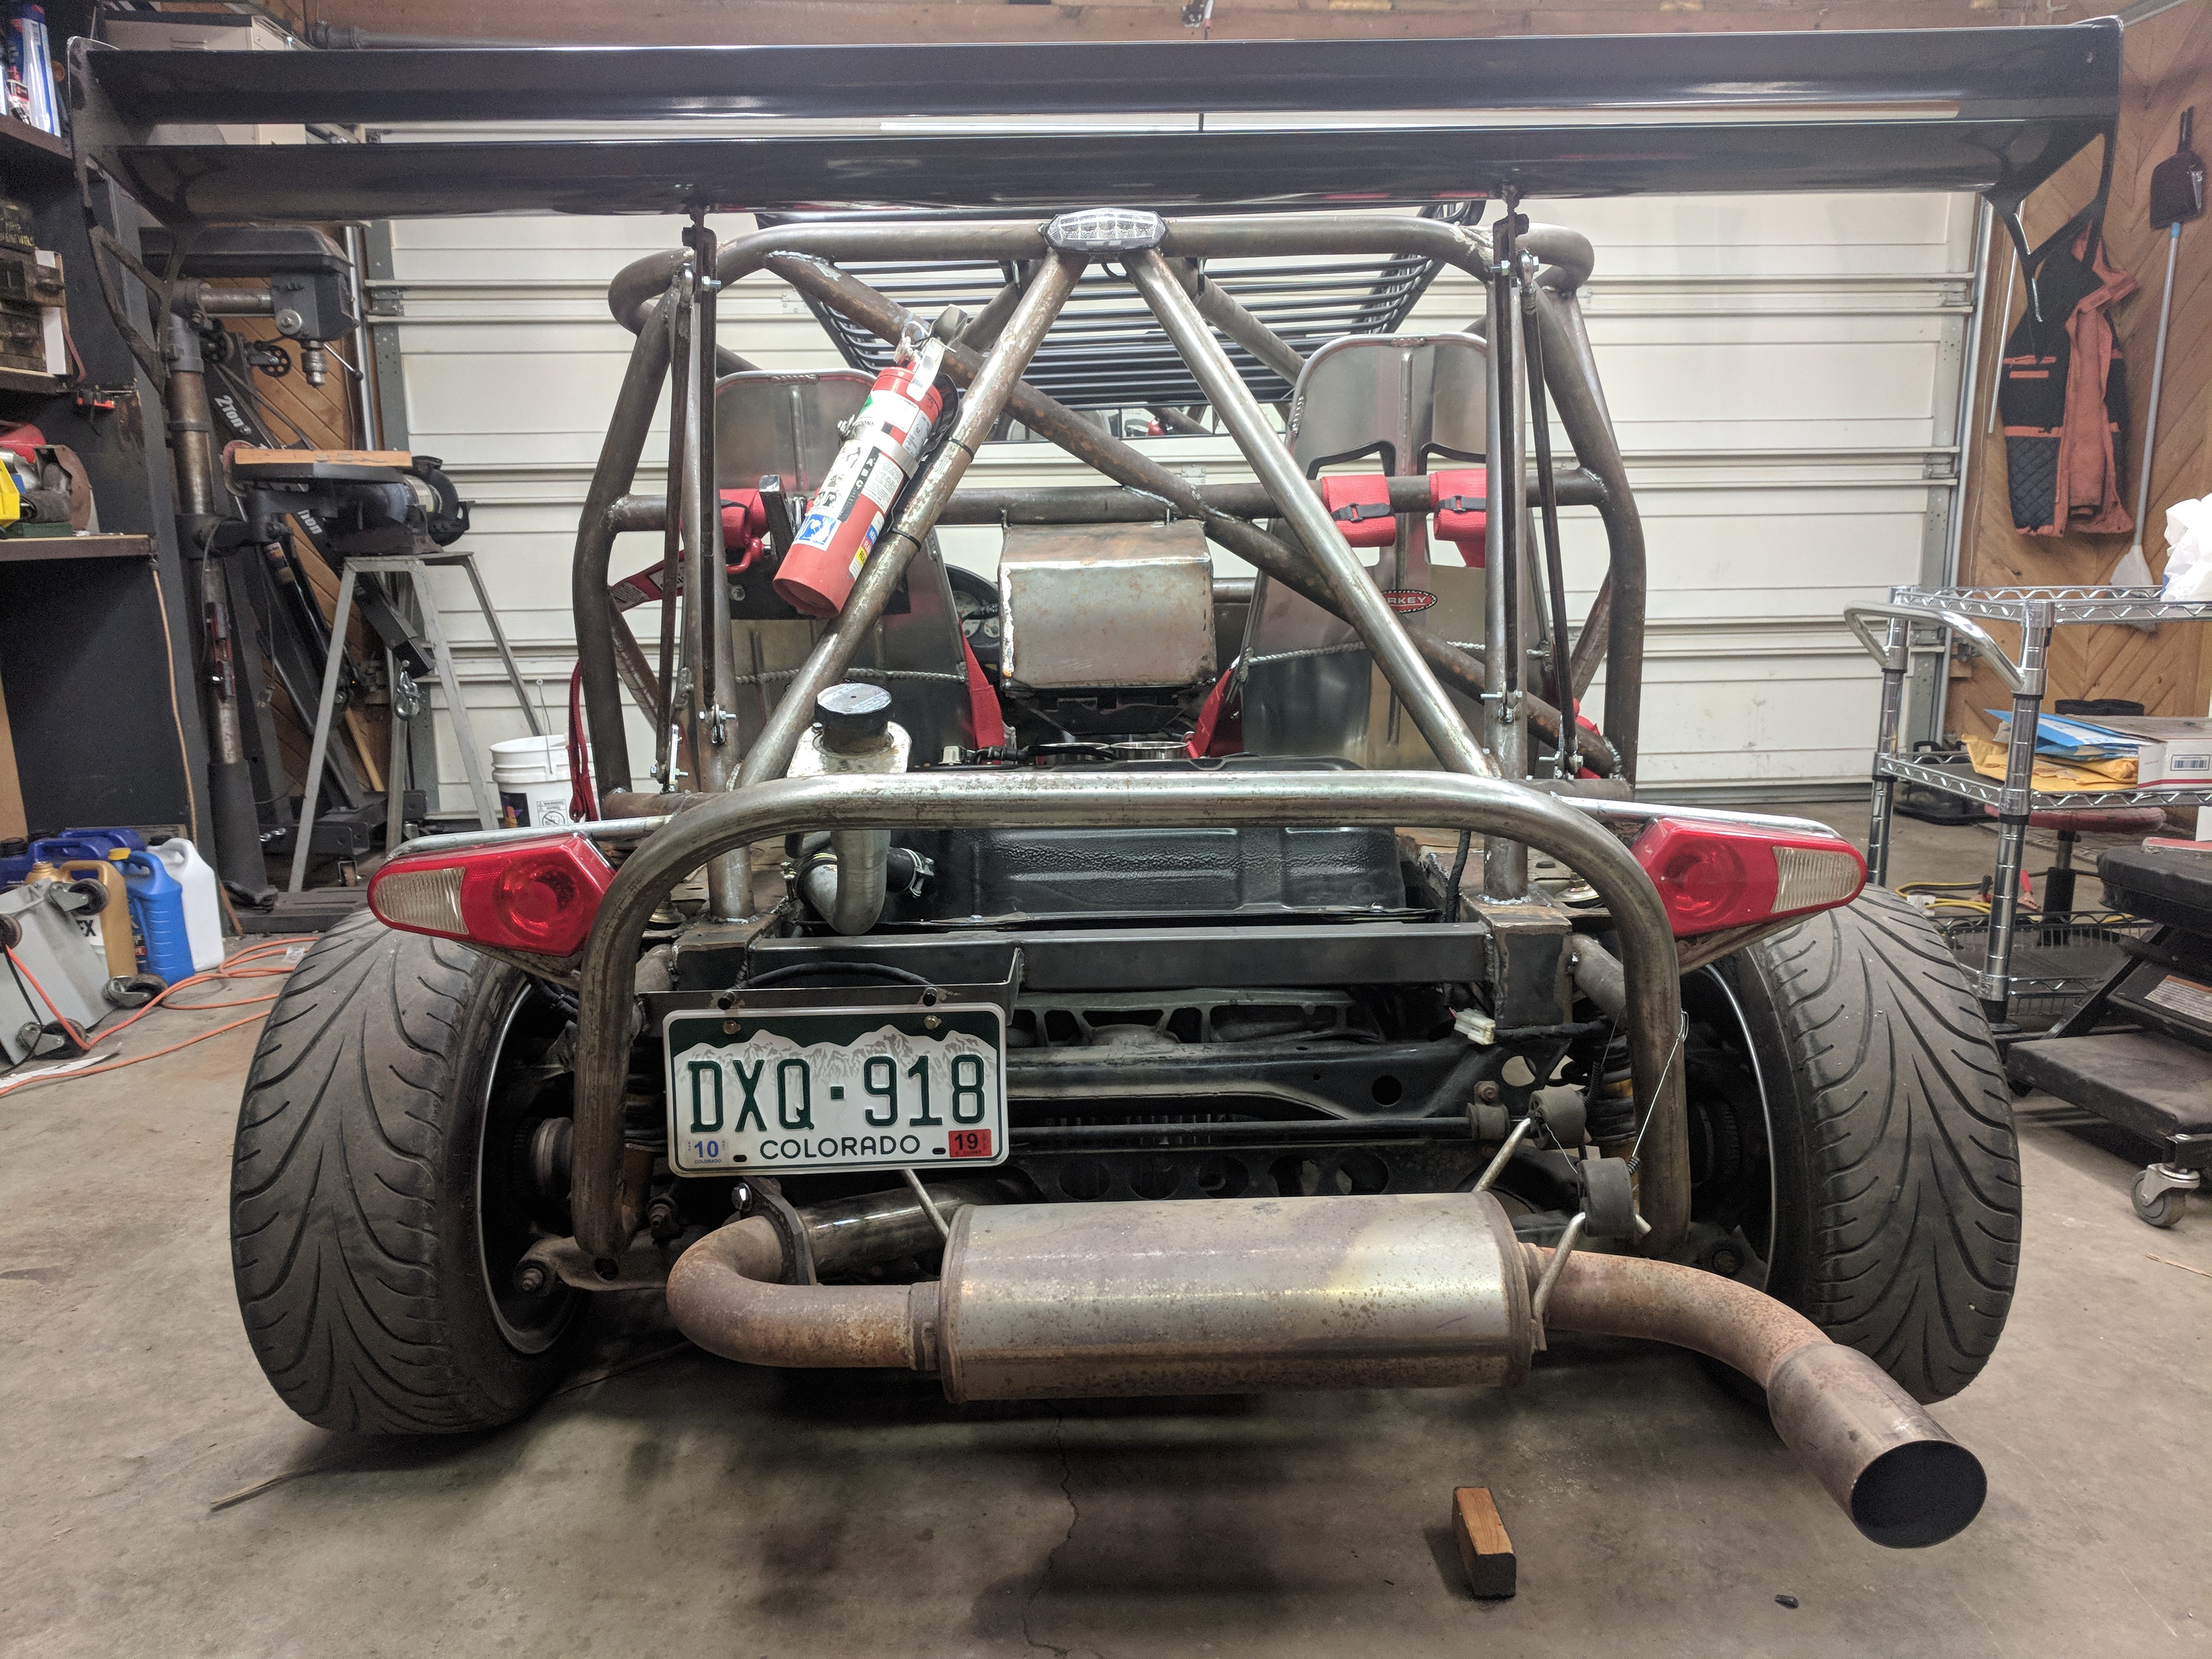
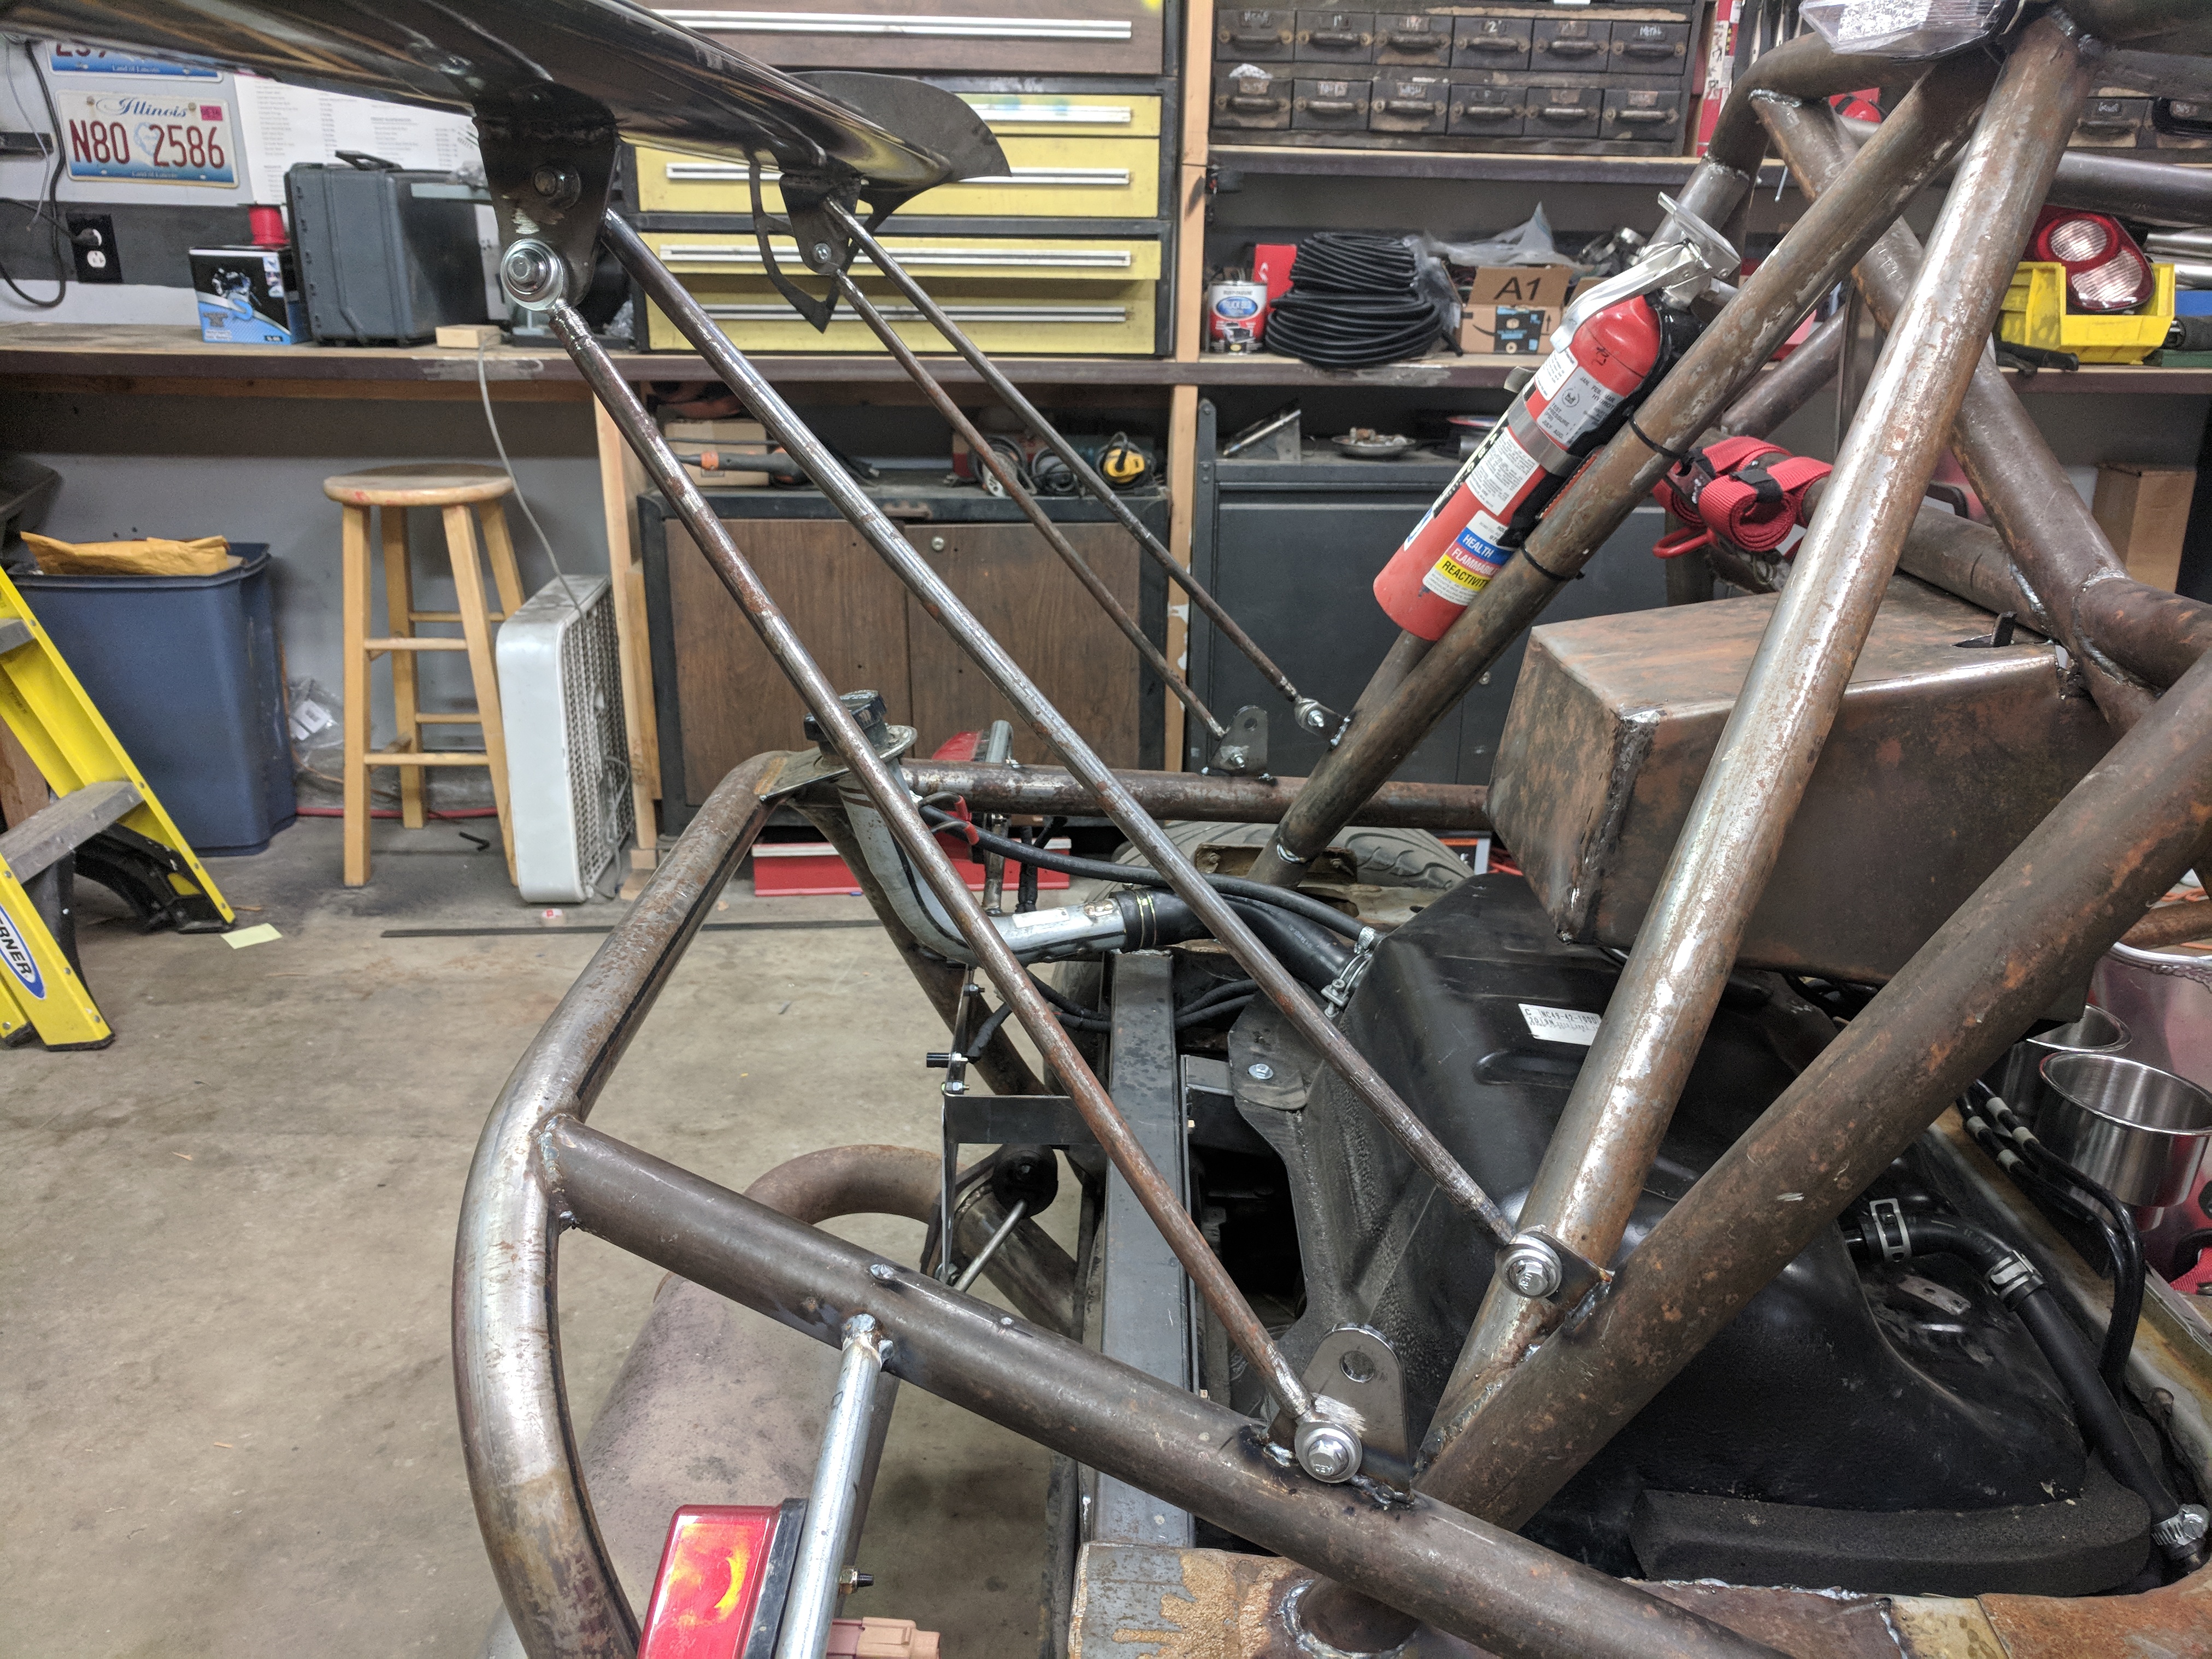
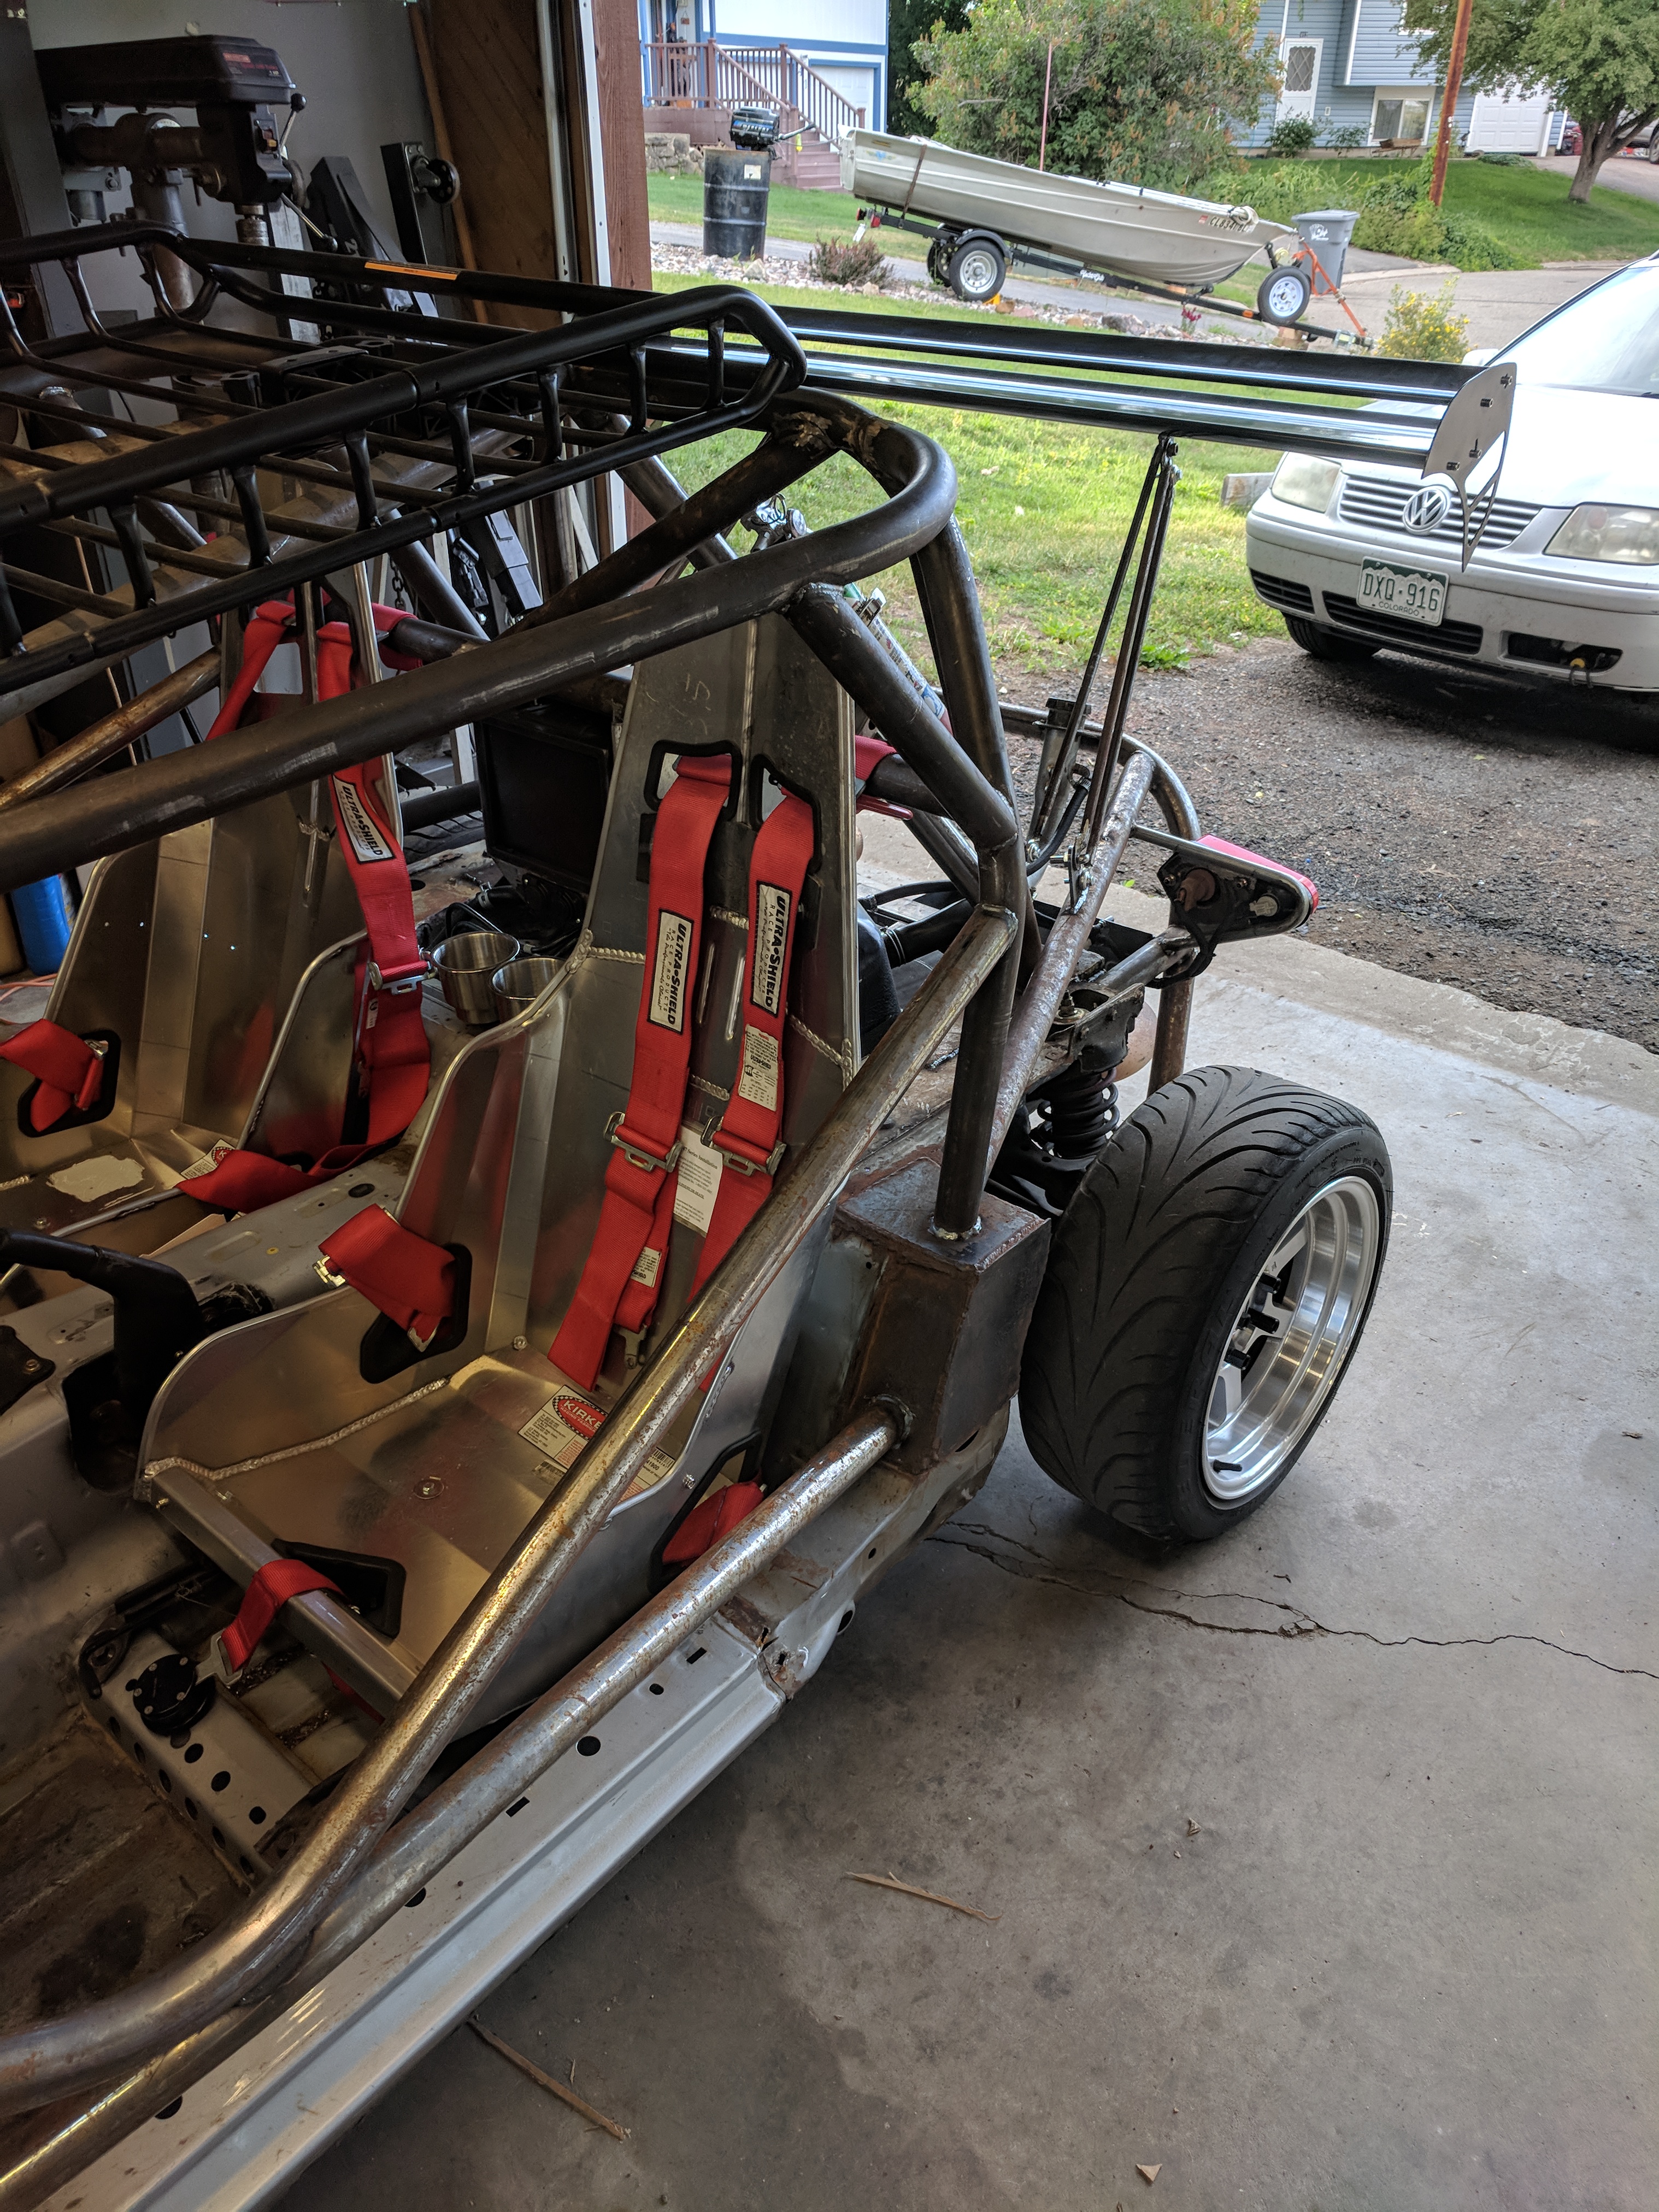
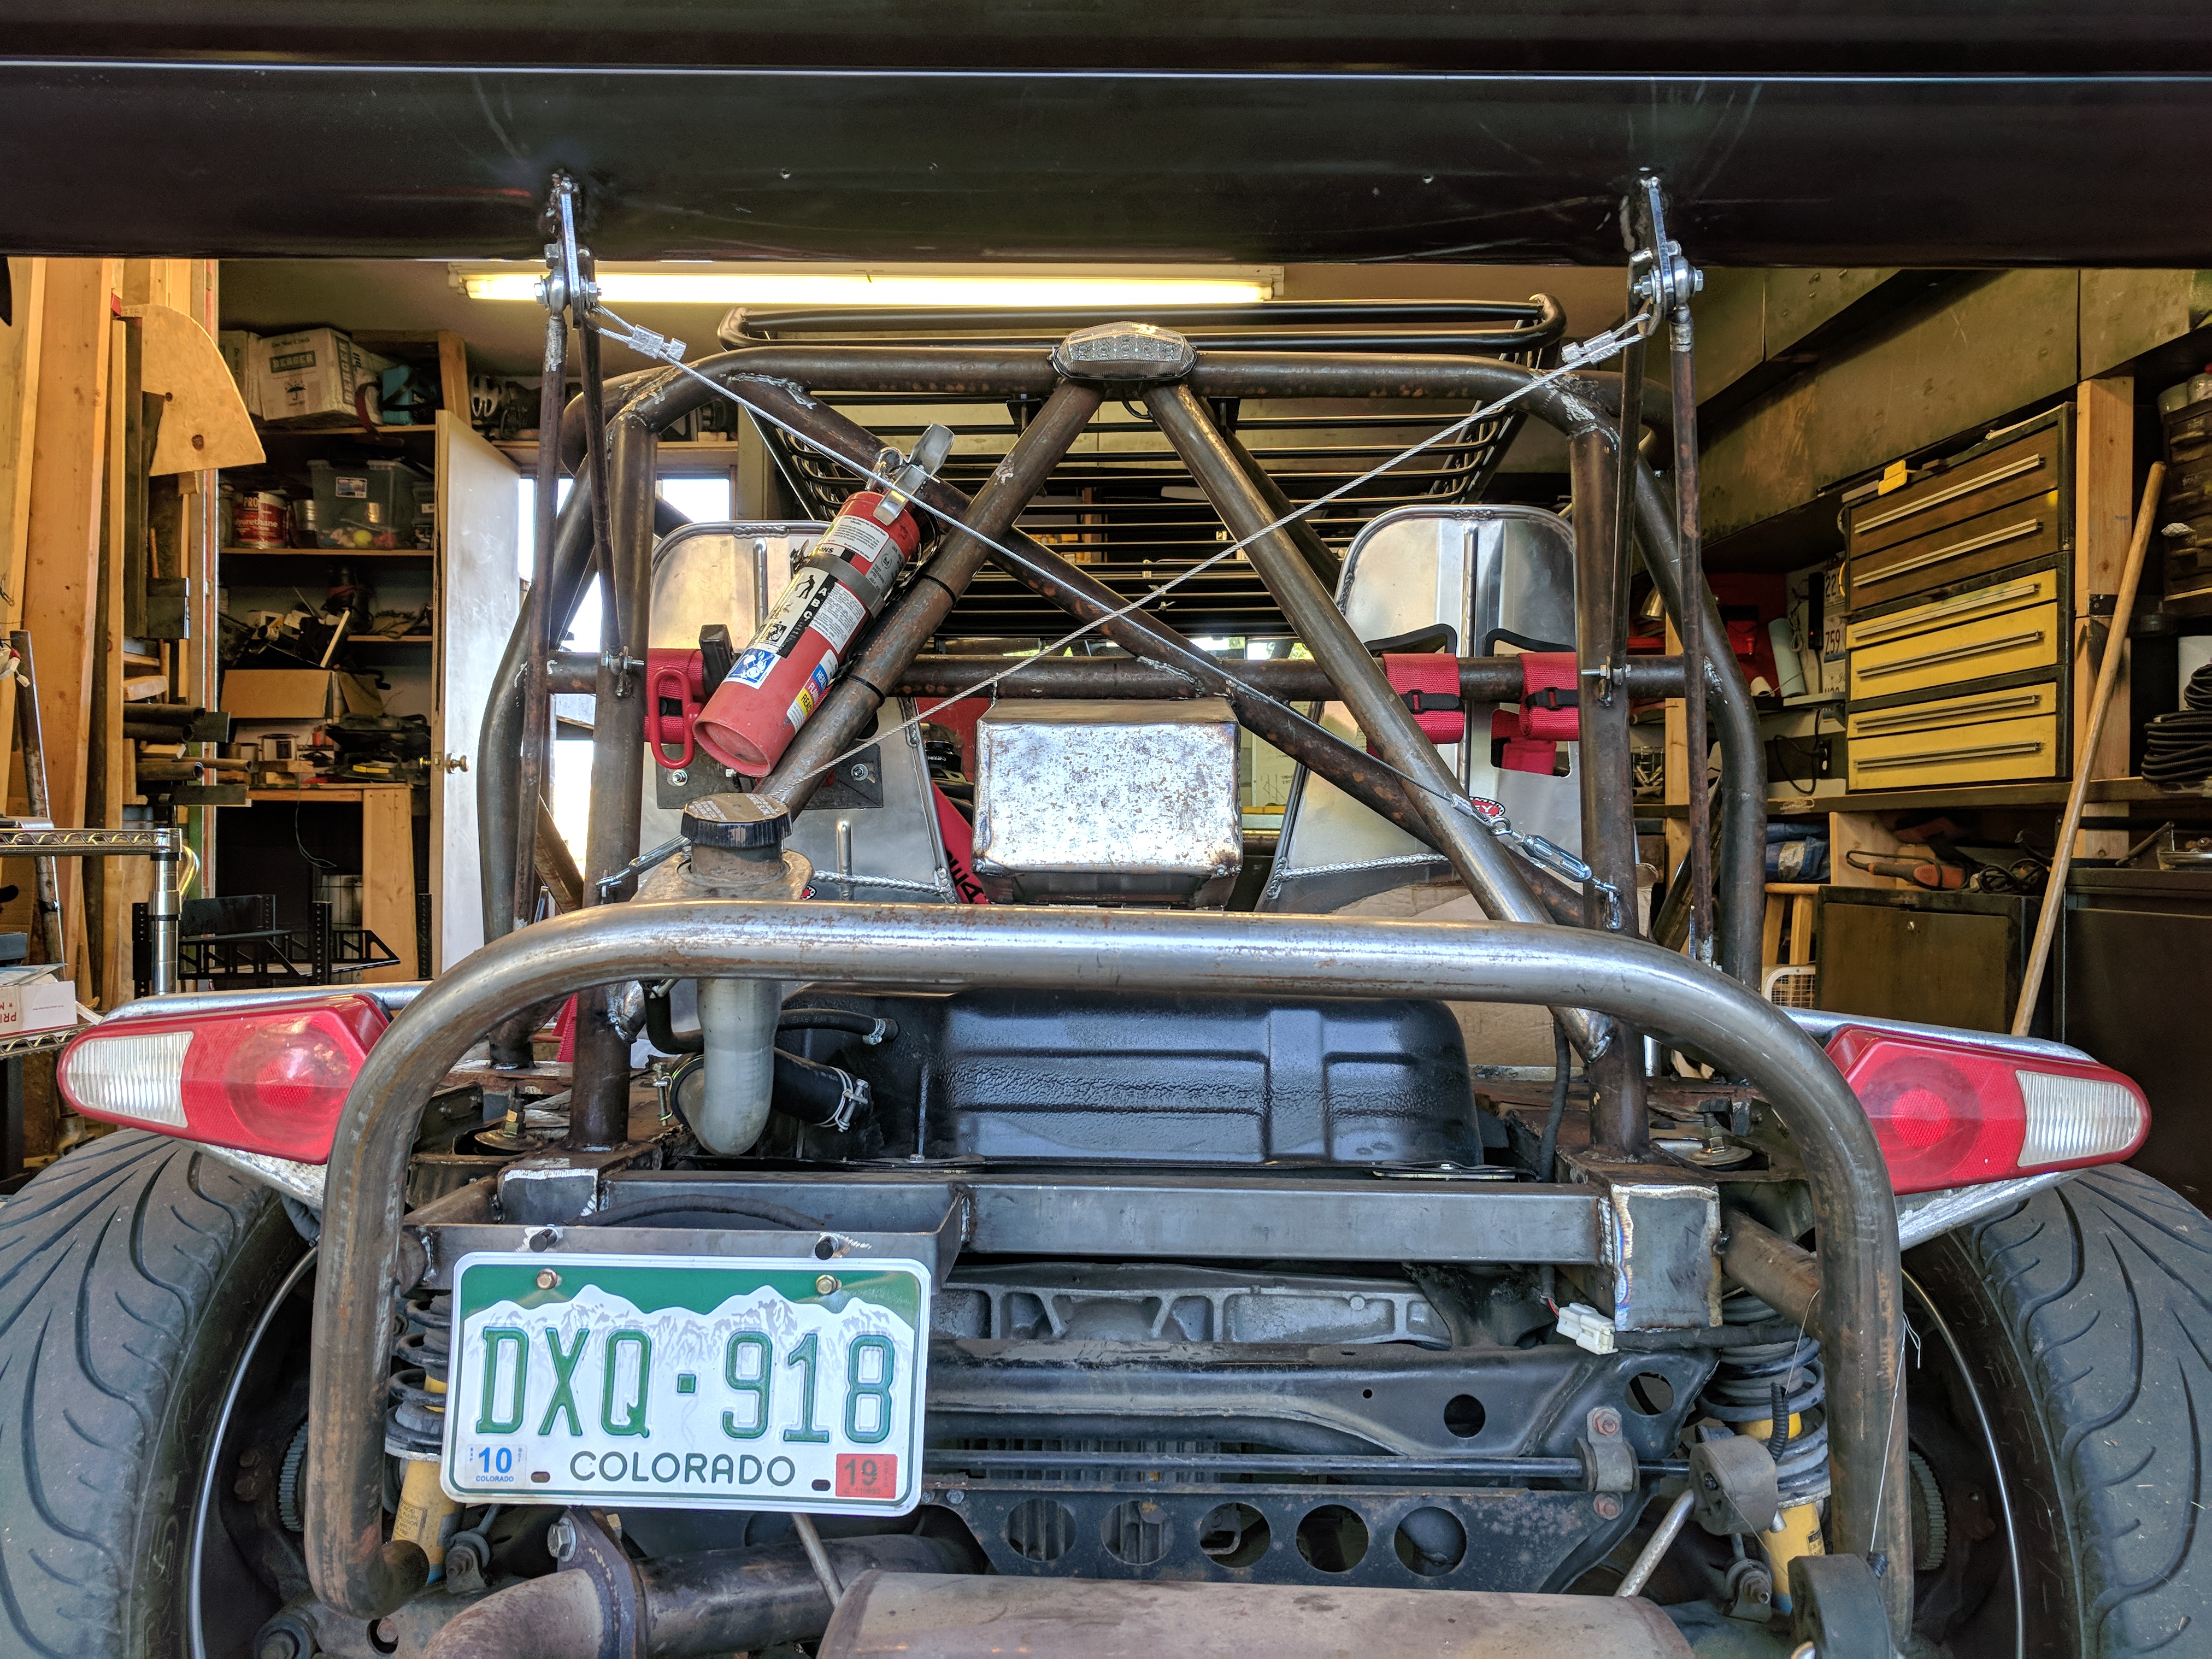
Well, I've had this spoiler sitting in the garage for 6mo, time to install!
I intentionally left the rear of the kart a bit 'featureless', knowing this thing was going to gather all kinds of attention - and I think it succeeds. I'm not typically a fan of massive wings (especially when they're strictly ornamental, as this one is) - however on a car as outrageous looking as the kart is, I think it fits.
Support was created with male/female threaded 'Heim' joints and steel tube. Welded the nuts on the end then ground down the joint. There is built-in adjustability, however I'm not sure if I'll ever need it.
The spoiler itself doesn't project beyond the rear bumper, meaning if I were to back into a brick wall (straight on), the first point of contact would be the rear bumper bar.
Reply
0
0
08-12-2019, 12:26 PM
#92
Junior Member
Thread Starter
iTrader: (3)
Join Date: Oct 2015
Location: Steamboat Springs, CO
Posts: 329
Total Cats: 22
Great weekend of camping and (some) minor work on the kart.
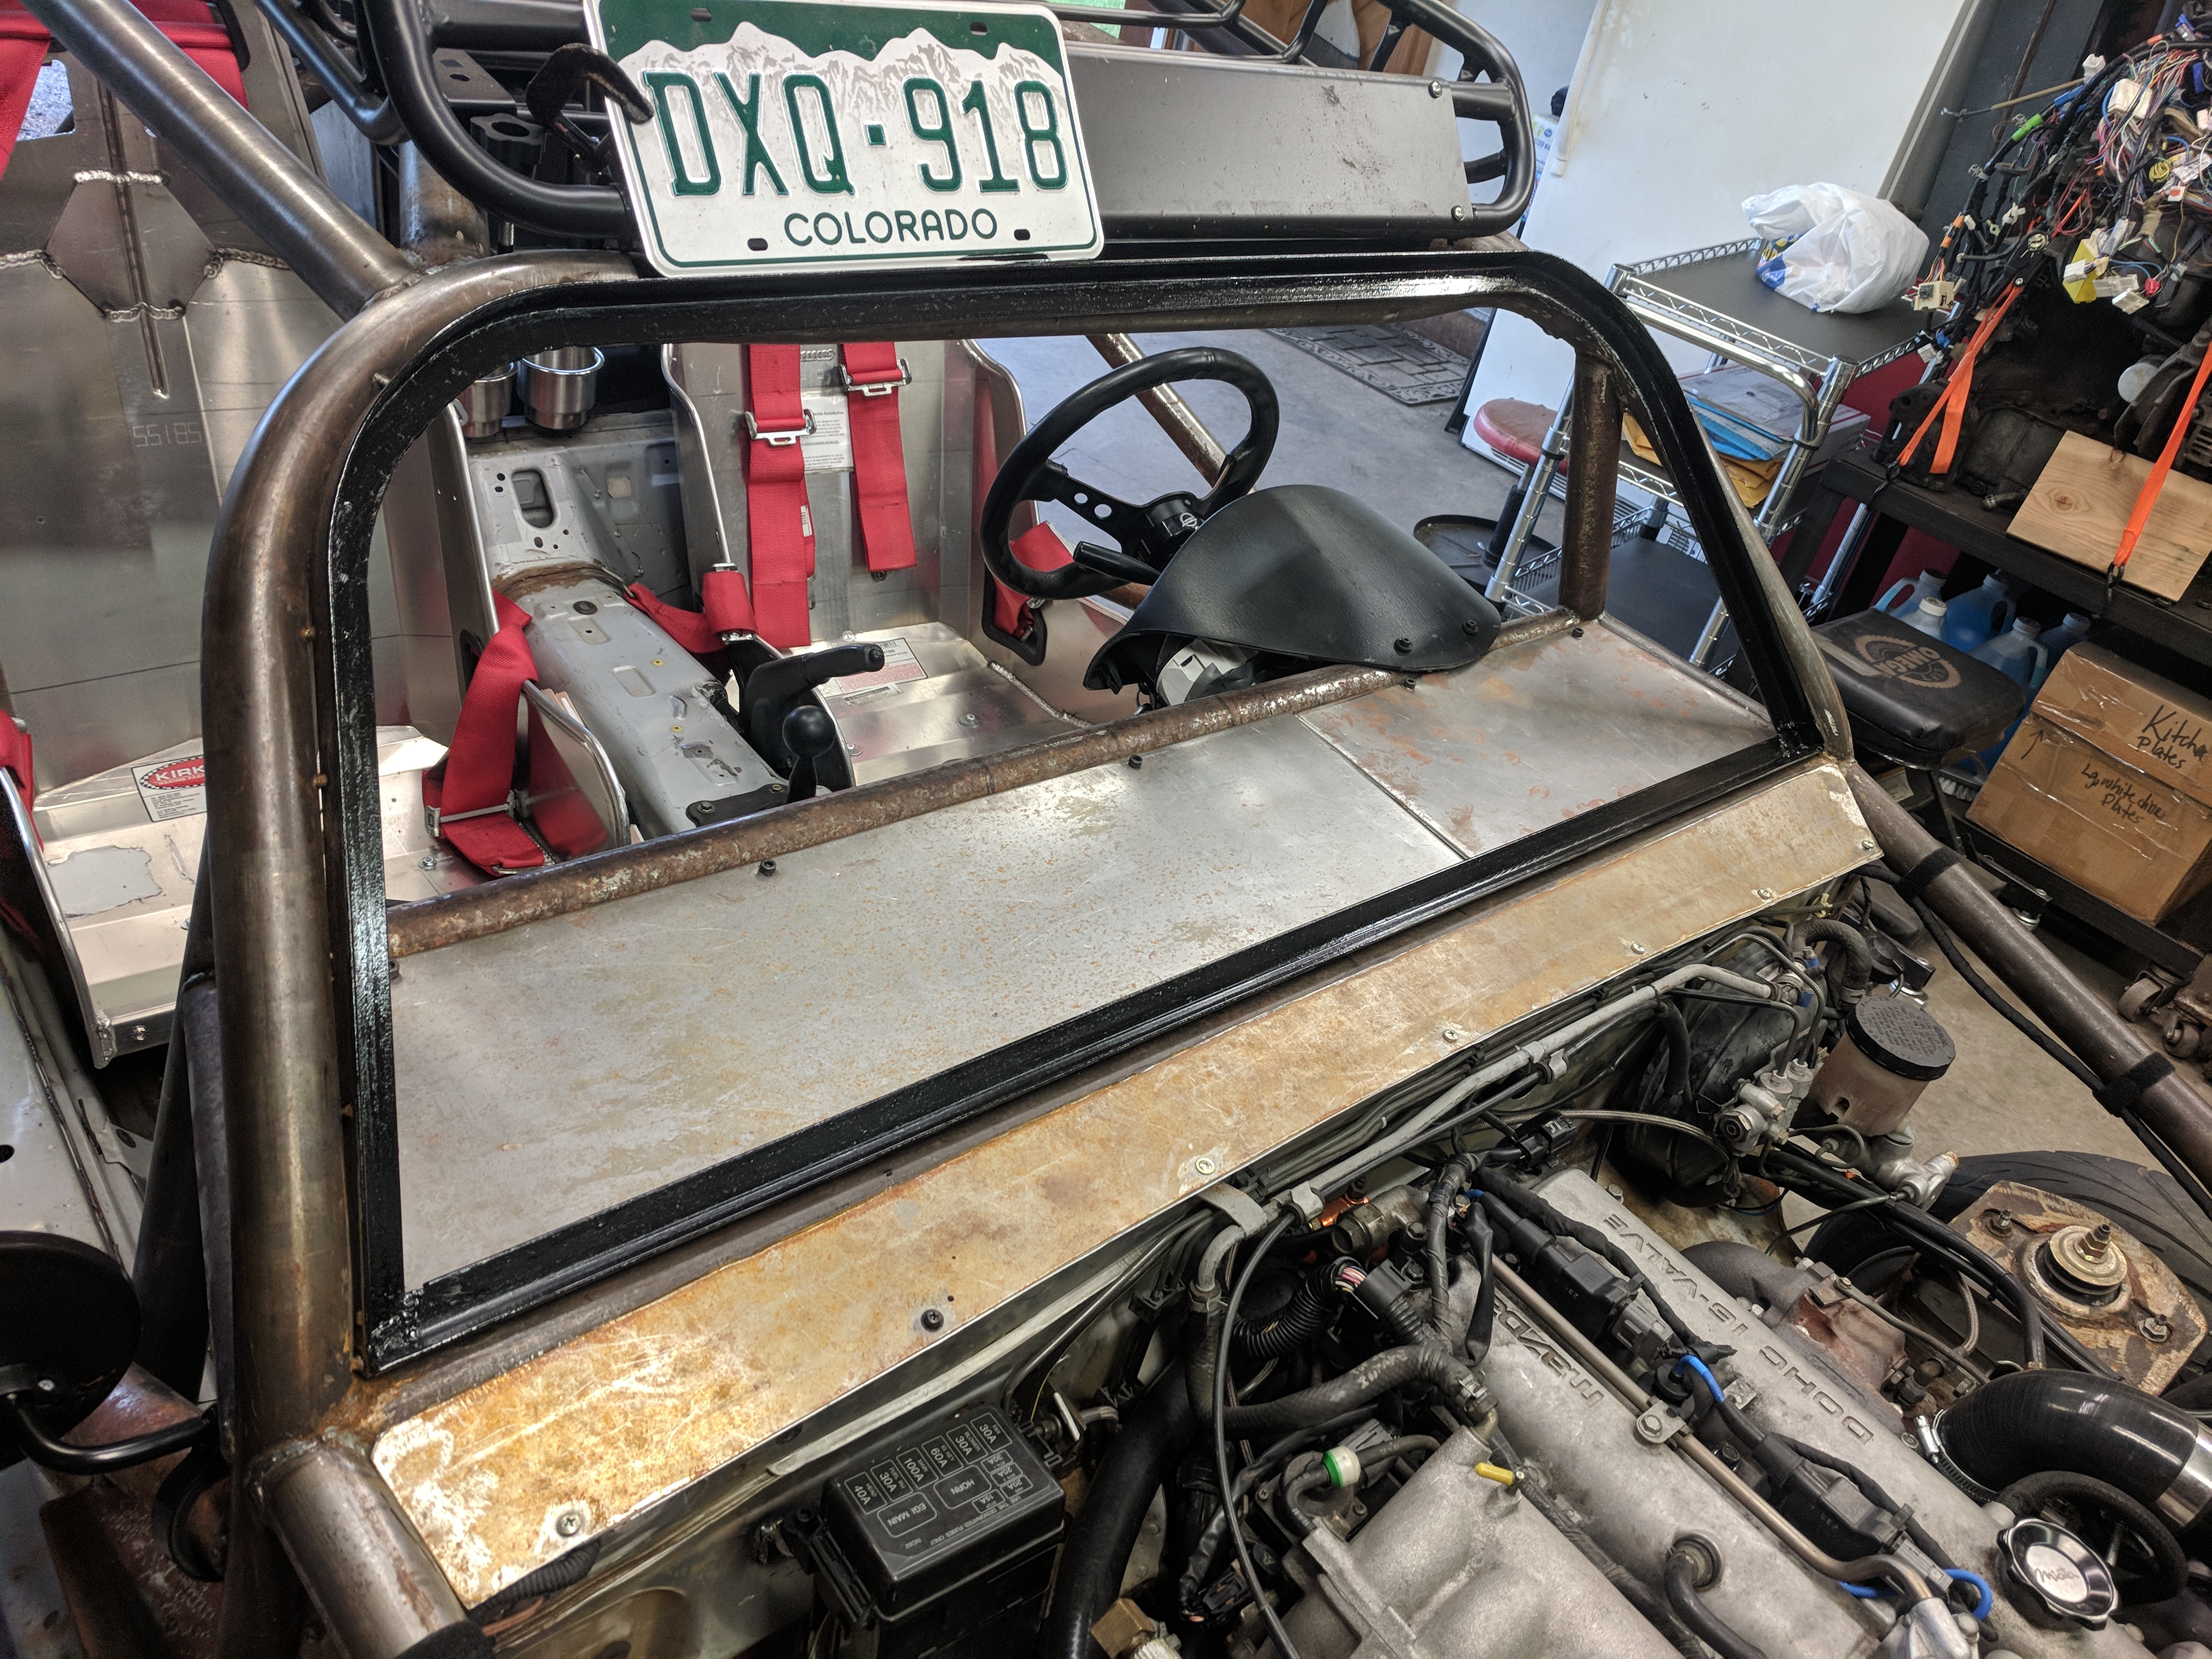
Got some flat auto glass cut for $130 - smooth edges - bought the primer / install kit with the glass for $30.
Template supplied to the glass guys - I cut the template for a 1/4-3/8" gap between the angle iron frame and the glass (to minimize possibility of cracking the windshield due to any frame flexing) :
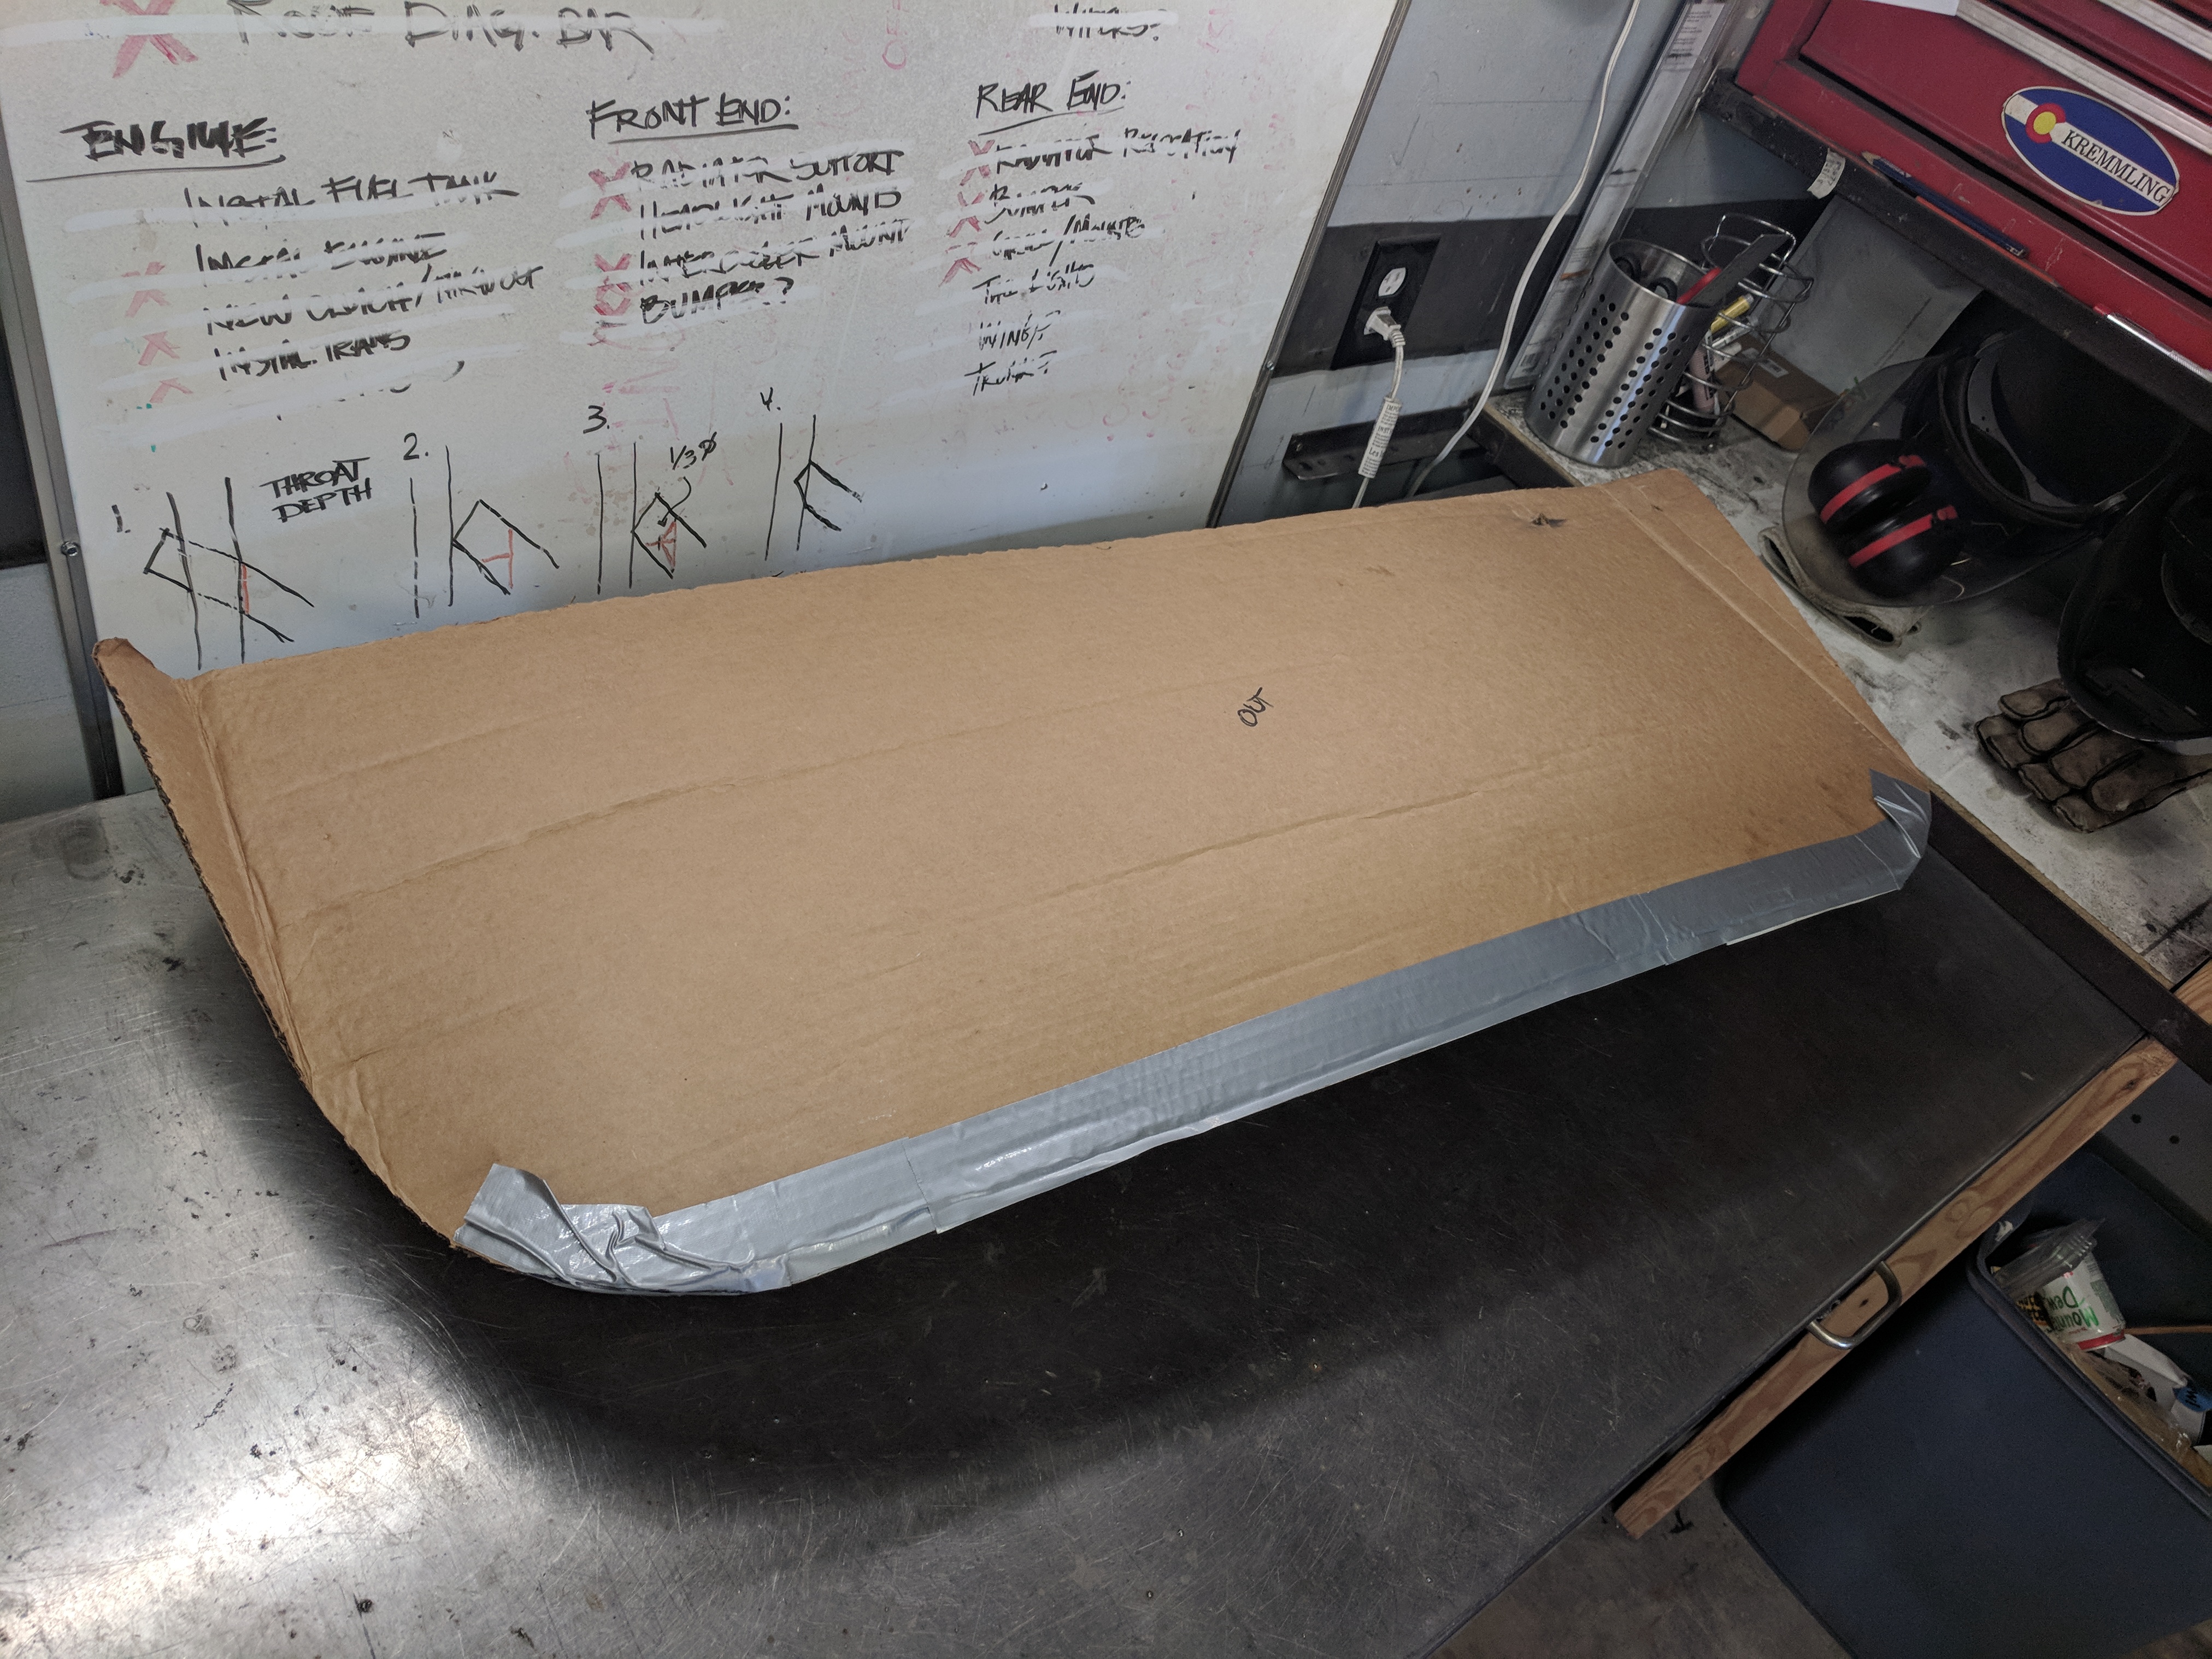
Got the glass home, did a test fit - VERY pleased with the outcome:
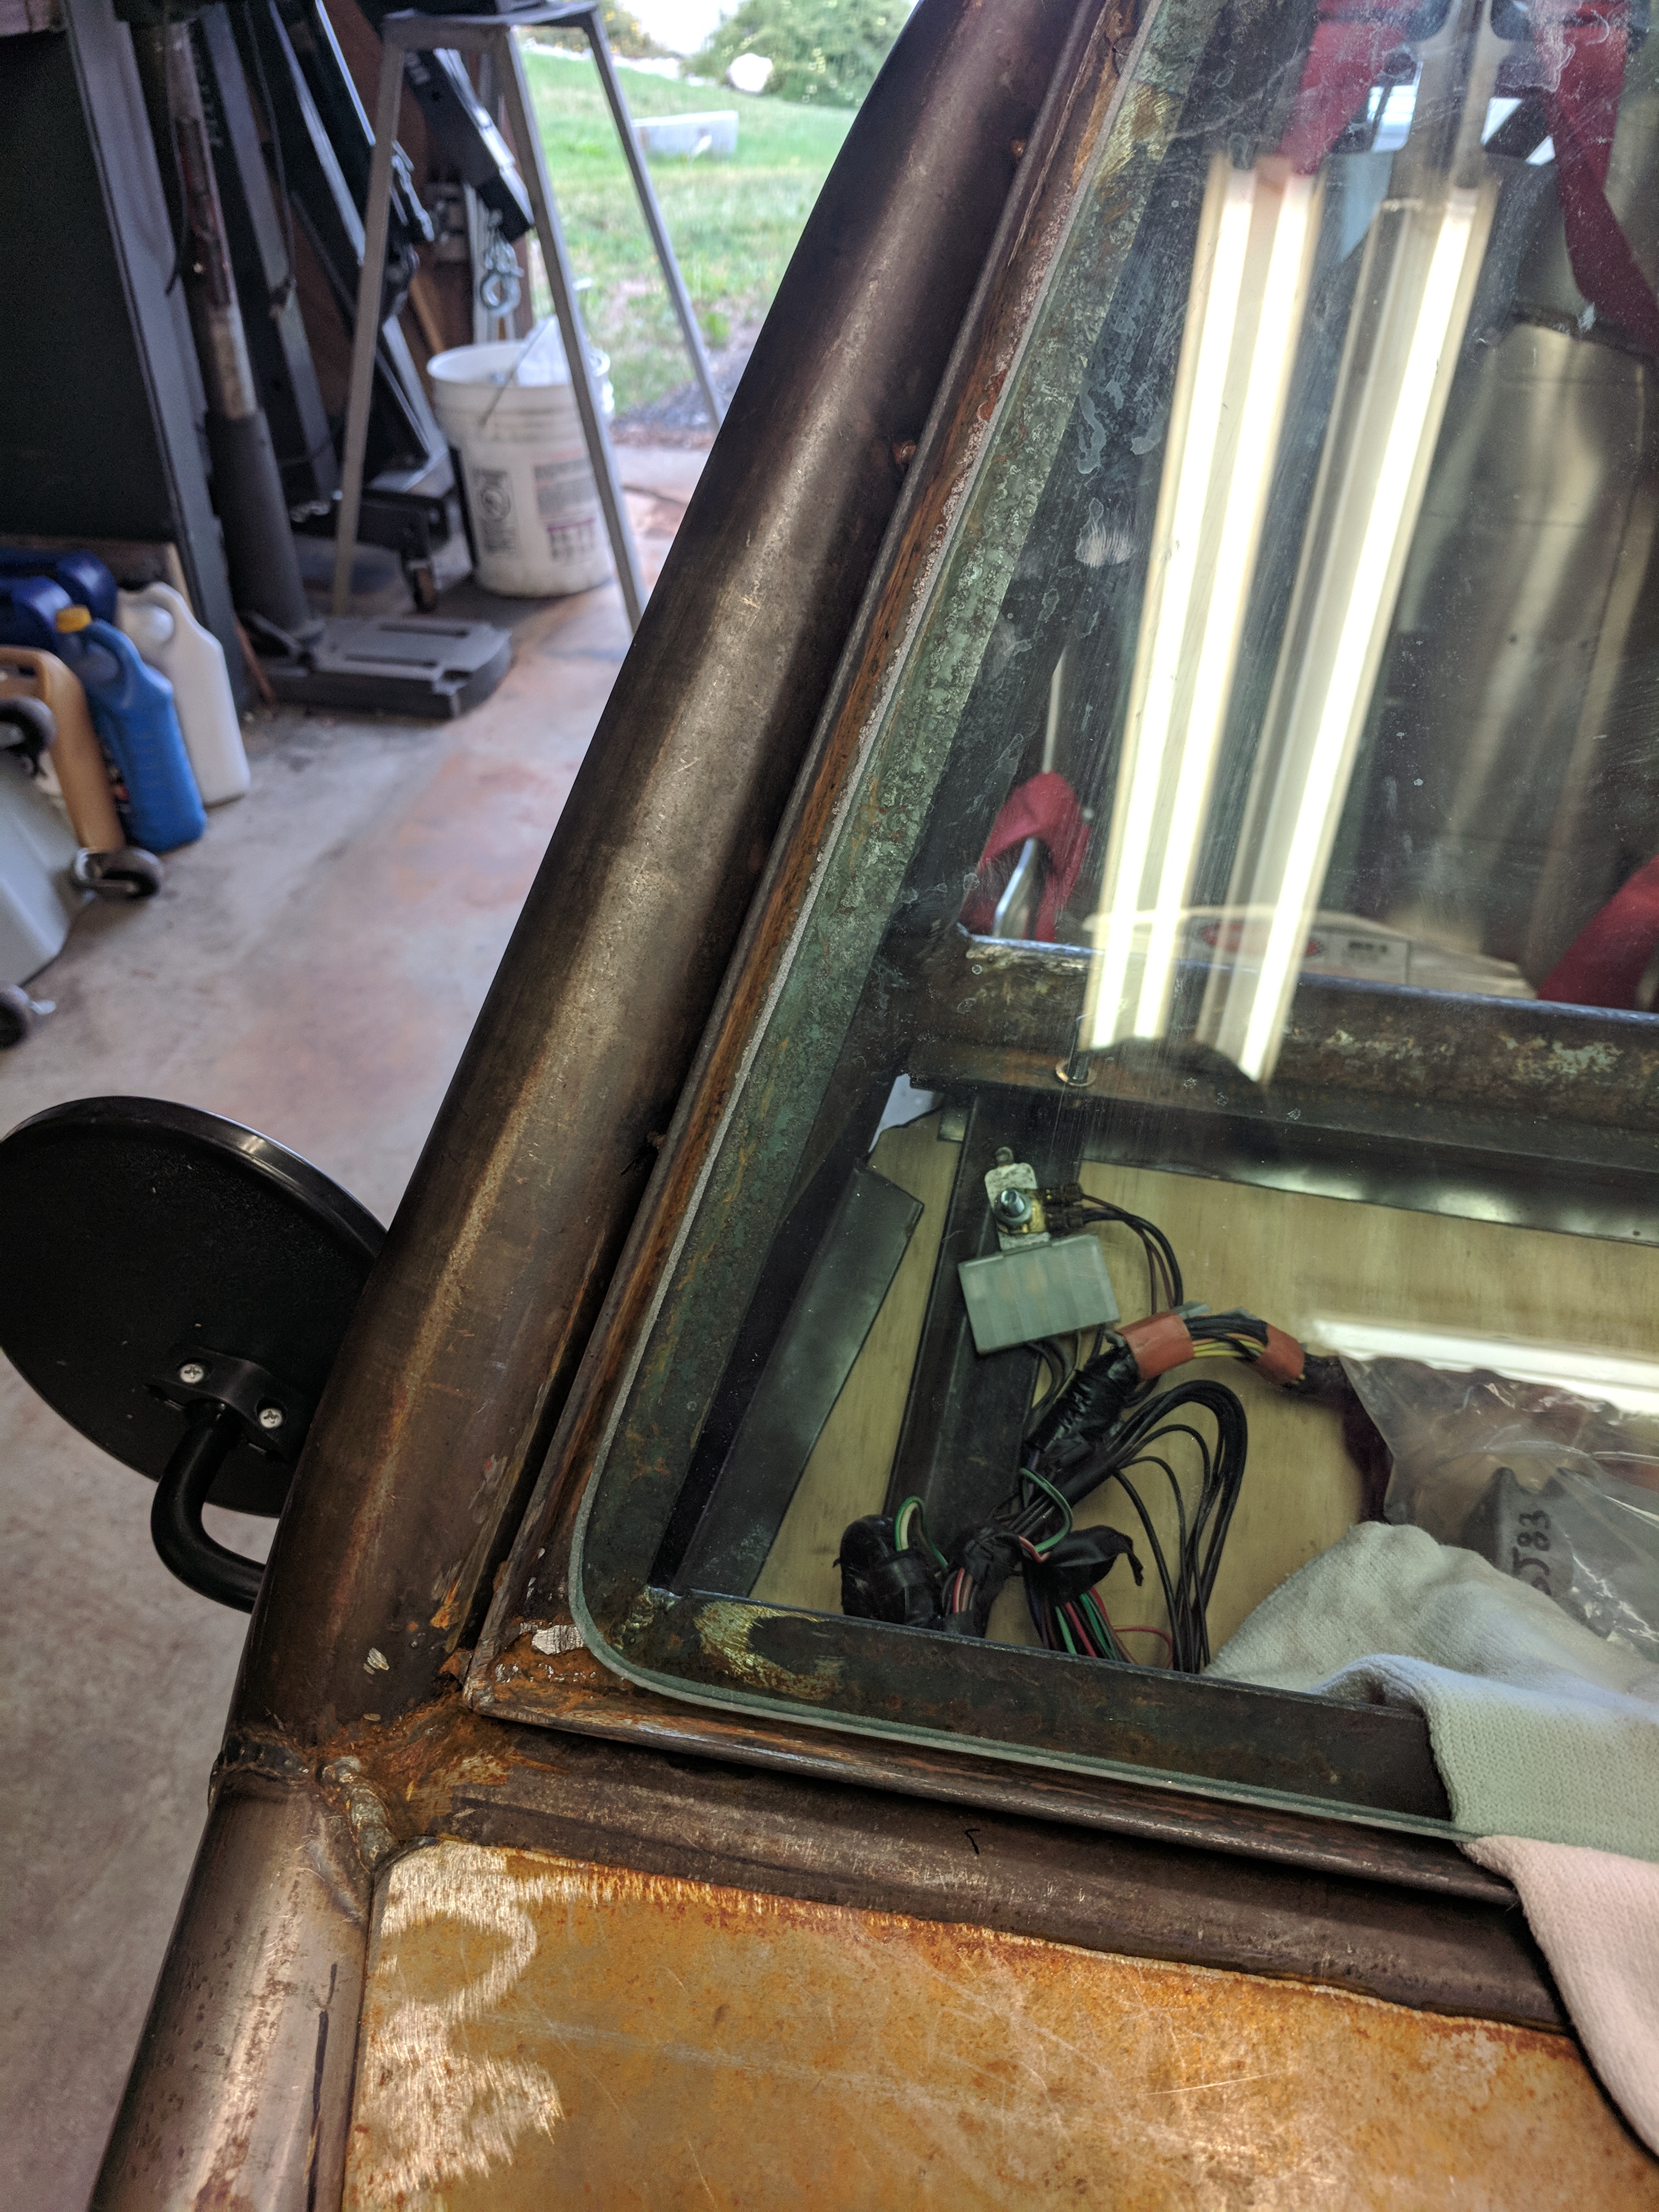
The supplied installation kit included two primers - one for the glass, one for the metal. Metal was applied with a little foam applicator (think PVC / irrigation lines.) The glass primer was a plastic tube with a glass vial inside; break the glass, then apply a foam tip to the plastic tube - smear all over the taped-off edge of the glass.
Got some flat auto glass cut for $130 - smooth edges - bought the primer / install kit with the glass for $30.
Template supplied to the glass guys - I cut the template for a 1/4-3/8" gap between the angle iron frame and the glass (to minimize possibility of cracking the windshield due to any frame flexing) :
Got the glass home, did a test fit - VERY pleased with the outcome:
The supplied installation kit included two primers - one for the glass, one for the metal. Metal was applied with a little foam applicator (think PVC / irrigation lines.) The glass primer was a plastic tube with a glass vial inside; break the glass, then apply a foam tip to the plastic tube - smear all over the taped-off edge of the glass.
Reply
0
0
08-13-2019, 03:11 PM
#93
Junior Member
Thread Starter
iTrader: (3)
Join Date: Oct 2015
Location: Steamboat Springs, CO
Posts: 329
Total Cats: 22
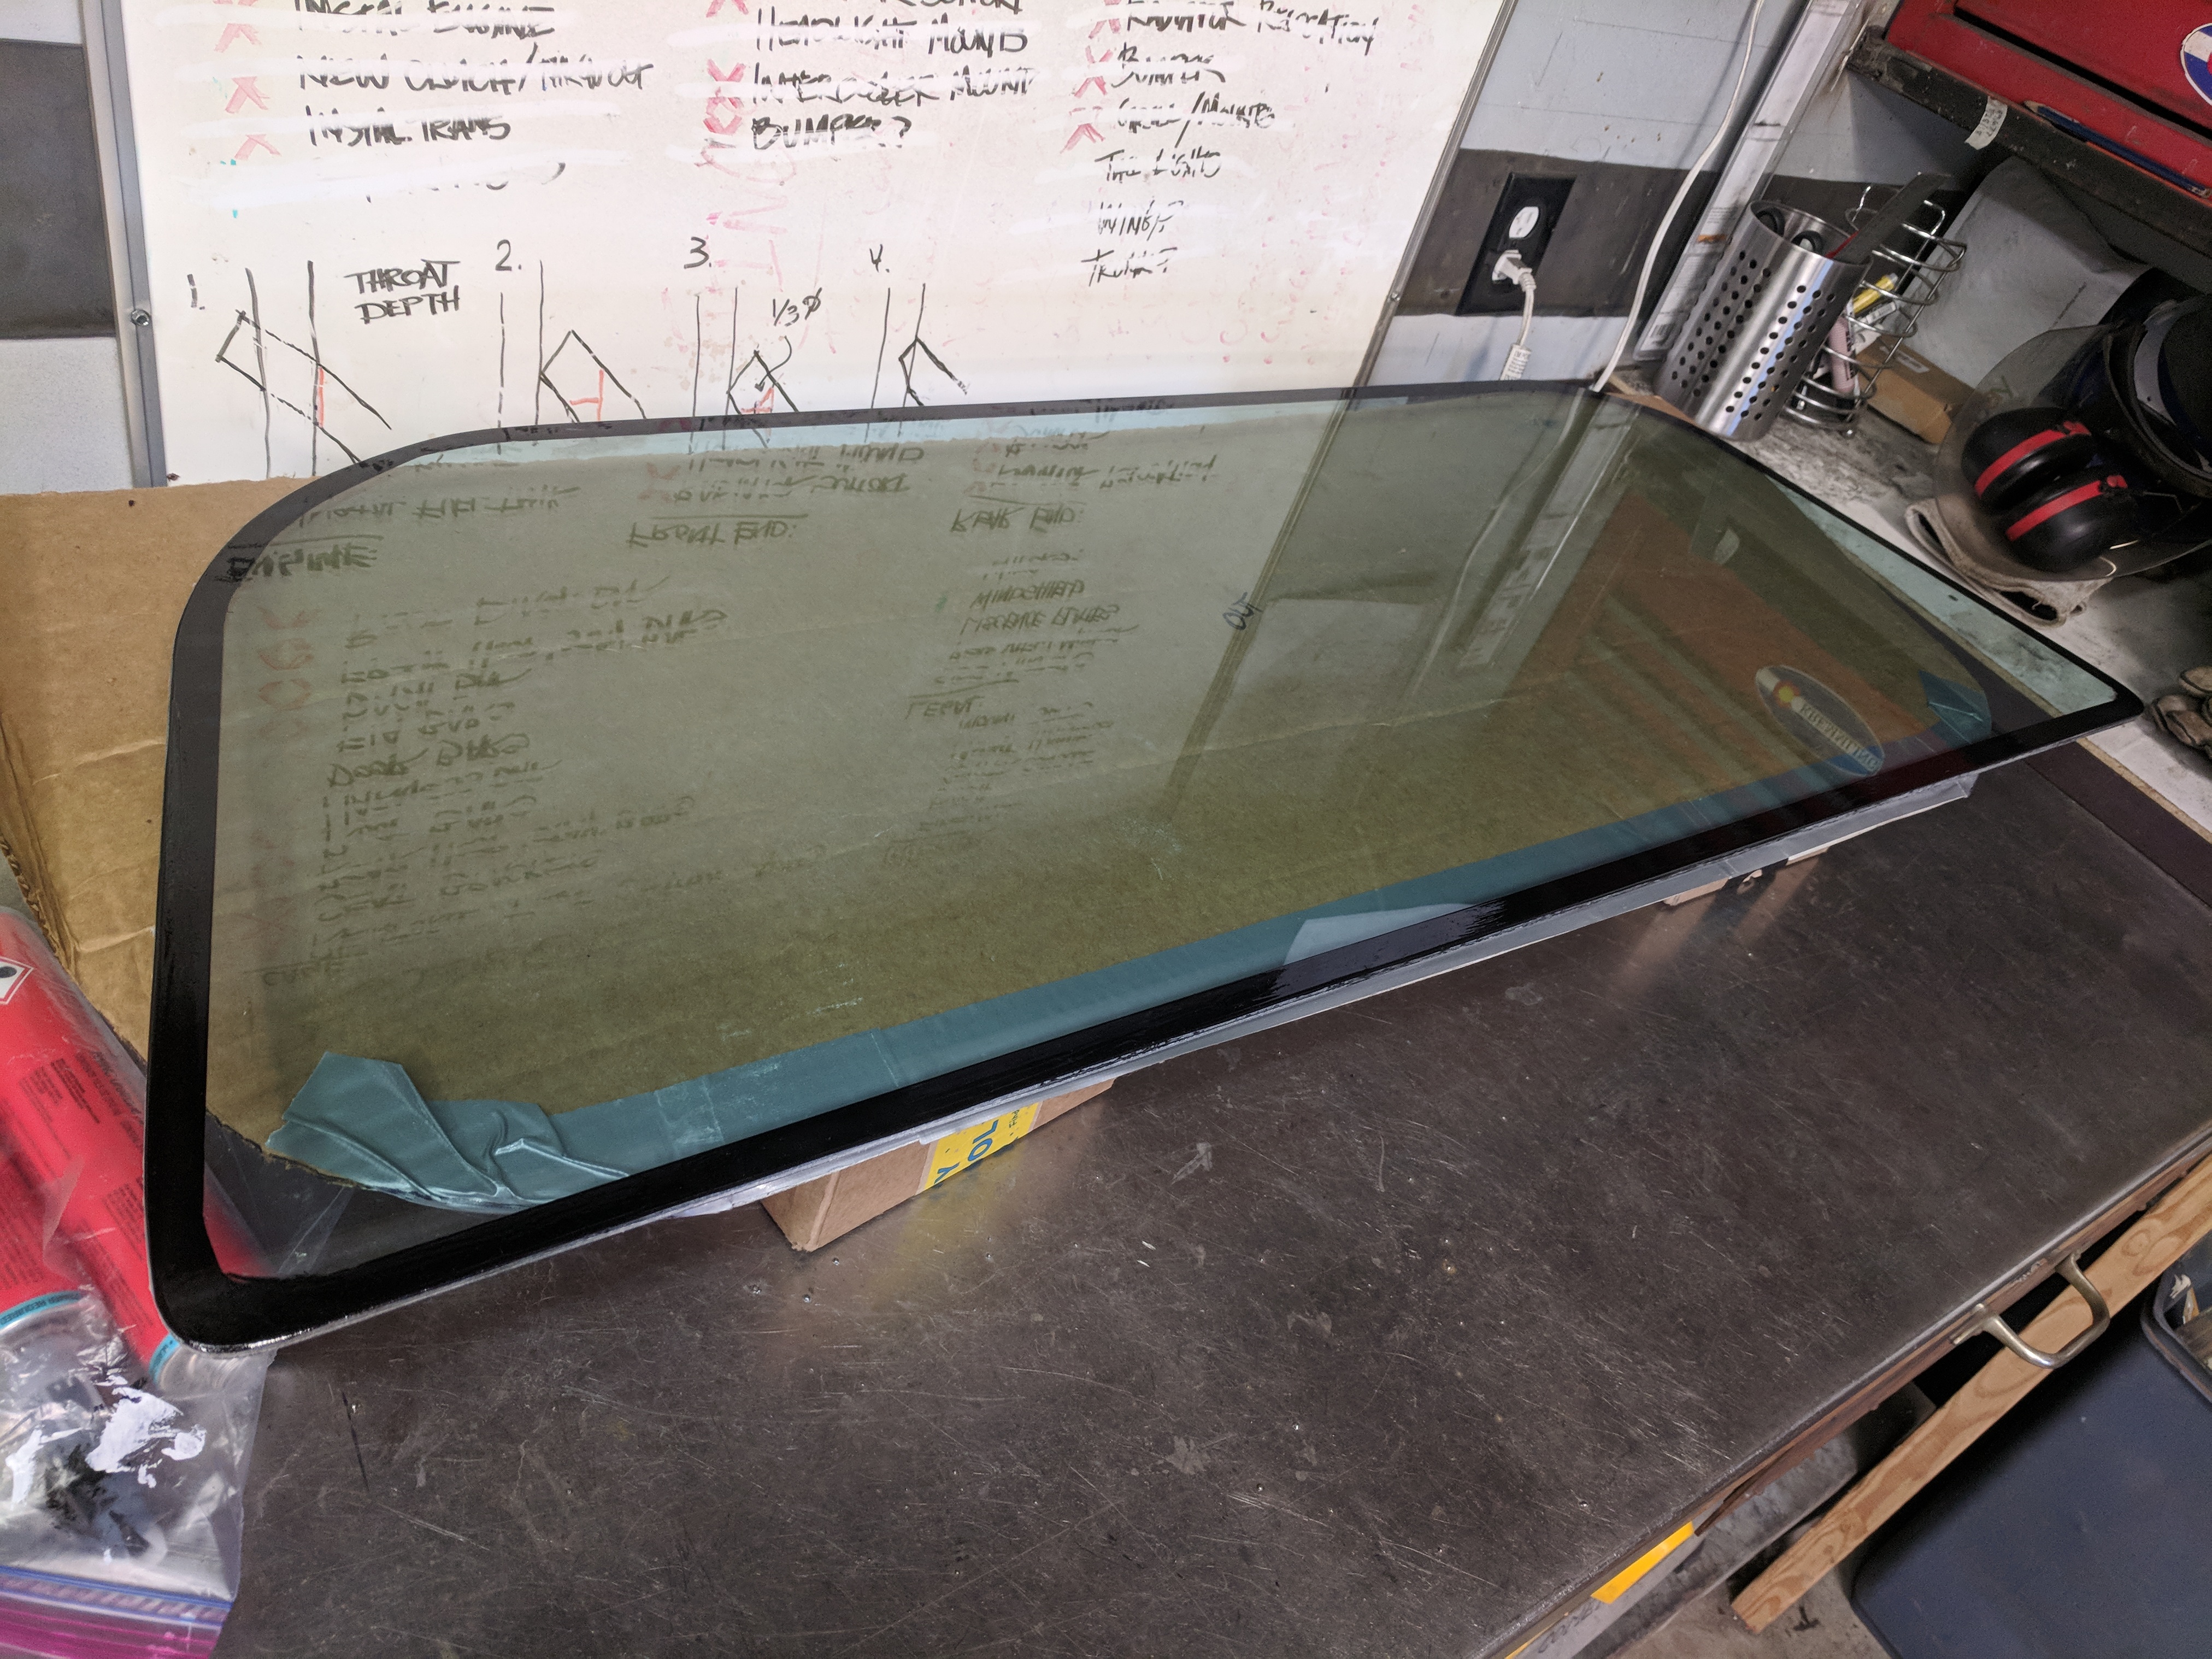
Finished up the windshield last night - put the epoxy tubes in the oven on 250 for about 5 minutes, made the process MUCH easier (I bent the squeeze handle on one of my caulk guns initially trying to get the stuff out!)
First bead laid on the angle iron, set the windshield, place a couple pieces at the top to keep the glass from sliding down, then work the outside edge of the glass/angle iron intersection - strike with a tool or covered finger. Use a glass-scraper to remove and extra epoxy from edges.
(Sorry for the crappy pic)
Reply
0
0
 08-14-2019, 10:56 AM
#95
Junior Member
Thread Starter
iTrader: (3)
Join Date: Oct 2015
Location: Steamboat Springs, CO
Posts: 329
Total Cats: 22
No wipers - yet. A single driver-side wiper is in under consideration. Primarily this will be a 'fair weather' car (think motorcycle)
There are (2) camping ponchos in the gun-case, just in case

I've got (2) stripped NB shells w/ titles if anyone wants a good starting point!
Reply
0
0
08-20-2019, 01:14 PM
#96
Junior Member
Thread Starter
iTrader: (3)
Join Date: Oct 2015
Location: Steamboat Springs, CO
Posts: 329
Total Cats: 22
Been a pretty fun couple of days.
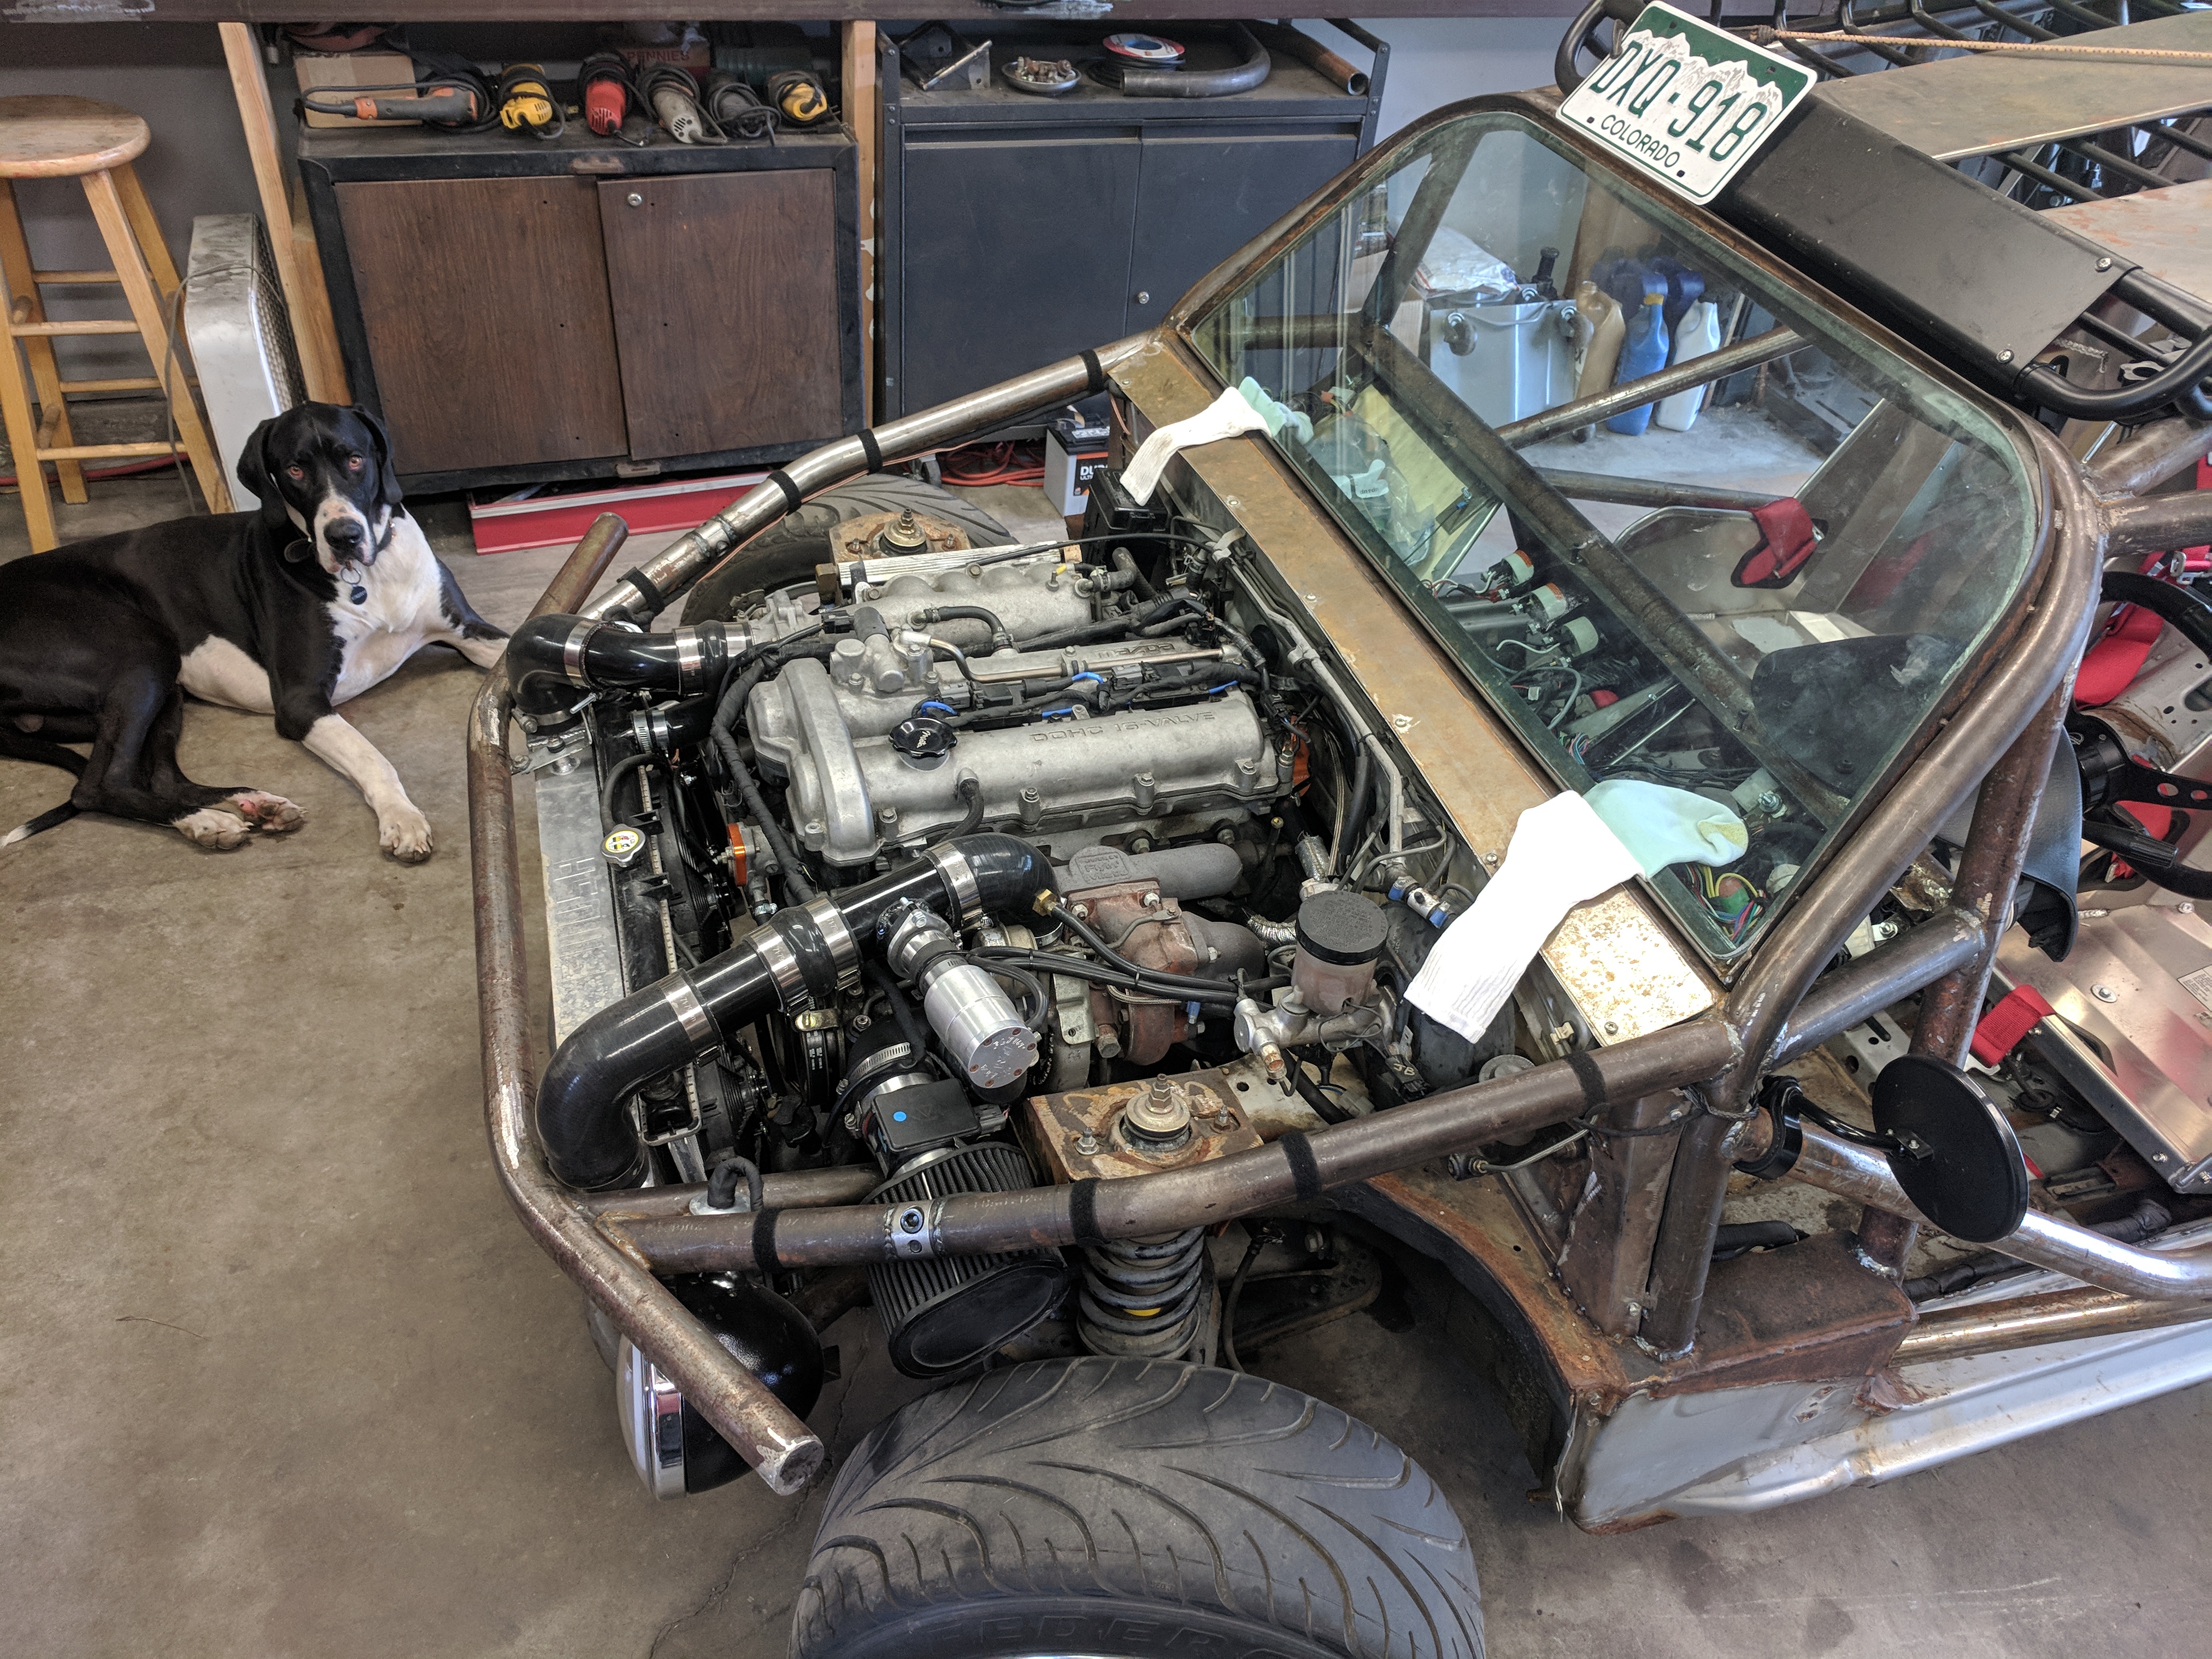
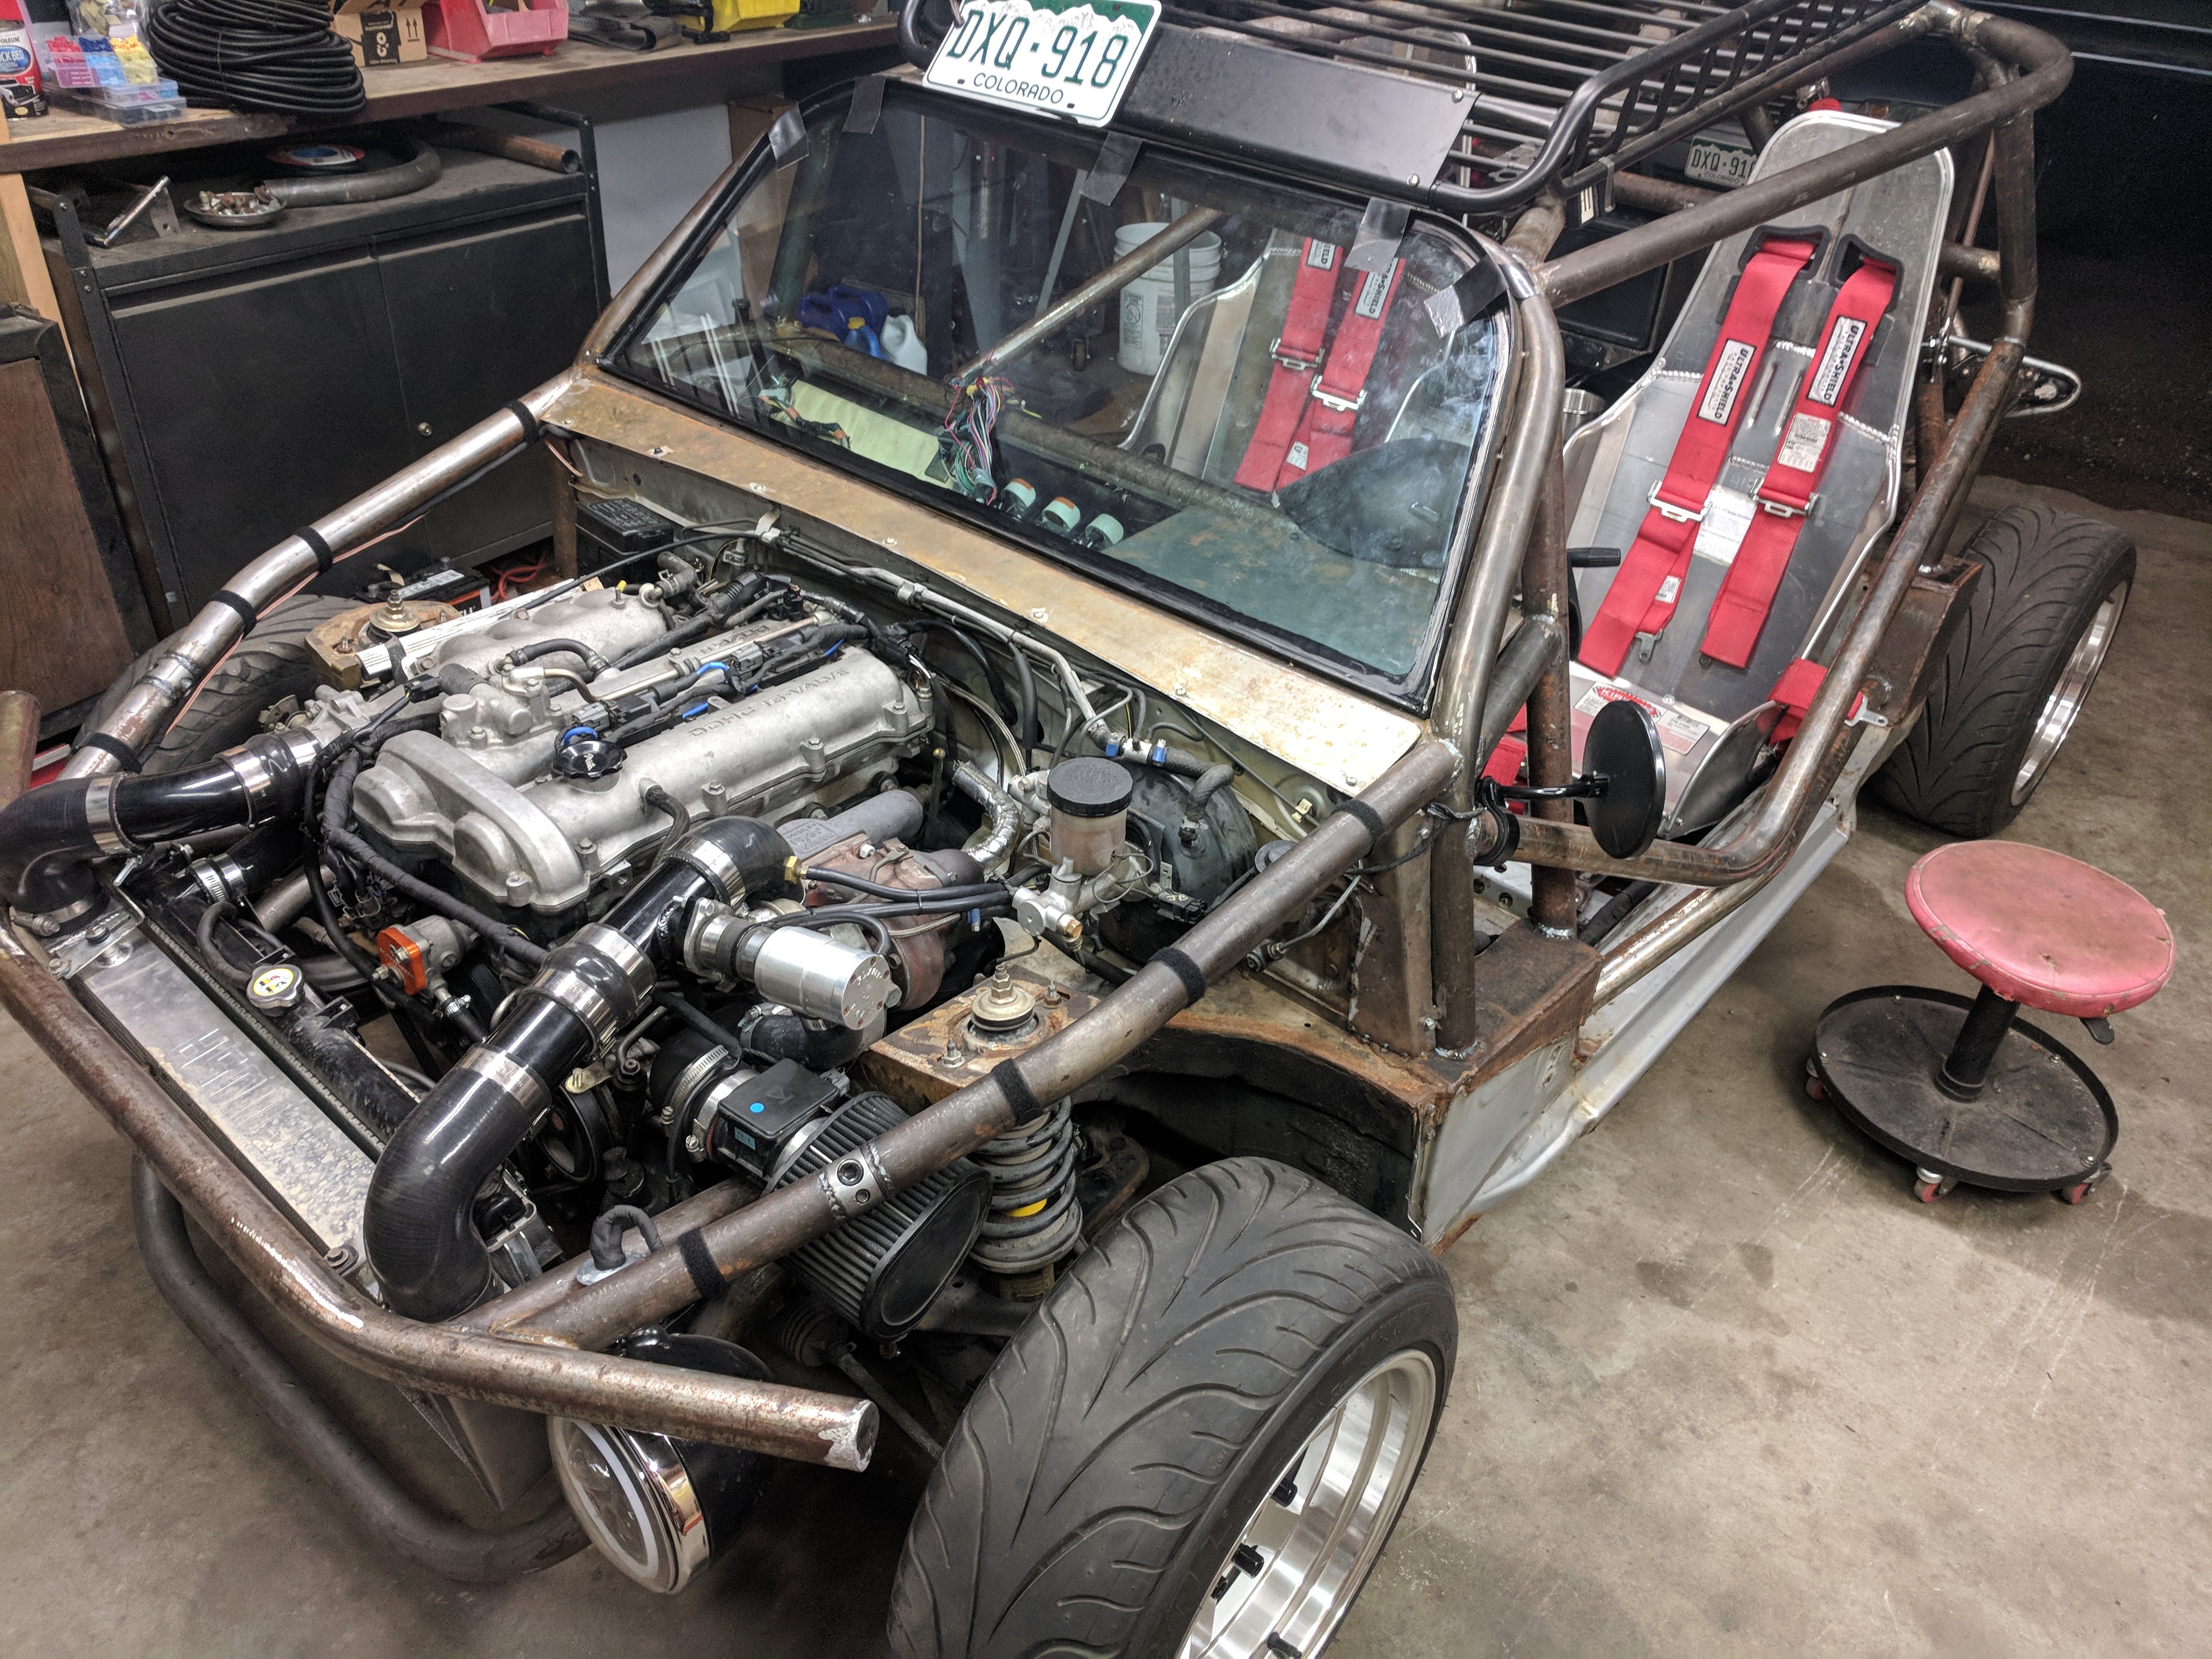
Got the windshield on - makes the interior of the car VERY quiet driving at speed (70/80mph) - at least compared to driving without a windshield!
Have driven the car into work a couple times, pretty fun - the looks are priceless!
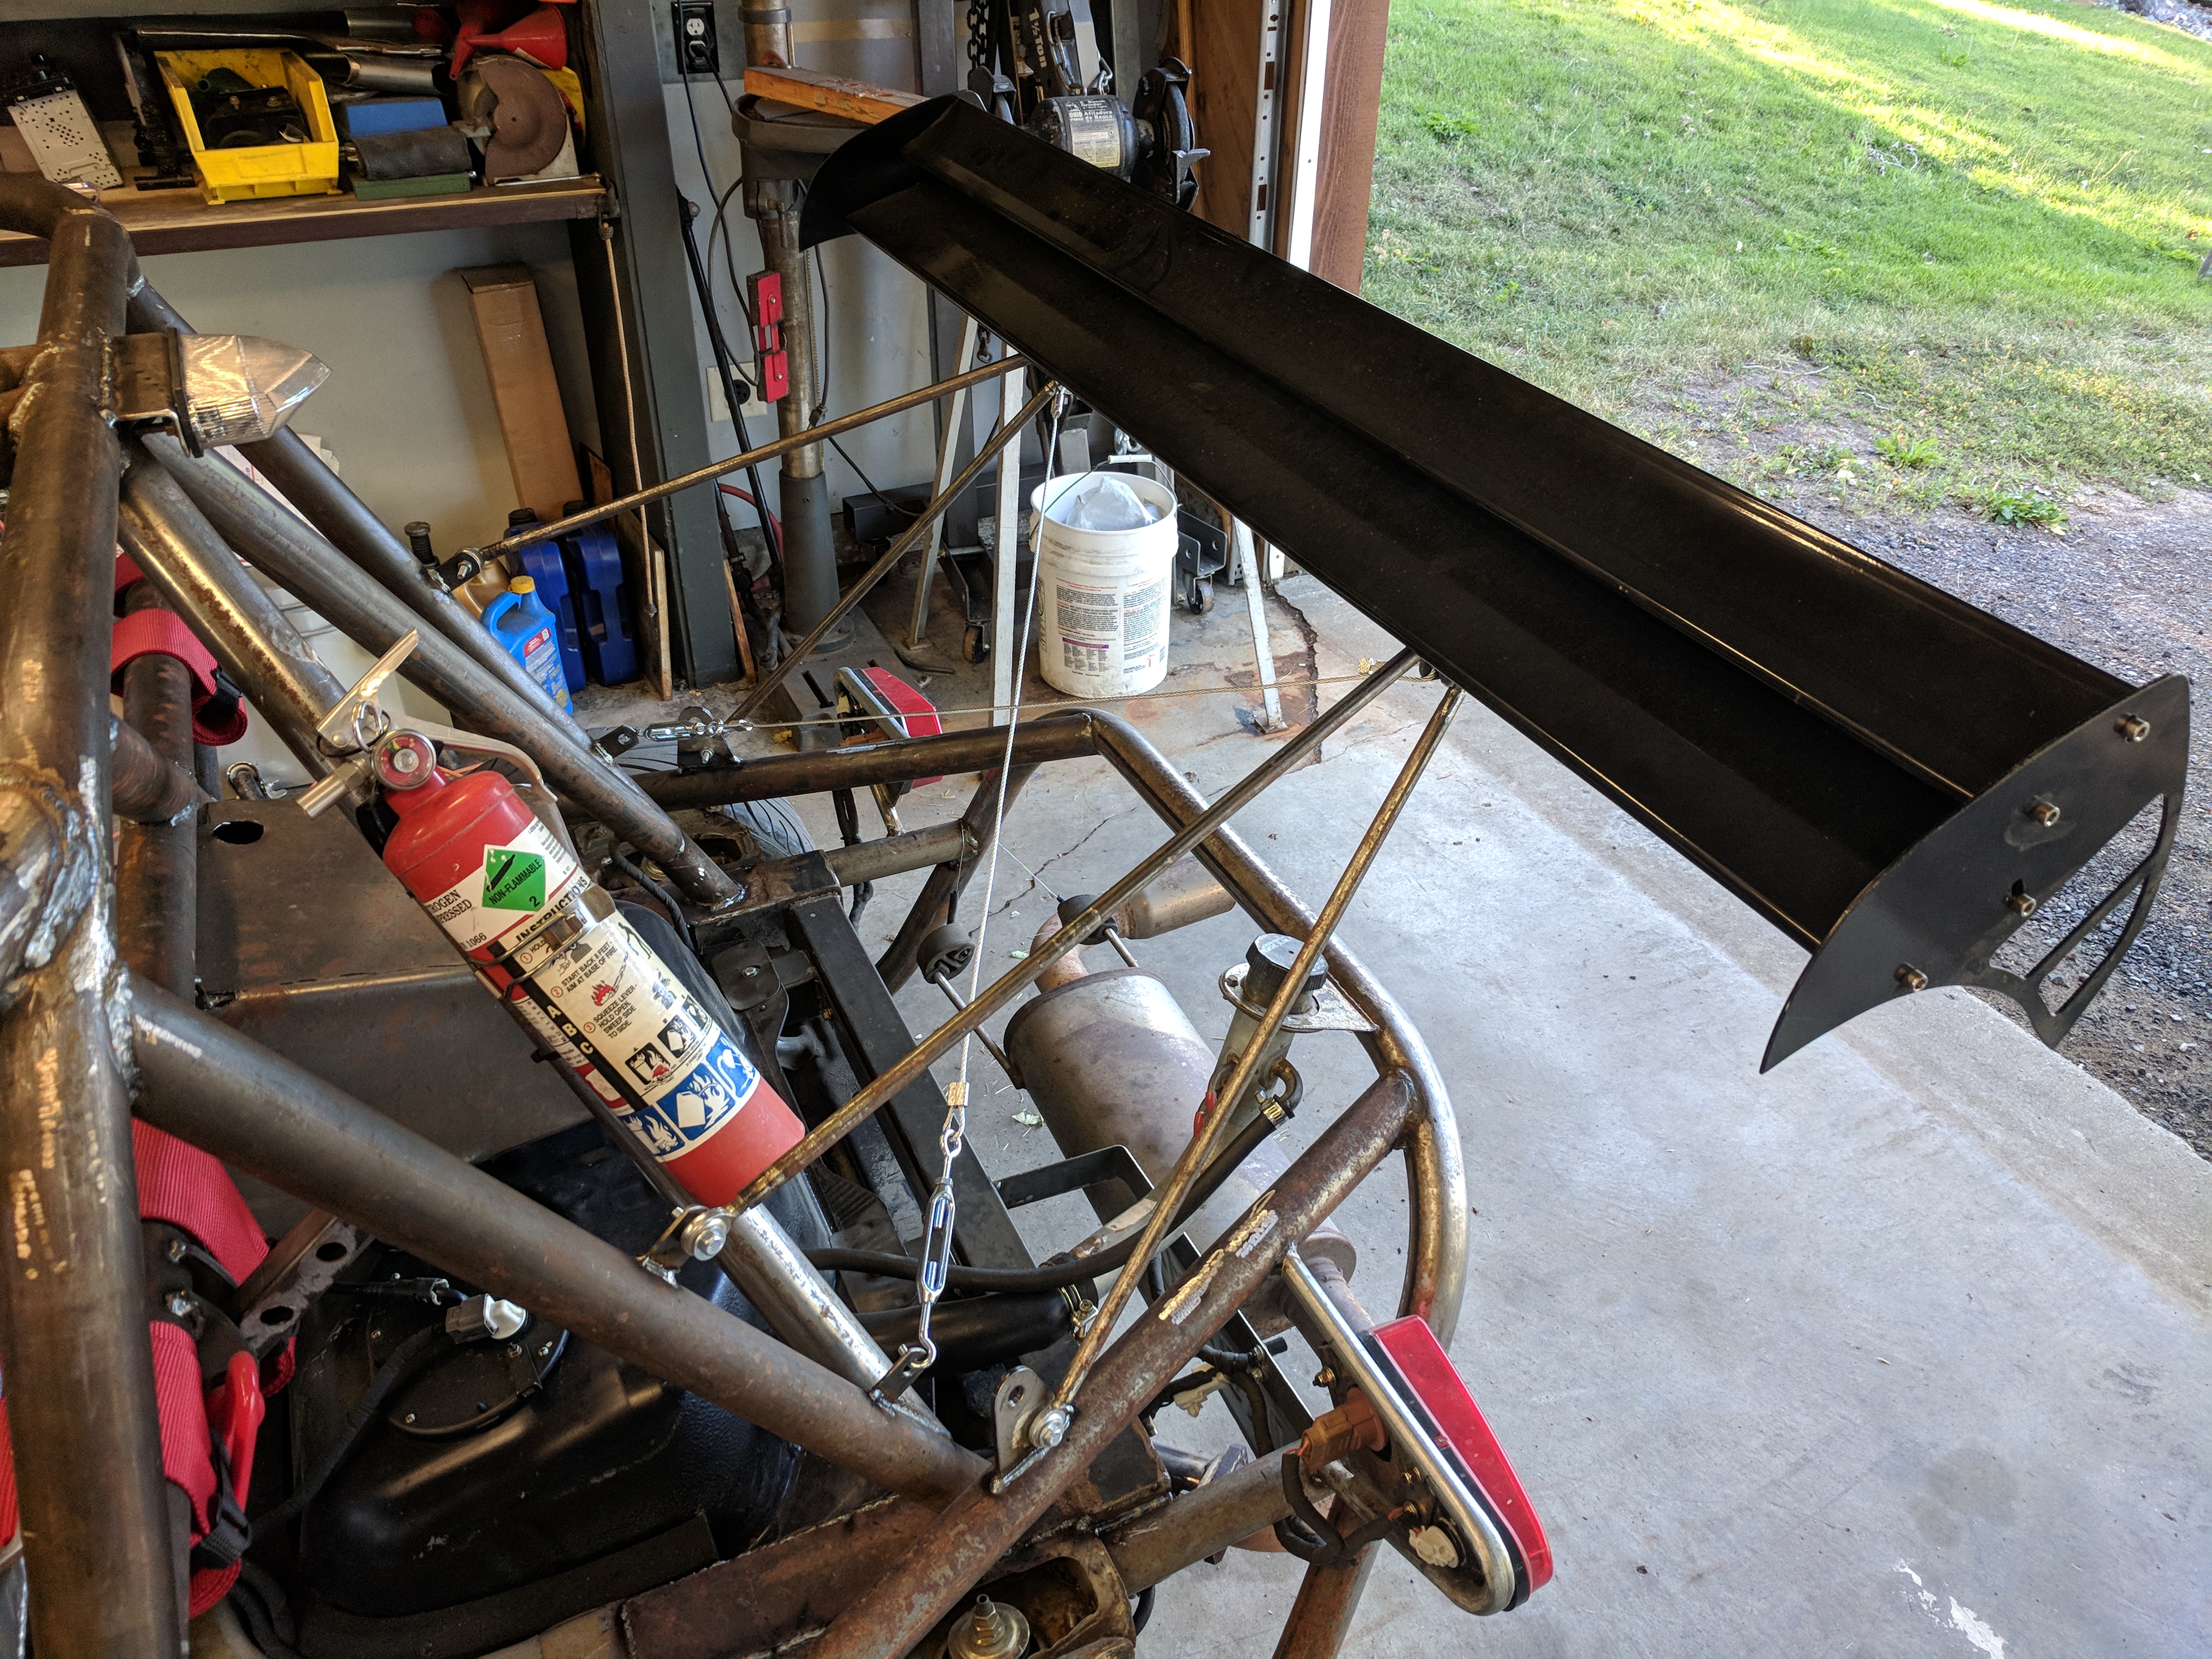
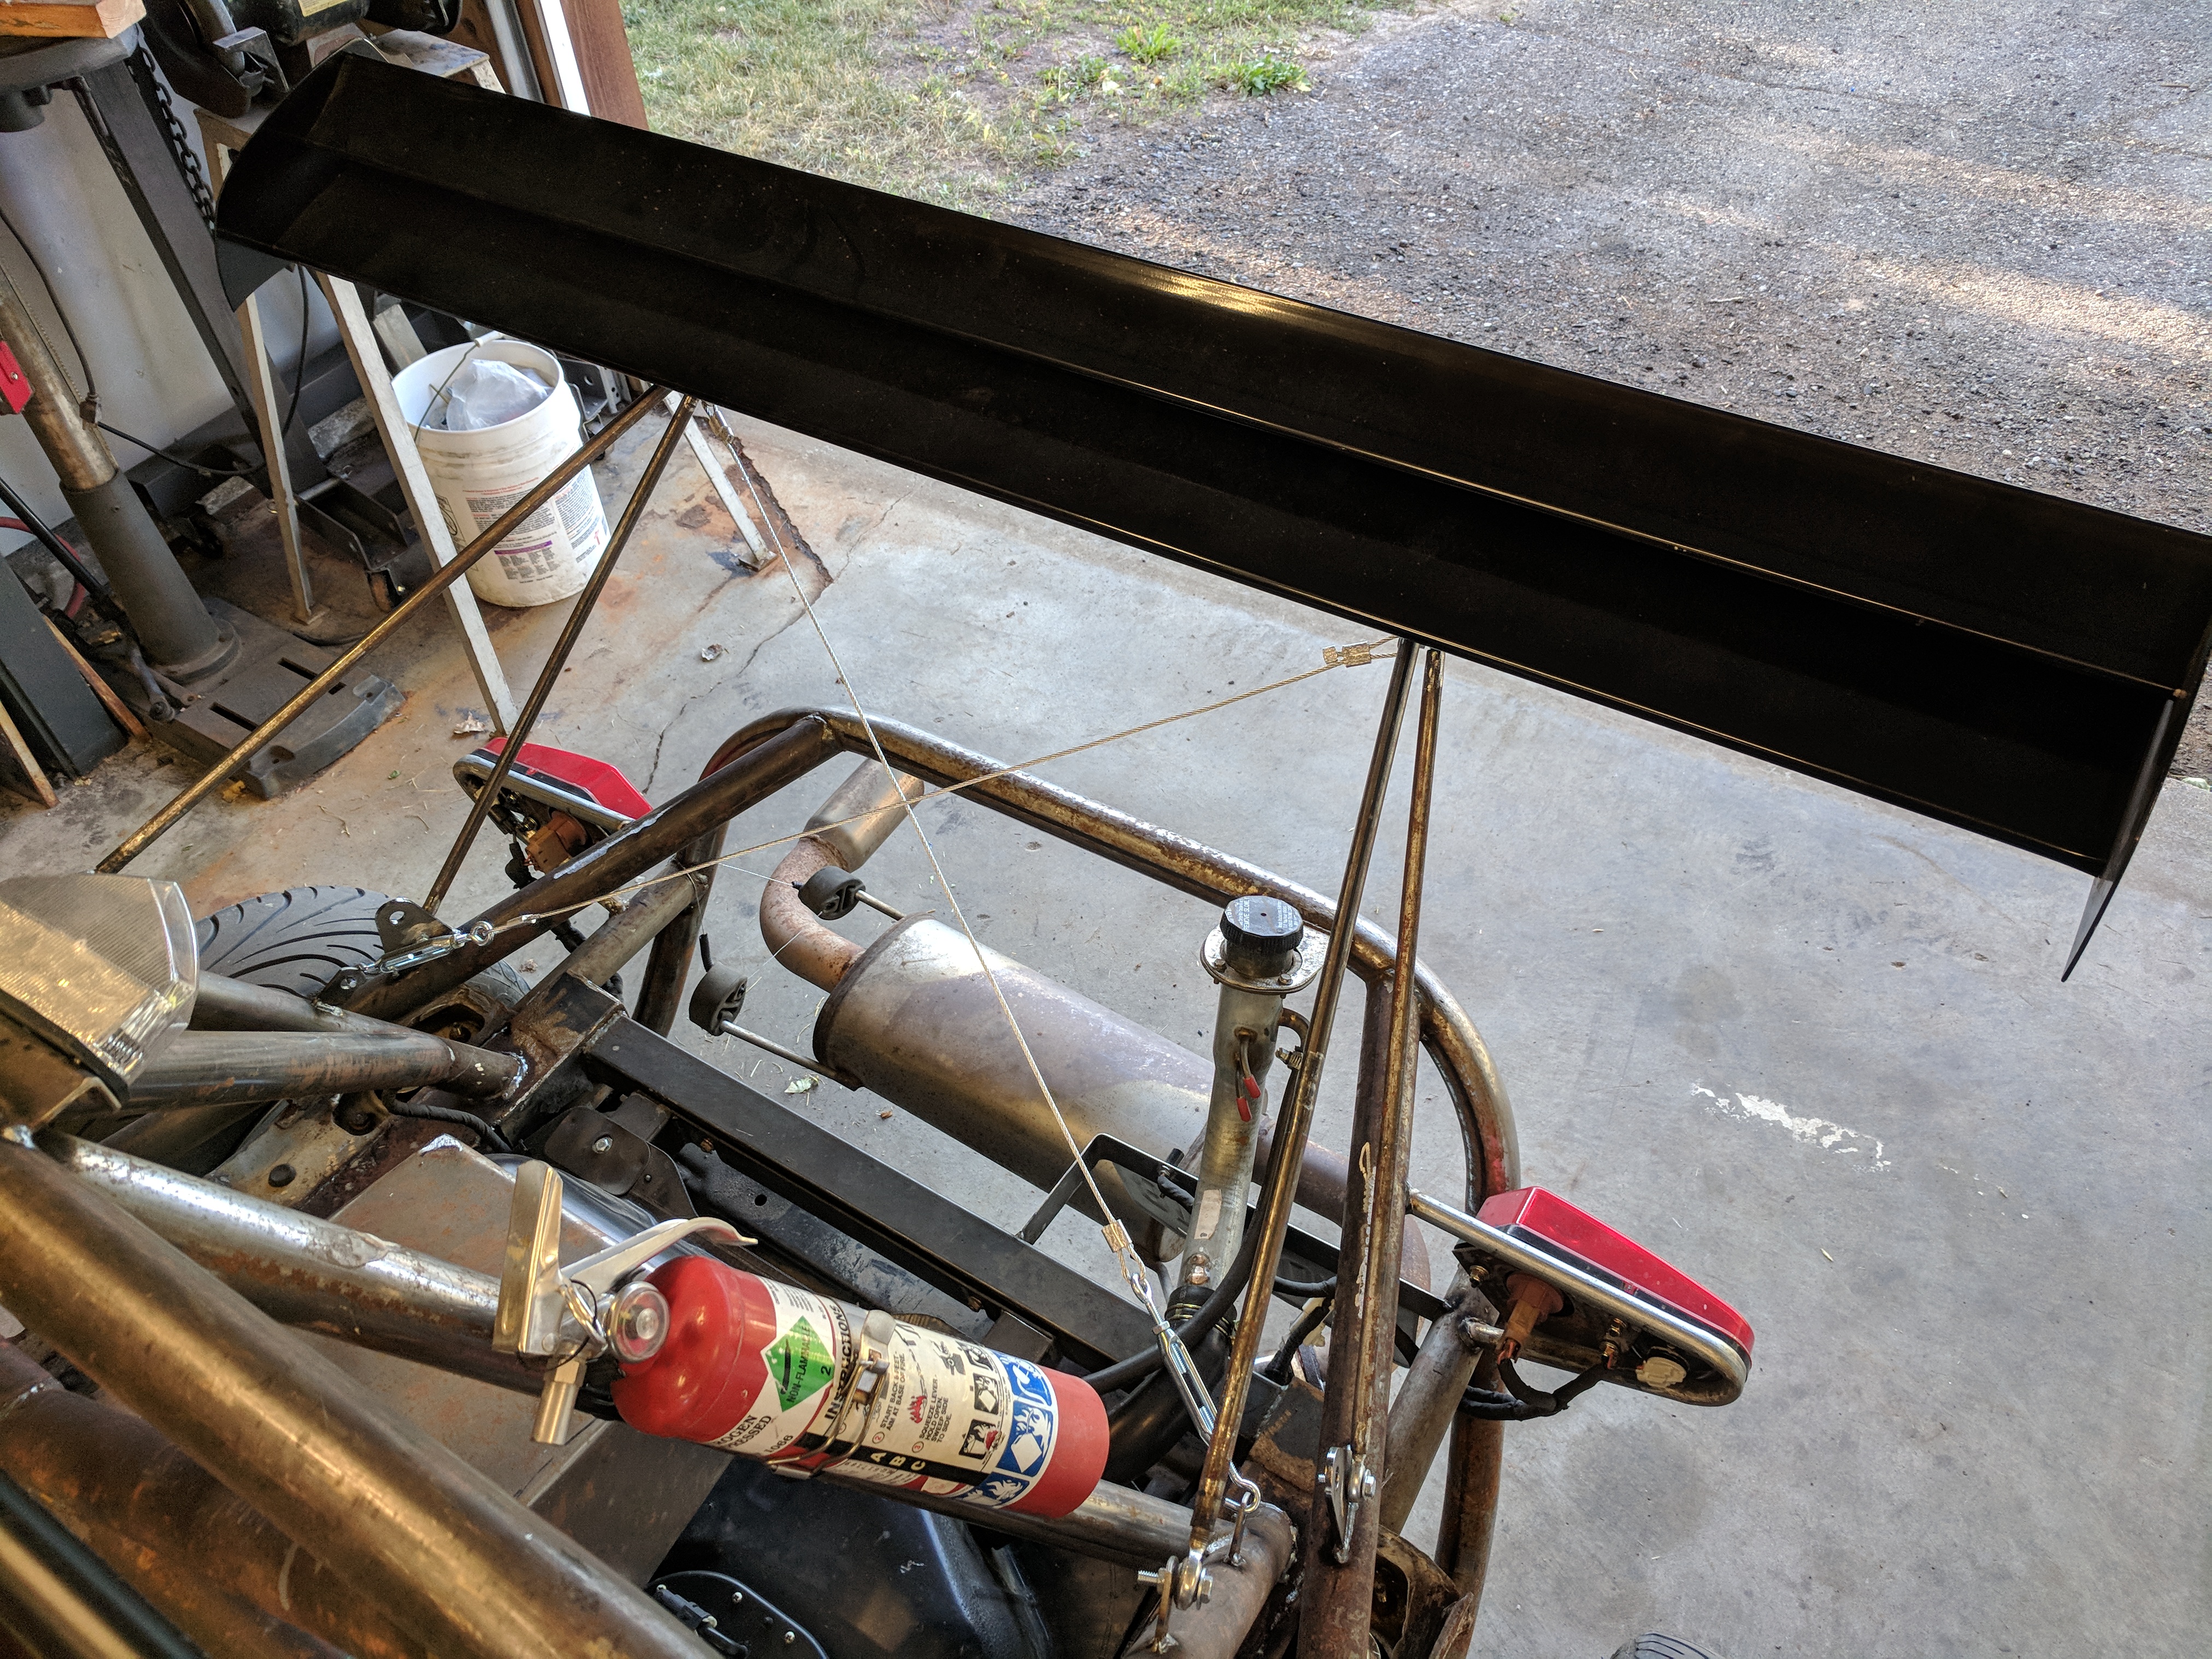
Been working out the kinks with the spoiler support (it's aesthetic only, doesn't help me - if anything is slows me down!) - it likes to shift slightly around 60-80mph - this has been remedied.
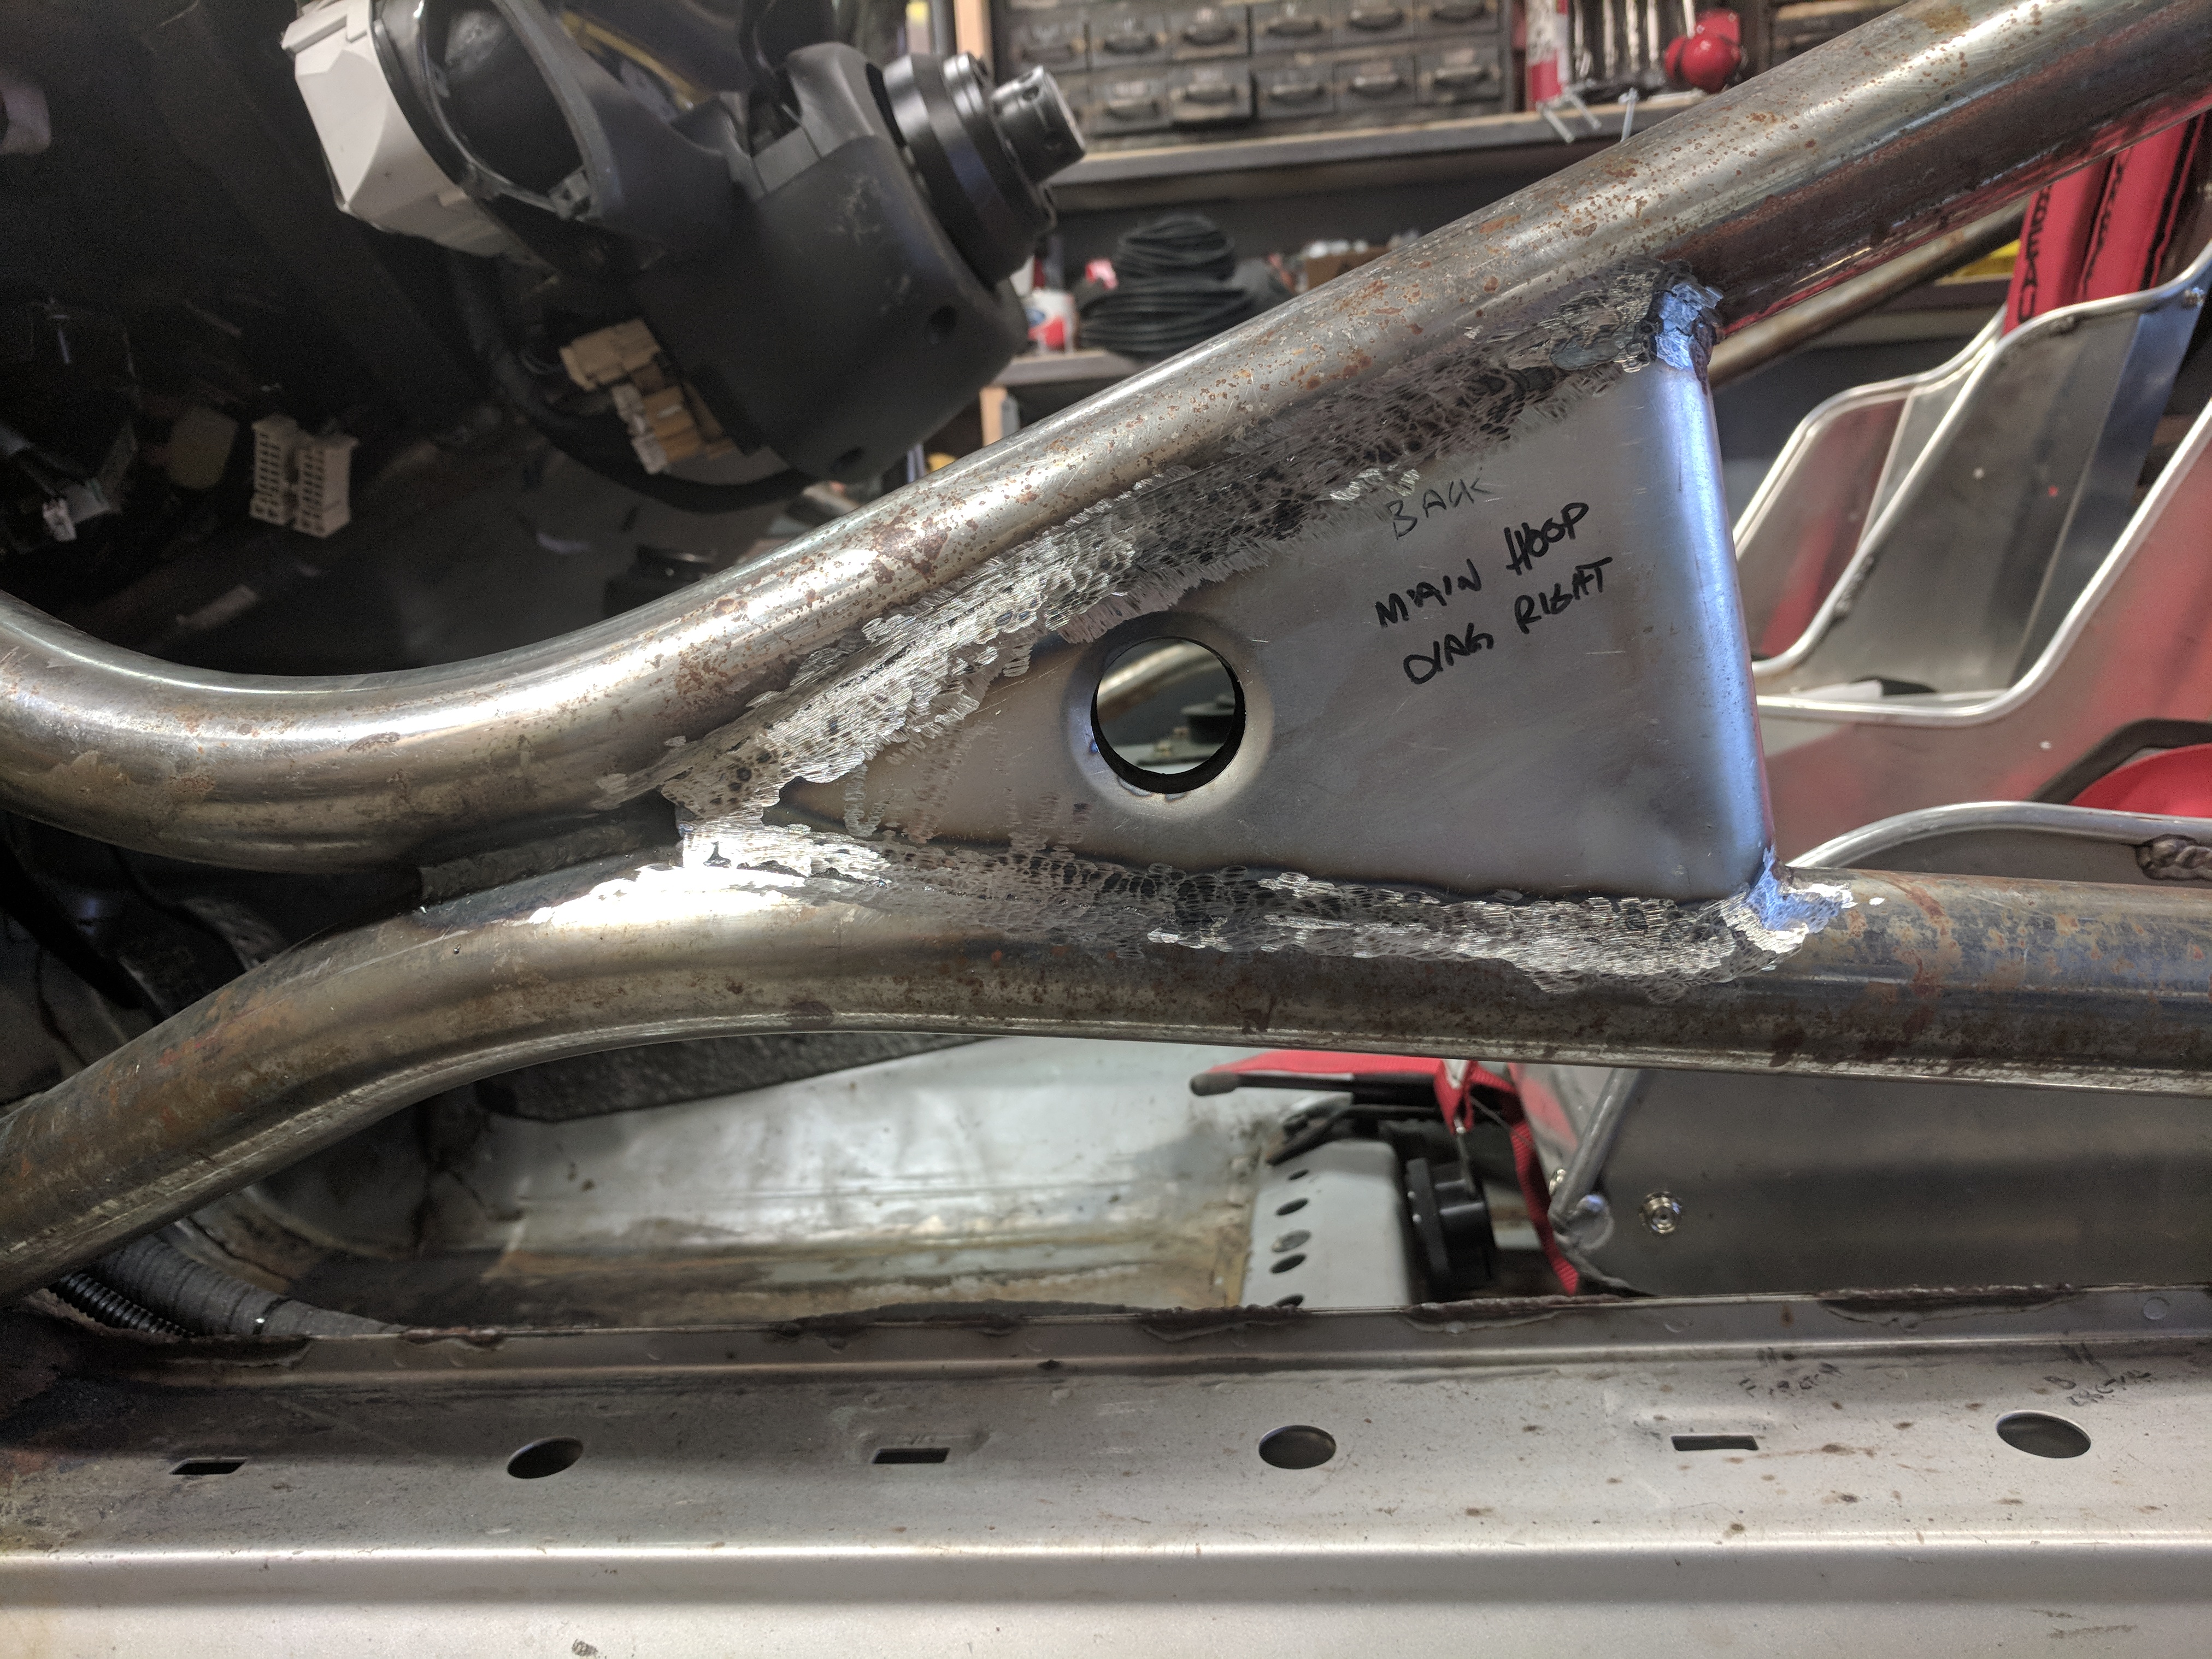
Last nights progress was working on gussets for the door bars. Welding 18ga (per regulations) to the thick DOM was very annoying - I haven't mastered ANY technique for this yet. So after some 'non-appealing' welds, I ground everything down smooth - will look pretty good with paint (coming this winter.) The thickness, 'vertical leg' length and gap at the small-end of the gusset are all prescribed per SCCA Reg 4.2, Appendix B:
Got the windshield on - makes the interior of the car VERY quiet driving at speed (70/80mph) - at least compared to driving without a windshield!
Have driven the car into work a couple times, pretty fun - the looks are priceless!
Been working out the kinks with the spoiler support (it's aesthetic only, doesn't help me - if anything is slows me down!) - it likes to shift slightly around 60-80mph - this has been remedied.
Last nights progress was working on gussets for the door bars. Welding 18ga (per regulations) to the thick DOM was very annoying - I haven't mastered ANY technique for this yet. So after some 'non-appealing' welds, I ground everything down smooth - will look pretty good with paint (coming this winter.) The thickness, 'vertical leg' length and gap at the small-end of the gusset are all prescribed per SCCA Reg 4.2, Appendix B:
Reply
0
0
09-03-2019, 12:13 PM
#97
Junior Member
Thread Starter
iTrader: (3)
Join Date: Oct 2015
Location: Steamboat Springs, CO
Posts: 329
Total Cats: 22
Been driving the kart around - work, shows, etc - it's a blast.
Pulled over once for being a 'go cart on the street' - the VIN / Plate / Registration quickly cleared things up and I was on my way.
Noticed that the spoiler was shifting left/right around 80mph - not great! SO - grabbed some cable and turnbuckles - pretty simple (30 minute) project - great results!
Reply
0
0
09-05-2019, 06:19 PM
#98
Junior Member
Thread Starter
iTrader: (3)
Join Date: Oct 2015
Location: Steamboat Springs, CO
Posts: 329
Total Cats: 22
OK – Here’s an up to date (8/2019) compilation of project costs.
A lot of this was offset by selling good parts off the donor car(s) – but to have good parts you need a good donor – sometimes it’s worth the extra $$$ to buy a wrecked Miata with clean interior / etc.
As with anything, this list is neither complete nor perfectly organized – this is just an attempt to help those wanting to build a ‘Kart’ to have a handle on cost. Add an additional 10%-15% for the other random crap and you’d be pretty close to the ‘real’ cost.
These builds *can* be done on the cheap, but projects STILL cost money. I reused good parts I had on hand and bought used parts where it made sense.
These costs do not reflect the FMII turbo kit, built engine, clutch, exhaust, fueling, etc. Also not included are any tools I had on hand prior to starting the project (Vise, Bench Grinder, Band saw, Drill Press, Workbench, Floor Jack, etc, etc, etc)
Donor:
$1300 Cost of original 1999 (silver) donor
Books:
$100 Midlana, Kurt Bilinski
$50 Kimini, Kurt Bilinski
$25 Prepare to Win, Carroll Smith
$25 Tune to Win, Carroll Smith
$25 Race to Win, Carroll Smith
$25 Chassis Engineering, Herb Adams
$35 Nuts, Bolts, Fasteners, Carroll Smith
$10 Drive to Win, Carroll Smith
Total: $295.00
Shop Upgrades:
$400 Wiring in (12) 110 outlets, (2) 220 outlets, (4) 8’ fluorescent lights
Total: $400.00
Tools:
$1200 Lincoln 210MP Mig Welder
$600 Forcecut 62i Plasma Cutter
$45 DeWalt corded saw-zall
$90 (2) DeWalt corded angle grinders
$250 Tube bender frame
$150 Tube bender die
$13 O2 Sensor Wrench
$40 Knotted Grinder Brushes
$50 Cut-Off Wheels
$40 Plasma Cutter nozzles
$7 Metal strap locking tool
$15 DeWalt sawzall blades
$25 DeWalt Cobalt drill bits
$35 Cleco wrench and hardware
$25 Saftey wire pliers and wire
$50 Rivnut pliers and hardware
$80 Dimple Die Set (3 piece)
$54 Pipemaster Coping Tool
$50 1 �" Hole Saw Bits
$45 3M respirator / 2097 P100 filters
$80 Welding pliers, squares, magnets, etc
$60 Pipe / Tube Notcher
$130 Welding putty, level, angle finder, clamps, etc, etc
$30 8ton Bottle Jack
$45 12ton bottle jack
$40 Welding Cart
$75 Welding helmet, gloves, etc
$45 Grinding shield, gloves, etc
$25 Weatherpack crimp tool
Total: $3,395.00
Materials:
$900 140’ DOM seamless tubing - 1 �”, 0.120 wall
$150 60’ 10ga (1/8”) metal plate (2”, 3”, 4”, 12” wide sticks)
$40 20’, Mild steel tubing (1/4”, �”)
$40 20’, 2” square Mild steel tubing
$250 (3) C20 Gas refills
$150 (3) Spools of welding wire
$20 Rivnut pack
$10 Metal zip ties
$25 Wire Loom Protector
$35 (10) Rolls Tesa wiring harness tape
$36 (10) Rolls 18ga wire rolls
$75 Wiring connectors / wrench / accs
$30 Heat Shrink tubing, assorted
$110 Weatherpack connectors
$12 Steel weld tabs
$10 Zip tie set
$15 (5) Bosch-style relays
$45 Clear Plexi
$40 Gray Tinted Plexi
$24 (1) quart Rustoleum bed liner
$8 (120piece) grommet set
$55 Weld in bungs
$200 18ga Hot Roll sheet metal
Total: $2,275.00
Engine:
$65 Rear Main Seal/Pilot / Throwout Bearing
$55 Radiator Hoses (Various)
$70 Walbro Fuel Pump
$150 Intercooler & Piping
$20 Injector Seals Kit
$30 NKG Spark Plugs
$12 Spark Plugs
$5 Radiator Cap
$8 Rad hose barb connector
$7 Exhaust gaskets
$5 Radiator Zip-Ties
$3 Vacuum Caps
$10 Fuel line plastic connectors
$13 WIX fuel filter
$7 Radiator Hose
$33 Piping / acc
$40 Spal fans
$20 BOV adapter flange
$16 BOV pipe mount
$8 Intercooler elbow
$40 Intercooler connectors
$14 Timing belt
$70 Walbro Fuel Pump
Total: $705.00
Lighting / Elec:
$40 2010 Polaris RZR Tailights
$50 7" Headlight Buckets
$100 7" LED Round Headlights
$30 Polaris Rear Wiring Harness
$15 Polaris Bulb Holder
$10 RZR nylon nuts
$15 Hella Horn
$12 Horn Button
$35 LED Tail Light
$10 (4) LED Resistors
$50 Wideband Wiring Harness
$7 Amber LED bulbs
$35 White / Red LED Bulbs
$7 LED rear plate lights
$12 USB / Cig plugs
$10 Battery disconnect
$27 Master relay / camshaft sensor
$30 Mower Replacement Battery
$17 Camshaft Sensor
$55 Coolant Temp Sensor / O2 Sensor
$35 Bosch LSU4.2 Wideband Sensor
Total: $600.00
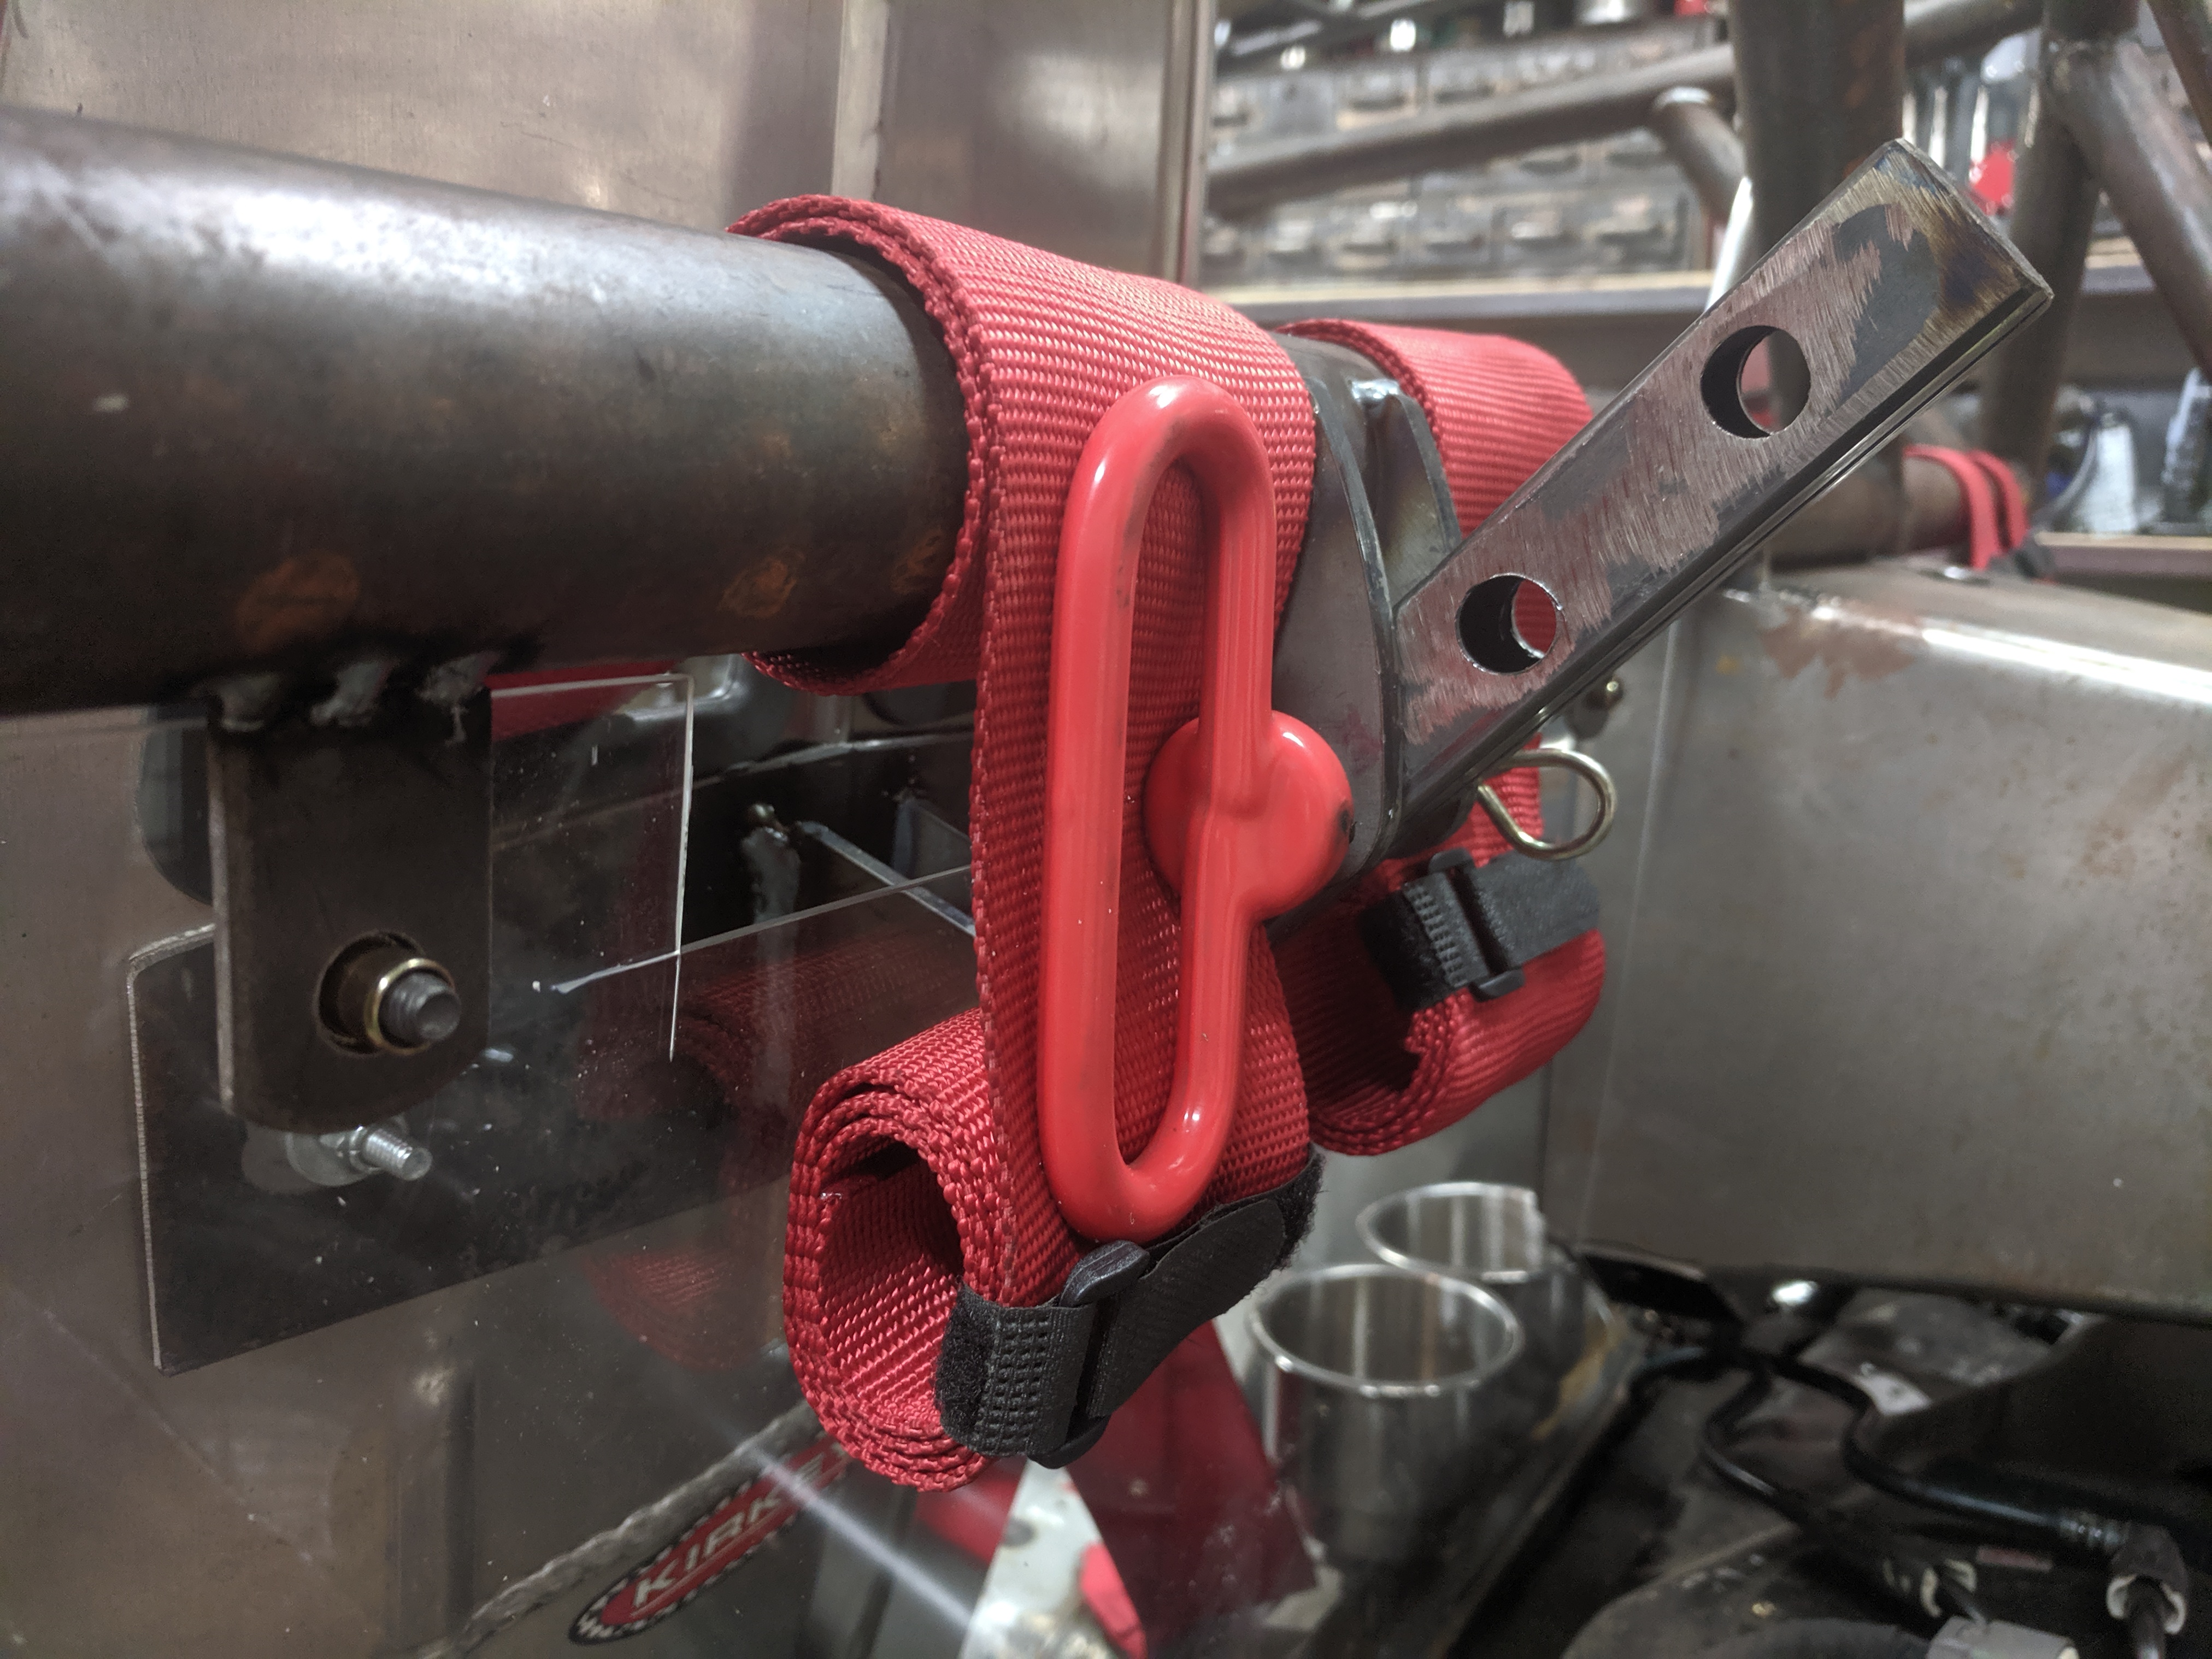
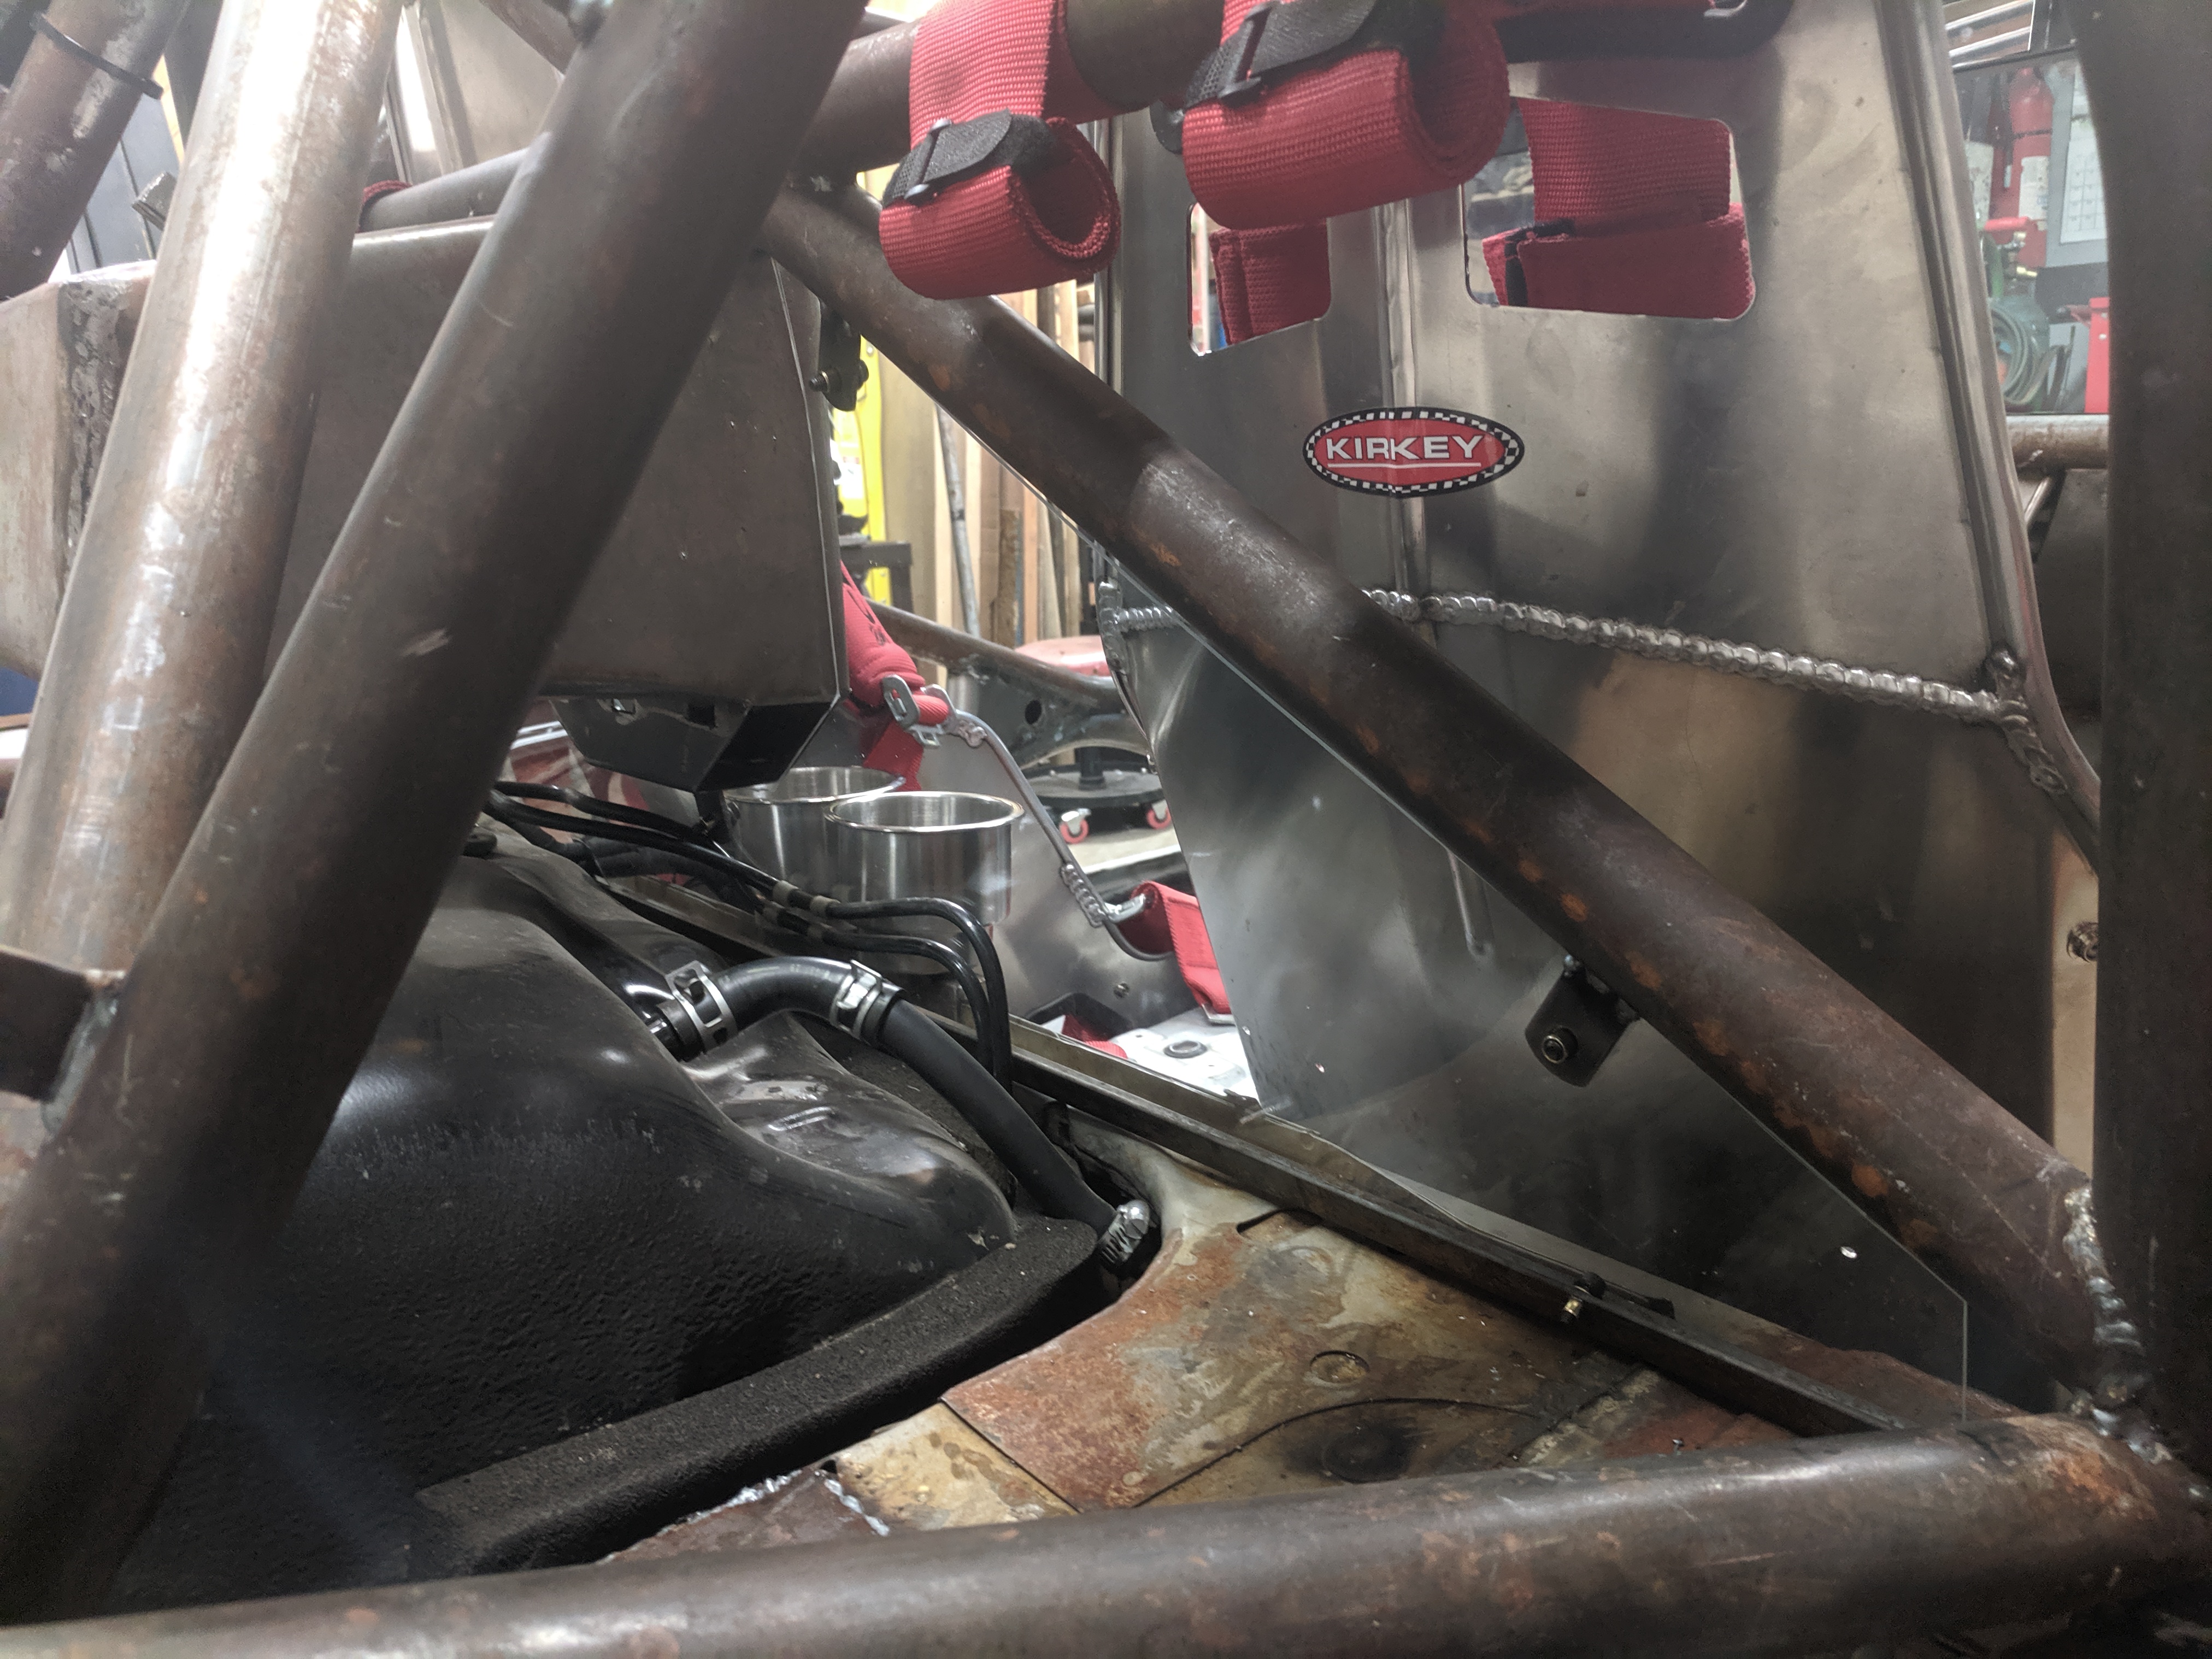
Interior:
$60 Stalwart Gun Safe
$40 Shifter boot / rebuild
$20 Harness Pads
$85 Harness hardware
$100 Ultrashielf 5pt Harnesses (used)
$150 Kirkey Driver Seat
$170 Kirkey Passenger Seat
$125 Gauges / O2 Sensor / Wideband, used
$35 Lifting Eye Bolts
$55 (2) SFI Roll Bar Padding
$10 Net Pockets
$15 Other Roll Bar Padding
$10 Grip Tape
$20 5-Panel Rear View Mirror
$11 Cup holders
$85 NRG Quick Hub w/ wheel (used)
$25 Weighted Shift ****
$50 Fire Extinguisher w/ mount
Total: $1,065.00
Exterior:
$25 Spoiler Heim Joints
$25 3" Muffler Tip
$20 Shock Tab brackets
$20 Lug Nuts (extended)
$600 MST Wheels w/ Federal Tires (used)
$10 Trailer Hitch Handle
$40 Clamp on side-view mirrors
$15 Third brake light
$65 Rear spoiler
$75 Roof rack
$10 Third brake light
$160 Windshield w/ glue
Total: $1065.00
Totals:
$1300 1999 Donor
$295.00 Books
$400.00 Shop Upgrades
$3,395.00 Tools
--
$2,275.00 Materials
$705.00 Engine
$600.00 Wiring / Elec
$1,065.00 Interior
$1065.00 Exterior
A lot of this was offset by selling good parts off the donor car(s) – but to have good parts you need a good donor – sometimes it’s worth the extra $$$ to buy a wrecked Miata with clean interior / etc.
As with anything, this list is neither complete nor perfectly organized – this is just an attempt to help those wanting to build a ‘Kart’ to have a handle on cost. Add an additional 10%-15% for the other random crap and you’d be pretty close to the ‘real’ cost.
These builds *can* be done on the cheap, but projects STILL cost money. I reused good parts I had on hand and bought used parts where it made sense.
These costs do not reflect the FMII turbo kit, built engine, clutch, exhaust, fueling, etc. Also not included are any tools I had on hand prior to starting the project (Vise, Bench Grinder, Band saw, Drill Press, Workbench, Floor Jack, etc, etc, etc)
Donor:
$1300 Cost of original 1999 (silver) donor
Books:
$100 Midlana, Kurt Bilinski
$50 Kimini, Kurt Bilinski
$25 Prepare to Win, Carroll Smith
$25 Tune to Win, Carroll Smith
$25 Race to Win, Carroll Smith
$25 Chassis Engineering, Herb Adams
$35 Nuts, Bolts, Fasteners, Carroll Smith
$10 Drive to Win, Carroll Smith
Total: $295.00
Shop Upgrades:
$400 Wiring in (12) 110 outlets, (2) 220 outlets, (4) 8’ fluorescent lights
Total: $400.00
Tools:
$1200 Lincoln 210MP Mig Welder
$600 Forcecut 62i Plasma Cutter
$45 DeWalt corded saw-zall
$90 (2) DeWalt corded angle grinders
$250 Tube bender frame
$150 Tube bender die
$13 O2 Sensor Wrench
$40 Knotted Grinder Brushes
$50 Cut-Off Wheels
$40 Plasma Cutter nozzles
$7 Metal strap locking tool
$15 DeWalt sawzall blades
$25 DeWalt Cobalt drill bits
$35 Cleco wrench and hardware
$25 Saftey wire pliers and wire
$50 Rivnut pliers and hardware
$80 Dimple Die Set (3 piece)
$54 Pipemaster Coping Tool
$50 1 �" Hole Saw Bits
$45 3M respirator / 2097 P100 filters
$80 Welding pliers, squares, magnets, etc
$60 Pipe / Tube Notcher
$130 Welding putty, level, angle finder, clamps, etc, etc
$30 8ton Bottle Jack
$45 12ton bottle jack
$40 Welding Cart
$75 Welding helmet, gloves, etc
$45 Grinding shield, gloves, etc
$25 Weatherpack crimp tool
Total: $3,395.00
Materials:
$900 140’ DOM seamless tubing - 1 �”, 0.120 wall
$150 60’ 10ga (1/8”) metal plate (2”, 3”, 4”, 12” wide sticks)
$40 20’, Mild steel tubing (1/4”, �”)
$40 20’, 2” square Mild steel tubing
$250 (3) C20 Gas refills
$150 (3) Spools of welding wire
$20 Rivnut pack
$10 Metal zip ties
$25 Wire Loom Protector
$35 (10) Rolls Tesa wiring harness tape
$36 (10) Rolls 18ga wire rolls
$75 Wiring connectors / wrench / accs
$30 Heat Shrink tubing, assorted
$110 Weatherpack connectors
$12 Steel weld tabs
$10 Zip tie set
$15 (5) Bosch-style relays
$45 Clear Plexi
$40 Gray Tinted Plexi
$24 (1) quart Rustoleum bed liner
$8 (120piece) grommet set
$55 Weld in bungs
$200 18ga Hot Roll sheet metal
Total: $2,275.00
Engine:
$65 Rear Main Seal/Pilot / Throwout Bearing
$55 Radiator Hoses (Various)
$70 Walbro Fuel Pump
$150 Intercooler & Piping
$20 Injector Seals Kit
$30 NKG Spark Plugs
$12 Spark Plugs
$5 Radiator Cap
$8 Rad hose barb connector
$7 Exhaust gaskets
$5 Radiator Zip-Ties
$3 Vacuum Caps
$10 Fuel line plastic connectors
$13 WIX fuel filter
$7 Radiator Hose
$33 Piping / acc
$40 Spal fans
$20 BOV adapter flange
$16 BOV pipe mount
$8 Intercooler elbow
$40 Intercooler connectors
$14 Timing belt
$70 Walbro Fuel Pump
Total: $705.00
Lighting / Elec:
$40 2010 Polaris RZR Tailights
$50 7" Headlight Buckets
$100 7" LED Round Headlights
$30 Polaris Rear Wiring Harness
$15 Polaris Bulb Holder
$10 RZR nylon nuts
$15 Hella Horn
$12 Horn Button
$35 LED Tail Light
$10 (4) LED Resistors
$50 Wideband Wiring Harness
$7 Amber LED bulbs
$35 White / Red LED Bulbs
$7 LED rear plate lights
$12 USB / Cig plugs
$10 Battery disconnect
$27 Master relay / camshaft sensor
$30 Mower Replacement Battery
$17 Camshaft Sensor
$55 Coolant Temp Sensor / O2 Sensor
$35 Bosch LSU4.2 Wideband Sensor
Total: $600.00
Interior:
$60 Stalwart Gun Safe
$40 Shifter boot / rebuild
$20 Harness Pads
$85 Harness hardware
$100 Ultrashielf 5pt Harnesses (used)
$150 Kirkey Driver Seat
$170 Kirkey Passenger Seat
$125 Gauges / O2 Sensor / Wideband, used
$35 Lifting Eye Bolts
$55 (2) SFI Roll Bar Padding
$10 Net Pockets
$15 Other Roll Bar Padding
$10 Grip Tape
$20 5-Panel Rear View Mirror
$11 Cup holders
$85 NRG Quick Hub w/ wheel (used)
$25 Weighted Shift ****
$50 Fire Extinguisher w/ mount
Total: $1,065.00
Exterior:
$25 Spoiler Heim Joints
$25 3" Muffler Tip
$20 Shock Tab brackets
$20 Lug Nuts (extended)
$600 MST Wheels w/ Federal Tires (used)
$10 Trailer Hitch Handle
$40 Clamp on side-view mirrors
$15 Third brake light
$65 Rear spoiler
$75 Roof rack
$10 Third brake light
$160 Windshield w/ glue
Total: $1065.00
Totals:
$1300 1999 Donor
$295.00 Books
$400.00 Shop Upgrades
$3,395.00 Tools
--
$2,275.00 Materials
$705.00 Engine
$600.00 Wiring / Elec
$1,065.00 Interior
$1065.00 Exterior
Reply
0
0
09-09-2019, 11:59 AM
#99
Junior Member
Thread Starter
iTrader: (3)
Join Date: Oct 2015
Location: Steamboat Springs, CO
Posts: 329
Total Cats: 22
Been driving the kart a bit the last couple of weeks - the combination of windshield, no doors / roof / rear window AND my silly spoiler have created some sort of negative pressure zone in the cabin, sucking in a fair amount of the exhaust - NOT great when commuting 35min one-way!
The car is running pretty rich - that could be contributing to the problem as well - I'll be creating a solution for the muffler / exhaust setup this winter which will (fingers crossed) alleviate this problem - but until then I needed an affordable means of 'mitigation'
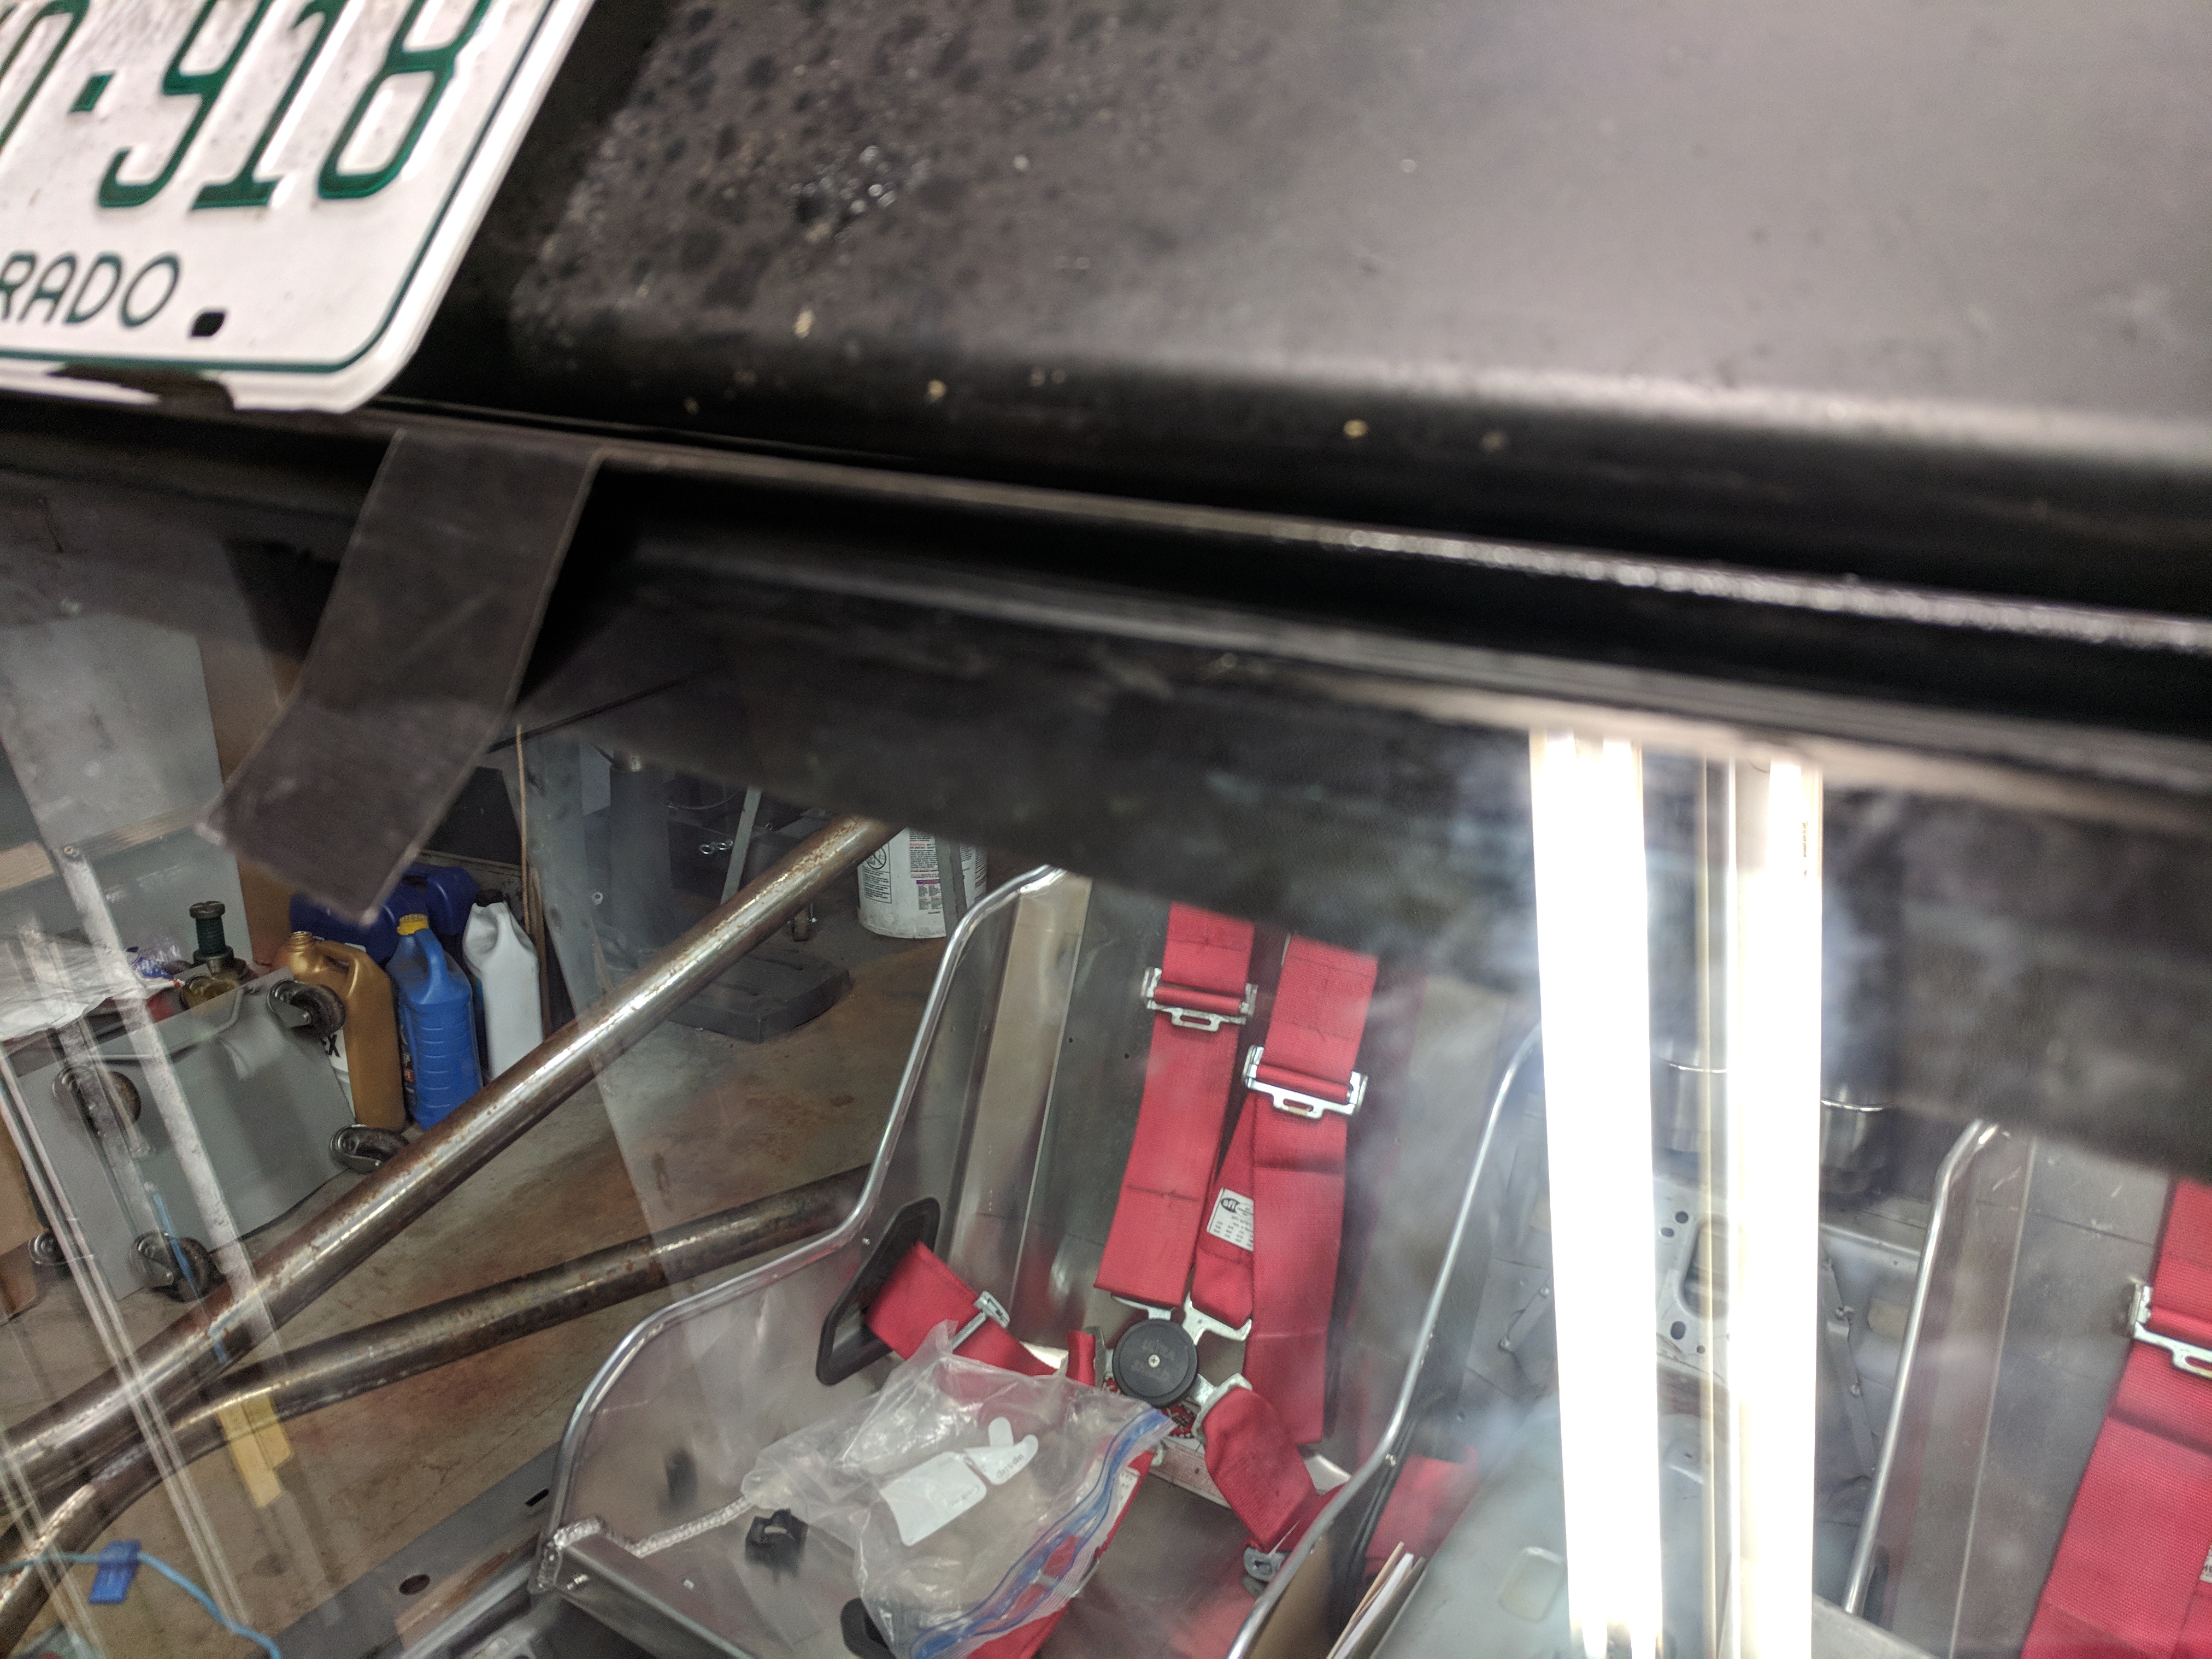
SO - created plexi inserts - 1/4" clear - welded tabs to the Main Hoop, inserted Riv-Nuts, used rubber washers with the hardware. The plexi is only on the lower half of the Main Hoop - This has helped 90% of the smell, and made the cabin much quieter!
The car is running pretty rich - that could be contributing to the problem as well - I'll be creating a solution for the muffler / exhaust setup this winter which will (fingers crossed) alleviate this problem - but until then I needed an affordable means of 'mitigation'
SO - created plexi inserts - 1/4" clear - welded tabs to the Main Hoop, inserted Riv-Nuts, used rubber washers with the hardware. The plexi is only on the lower half of the Main Hoop - This has helped 90% of the smell, and made the cabin much quieter!
Reply
0
0


