Engine Build Porn
#1
Thread Starter
Elite Member
iTrader: (15)
Joined: Dec 2007
Posts: 4,847
Total Cats: 27
From: San Antonio, Texas
So I'll be documenting the start of my engine build thread. The build is due to a ventilated block as discussed in this thread:
https://www.miataturbo.net/forum/t29521/
The parts for the build are coming in bit by bit. I took some pictures of some of the sexier components from the Belfab HP Kit. Go to the link below for the **** show.
http://picasaweb.google.com/zx.tex.m...uild#slideshow
Here is a teaser shot:
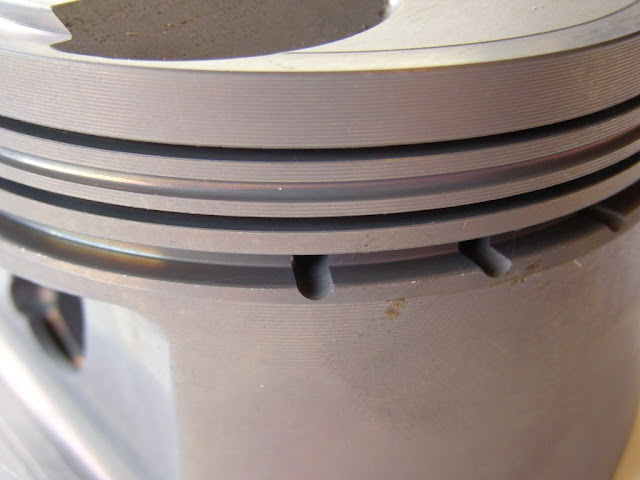
https://www.miataturbo.net/forum/t29521/
The parts for the build are coming in bit by bit. I took some pictures of some of the sexier components from the Belfab HP Kit. Go to the link below for the **** show.
http://picasaweb.google.com/zx.tex.m...uild#slideshow
Here is a teaser shot:
Last edited by ZX-Tex; 01-28-2009 at 11:30 PM.
#3
Elite Member
iTrader: (22)
Joined: Dec 2006
Posts: 3,224
Total Cats: 3
From: Sunny Spanish speaking Non US Caribbean
Since I'm about to follow this same path; what compression ratio pistons did you choose?
BTW, thanks for the pics. I was still in the fence between the Supertechs and the Wisecos. Not anymore
BTW, thanks for the pics. I was still in the fence between the Supertechs and the Wisecos. Not anymore

#5
Thread Starter
Elite Member
iTrader: (15)
Joined: Dec 2007
Posts: 4,847
Total Cats: 27
From: San Antonio, Texas
Rafa those are 9:1 pistons. They are also available in 8.5:1, 9.5:1, and 11:1. This is slightly less compression than my stock motor (9.5:1) for some added knock resistance, but not so low that the pre-spool torque and cruise efficiency will suffer much.
To avoid any confusion the ARP main and head studs shown in the picture do not come with the kit.
To avoid any confusion the ARP main and head studs shown in the picture do not come with the kit.
#10
Elite Member
iTrader: (22)
Joined: Dec 2006
Posts: 3,224
Total Cats: 3
From: Sunny Spanish speaking Non US Caribbean
Rafa those are 9:1 pistons. They are also available in 8.5:1, 9.5:1, and 11:1. This is slightly less compression than my stock motor (9.5:1) for some added knock resistance, but not so low that the pre-spool torque and cruise efficiency will suffer much.
To avoid any confusion the ARP main and head studs shown in the picture do not come with the kit.
To avoid any confusion the ARP main and head studs shown in the picture do not come with the kit.
I'm undecided between 9.5:1 and 9:1. I think my stock motor compression is slightly lower. I'm not sure though.
I guess you bought the full kit they're offering. I'm only going to buy their Piston/Rod combo. I'm sourcing the rest of the parts elsewhere.
#11
Thread Starter
Elite Member
iTrader: (15)
Joined: Dec 2007
Posts: 4,847
Total Cats: 27
From: San Antonio, Texas
An update on the build, and a story about the Belfab kit.
The short block is assembled, the head is rebuilt, and the flywheel is lightened and balanced.
The 3.63 diff gears are in the differential. I cannot wait to try these out.
I am shopping for a 6-speed which will work great with the 3.63 rear end and the boost. For those who do not know, basically the gearing is almost identical to the 5-speed with a 4.30 diff, in gears 1-5, but then 6th becomes an overdrive. And the 6-speed is stronger, at least according to empirical evidence.
The ACT XT clutch is here, waiting...
Mazda Competition engine mounts are here. I had already ordered these anyway, but we noticed when we pulled the motor that one of the engine mounts was torn.
I may be selling off the 2560, cast mani, and DP in order to upgrade to a tubular mani and a GT2871. That should be pretty bitchin'
Whether or not I pull the trigger on this depends on cost (new parts minus what I get for my turbo/mani/dp). I am waiting on a quote from BEGI.
*****************************************
Belfab Story:
It turns out that the bearings supplied with the kit I bought had a slight fitment problem.
The engine builder (very reputable, builds race engines) called me to let me know the tangs on the rod bearings did not fit in the slot (for the tang) on the rods. He said they could either file down the tangs on the bearings, or get some other bearings, like Clevites. I told him I would find out what was going on and call him back.
So I called Belfab to find out what the deal was. According to the owner (he answered the phone) the bearing tangs are slightly oversized since they are racing bearings and most race engine builders like to file the tangs so they are a tight fit in the tang slot (I am not sure I buy this one, let me know what you think). He also mentioned that they had a run of rods where the tang slot was slightly undersized by .003" (IIRC) and this contributed to the interference fit situation. I let him know I understood his explanation, but that he should have let me know that this was the case with the bearing/rod fit so there were no surprises during assembly (like mine). He apologized, said it had only happened to a few that got the kit, and said to let him know if I need anything else and he would take care of me.
So I call back my engine builder, relay the information to him, and he agrees to file down the tangs to fit, no big deal. Later on he called me back to let me know that when they fit up the Belfab bearings, that they actually were out-of-round when installed (I forget by how much) to the point that they did not like it at all. I assume he plastigaged them and the platigage strip width once smashed was uneven. I'll ask when I pick up the motor. Then, he tells me they bought some Clevite rod bearings, they dropped right in (no filing was needed on the tangs) and the roundness was much better. I asked if the Belfab kit main bearings were OK, and he said the main bearings were great, no problems.
*******************************************
I'll be picking up the short block and head tomorrow so I should have some more Engine Build **** pictures up soon.
.
Last edited by ZX-Tex; 02-11-2009 at 11:59 PM.
#12
Bearings are designed to be crushed. When they are, they slightly deform and friction is what holds them in place. The tangs are helpful if sized correctly as it helps to keep things aligned during assembly, but they are not necessary. If the new bearings were too tight, there's nothing wrong with that. They just needed to be slightly adjusted for proper fit. Better to have to slightly sand the ends of every one and get your desired optimal crush vs. "these bearings fit ok".
EDIT: Also I would assume he assembled the bearings in the caps, torqued them, and measured the bore at several angles with a snap gauge and mike to determine any out of roundness. Ask them if they measured the crush and see what they say.
EDIT: Also I would assume he assembled the bearings in the caps, torqued them, and measured the bore at several angles with a snap gauge and mike to determine any out of roundness. Ask them if they measured the crush and see what they say.
#13
Thread Starter
Elite Member
iTrader: (15)
Joined: Dec 2007
Posts: 4,847
Total Cats: 27
From: San Antonio, Texas
Bearings are designed to be crushed. When they are, they slightly deform and friction is what holds them in place. The tangs are helpful if sized correctly as it helps to keep things aligned during assembly, but they are not necessary. If the new bearings were too tight, there's nothing wrong with that. They just needed to be slightly adjusted for proper fit. Better to have to slightly sand the ends of every one and get your desired optimal crush vs. "these bearings fit ok".
EDIT: Also I would assume he assembled the bearings in the caps, torqued them, and measured the bore at several angles with a snap gauge and mike to determine any out of roundness. Ask them if they measured the crush and see what they say.
EDIT: Also I would assume he assembled the bearings in the caps, torqued them, and measured the bore at several angles with a snap gauge and mike to determine any out of roundness. Ask them if they measured the crush and see what they say.
#14
Thread Starter
Elite Member
iTrader: (15)
Joined: Dec 2007
Posts: 4,847
Total Cats: 27
From: San Antonio, Texas
UPDATE:
The engine is assembled and going back in the car today. I have updated the photo album linked to above with pictures of the assembled engine. Check out the beautiful female engine builder
I also have some pictures of some related upgrades, namely the Energy Suspension urethane differential bushings, Enthuza 3" exhaust, depowered steering rack (FM method), and cowl air intake. There are also some shots of my spacerless coolant reroute.
Update to the update
Whohoo, the engine is back in the car! Thanks to RLogan for dropping by to help out.
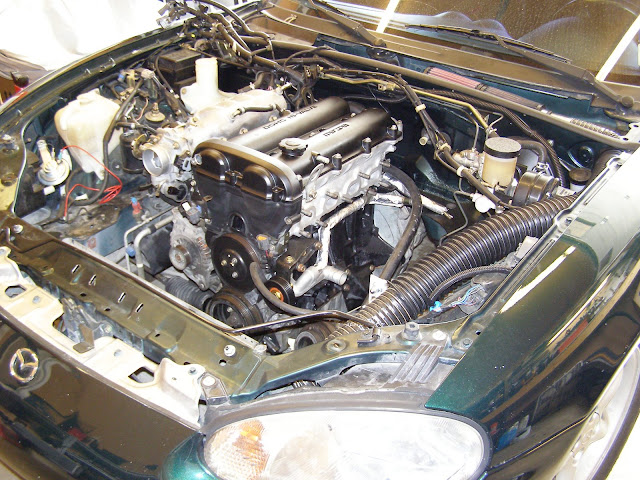
The engine is assembled and going back in the car today. I have updated the photo album linked to above with pictures of the assembled engine. Check out the beautiful female engine builder

I also have some pictures of some related upgrades, namely the Energy Suspension urethane differential bushings, Enthuza 3" exhaust, depowered steering rack (FM method), and cowl air intake. There are also some shots of my spacerless coolant reroute.
Update to the update
Whohoo, the engine is back in the car! Thanks to RLogan for dropping by to help out.
Last edited by ZX-Tex; 03-08-2009 at 03:41 PM.
#15
Thread Starter
Elite Member
iTrader: (15)
Joined: Dec 2007
Posts: 4,847
Total Cats: 27
From: San Antonio, Texas
Update:
More photos added to the engine **** collection, including shots of the GT2871 with the ported shroud compressor housing, the BEGI S4 manifold, and the BEGI stainless SGDP. The BEGI pieces are sweetness.
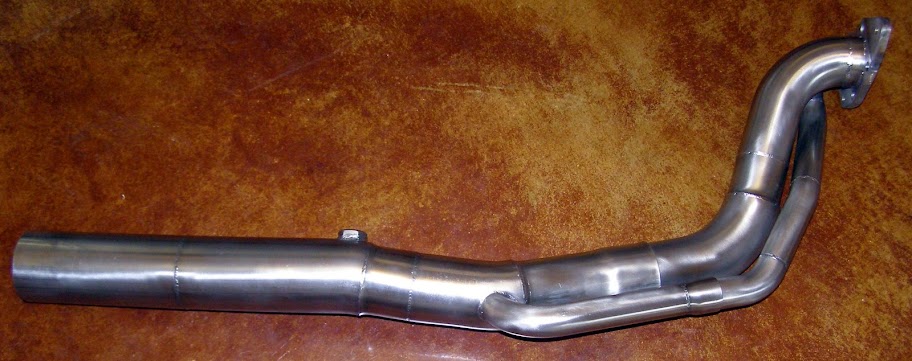
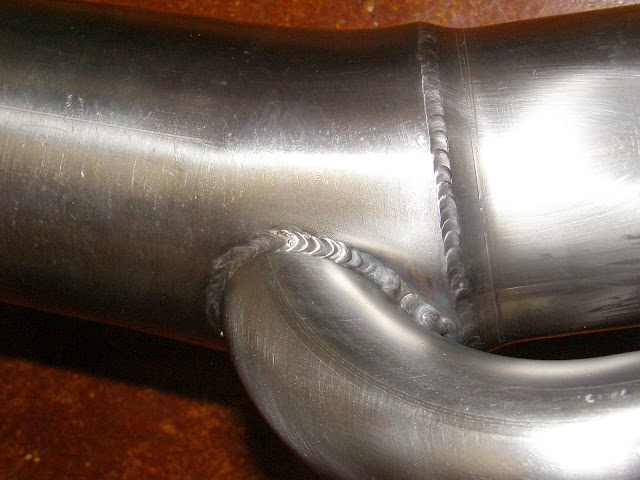
The turbo is a sexy beast. The compressor housing is BIG compared to what I had before, especially the monster 4" inlet. It also has a nice wastegate actuator bracket that Corky himself whipped up while I was hanging out in the shop.
Some turbo teaser shots:
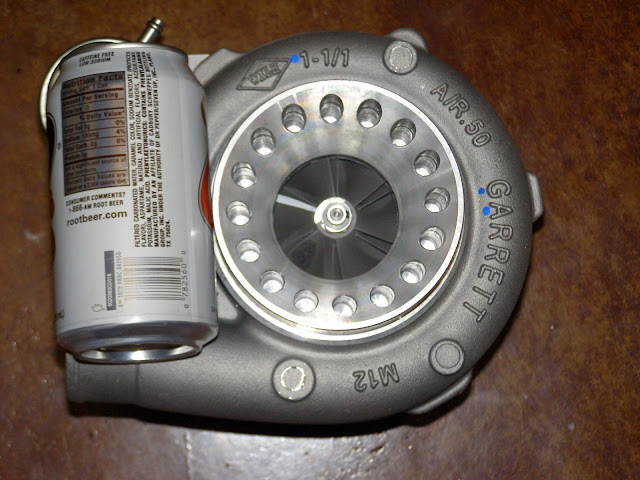
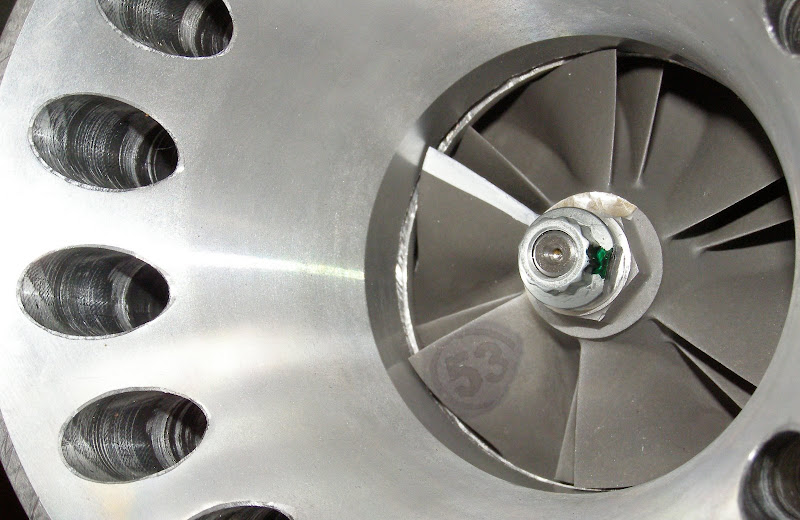
All of the **** shots are here:
http://picasaweb.google.com/zx.tex.m...d/EngineBuild#
More photos added to the engine **** collection, including shots of the GT2871 with the ported shroud compressor housing, the BEGI S4 manifold, and the BEGI stainless SGDP. The BEGI pieces are sweetness.
The turbo is a sexy beast. The compressor housing is BIG compared to what I had before, especially the monster 4" inlet. It also has a nice wastegate actuator bracket that Corky himself whipped up while I was hanging out in the shop.
Some turbo teaser shots:
All of the **** shots are here:
http://picasaweb.google.com/zx.tex.m...d/EngineBuild#
Last edited by ZX-Tex; 03-24-2009 at 06:23 PM.
#17
Thread Starter
Elite Member
iTrader: (15)
Joined: Dec 2007
Posts: 4,847
Total Cats: 27
From: San Antonio, Texas
Noz, sorry playah 
A note for those considering this route. If you use the S4 manifold and the GT2871 the compressor housing will hit the water inlet tube on the mixing manifold. But, I worked with BEGI on a solution. They will sell the reversed water inlet fitting separately (normally included with their reroute kit). It looks like this:

If you are running no PS with A/C and are using the tensioner bracket, you will need to add spacers to the bracket to keep it from hitting the new coolant inlet tube as discussed here:
https://www.miataturbo.net/forum/t32696/

A note for those considering this route. If you use the S4 manifold and the GT2871 the compressor housing will hit the water inlet tube on the mixing manifold. But, I worked with BEGI on a solution. They will sell the reversed water inlet fitting separately (normally included with their reroute kit). It looks like this:

If you are running no PS with A/C and are using the tensioner bracket, you will need to add spacers to the bracket to keep it from hitting the new coolant inlet tube as discussed here:
https://www.miataturbo.net/forum/t32696/
#18
Thread Starter
Elite Member
iTrader: (15)
Joined: Dec 2007
Posts: 4,847
Total Cats: 27
From: San Antonio, Texas
DIY turbo heat shield. I whipped this up yesterday.
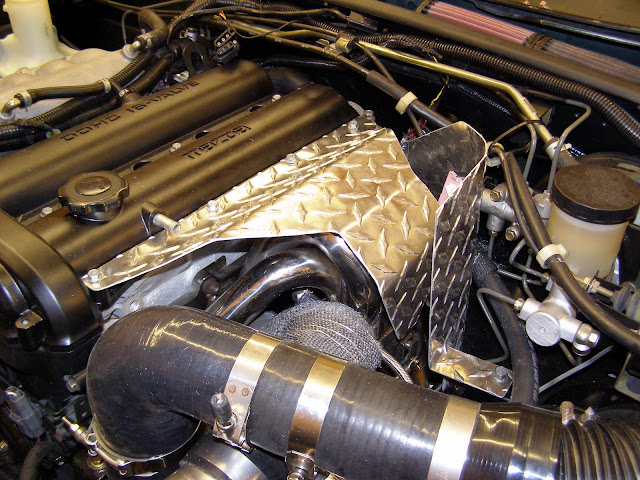
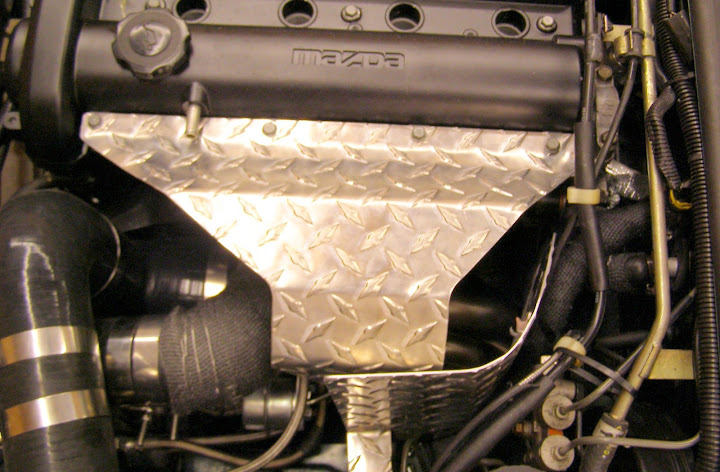
It is made from aluminum diamond plate. I have to admit the BEGI S4 shield design inspired me. I am pleased with the way they turned out, especially considering I have never made them before, and I did it in the garage with nothing but hand tools and a bench vise. I am thinking about painting the shields high-temp engine enamel black the same as the valve cover. It could look nice with all of the other black duct work as long as the paint holds up. For the one attached to the valve cover I would only paint the top side.
It is made from aluminum diamond plate. I have to admit the BEGI S4 shield design inspired me. I am pleased with the way they turned out, especially considering I have never made them before, and I did it in the garage with nothing but hand tools and a bench vise. I am thinking about painting the shields high-temp engine enamel black the same as the valve cover. It could look nice with all of the other black duct work as long as the paint holds up. For the one attached to the valve cover I would only paint the top side.
#20
Thread Starter
Elite Member
iTrader: (15)
Joined: Dec 2007
Posts: 4,847
Total Cats: 27
From: San Antonio, Texas
Update: The engine is in and running. I am just street tuning it right now with a conservative timing map but I can already tell there is a big increase in power between the 2560-cast mani setup and the new setup. I think when the AFR tune is complete and the timing is bumped up it is going to be pretty dang quick.


