93' Miata stolen and flipped build thread
 04-17-2014, 09:01 AM
#2181
Elite Member

Join Date: Oct 2013
Location: Cedar City, UT
Posts: 2,764
Total Cats: 951

Lovingly making both coolant pipes Polar Bear Brothers. The fit was absolutely perfect and it is obviously going to do a better job than my busted ***, probably-going-to-rust, coupler.

I totally forgot I installed it, luckily I got a picture before I did!

Reply
 1
1

1
04-17-2014, 11:55 AM
#2182
Elite Member
Join Date: Oct 2013
Location: Cedar City, UT
Posts: 2,764
Total Cats: 951
So it looks as though I may have been a little lucky that I damaged my alternator. The repair guy called and asked if I knew my main bearing was toast...apparently the main bearing which goes just below the brushes(and the one I was to scared to remove) sounded terrible. Luckily he said he had a couple new 800 series bearing sitting on his desk, so he will replace it.
Plus he will completely reassemble it for me as well as resolder all the copper wires, seeing as several were loose. I'm glad he is reassembling the unit, that way I know it was done right!
Plus he will completely reassemble it for me as well as resolder all the copper wires, seeing as several were loose. I'm glad he is reassembling the unit, that way I know it was done right!
Reply
0
0
04-17-2014, 12:07 PM
#2183

So it looks as though I may have been a little lucky that I damaged my alternator. The repair guy called and asked if I knew my main bearing was toast...apparently the main bearing which goes just below the brushes(and the one I was to scared to remove) sounded terrible. Luckily he said he had a couple new 800 series bearing sitting on his desk, so he will replace it.
Plus he will completely reassemble it for me as well as resolder all the copper wires, seeing as several were loose. I'm glad he is reassembling the unit, that way I know it was done right!
Plus he will completely reassemble it for me as well as resolder all the copper wires, seeing as several were loose. I'm glad he is reassembling the unit, that way I know it was done right!
Reply
0
0
04-17-2014, 12:24 PM
#2184

So it looks as though I may have been a little lucky that I damaged my alternator. The repair guy called and asked if I knew my main bearing was toast...apparently the main bearing which goes just below the brushes(and the one I was to scared to remove) sounded terrible. Luckily he said he had a couple new 800 series bearing sitting on his desk, so he will replace it.
Plus he will completely reassemble it for me as well as resolder all the copper wires, seeing as several were loose. I'm glad he is reassembling the unit, that way I know it was done right!
Plus he will completely reassemble it for me as well as resolder all the copper wires, seeing as several were loose. I'm glad he is reassembling the unit, that way I know it was done right!
Reply
0
0
04-17-2014, 12:27 PM
#2185
Elite Member
iTrader: (21)

Join Date: Jun 2007
Location: Rochester, NY
Posts: 6,614
Total Cats: 1,274
Cool.
If the guy won't take cash payment, find some other way to compensate him. A lot of older people just want some human interaction, so maybe take over a sub and have lunch with him. Anything to show your appreciation.
If the guy won't take cash payment, find some other way to compensate him. A lot of older people just want some human interaction, so maybe take over a sub and have lunch with him. Anything to show your appreciation.
Reply
0
0
04-17-2014, 12:31 PM
#2186
Elite Member
Join Date: Oct 2013
Location: Cedar City, UT
Posts: 2,764
Total Cats: 951
Yup, blessing in disguise for my rampant stupidity!
Seriously. Next time I head down to St. George I'm bringing him a ton of bread and some quality beer.
Maybe he prefers Utah beer...obviously not the 3%abv crap you find in the grocery stores here in this blessed state.

Seriously. Next time I head down to St. George I'm bringing him a ton of bread and some quality beer.
Maybe he prefers Utah beer...obviously not the 3%abv crap you find in the grocery stores here in this blessed state.
Reply
0
0
 04-17-2014, 12:42 PM
#2188
Elite Member
iTrader: (37)

Join Date: Apr 2010
Location: Very NorCal
Posts: 10,441
Total Cats: 1,899
I really love finding these kinds of guys that have these skills and tools, its seriously becoming a lost art. I feel like a lot of these skills are dieing out in what is becoming a more and more disposable society where "No User Serviceable Parts Inside" stickers dominate and the threat of litigation prevents people from exploring how things work
</rant>
Nice job on the LED's. I did something similar to the gauge cluster on my '74 pickup. Now I can finally see how fast I'm going in the dark
</rant>
Nice job on the LED's. I did something similar to the gauge cluster on my '74 pickup. Now I can finally see how fast I'm going in the dark
Reply
0
0
04-17-2014, 01:16 PM
#2189
Elite Member
Join Date: Oct 2013
Location: Cedar City, UT
Posts: 2,764
Total Cats: 951
Well looks like the silver lining has a corroded core...
Just got a call back and said once he started to tear into it he noticed it had been rebuilt once before, and not very well. He said after rebuilding it, and testing it on his bench, the regulator and rectifier are shot.
He asked how the hell was I even driving with this, since it was barely producing any charge at all, and that is after almost completely rebuilding it as well.
Sigh....well looks like a new core in needed after all! Luckily he said he won't charge me, but I offered to bring him some bread for recompense.
Normally I'd be suspicious that he caused the damage, but the shop owner who recommended him is not one to associate or do business with people who do poor work. Who knows if I damaged it when I removed it from the housing or not. I'm not going to point fingers, just fix the underlying problem and move on with my life.
Reply
0
0

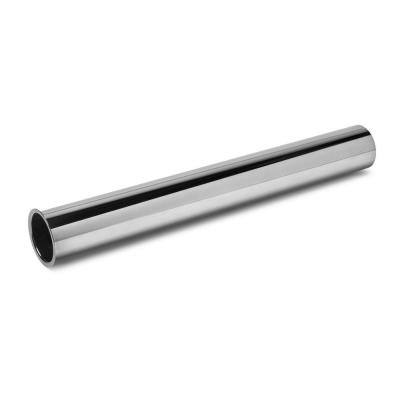
 04-17-2014, 02:51 PM
#2192


When cutting my re-route chevy hose i used a sink pipe. It was very difficult to get it to fit in the hose but with some strength and a little lube it is snuggly in place. Looks purdy too. It's no custom curly fitting and it's diameter is a little too big but I was having difficulty finding anything I liked in the right size. Also it's brass so no rusty poo poo.
Reply
0
0


 04-19-2014, 12:57 PM
#2197
Elite Member
iTrader: (13)

Join Date: Dec 2006
Location: Taos, New mexico
Posts: 6,714
Total Cats: 610
Well looks like the silver lining has a corroded core...
Just got a call back and said once he started to tear into it he noticed it had been rebuilt once before, and not very well. He said after rebuilding it, and testing it on his bench, the regulator and rectifier are shot.
He asked how the hell was I even driving with this, since it was barely producing any charge at all, and that is after almost completely rebuilding it as well.
Sigh....well looks like a new core in needed after all! Luckily he said he won't charge me, but I offered to bring him some bread for recompense.
Normally I'd be suspicious that he caused the damage, but the shop owner who recommended him is not one to associate or do business with people who do poor work. Who knows if I damaged it when I removed it from the housing or not. I'm not going to point fingers, just fix the underlying problem and move on with my life.
Just got a call back and said once he started to tear into it he noticed it had been rebuilt once before, and not very well. He said after rebuilding it, and testing it on his bench, the regulator and rectifier are shot.
He asked how the hell was I even driving with this, since it was barely producing any charge at all, and that is after almost completely rebuilding it as well.
Sigh....well looks like a new core in needed after all! Luckily he said he won't charge me, but I offered to bring him some bread for recompense.
Normally I'd be suspicious that he caused the damage, but the shop owner who recommended him is not one to associate or do business with people who do poor work. Who knows if I damaged it when I removed it from the housing or not. I'm not going to point fingers, just fix the underlying problem and move on with my life.
Imo, just buy a new OEM one, or a just a used OEM one and clean it up. Used ones (that work) can be had on this forum for like $30-45. Then just wire wheel the **** out of it until it looks nice, spray rattlecan clear over it, and it should look pretty damn nice.

Reply
0
0
04-19-2014, 01:27 PM
#2198
Elite Member
Join Date: Oct 2013
Location: Cedar City, UT
Posts: 2,764
Total Cats: 951
A combination of several long naps, taxes, new employees, and bills made me take a little hiatus!

I still don't understand why you went through all this effort over a second hand alternator. Is it just because you had the housing powdercoated or whatever?
Imo, just buy a new OEM one, or a just a used OEM one and clean it up. Used ones (that work) can be had on this forum for like $30-45. Then just wire wheel the **** out of it until it looks nice, spray rattlecan clear over it, and it should look pretty damn nice.
Imo, just buy a new OEM one, or a just a used OEM one and clean it up. Used ones (that work) can be had on this forum for like $30-45. Then just wire wheel the **** out of it until it looks nice, spray rattlecan clear over it, and it should look pretty damn nice.
I'm currently waiting on a new alternator to ship to the shop, hopefully next Monday it will come in.
===
Trying to finish up the rear mud flaps and finish little bits and bobs until the alternator gets here. This took a long time to get right.
After I cut it I had to find some way to pull the flap up to the body otherwise there would be a 1/2" gap between the top of the curve and the bumper. So I took a heat gun to it and slowly applied heat until it was pliable enough to bend into place, and hold it in place till it cooled enough to retain its shape. Then, I put a few skims of bondo on some of the deeper scratches, sanded out the smaller bumps, and painted it with this awesome awesome rubber bumper paint. Much more durable than just paint, it is very flexible so it won't chip, AND best of all, no plastic adhesion promoter needed.
I have only done one side because I want to make sure I'm happy with the result before I put that much effort into the other side. Bondo, as some may know, takes a long time to sand if you want it to look nice.
Going to let it cure in the sun for a couple hours before I try mounting it up. Going to use a little 3M trim double sided tape to make sure it stays flush with the bumper.


Reply
5
5


