
11's on the Motor, 9's on the Nitrous
 06-12-2013, 10:43 AM
#101
Elite Member
Thread Starter
iTrader: (2)

Join Date: Aug 2009
Location: Dover, FL
Posts: 3,145
Total Cats: 174
As for the Dzus fasteners... Have you used them before? I spent a summer as an assistant crew member for a formula car spec series and we were constantly having issues with them. Having to muck with seven attachment points everytime you need to access the trunk (e.g. to tender the battery or get teched) seems like a bit of a nuisance.
My taste for how I want the car to look has changed over the years. Before, I wanted the car to be as stock appearing as possible. Now I want it to look like a race car inside and out.

Reply
 0
0

0

 06-12-2013, 12:32 PM
#104
Elite Member
Thread Starter
iTrader: (2)
Join Date: Aug 2009
Location: Dover, FL
Posts: 3,145
Total Cats: 174
Lol! Steve has been giving me a lot of **** about getting this car done.
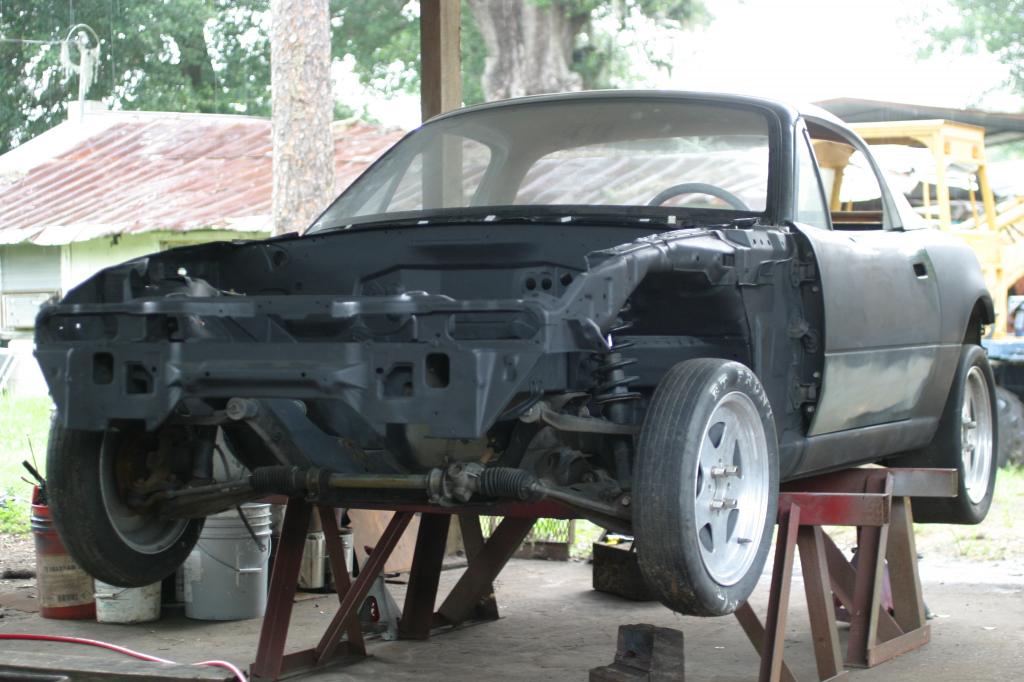
I will be at the shop late tonight getting both the front and rear subframes mounted so it will again be a roller. I also have to finish work on mounting the hardtop before the roll cage can be installed.
I will be at the shop late tonight getting both the front and rear subframes mounted so it will again be a roller. I also have to finish work on mounting the hardtop before the roll cage can be installed.
Reply
0
0
 06-15-2013, 06:43 PM
#107
Elite Member
Thread Starter
iTrader: (2)
Join Date: Aug 2009
Location: Dover, FL
Posts: 3,145
Total Cats: 174
I worked on the car a good bit in the last few days. I temporarily installed both front and rear sub-frames, dash bar, steering column, and hard top so I can roll the car on the trailer and get it out of my shop. I am delivering it to BSI Racing for a roll cage.
I have a cheap coating of primer on the car now. When I get the car back from the chassis shop, I will strip the car and send it right out for a proper coat of primer.
I have a cheap coating of primer on the car now. When I get the car back from the chassis shop, I will strip the car and send it right out for a proper coat of primer.

Reply
0
0
06-19-2013, 04:58 PM
#108
Elite Member
Thread Starter
iTrader: (2)
Join Date: Aug 2009
Location: Dover, FL
Posts: 3,145
Total Cats: 174
I ended up having a few more hurdles before I could get the car out of here.
The hardtop I purchased is an ultra light fiberglass one from Treasure Coast Miata. It is hold it with one finger light. Problem is that it does not fit very well, and has a few flaws that need fixing. When I first put the top on, I got a pair of Rennen Metal front hardtop mounts. They did not fit at all, and I ended up trying to modify them, as well as stacking washers so the top would fit right.
For some reason one side of the top was raised way too high, and it ended up looking like I was going to have to do some serious fiberglass work to it. In the mean time I needed to get the car to the chassis shop, so I decided to work on the mounts to get the top as close as I could before doing any fiberglass work.
I ended up cutting the top mounts into two pieces. I bolted one part to the windshield frame, and bolted the other piece to the hardtop. I then tack welded a piece of metal to bridge the two bolted halves of the top mounts. I unbolted the now one piece, and fully welded them together.
For some reason, the top does not pooch up on the one side anymore. I am so thrilled that I do not have to do all that fiberglass work. I just need to do some minor work to make all the lines match properly.
You will note that there are only two bolts in the hard top. That is the way it was manufactured. I modified the shape of the mounts a bit, and will likely continue to remove some of the unnecessary metal off of them since there are only two bolt holes in the top.
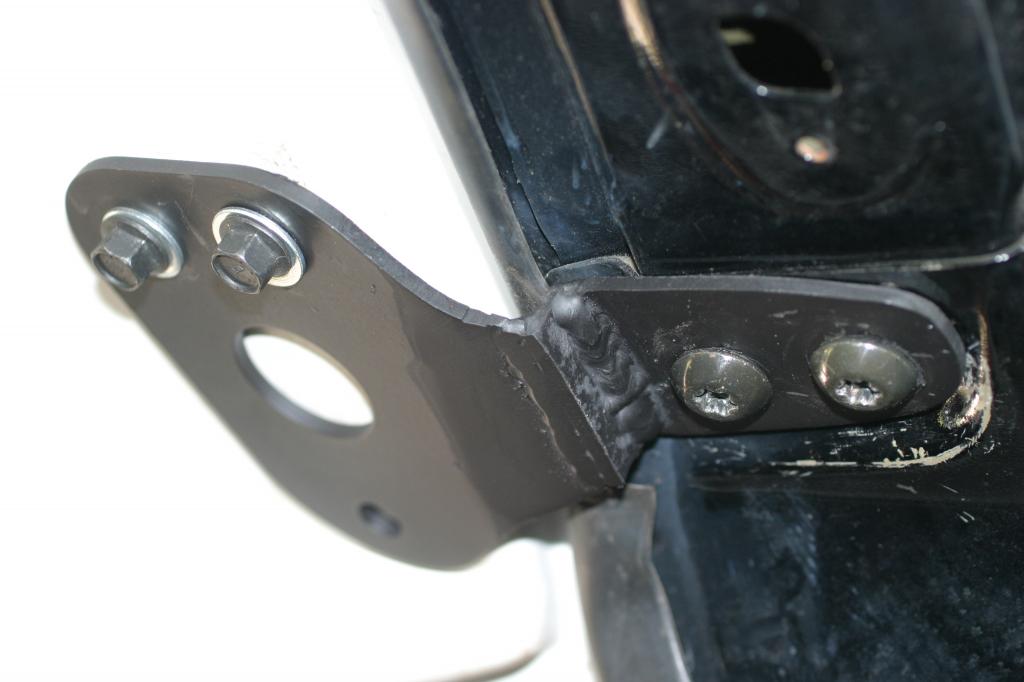
I also made the side mounts as well.

Last edited by miata2fast; 06-19-2013 at 05:24 PM.
Reply
0
0
06-20-2013, 09:48 AM
#110
Elite Member
Thread Starter
iTrader: (2)
Join Date: Aug 2009
Location: Dover, FL
Posts: 3,145
Total Cats: 174

Here is a prototype seat bracket I made a while back now. I pulled it off the seat and painted it today. The seat is an Ultra Shield Spec Miata seat.
It utilizes the factory seat mounts and positions the seat properly for me. At least I think it is in the right location. It feels right when I sit in the car...with nothing happening.
I need to reposition the steering wheel.
Reply
0
0
06-21-2013, 08:24 AM
#111
Elite Member
Thread Starter
iTrader: (2)
Join Date: Aug 2009
Location: Dover, FL
Posts: 3,145
Total Cats: 174
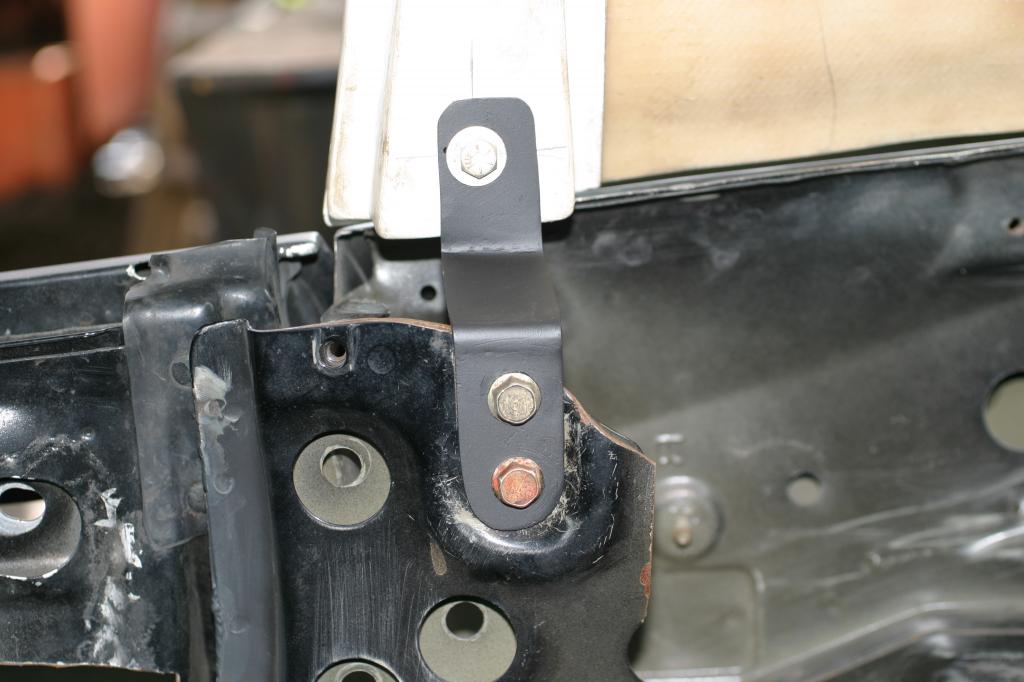
I delivered the car to BSI yesterday. After all that work on the upper hardtop mounts, they tell me they can not use them.  The top will now be bolted to the hoop apparently.
The top will now be bolted to the hoop apparently.
Reply
0
0


 07-23-2013, 08:32 PM
#116
Elite Member
Thread Starter
iTrader: (2)
Join Date: Aug 2009
Location: Dover, FL
Posts: 3,145
Total Cats: 174
The last pic is of BSI's solution to connecting the dash bar to the roll cage, and make it so you can still remove the dash bar if needed. There is one on each side. The coupler sides to one side during removal.
Last edited by miata2fast; 07-23-2013 at 09:12 PM.
Reply
0
0
 07-24-2013, 04:22 PM
#118
Elite Member
Thread Starter
iTrader: (2)
Join Date: Aug 2009
Location: Dover, FL
Posts: 3,145
Total Cats: 174
Leafy, not sure where you are going with this. I believe the whole point of the modified dash mount is because the best location for the window bars are right where the dash bar is bolted to the chassis. They essentially cut a portion of the dash bar out to make room for the cage, but needed a way to securely mount the dash bar. I want to have the factory dash in the car, and mounting it properly without too much fabrication requires the dash bar.
If I were to run in a class where a structural dash bar the same thickness of the rest of the cage was required, then I would either have an additional bar underneath the factory dash bar, or do some serious fabrication so the dash would mount without the factory dash bar.
If I were to run in a class where a structural dash bar the same thickness of the rest of the cage was required, then I would either have an additional bar underneath the factory dash bar, or do some serious fabrication so the dash would mount without the factory dash bar.
Reply
0
0
07-25-2013, 08:38 AM
#120
Elite Member
iTrader: (8)

Join Date: Dec 2008
Location: Kingston, Ontario
Posts: 2,910
Total Cats: 51
Nice cage.
I cant see that cage fitting into any kind of cert rulebook though.
The door bars have too many bends in them for it to be very structural, but thats ok your down bars will just bend in being that you dont have a structural dash bar anyways.
I cant see that cage fitting into any kind of cert rulebook though.
The door bars have too many bends in them for it to be very structural, but thats ok your down bars will just bend in being that you dont have a structural dash bar anyways.
Reply
0
0


