

Post your DIY aero pics
 04-17-2014, 05:49 PM
#701

Yeah, I hadn't realized that you pretty much have to start the diffuser after the diff on a miata, which still leaves you with your current routing problem.
The on/off throttle effect they discussed was on a well-developed diffuser with a 19k rpm 2.4L. I doubt it would be noticeable on a homemade diffuser with a 7500rpm 1.8L. I'd do it just for the scavenging benefit of routing the exhaust into a low-pressure area.
The on/off throttle effect they discussed was on a well-developed diffuser with a 19k rpm 2.4L. I doubt it would be noticeable on a homemade diffuser with a 7500rpm 1.8L. I'd do it just for the scavenging benefit of routing the exhaust into a low-pressure area.

Reply
 0
0

0
04-17-2014, 09:15 PM
#703
Supporting Vendor

iTrader: (3)

Join Date: Jul 2006
Location: San Diego
Posts: 3,304
Total Cats: 1,225
I had a similar exhaust dump before the diff long ago, back when all I had was a Lotus Elise diffuser which probably wasn't doing much anyways. When I built my own diffuser and flat bottom, I changed the exhaust to continue out to the rear of the car. I had the later-year one piece axles already, with those there should be enough room to route even a 3" exhaust although it is tight. Don't be afraid to pull the subframe "brace" if you need to to make the exhaust fit, that little thing doesn't do that much anyways.
-Ryan
-Ryan

Reply
0
0
05-04-2014, 01:56 AM
#704

Dollars spent: $60
Hours spent: 6
How effective: 2 =slightly better
Materials used: Structural Plywood
Size/thickness of materials: 12mm (around 1/2")
Bracket location: Front crash beam and subframe mounts (behind steering rack)
Tracks tested on: Wakefield Park
Race/TT class built for: CAMS 2B Production Sports
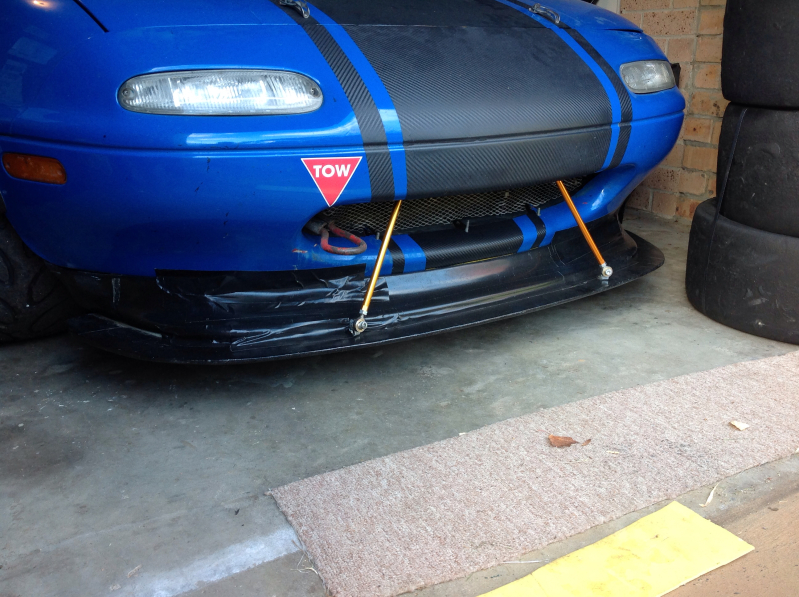
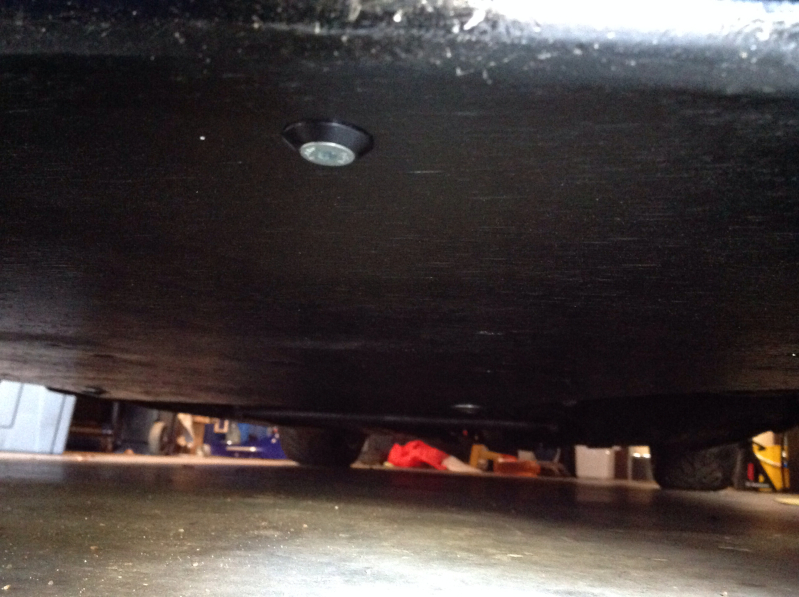
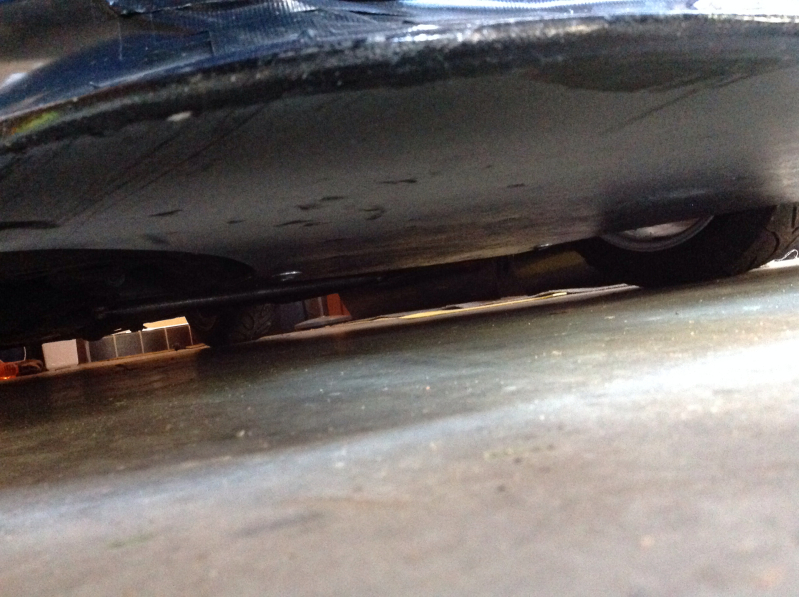
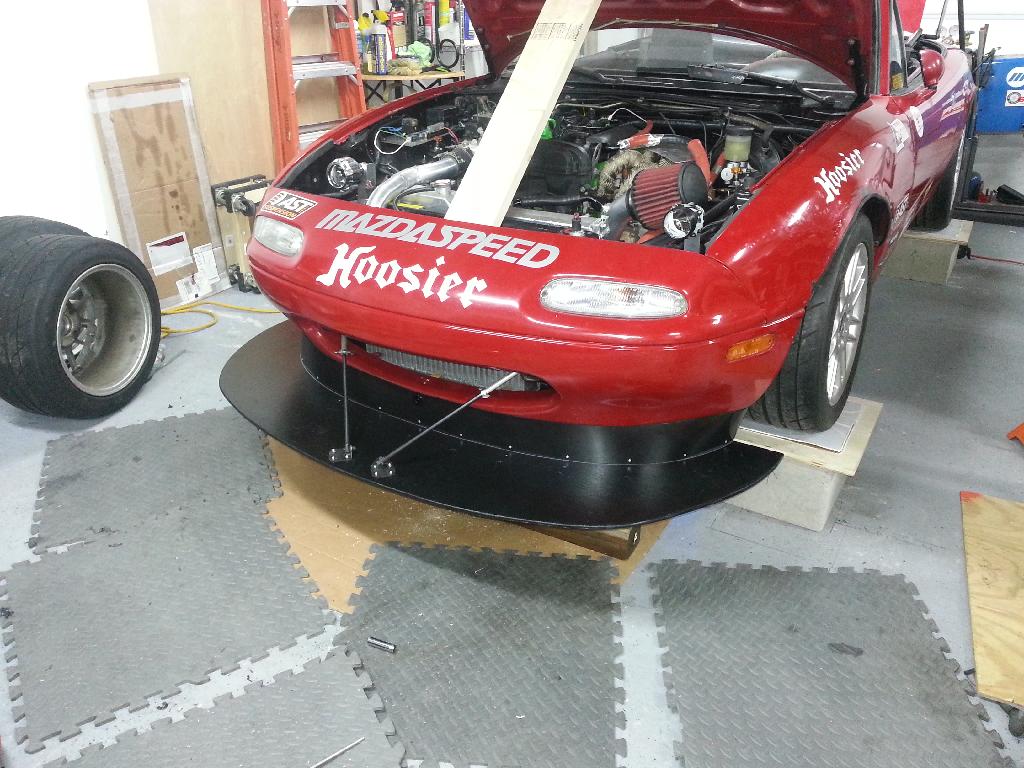
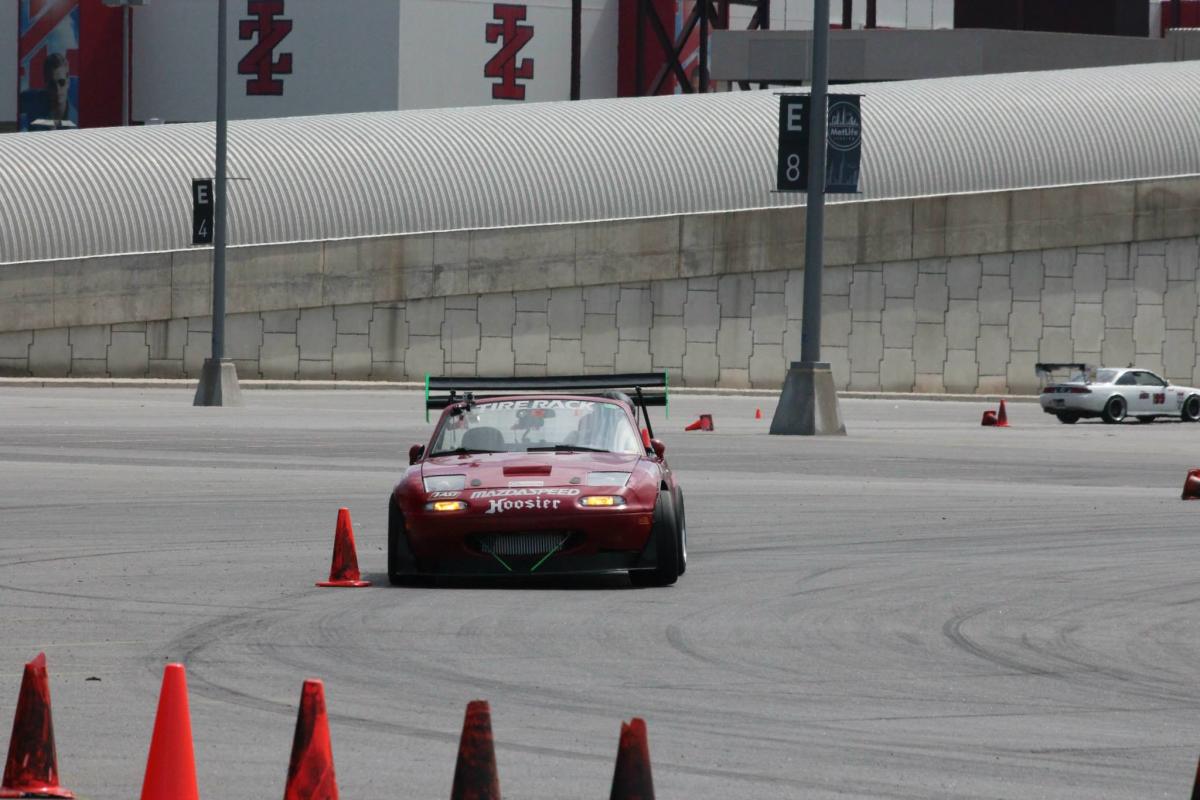
Built a basic splitter out of 12mm ply to try and dial out some chronic understeer the car has been suffering from. Car also has a GTC-200 style wing (cheapo eBay copy) and it always needed some front aero. Current class does not allow me to cut or reshape the front so a crusher front is not an option (but considering a class change soon so this might change).
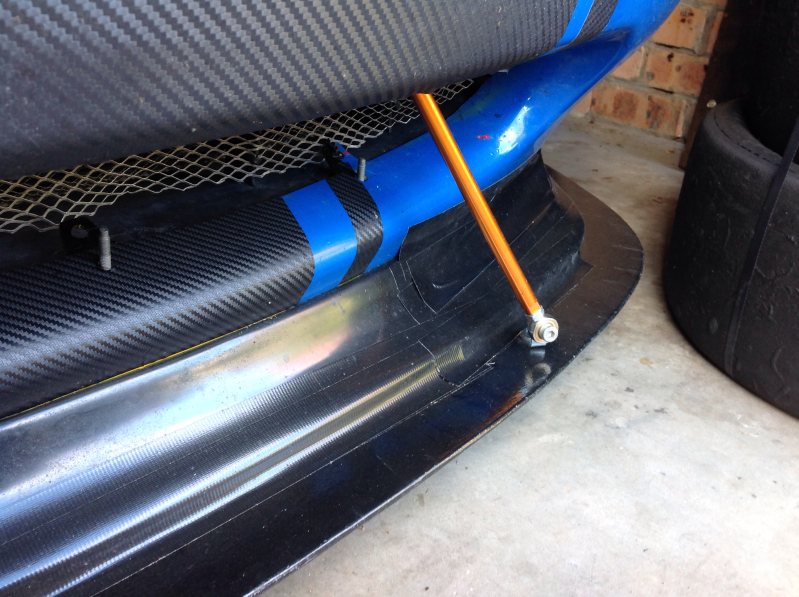
I used go-kart steering rods (which are just long turnbuckles, but light and strong with heim jointed ends) to mount the front, and just attached the rear to the subframe mounts. I shaped the leading edge slightly with a file to add an aerofoil shape (at least in recalling my basic knowledge of aerodynamics from school) and increase survivability. I used flush mount Go kart seat bolts to keep the underside as smooth as possible. Then spray painted black.
After cutting, the ply warped slightly so I added two longitudinal spars made from light 2" by 3" pine. These were just screwed on from the underside with flush mount self tappers and they straightened it out nicely. The front rods pulled the front of the splitter up snug under the GV copy lip and the connection was sealed with slick-on window sealing foam. Then I added race tape to complete the seal and also to seal the ducts on the GV lip to minimise flow (will be adding brake ducts soon - this car currently only runs short sprint races, 8-10 laps).
The car is certainly better, understeer is far more manageable and easier to tune with sway bar settings. I gained around 0.5 - 0.7 seconds per lap from this change, and the car points much better in medium to fast corners with much less push. I'll probably make a new splitter out of 5mm aluminium at some stage as this has been a worthwhile improvement, but it is a bit heavy with those pine spars.
Hours spent: 6
How effective: 2 =slightly better
Materials used: Structural Plywood
Size/thickness of materials: 12mm (around 1/2")
Bracket location: Front crash beam and subframe mounts (behind steering rack)
Tracks tested on: Wakefield Park
Race/TT class built for: CAMS 2B Production Sports
Built a basic splitter out of 12mm ply to try and dial out some chronic understeer the car has been suffering from. Car also has a GTC-200 style wing (cheapo eBay copy) and it always needed some front aero. Current class does not allow me to cut or reshape the front so a crusher front is not an option (but considering a class change soon so this might change).
I used go-kart steering rods (which are just long turnbuckles, but light and strong with heim jointed ends) to mount the front, and just attached the rear to the subframe mounts. I shaped the leading edge slightly with a file to add an aerofoil shape (at least in recalling my basic knowledge of aerodynamics from school) and increase survivability. I used flush mount Go kart seat bolts to keep the underside as smooth as possible. Then spray painted black.
After cutting, the ply warped slightly so I added two longitudinal spars made from light 2" by 3" pine. These were just screwed on from the underside with flush mount self tappers and they straightened it out nicely. The front rods pulled the front of the splitter up snug under the GV copy lip and the connection was sealed with slick-on window sealing foam. Then I added race tape to complete the seal and also to seal the ducts on the GV lip to minimise flow (will be adding brake ducts soon - this car currently only runs short sprint races, 8-10 laps).
The car is certainly better, understeer is far more manageable and easier to tune with sway bar settings. I gained around 0.5 - 0.7 seconds per lap from this change, and the car points much better in medium to fast corners with much less push. I'll probably make a new splitter out of 5mm aluminium at some stage as this has been a worthwhile improvement, but it is a bit heavy with those pine spars.
Reply
0
0
05-04-2014, 03:47 AM
#705
Senior Member

Join Date: Dec 2010
Location: Auckland, NZ
Posts: 993
Total Cats: 57
Most of the guyus here suggest retaining ply.
I added some 90 degree ali to my undertray to provide some light but strong stiffening... this might work better that the pine...?
Mine is about 1.5 feet long each in a v centred just behind the radiator and splayed out towards the centre of the wheels. I used ali sheet as it is not protruding forward, if I get a wing I will be using ply for a splitter and not ali.
I just used rivets through my ali sheet but you might need some sort of small nut,bolt or other fastener for the ply thickness...
Reply
-1
-1
05-04-2014, 08:52 AM
#706
It works! So i'll chase down some 5mm aluminium and get cracking... If it needs bracing, then i'll counter sink some machine screws into the underside of the splitter, through the ally angle, and nylocs on top.
Reply
0
0
05-04-2014, 11:40 AM
#707
Supporting Vendor
iTrader: (3)
Join Date: Jul 2006
Location: San Diego
Posts: 3,304
Total Cats: 1,225
A 4'x4' sheet of 5mm al is somewhere around 40 lbs according to the interwebz.. What's your current setup weigh? Wood is honestly a really good option until you increase the budget substantially to go with a composite..
And nice execution, 0.5-0.7s per lap plus an overall better balance and feel is significant.
-Ryan
And nice execution, 0.5-0.7s per lap plus an overall better balance and feel is significant.
-Ryan
Reply
0
0
05-04-2014, 09:51 PM
#708
A 4'x4' sheet of 5mm al is somewhere around 40 lbs according to the interwebz.. What's your current setup weigh? Wood is honestly a really good option until you increase the budget substantially to go with a composite..
And nice execution, 0.5-0.7s per lap plus an overall better balance and feel is significant.
-Ryan
And nice execution, 0.5-0.7s per lap plus an overall better balance and feel is significant.
-Ryan
The wood splitter is only around 10 kg (so 22lbs?) with the spars so you have a point. I could also take some weight off this by using ally angle or box for the spars. My measurements were around 1440mm wide at the front and around 880mm long (measured at the widest/longest points), minus cut outs for wheels and front sections so area is probably around 0.95m2 (sorry, we think in metric). So for ally, that comes in around 13kg (around 30lbs?) for 5mm sheet.
Wouldn't have guessed that. That saves me a few bucks... Will look at 3mm ply sheeted with fibreglass instead, or maybe 6mm composite sheet - but for the weight savings, it may not be worth it with the loss of survivability.
Ghetto plywood FTW.
Any ideas on a better solution to seal the join at the lip and the splitter? It needs to be temporary as the splitter needs to be easily removable to get at the underside of the engine. That rules out caulk. There are 6mm bolts holding the splitter to the wings of the lip (easily accessible through the wheel wells). I could run more with captive threaded clips along the length of the lip...
Reply
0
0
05-05-2014, 10:01 AM
#709


Any ideas on a better solution to seal the join at the lip and the splitter? It needs to be temporary as the splitter needs to be easily removable to get at the underside of the engine. That rules out caulk. There are 6mm bolts holding the splitter to the wings of the lip (easily accessible through the wheel wells). I could run more with captive threaded clips along the length of the lip...
-Zach
Reply
0
0
05-05-2014, 12:13 PM
#710
Junior Member

Join Date: Jun 2013
Location: Raleigh, NC
Posts: 122
Total Cats: -10
blue insulation foam from home depot motorsports works well too as a spacer. Just sandwich it in and cut along the bumper curve. I need to figure out a good way to paint/cover it up though since I've heard regular spray paint will melt it
Reply
0
0
05-05-2014, 05:09 PM
#711
Supporting Vendor
iTrader: (3)
Join Date: Jul 2006
Location: San Diego
Posts: 3,304
Total Cats: 1,225
Build things with a tight fit/finish and then you only need small 1/8" thick adhesive-backed foam strip to make air-tight seals between things.
Make everything with a hack-saw and you're going to need bottles of expanding foam
Make everything with a hack-saw and you're going to need bottles of expanding foam
Reply
0
0
05-06-2014, 07:17 PM
#712
Senior Member

Join Date: Aug 2009
Location: melbourne aus
Posts: 515
Total Cats: 92
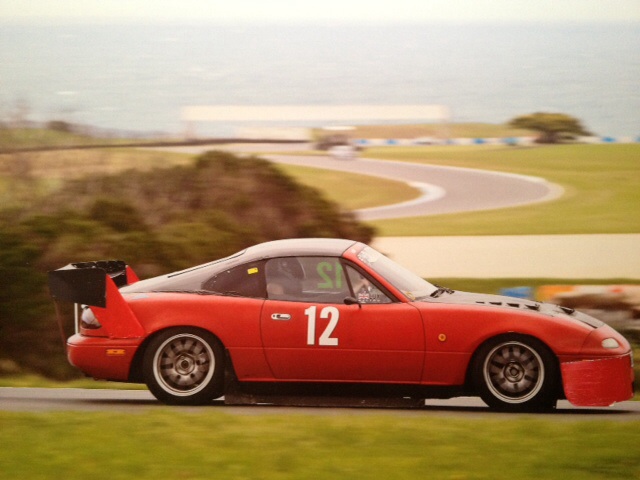
Haven't been on here for a while. And thought I would post up my last quick aero package. I was in a class that allowed limited mods the week before, so had a few nights to go unlimited mods with zero dollar budget.
First I removed the softop and trunk. And replaced them with a one piece carbon fibre fastback and trunk that weighs 2.1kgs.
Then I had to make new wing stands as I couldn't mount the wing to the boot. So I made big end plates that bolted to the gap between the bumper and the body.
Put on my vented hood.
I made a flat front (with ducting to the radiator) and flat floor up to the crossmember. But didn't have time to make a splitter to stick out the front. :(
And I made some side skirts that stuck out in front of the rear wheels.
The rear wing is made up of a cf wing I bought of Ebay for $60, and another I bought for $20.
It works so well I had to reduce the angle to about negative 7-10degrees. I already had most of these things in the garage. All I had to buy was some sheet alloy for the flat front.
The car won it's class easily, and as far as I know is the fastest non turbo NA/NB MX5 ever to lap Phillip Island. Considering the car is running a stock motor, ecu, etc with only an exhaust and pod filter for fasts.
There are other MX5's with fully built motors, plastic windows, gutted interiors, etc that are still 2 seconds behind me. Even the outright MX5 fastest times are only 3-4 seconds quicker. So the aero package was certainly working. Took about 3 seconds of my non aero time.
images

images
First I removed the softop and trunk. And replaced them with a one piece carbon fibre fastback and trunk that weighs 2.1kgs.
Then I had to make new wing stands as I couldn't mount the wing to the boot. So I made big end plates that bolted to the gap between the bumper and the body.
Put on my vented hood.
I made a flat front (with ducting to the radiator) and flat floor up to the crossmember. But didn't have time to make a splitter to stick out the front. :(
And I made some side skirts that stuck out in front of the rear wheels.
The rear wing is made up of a cf wing I bought of Ebay for $60, and another I bought for $20.
It works so well I had to reduce the angle to about negative 7-10degrees. I already had most of these things in the garage. All I had to buy was some sheet alloy for the flat front.
The car won it's class easily, and as far as I know is the fastest non turbo NA/NB MX5 ever to lap Phillip Island. Considering the car is running a stock motor, ecu, etc with only an exhaust and pod filter for fasts.
There are other MX5's with fully built motors, plastic windows, gutted interiors, etc that are still 2 seconds behind me. Even the outright MX5 fastest times are only 3-4 seconds quicker. So the aero package was certainly working. Took about 3 seconds of my non aero time.
images
images
Last edited by lightyear; 05-06-2014 at 07:31 PM.
Reply
0
0

 05-07-2014, 05:31 PM
#715
Senior Member
Join Date: Aug 2009
Location: melbourne aus
Posts: 515
Total Cats: 92
This is the wing when it was mounted to the boot.
m.youtube.com/watch?v=40UoyIHxpsQ
And I made the fastback. It was just a shell, so for that day, I put in some alcubond side windows in with race tape. So it looks a bit dodgy.
It is actually a triple element wing. But I did end up dropping the angle from zero and removing the third element as I couldn't steer it around the faster corners.
Reply
0
0
05-07-2014, 10:05 PM
#716
Elite Member
iTrader: (14)

Join Date: Sep 2009
Location: Birmingham, AL
Posts: 2,101
Total Cats: 180
This is the wing when it was mounted to the boot.
And I made the fastback. It was just a shell, so for that day, I put in some alcubond side windows in with race tape. So it looks a bit dodgy.
It is actually a triple element wing. But I did end up dropping the angle from zero and removing the third element as I couldn't steer it around the faster corners.
Your carbon skills are crazy - you need to update your thread with more ****
Reply
0
0
05-08-2014, 02:00 AM
#717
Senior Member
Join Date: Aug 2009
Location: melbourne aus
Posts: 515
Total Cats: 92
Unfortunately I don't have any time to do carbon fibre work at the moment. I am getting to the end of the house build, and even started setting up the workshop on the second floor. Problem with working on the house full time means I can't earn any money. Lucky my wife pays for my Motorsport.
Reply
0
0
05-08-2014, 08:44 AM
#719
Dave I thought the red car got sold? I kind of regret not buying this car when I had the chance... Good to see you still have it, any chance of you and Brendan coming up our way (Wakefield) any time soon?
My race car has one of your first carbon lids on it
My race car has one of your first carbon lids on it
Haven't been on here for a while. And thought I would post up my last quick aero package. I was in a class that allowed limited mods the week before, so had a few nights to go unlimited mods with zero dollar budget.
First I removed the softop and trunk. And replaced them with a one piece carbon fibre fastback and trunk that weighs 2.1kgs.
Then I had to make new wing stands as I couldn't mount the wing to the boot. So I made big end plates that bolted to the gap between the bumper and the body.
Put on my vented hood.
I made a flat front (with ducting to the radiator) and flat floor up to the crossmember. But didn't have time to make a splitter to stick out the front. :(
And I made some side skirts that stuck out in front of the rear wheels.
The rear wing is made up of a cf wing I bought of Ebay for $60, and another I bought for $20.
It works so well I had to reduce the angle to about negative 7-10degrees. I already had most of these things in the garage. All I had to buy was some sheet alloy for the flat front.
The car won it's class easily, and as far as I know is the fastest non turbo NA/NB MX5 ever to lap Phillip Island. Considering the car is running a stock motor, ecu, etc with only an exhaust and pod filter for fasts.
There are other MX5's with fully built motors, plastic windows, gutted interiors, etc that are still 2 seconds behind me. Even the outright MX5 fastest times are only 3-4 seconds quicker. So the aero package was certainly working. Took about 3 seconds of my non aero time.
images
images
Reply
0
0
05-08-2014, 08:18 PM
#720

Dollars spent: $60
Hours spent: 6
How effective: 2 =slightly better (than previous splitter)
Materials used: PTS (plugged touched and sanded) Fir, 1.25x1.25x.125 stainless angle, longe acre felx adjustable fender supports, speedway air dam plastic
Size/thickness of materials: 3/8"
Bracket location: Front crash beam Outside of the front frame rails
Tracks tested on: Fort Devens, Meadowlands
Race/TT class built for: SSM
Brackets
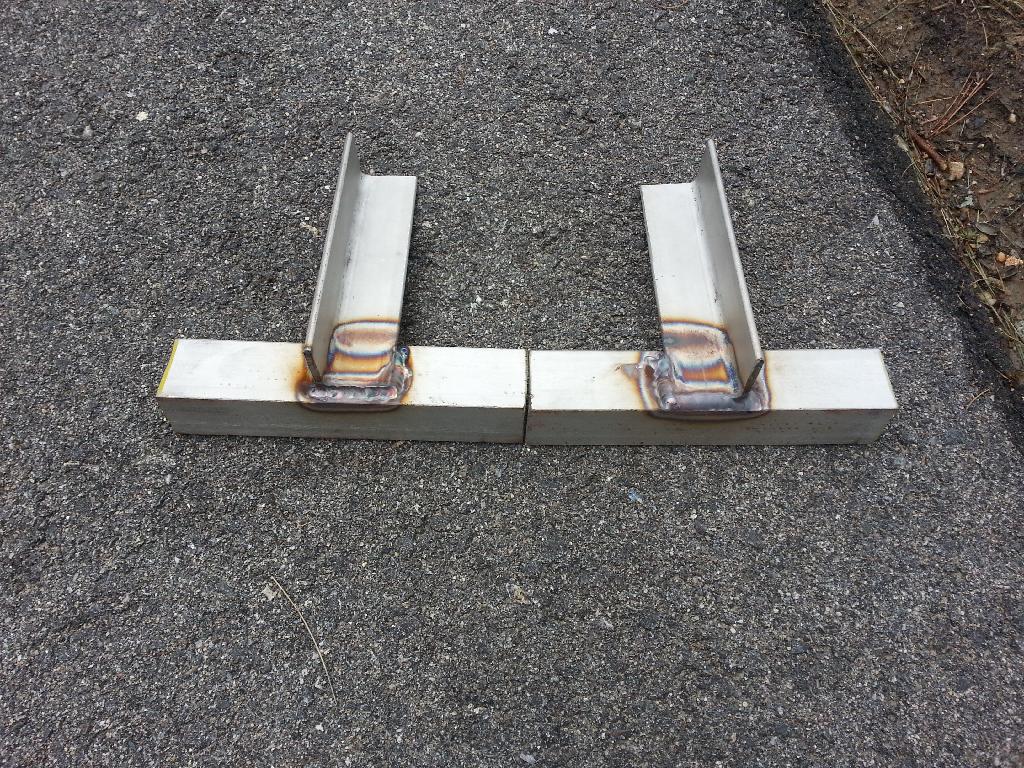
Connection
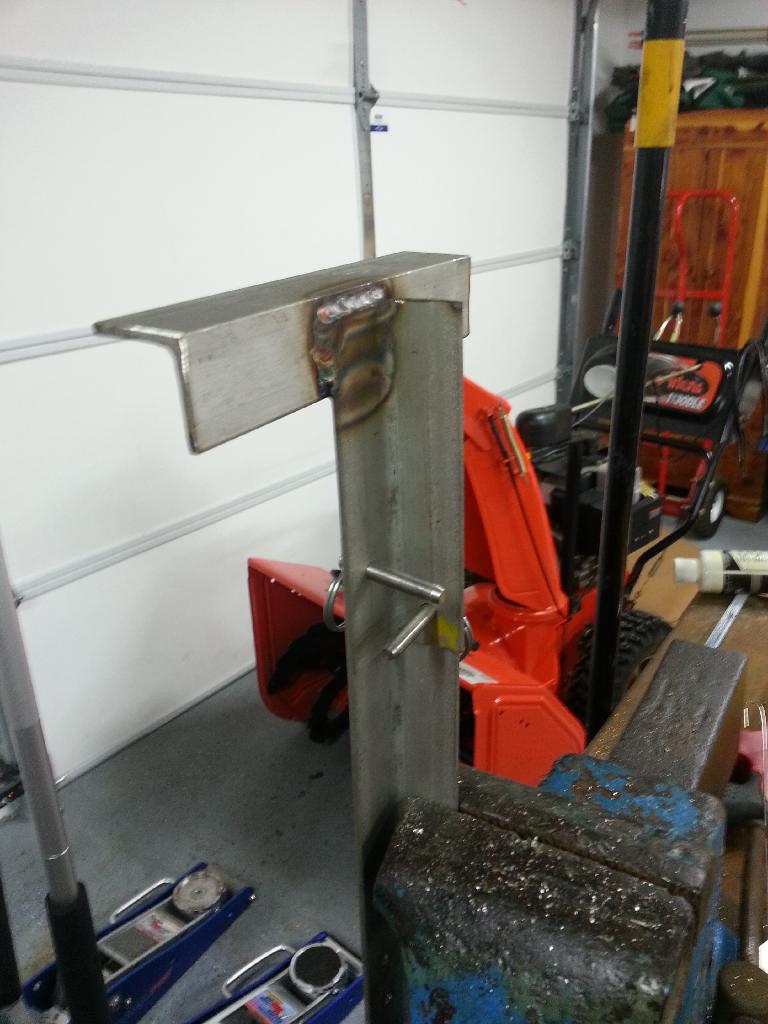
Mounting point
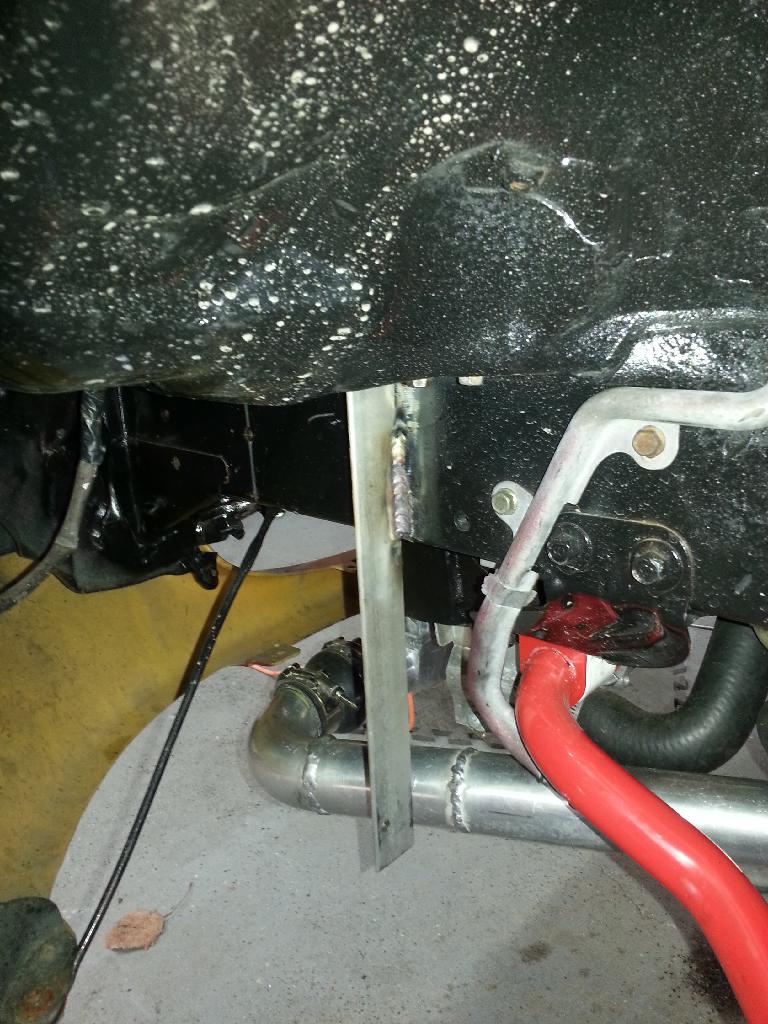
Before the tire spats
Tire spats installed
Details you cant see. I cut a bunch of 1/2" long piece of thin aluminum angle and drilled a hole in each side for connecting the air dam to the splitter. There's also an aluminum angle cross brace between the main supports to help prevent warpage. "Painted" with black gel coat, goes on awful with a brush, decent with a roller, much better with a spay gun. And black calk was used to seal the tire spats, air damn, and splitter together.
What I would do differently again?
1/2" plywood, the 3/8" is stiff enough but I cant get it to stay flat. Or get 1/4" and put a layer of glass cloth on both sides. Shorter push pins, and an additional push pin in the in/out direction to get some more slop out. It also needs 2 quik latches for the tires spats, they're attached to the car with duct tape ATM.
Hours spent: 6
How effective: 2 =slightly better (than previous splitter)
Materials used: PTS (plugged touched and sanded) Fir, 1.25x1.25x.125 stainless angle, longe acre felx adjustable fender supports, speedway air dam plastic
Size/thickness of materials: 3/8"
Bracket location: Front crash beam Outside of the front frame rails
Tracks tested on: Fort Devens, Meadowlands
Race/TT class built for: SSM
Brackets
Connection
Mounting point
Before the tire spats
Tire spats installed
Details you cant see. I cut a bunch of 1/2" long piece of thin aluminum angle and drilled a hole in each side for connecting the air dam to the splitter. There's also an aluminum angle cross brace between the main supports to help prevent warpage. "Painted" with black gel coat, goes on awful with a brush, decent with a roller, much better with a spay gun. And black calk was used to seal the tire spats, air damn, and splitter together.
What I would do differently again?
1/2" plywood, the 3/8" is stiff enough but I cant get it to stay flat. Or get 1/4" and put a layer of glass cloth on both sides. Shorter push pins, and an additional push pin in the in/out direction to get some more slop out. It also needs 2 quik latches for the tires spats, they're attached to the car with duct tape ATM.
Reply
0
0


