

Remote Brake bias control install
 07-21-2009, 10:50 AM
#1
Miotta FTW!

Thread Starter
iTrader: (24)
Join Date: Jun 2006
Location: Chicagoland, IL
Posts: 4,290
Total Cats: 31
So having done a 1.8 bracket and rotor upgrade on my car... then running out of brakes. My next step was the 949 racing 11" rotor upgrade. Got it, very nice pieces all installed and with that... realized I NEEDED to control brake bias now.
So. Bought the Wilwood brake bias proportioning kit from Flying Miata. Typically I'd just buy from whoever is cheapest, but their price was almost inline with others and they had the 3 fittings so I could be lazy about it.
At the same time I did some research and found a kit from Wilwood that allows for remote brake bias adjustment. Awesome!
Get both items in, remote kit from a random ebayer (came in very fast). I start looking at things and scratching my head. Hurm... wtf does this remote kit talk about a bias bar? I don't remember seeing anything about that when I found the kit.
FAWK.... the remote kit is for a Bias BAR setup for their pedal kits. Basically your pedal is moving a bar from the middle and on either end of the bar is a mini master cylinder... the Remote kit allows you to adjust the bar and tilt it form side to side, thus adjusting F/R bias.
Great... I just bought something I can't use. Hurm... wait now... the thread here looks really close... really really really close. Well fug it... lets try.
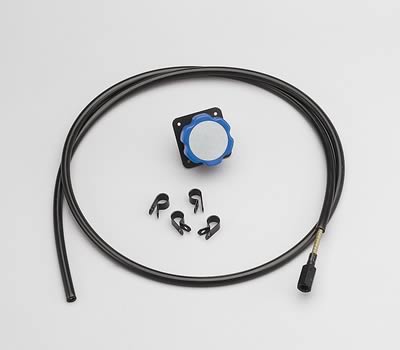
Recipe for Remote bias control:
1x Wilwood bias proportioning valve (flying miata part #14-76240 )
1x Wilwood Remote Bias bar kit (WIL-340-4990)
Take the proportioning valve and carefully cut/hammer/hack the **** off. It is some sintered cheap metal. I held it down on some wood and hammered most of the **** off... then slit it with a dremel and used a chisel to finish splitting it off.
Next install it and the remote kit, locating the **** as you wish and running the cable through the firewall safely. Pictures below show my chosen locations.
Last real bit is attaching the cable to the **** with the little allen set key.
And then attaching the other end to the proportioning valve with some Thread Locker.
There... you know have remote brake bias control for when conditions change (rain/sleet/snow ;p) or trying out staggered tires and needing to redial brake bias. Or you change brake pad compounds and need to adjust.
Pictures:


So. Bought the Wilwood brake bias proportioning kit from Flying Miata. Typically I'd just buy from whoever is cheapest, but their price was almost inline with others and they had the 3 fittings so I could be lazy about it.
At the same time I did some research and found a kit from Wilwood that allows for remote brake bias adjustment. Awesome!
Get both items in, remote kit from a random ebayer (came in very fast). I start looking at things and scratching my head. Hurm... wtf does this remote kit talk about a bias bar? I don't remember seeing anything about that when I found the kit.
FAWK.... the remote kit is for a Bias BAR setup for their pedal kits. Basically your pedal is moving a bar from the middle and on either end of the bar is a mini master cylinder... the Remote kit allows you to adjust the bar and tilt it form side to side, thus adjusting F/R bias.
Great... I just bought something I can't use. Hurm... wait now... the thread here looks really close... really really really close. Well fug it... lets try.
Recipe for Remote bias control:
1x Wilwood bias proportioning valve (flying miata part #14-76240 )
1x Wilwood Remote Bias bar kit (WIL-340-4990)
Take the proportioning valve and carefully cut/hammer/hack the **** off. It is some sintered cheap metal. I held it down on some wood and hammered most of the **** off... then slit it with a dremel and used a chisel to finish splitting it off.
Next install it and the remote kit, locating the **** as you wish and running the cable through the firewall safely. Pictures below show my chosen locations.
Last real bit is attaching the cable to the **** with the little allen set key.
And then attaching the other end to the proportioning valve with some Thread Locker.
There... you know have remote brake bias control for when conditions change (rain/sleet/snow ;p) or trying out staggered tires and needing to redial brake bias. Or you change brake pad compounds and need to adjust.
Pictures:

Reply
 1
1

1


 08-02-2010, 04:34 PM
#9
Cpt. Slow
iTrader: (25)
Join Date: Oct 2005
Location: Oregon City, OR
Posts: 14,447
Total Cats: 1,216
Think you fell victim of the necro thread Kiethy.
This wasn't two weeks old, it was a year and two weeks. :P
That being said I remember seeing this and liking it a lot, it's much easier than the work I did to get mine working. I have my **** mounted on the transmission tunnel (I gave Keith the idea for the targa), and running/mounting/flaring lines there was a bitch. Took a while to get to stop leaking, etc. That being said it was fairly cheap, but still around $40, same as this ****.
Do they make longer ones that could possible get to the center console area?
Reply
0
0
08-02-2010, 04:57 PM
#10
A customer pointed this thread out to me, asking if we sold that adjustment cable. It IS an interesting idea, even if nobody's posted to the thread for a year. The more I think about it, the more I like it  All of my cars with adjustable brake bias can be adjusted from the driver's seat, it's very useful on track. And yes, the position of the adjuster in the Targa car was Curly's idea. If you have the transmission out, the plumbing is easy.
On the Seven, the cable goes from the base of the brake pedal to behind the shifter fairly easily. I don't know about fitting in a Miata. I might have to pick a cable up and see what possibilities present themselves in terms of length.
All of my cars with adjustable brake bias can be adjusted from the driver's seat, it's very useful on track. And yes, the position of the adjuster in the Targa car was Curly's idea. If you have the transmission out, the plumbing is easy.On the Seven, the cable goes from the base of the brake pedal to behind the shifter fairly easily. I don't know about fitting in a Miata. I might have to pick a cable up and see what possibilities present themselves in terms of length.
Reply
0
0
 08-02-2010, 07:20 PM
#13
Cpt. Slow
iTrader: (25)
Join Date: Oct 2005
Location: Oregon City, OR
Posts: 14,447
Total Cats: 1,216
A customer pointed this thread out to me, asking if we sold that adjustment cable. It IS an interesting idea, even if nobody's posted to the thread for a year. The more I think about it, the more I like it All of my cars with adjustable brake bias can be adjusted from the driver's seat, it's very useful on track. And yes, the position of the adjuster in the Targa car was Curly's idea. If you have the transmission out, the plumbing is easy.
On the Seven, the cable goes from the base of the brake pedal to behind the shifter fairly easily. I don't know about fitting in a Miata. I might have to pick a cable up and see what possibilities present themselves in terms of length.
All of my cars with adjustable brake bias can be adjusted from the driver's seat, it's very useful on track. And yes, the position of the adjuster in the Targa car was Curly's idea. If you have the transmission out, the plumbing is easy.On the Seven, the cable goes from the base of the brake pedal to behind the shifter fairly easily. I don't know about fitting in a Miata. I might have to pick a cable up and see what possibilities present themselves in terms of length.
I plumbed my Targa location located wilwood **** with the engine and transmission in the car. If you cut the stock rear line, flaring it isn't too bad if you disconnect enough of it to give yourself some slack. Then you can bend and position the lines 90* towards the middle of the car, 90* to face up the transmission tunnel, and then 90* into the adjuster. All of that bending can be done outside the car, after a little measuring underneath. Then just slide it under and bolt it up. I did this on jack stands, no lift. It adds two more failure points with the union, but once I figured out how to flare, it hasn't leaked.
I used 1/4" flares (I think) on the metric lines, which are roughly equivalent. I think I remember removing both ends once I cut it, and wire wheeling off the paint. The flare tool liked to slip on the paint. The lines were $6ish at NAPA. The double flare tool was the most expensive at $40, unions were $10ish.
Reply
0
0
08-02-2010, 07:25 PM
#14
Tech tips for flaring: like painting, prep is really important. Make sure the pipe is cut straight, deburred and chamfered. A good quality flaring tool makes a huge difference. Those cheap ones they loan out at auto parts stores will drive you nuts. And you would have used a 3/16" flare, that's the right size for a Miata line.
Alternately, you can buy lengths of pre-flared brake line at auto parts store. You could use two of those, though it might be a pain dealing with bending up the rear section.
Alternately, you can buy lengths of pre-flared brake line at auto parts store. You could use two of those, though it might be a pain dealing with bending up the rear section.
Reply
0
0
08-02-2010, 07:39 PM
#15
Cpt. Slow
iTrader: (25)
Join Date: Oct 2005
Location: Oregon City, OR
Posts: 14,447
Total Cats: 1,216
Yup that's what I used, 3/16". I did buy those pre-cut lengths (36"?), cutting a section out of the stock rear line so I didn't have to cut the pre-cut ones to length. I think I cut out about 1-1.5'. With that section gone, the rear part was really easy to remove, the one going up from and then over to the master cylinder was a bit of a bitch, but came out.
My $40 flare tool was decent, although I have no past experience. Being my first time flaring lines, I wouldn't say it drove me nuts. I did buy a piece of 3/16" line to practice on. My advice would be to use a pipe cutter as well, I tried one or two with a hack saw and cut off wheel, and they failed horribly. I borrow a proper pipe cutter from work.
If I did it again I'd try to borrow a decent one (if I could find it) from a friend or auto store, and buy the pipe cutter, I've wanted one of those more times than the double flare tool. If anyone wants mine, I'd be willing to sell it.
Reply
0
0


 Awesome!


